sketchucation logo sketchucation
    • Login
    ℹ️ Licensed Extensions | FredoBatch, ElevationProfile, FredoSketch, LayOps, MatSim and Pic2Shape will require license from Sept 1st More Info

    Craftsman Tool Chest

    Scheduled Pinned Locked Moved Woodworking
    39 Posts 5 Posters 2.1k Views 5 Watching
    Loading More Posts
    • Oldest to Newest
    • Newest to Oldest
    • Most Votes
    Reply
    • Reply as topic
    Log in to reply
    This topic has been deleted. Only users with topic management privileges can see it.
    • Dave RD Offline
      Dave R
      last edited by

      @unknownuser said:

      If I may, a visual tip with SU. If you turn your back face color to a black or near black you wont' get the white jaggies showing up in your image export.

      Yes, that's a good suggestion. I do that before I make image exports although I use my default green back face color while drawing.

      Walt, it looks like a good model. Keep up the good work.

      Etaoin Shrdlu

      %

      (THERE'S NO PLACE LIKE)

      G28 X0.0 Y0.0 Z0.0

      M30

      %

      1 Reply Last reply Reply Quote 0
      • D Offline
        davidheim1
        last edited by

        Am I missing something? Seems to me that modeling a tapered hole and slot for the chisels is infinitely easier in SketchUp than in real life. In real life, I'd probably use a reamer, like the one Dave R. mentioned that Windsor chair makers use. In SU, I'd make a hole for the smallest diameter, then use the Offset Tool to set the largest diameter on the top face of the board. With the Move/Copy Tool, I'd pull the smaller diameter over to the larger one, tapering the hole. Then, for the slot, I'd turn on X-Ray view and hidden geometry. Trace over hidden geometry lines to mark where the tapered slot falls on the hole, then carry those lines through the board and across the faces. A little erasing, and I'm done. Took longer to type these abbreviated instructions than it did to do the modeling.
        dh

        1 Reply Last reply Reply Quote 0
        • Dave RD Offline
          Dave R
          last edited by

          David, I agree with you. Modeling it would be easier than making the real thing. I'd still just use the counterbored holes in real wood.

          I can think of several ways to create the tapered hole in SketchUp. Using Cardinal Points is one, Autofold, another.

          Etaoin Shrdlu

          %

          (THERE'S NO PLACE LIKE)

          G28 X0.0 Y0.0 Z0.0

          M30

          %

          1 Reply Last reply Reply Quote 0
          • M Offline
            mwm5053
            last edited by

            As I agree with Dave I wouldn't go to the trouble to do the tapered holes in the shop a simple hole and dado as he said earlier but he sorta challenged to see if I could do it in SU so this is how I went about it. Circle tool, made cylinder to 1/16 more than top af taper with PP, scaled bottom of cylinder to ah better to just show you

            Sorry about video quality need to improve on that.

            2011 iMac
            SU 2015 Pro, 2017 Make
            V2 Twilight
            macOS Sierra 10.12.5

            1 Reply Last reply Reply Quote 0
            • Dave RD Offline
              Dave R
              last edited by

              Good work, Walt.

              Etaoin Shrdlu

              %

              (THERE'S NO PLACE LIKE)

              G28 X0.0 Y0.0 Z0.0

              M30

              %

              1 Reply Last reply Reply Quote 0
              • M Offline
                mwm5053
                last edited by

                Thanks, that's an extreme compliment coming from my mentor. 😄

                2011 iMac
                SU 2015 Pro, 2017 Make
                V2 Twilight
                macOS Sierra 10.12.5

                1 Reply Last reply Reply Quote 0
                • M Offline
                  mwm5053
                  last edited by

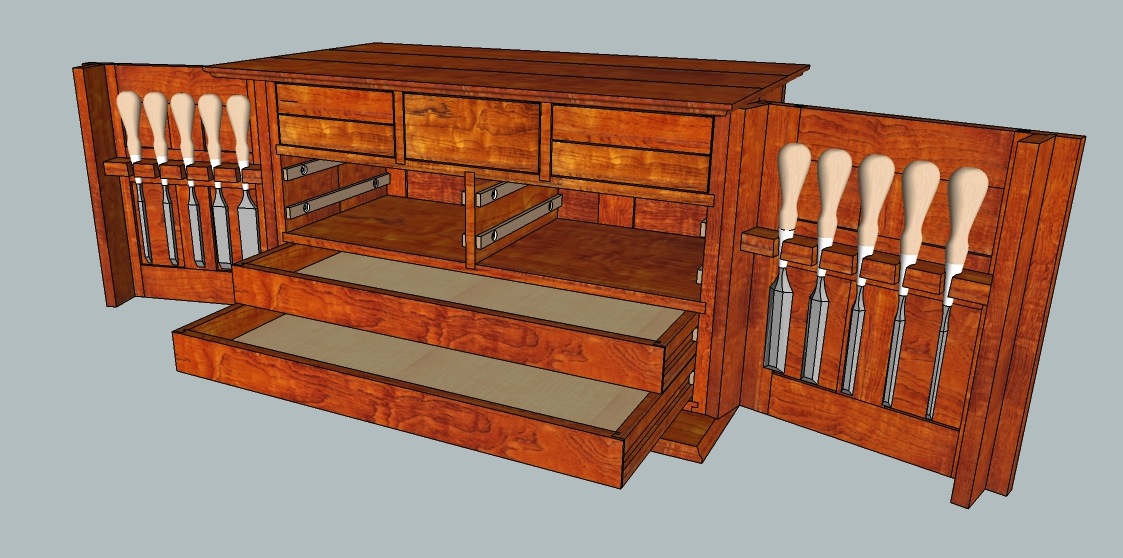
                  Well moving forward, sometimes 1 step forward 2 steps back. the chisels were somewhat tedious but it's all about experimenting and trial and error. I hid the middle drawers so the inside was visible.

                  Thanks for looking


                  Craftsman's Tool Chest.jpg

                  2011 iMac
                  SU 2015 Pro, 2017 Make
                  V2 Twilight
                  macOS Sierra 10.12.5

                  1 Reply Last reply Reply Quote 0
                  • Dave RD Offline
                    Dave R
                    last edited by

                    Nice work. I think your drawers should have green felt in them So should those in the tool chest. 😄

                    Etaoin Shrdlu

                    %

                    (THERE'S NO PLACE LIKE)

                    G28 X0.0 Y0.0 Z0.0

                    M30

                    %

                    1 Reply Last reply Reply Quote 0
                    • boofredlayB Offline
                      boofredlay
                      last edited by

                      That is looking great Walt. I am impressed.

                      http://www.coroflot.com/boofredlay

                      1 Reply Last reply Reply Quote 0
                      • M Offline
                        mwm5053
                        last edited by

                        Thanks guy's I think I'm going to model some more tools to put in to it. What's a tool chest without tools right. I'm thinking of a tri square and mallet off the bat. But at a loss for further options. Maybe a few suggestions .

                        Thanks

                        2011 iMac
                        SU 2015 Pro, 2017 Make
                        V2 Twilight
                        macOS Sierra 10.12.5

                        1 Reply Last reply Reply Quote 0
                        • Dave RD Offline
                          Dave R
                          last edited by

                          How about a marking gauge, a striking knife, a little block plane like the LN bronze plane? A dovetail gauge, a sliding bevel gauge, dividers (inside, outside and straight), caliper a couple of pencils and a piece of chalk.

                          Etaoin Shrdlu

                          %

                          (THERE'S NO PLACE LIKE)

                          G28 X0.0 Y0.0 Z0.0

                          M30

                          %

                          1 Reply Last reply Reply Quote 0
                          • M Offline
                            mwm5053
                            last edited by

                            Ya why didn't I think of that. Will keep me busy for a while 👍

                            2011 iMac
                            SU 2015 Pro, 2017 Make
                            V2 Twilight
                            macOS Sierra 10.12.5

                            1 Reply Last reply Reply Quote 0
                            • Dave RD Offline
                              Dave R
                              last edited by

                              And out of the bars. 😄

                              Etaoin Shrdlu

                              %

                              (THERE'S NO PLACE LIKE)

                              G28 X0.0 Y0.0 Z0.0

                              M30

                              %

                              1 Reply Last reply Reply Quote 0
                              • M Offline
                                mwm5053
                                last edited by

                                Well maybe at least before dark

                                2011 iMac
                                SU 2015 Pro, 2017 Make
                                V2 Twilight
                                macOS Sierra 10.12.5

                                1 Reply Last reply Reply Quote 0
                                • M Offline
                                  mwm5053
                                  last edited by

                                  Well I've had some time to work on the model. I've really never worked with nested components much before this and it proved to be quite 😞 but I got it done to my satisfaction for the time being. The problem came when I started to copy the nested components ie the drawers to put on different layers to show the different drawers open and closed like Dave suggested, the components inside the drawer were on the original layer I'm not sure what the proper workflow for that is but I guess it came out right. I made the drawers unique so I could postion the textures so the pieces looked like the where cut the same board as I would do in the shop.The PDF came form LO not very experienced with it yet but will be before this is done. I hope to do one for the tools inside the drawers and on LO for the tool chest with the dimensions to be milled. And one last thing I modeled a Lie Nielsen low angle block plane the problem I had there was how to model the cap iron right I tried several time with Curviloft but struck out.THe pDF can be found if I did it right

                                  https://dl-web.dropbox.com/get/Public/craftsman%20tool%20chest.pdf?w=ce7eb84a


                                  low angle block plane.skp

                                  2011 iMac
                                  SU 2015 Pro, 2017 Make
                                  V2 Twilight
                                  macOS Sierra 10.12.5

                                  1 Reply Last reply Reply Quote 0
                                  • Dave RD Offline
                                    Dave R
                                    last edited by

                                    Walt, as to the nested components and layers, you could just make layer associations for the drawers and leave the sub-components (fronts, sides, back, etc.) on Layer 0. Unless you'd have some reason to hide just parts of the drawers, there's no reason to confuse things. The top level component's layer will control the visibility for all of the contents of the nested component.

                                    The plane is a good start. I've got one of those planes and it gets the most use of them all. The finger dimple on the front should be larger. If you want me to I can measure it. As for the cap iron, I would think you could curviloft to do what you need and get pretty close. I would split it in half down its length. Draw the edges and the centerline on top of it. Then draw some curves to create the rounding.

                                    Keep up the good work.

                                    Etaoin Shrdlu

                                    %

                                    (THERE'S NO PLACE LIKE)

                                    G28 X0.0 Y0.0 Z0.0

                                    M30

                                    %

                                    1 Reply Last reply Reply Quote 0
                                    • M Offline
                                      mwm5053
                                      last edited by

                                      Dave your right about the layer association what was I thinking sometimes go down roads I know are wrong.
                                      As for the finger dimple when your in the shop ya check it out, thanks

                                      2011 iMac
                                      SU 2015 Pro, 2017 Make
                                      V2 Twilight
                                      macOS Sierra 10.12.5

                                      1 Reply Last reply Reply Quote 0
                                      • Dave RD Offline
                                        Dave R
                                        last edited by

                                        I'll get it for you when I get home from work.

                                        Etaoin Shrdlu

                                        %

                                        (THERE'S NO PLACE LIKE)

                                        G28 X0.0 Y0.0 Z0.0

                                        M30

                                        %

                                        1 Reply Last reply Reply Quote 0
                                        • M Offline
                                          mwm5053
                                          last edited by

                                          Thanks

                                          2011 iMac
                                          SU 2015 Pro, 2017 Make
                                          V2 Twilight
                                          macOS Sierra 10.12.5

                                          1 Reply Last reply Reply Quote 0
                                          • Dave RD Offline
                                            Dave R
                                            last edited by

                                            Walt, I just measured my little bronze 102. The finger rest on the front is about 0.73 in. dia. and about 0.14 in. high. Front of the plane has a bevel on it andmeasuring from the bottom of the bevel to the finger rest at the middle, it measures about 0.15 in. I hope that helps.

                                            Etaoin Shrdlu

                                            %

                                            (THERE'S NO PLACE LIKE)

                                            G28 X0.0 Y0.0 Z0.0

                                            M30

                                            %

                                            1 Reply Last reply Reply Quote 0
                                            • 1
                                            • 2
                                            • 2 / 2
                                            • First post
                                              Last post
                                            Buy SketchPlus
                                            Buy SUbD
                                            Buy WrapR
                                            Buy eBook
                                            Buy Modelur
                                            Buy Vertex Tools
                                            Buy SketchCuisine
                                            Buy FormFonts

                                            Advertisement