Cantilevered Table design question
-
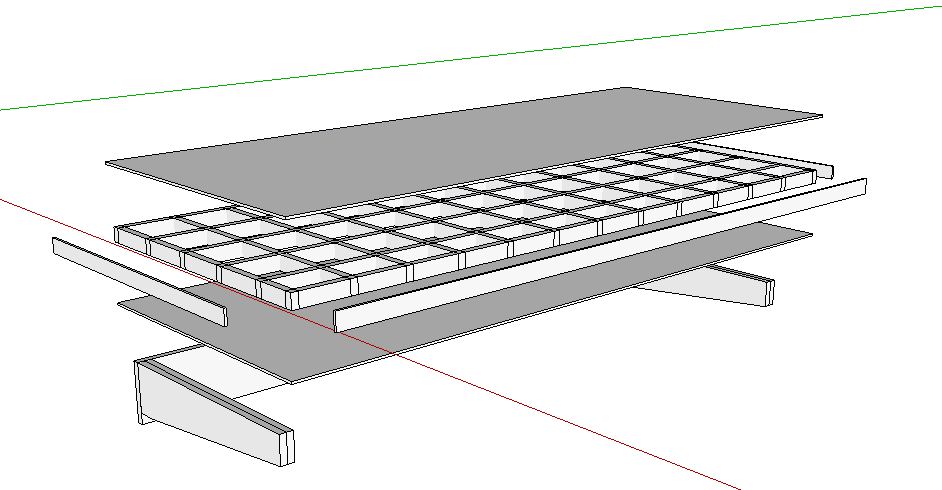
For the torsion box to work well, turn the grid pieces up on edge and then put a skin on the bottom surface, too. What you're doing is building a structure much like an airplane wing with both a top and bottom skin.
-
You could just buy a ready made cheap standard flush-door blank that'd be much the same size [2'6"x6'6"?].
If it's hollow/semi-hollow cored and you want a more substantial top, then glue a sheet of ply/mdf over it.
If it's not already lipped on all edges the pin/glue some hardwood lipping on the exposed edges... -
I believe, after installing this table, you will eventually be adding legs to the free corners due to sagging and deflection, cyclical loading, wood shrinkage, and localized material fatigue at the fasteners.
-
@mitcorb said:
I believe, after installing this table, you will eventually be adding legs to the free corners due to sagging and deflection, cyclical loading, wood shrinkage, and localized material fatigue at the fasteners.
@Mitcorb- The table top has an overhang of 1" on the sides and 4" in the front. If anything wouldn't the sagging occur in the unsupported span in the middle? Which really gets back to the question at hand, how big of a span can I have without additional supports?
@DaveR Of course, that makes sense. I don't know what I was thinking. Thanks.
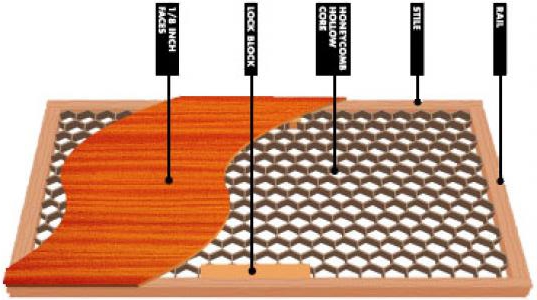
@TIG the problem for me with a hollow core door is the attachment points for the lower supports are going to be in the middle of the face of the door. I would need to find a way to attach the door without protruding through the top of the door panel.
-
A flush door, even hollow-cored, has solid wood as rails and stiles and mid-rail/blocking out...
-
Modified the model to reflect suggestions
-
@tig said:
A flush door, even hollow-cored, has solid wood as rails and stiles and mid-rail/blocking out...
I knew it had some solid wood for the door hardware, based on the image it looks as if the solid wood pieces at the top and bottom of the door are roughly the same dimension all the way around. I suppose it would depend on manufacturer but that would work.
-
Ok, just don't let "Aunt Bertha and her Holstein Revue" dance around on it. Do yourself a favor and replace the section of gypsum wallboard on the studs with equal thickness of plywood to be covered by the wall mounting plate. Then use lag screws from hell to attach the assembly to the studs. Also, place an intermediate gusset like the end ones and use clip angles to secure these gussets at the wall plate.
There will be sag/deflection--it's just a matter of degree. How much can you put up with after the effort? -
My Aunts gonna be pissed she can't dance on this one...
Thanks for the suggestions re: mounting procedure.
This project is slowly becoming a big pain in the

-
45 deg. Angle braces might work besides legs, but you need solid connection at the top to the wall, such as lag bolts. I've seen drafting tables built this way (that will fold down with a hinge). (that's how old I am--I've seen drafting tables.)
If you have a source or want to go to the trouble for a sleek look. Steel angles are used bolted to the sides of studs to provide hidden support to counters that are open below.
-
Maybe something like this:
http://www.amazon.com/John-Sterling-BK-0103-22-300-Pound-Capacity/dp/B0009SUWEW/ref=sr_1_12?s=hardware&ie=UTF8&qid=1333217520&sr=1-12
I just think to be safe, use no less than three brackets like this for the length of the table. It would be preferable that the horizontal arm reach at least 1/2 the width of the table from wall to front edge. Those fasteners have to resist pullout from Aunt Bertha, or, perish the thought, Uncle Bubba.
Hello! It looks like you're interested in this conversation, but you don't have an account yet.
Getting fed up of having to scroll through the same posts each visit? When you register for an account, you'll always come back to exactly where you were before, and choose to be notified of new replies (either via email, or push notification). You'll also be able to save bookmarks and upvote posts to show your appreciation to other community members.
With your input, this post could be even better 💗
Register Login


Advertisement