Change compnent to 3d image
-
Hi all
I am working on models with lots of pallet racking as a component. When I draw a full warehouse layout the model is too slow so I would like to have the pallet rack as a 3d image instead. I can do this with photos ok but the problem is every model will have a different rack size so the I need to redo the photo to suit the new size. Has anyone got a plugin that would convert a component to a 3d image?
Many thanks -
The only thing I can think of is Ghostcomp by Fredo6, since you mentioned that the model is slow. This is a tool that uses simplified proxies for placekeepers. But you must be talking about an array of unique instances, each with a different image on at least 4 faces? I assume the racks are all the same size, it's the contents that would be different. Are you using Scenes? Are you using Layers? These may help with the speed, although I am not sure.
-
I'd like to see your pallet racking model. I'm thinking you might be able to simplify the components and increase the speed.
I'm not quite sure what you mean by a "3D image" of the pallet racking anyway. That's what your SketchUp model is already.
Mitcorb's suggestion of substituting a simpler component while you're work makes some sense and you could give that a try.
-
Thanks for the reply. Ghostcomp is exactly what I need as I have tried it but what I would like is ghost which would put on a picture when set as a boundary box. The components in the model are all exactly the same (the component varies dimensionally from model to model) so I just need the picture to match the current component dimensionally. Is there a way that ghost can use a picture of the object?. I have seen something similar called proxy components but cant download it anywhere. It can be set to show block with images (however they may be not to scale).
Alternatively is there a quick way to take a 3d image of a component and transfer this onto the sides of a plain box -
You can make standard view image exports of the racking and apply those as materials to a box if that's what you want. Just set up the standard views, i.e. Front, Top, Left end, etc. and set the camera to Parallel Projection. Export the images and then draw a box in SU. Import the images as textures and apply them to the faces of the boxes.
I did a similar thing to create some scales for a complex model.

This is a screen grab of part of the scales I made.

And here's the resulting image of one of the scales applied to a box as a material and installed in the model.
-
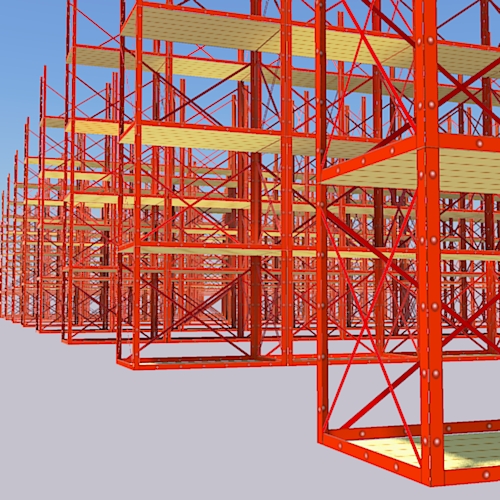
I'd be tempted to produce a single rack unit in detail in SU then take ortho renders of it from all sides plus the shelving. You could then process these and paint them onto a plain box of the same dimensions. If you were to make the renders into transparent pngs...deleting all the negative space, you could even have the box still appearing as a fully 3D see-through unit.
This little lot is less than 3000 faces
-
Alan thats very clever. I can understand how to get the pics onto the sides and remove the negative elements but how do you get the box to be see through and how do you get a different pic on each side of the box using the one material.
-
Just to the right of the racks you can see the original imported png file, which has the negative elements already depicted as transparent. I simply imported this (as an image), exploded it, then grouped it so it wouldn't stick to anything else. I had decided on a nominal shelf height of 5', so I imported the image 10' high...as it's double-stacked.
All I did then was trace a rectangle over the part of the image that represents the open front. I then measured the depth of the side image and Push/Pulled the drawn rectangle the same distance. You then have a box that is exactly the same size as the elements in the image, ready to take the projected textures.Projecting the textures is simply a case of lining up the different elements on the image with their respective sides, sampling them (Paint Bucket + Alt) the painting onto that side. Obviously, this involves rotating the image (or copies of it) 90° so that you have front and side elevations + plan. You'll also notice that the planking on the image is a bit short for the shelf itself, so the copy that lay flat over the top of the box was stretched to make it fit. I have deleted the top surface of the box, as it's not needed when they are stacked...although I guess you could make a separate top shelf component with a cover on, if it's needed.
PS I didn't use SU to produce the original image; I simply drew them directly in CorelDraw and exported a transparent png without bothering to create an original hi-res 3D version, complete with rivets. It's perfectly possible to use SU...you'd just have to do a load of post-processing to composite the different elevations and remove the negative parts.
Hello! It looks like you're interested in this conversation, but you don't have an account yet.
Getting fed up of having to scroll through the same posts each visit? When you register for an account, you'll always come back to exactly where you were before, and choose to be notified of new replies (either via email, or push notification). You'll also be able to save bookmarks and upvote posts to show your appreciation to other community members.
With your input, this post could be even better 💗
Register Login


Advertisement