How to stick an object to another ?
-
sorry forgot to subscribe to this thread
-
no prob
-
@erzane said:
nem is baj ha meg tudod magyaràzni màs hogy
OK, but in English (here). The good instructions above supported by an image.
If it is already a component, select it in your Component browser and go to the Edit tab. There you can set it to glue to something - here I set it to glue to a vertical face but it can also be "any" from the dropdown list.
The other important part is to properly set the gluing plane. When you create a new component, there is a button to set the component axes, here you need to right click on it and "Change axes". The gluing plane is always the red/green plane of the component and is marked with a grey rectangle (while the Z axis is "X'ed out").
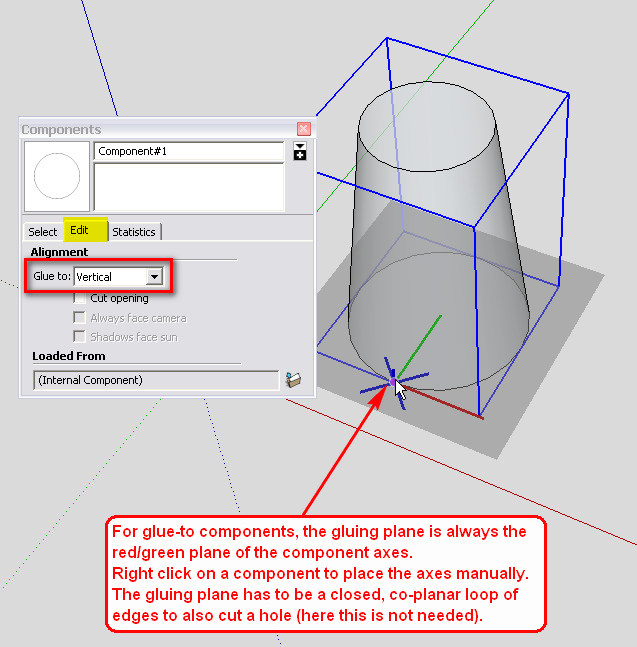
From now on, when you place a component from your component browser to a face in your model, it will automatically snap to that face and glues there so that you cannot even move it away (just on that plane) and if you use the PushPull tool to modify the face, the component will move with it.Note that it has to be a simple face, not a group or component (you can place components inside groups/components however).
-
ez eddig jol megy, de nem tudom hova kel clikkelni hogy pontosan a jo irànyban menyenek ezek a 6ok

booman, thanks
I will notify exactely step by step and retry
but, concerning copying, I knew it already
concerning rotating object it's ok to
but my prob is that I cannot succeed to glue it to the wall without using number control box
(down right corner the screen) mm per mmso, more precisely I would like to know
-how to glue it directly without trying all kinds of rotations ?
-how to fusion 2 pots of B letter (pls see pic higher) ?
-how to put 6 pots on the straight line of the edge of the wall ?

-
thanks a lot
it's a really good explanation
I will try it now
will give you news as soon as I succeeded itköszi

-
That was going to be my next tip... thanks Gaieus
As long as your building is perfectly flat, this should work.
But your AXIS has to be exactly along that flat surface you want to snap to the building.I think it sound more complex than it really is.
Play with the move tool and rotation tool along with the snapping ablilties of Sketchup.
Snapping is strange at first because Sketchup always refers to any surface your mouse roll over.
In the background you may have horizontal and vertical surfaces and Sketchup will tend to automatically snap your object to them.
This will make it difficult to move and rotate objects, but at the same time, if you learn to use these background surfaces... it will help you to move objects around the 3D space.One tip is: always snap objects to lines and endpoints not surfaces. Snapping will recognize surfaces, but to be more precise, using lines or endpoints is better.
Specially if your surface isn't perfectly flat. -
ok I see
thanks for those additional tips boomanp.s. Gaieus, I uploaded the file we spoke about before
-
Now save this file to somewhere then go back to your model, right click on that component and "Reload". Navigate to this file and reload your old component with this one.
The existing instances already inserted into your model will not work but if you insert a new instance from the component browser, it will already glue to any face you place it on.
Oops; remembered to save it down to SU 6 format. Is there any reason you are not using SU 8?
(Also cleaned up a little bit and reduced unnecessary poly count)
-
gaieus
thanks for your explanations
I succeeded to make it but it was difficult
difficult to put axes in the right placehere is the result
I putted transparent view like this you can see difference between component and the old ones not glued but putted inside wall with classic method

booman
-I see now why you said it's difficult because set the axis right is not very easy
I think I had luck this time
I hope other time I can study it moregaieus
-btw, I charged my own component
-perhaps I didnt understood but did you wanted that I charge yours ?
(radio button file) ?p.s. I dont think I need to use 8 format, 6 is enough for what I need to do
but if one day I see that 6 is not enough I will change it to 8so, thanks a lot for your help to both
I really appreciated it
I have only 2 questions left
pls can you do something for me for those two last ones ?-how to fusion 2 pots togheter ?
-how to put all pots in the right straight line with a 'help point' for be 100% straight to the wall edges (100% parallele)p.s. the other ones arent components (is it ok ? )
p.s. perhaps I will reply you tomorrow only if I sleep
-
Awesome! Glad you could get the component worked out.
I'll try to answer your two questions...how to fusion 2 pots togheter ?
- Now that your pots are components you can weld them together by making them snap together according to the surfaces/angles you want welded. Then you have to explode both components and re-component them together again. After that, double-click the welded component and deleted the inside face that was joined in the middle. You could also delete that face before they were exploded, either way works.
I would use Sketchup 8 and try the "Outer Shell" tool which does the exact same thing. Welds two solids together. Its kinda finiky because both objects have to be absolute solid which means no lines or faces inside them, but then you select both and click the "Outer Shell" tool.
how to put all pots in the right straight line with a 'help point' for be 100% straight to the wall edges (100% parallele)
I explained it earlier in my step-by-step instructions how to copy with the "Move" tool, just make sure your building/wall is perfectly straight according to the Red or Green axis and Ctrl+M then type the distance on the numpad & hit Enter. Immediately after that type the number of copied objects, Press "X" and then "Enter" again. Sketchup should copy all of them in a straight line.
I use this all the time and it works great! - Now that your pots are components you can weld them together by making them snap together according to the surfaces/angles you want welded. Then you have to explode both components and re-component them together again. After that, double-click the welded component and deleted the inside face that was joined in the middle. You could also delete that face before they were exploded, either way works.
-
Aligning the axes is not that very difficult if you have a little routine. Ideally I always make the component in a very early stage - when it is only 2D so axis alignment is pretty easy (the gluing plane is already given).
You could have used my component but it's better that you made (could make) yours as learning the how-to's is the most important.
I do not really understand what you mean by fusing the components together (unless it is what Booman understands).
You will need to learn linear arrays as he says. Basically you can do it in two ways; Copy-Moving the second component to the place where the next should be and typing x5 (for instance) to add four more than that first copy or copy-moving the component to the place of the last button first and typing /5 to do the same.
you can do the same with the rotate tool to make radial arrays:
http://sketchup.google.com/support/bin/answer.py?answer=94896Here is what can be entered into the Measurement box (or "VCB"):
http://sketchup.google.com/support/bin/answer.py?answer=151558 -
Ah, linear arrays... thats what I meant.
I thought you had to do the number first then the "x"
or maybe it works both ways. -
I think it works both ways (and also with the * character instead of the x)
-
ok, thanks for all your complete explanations and infos
I will try all that and reask you question if I have some
see you later
thanks again ; ) -
Not a problem. Thank you for coming back!


Hello! It looks like you're interested in this conversation, but you don't have an account yet.
Getting fed up of having to scroll through the same posts each visit? When you register for an account, you'll always come back to exactly where you were before, and choose to be notified of new replies (either via email, or push notification). You'll also be able to save bookmarks and upvote posts to show your appreciation to other community members.
With your input, this post could be even better 💗
Register Login


Advertisement