Taking pictures with cameras
-
Hi,
I've been working on this script to take pictures of windows to see if they are in shadow or not.
Dan Rathbun has been helping me out over at the google group, but I though I'd post it here too.It's going pretty well, but I still have a few question, other than that I'd be very receptive to general comments.
for now:
The images that are saved are showing the correct aspect ratio, but within the shape of the window. (http://flic.kr/p/8gR74b - there's an example here.) Is there a way to export images that don't have the greyed out section?Thanks for taking a look
Benrequire 'sketchup.rb' #require 'RMagick.rb' def start puts "************************" ##changeable stuff imagePath = 'C;\sk test images' cameraFOV = 120 #in degrees (between 1 and 120) insetFactor = 0.03 startTime = 10 #hours in 24hr format endTime = 15 #hours in 24hr format hourDivs = 2 #how many chunks to chop the hour into i.e. 4 = 15 minutes ########### model = Sketchup.active_model #entities = model.active_entities #ent = model.entities currentSelection = model.selection model.shadow_info["DisplayShadows"]= true m = 60/hourDivs result = UI.messagebox shadowInfoString + "\n\nAre these details correct?", MB_YESNO if result == 6 # Yes #this writes a message to the status bar (SB_PROMPT means the left bit) Sketchup.set_status_text "great, lets get going", SB_PROMPT itWorked = windowLooker(imagePath, cameraFOV, insetFactor, startTime, endTime, hourDivs, currentSelection, m, model) if itWorked puts "that all seemed to work out" end else Sketchup.set_status_text "OHNOES!! Set the location settings and try again", SB_PROMPT end end def windowLooker( imagePath, cameraFOV, insetFactor, startTime, endTime, hourDivs, currentSelection, m, model) for hour in (startTime..endTime) for minutes in (0...hourDivs) # three dots ignores last value i.e. 0...3 ==> 0,1,2 for i in (0...currentSelection.length) if (currentSelection[i].is_a?(Sketchup;;Face)) # make the face local for the rest of this loop face = currentSelection[i] if isFaceHorizontal(face, i) && isThisFourSided(face) #set the time # Time.utc( year [, month, day, hour, min, sec, usec] ) timeNow = Time.utc( 2010, "Jun", 21, hour, m*minutes, 0) model.shadow_info["ShadowTime"] = timeNow #get information about the face normal = face.normal centroidPoint = face.bounds.center height = (face.bounds.corner(4).distance face.bounds.corner(0)).to_mm width = (face.bounds.corner(0).distance face.bounds.corner(3)).to_mm #setup for the camera camera = Sketchup;;Camera.new camera.description = "camera looking at window " + i.to_s() camera.aspect_ratio = width/height camera.fov = cameraFOV #this shrinks the view to account for prudence and window frames width = width * (1-insetFactor) eyeDistance = calculateEyeDistance(camera, width) normalPoint = [] normalPoint[0] = centroidPoint[0] + (normal[0]*eyeDistance) normalPoint[1] = centroidPoint[1] + (normal[1]*eyeDistance) normalPoint[2] = centroidPoint[2] + (normal[2]*eyeDistance) eye = normalPoint target = centroidPoint up = [0,0,1] camera.set eye, target, up #get the material and hold it, the face #must be white to avoid problems of translucency holdMaterial = face.material face.material = "white" #model.entities.add_line(centroidPoint, normalPoint) puts "face " + i.to_s() + " successful" #change the view view = model.active_view status = view.camera = camera #save the image Dir.chdir( imagePath ) view.write_image 'window' + ("%03d" % i) + "_" + hour.to_s + "_" + (m*minutes).to_s + '.png' #change the material back to what it was to begin with face.material = holdMaterial view.refresh end end end end end end def isThisFourSided(aFace) if aFace.vertices.length == 4 return true else puts "face " + i.to_s + " probably isn't a window" return false end end def isFaceHorizontal(aFace, identifierOfFace) if aFace.normal == [0,0,1] || aFace.normal == [0,0,-1] puts "face " + identifierOfFace.to_s + " is horizontal " + aFace.normal.to_s return false else return true end end def calculateEyeDistance(theCamera, faceWidth) eyeDistance = ((faceWidth/2)/Math.tan(radToDeg(theCamera.fov)/2)) eyeDistance = eyeDistance/25.4 #to fix the crazy inch bug if eyeDistance == 0 eyeDistance = 1 puts "eye zero failure" puts "width was " + faceWidth.to_s puts "Math.tan(camera.fov) was " + Math.tan(radToDeg(theCamera.fov)/2).to_s end return eyeDistance end def shadowInfoString #extract shadow information to show to the user shadowInfo = Sketchup.active_model.shadow_info message = ""#declare an empty string outside the scope of the 'each' shadowInfo.each_pair {|key, value| message += "#{key} is #{value}\n" } return message end def radToDeg (aNumberInRadians) aNumberInRadians * Math;;PI / 180 end start -
Couple of things:
The built-in API's numeric90.0.degreesreturns the angle in radians whilst1.234.radiansreturns the angle in degrees - no need to reinvent the wheel there...You use
camera.aspect_ratio = width/heightwhich WILL change the image to have gray areas... so don't use it !The way I'd approach this so that the eye distance from the target lets you see all of the face is this...
Determine the face's centroid
centroid=face.bounds.center- this is to be used as thecamera.target=centroid
Determine the height and width of the face and take whichever is the bigger as the image's 'width' [+ whatever tolerance you want***] - get these from thebb=face.boundstoo - note the oddity of bounds terminology -width=bb.width; height=bb.height; width=height if height>width
You know the fov as it's set earlier [120 ?] - so you usedistance=width/2/Math::tan(fov.degrees/2)*** - the fov in SUp is horizontal, so the 'width' is used...
You know theface.normal, this tells us the vector to offset for thecamera.eyelocation using
eye=centroid.offset(face.normal, distance)
Now you have the camera's eye and target and we don't need to worry about the aspect_ratio as the image will include the face, adjusted to suit the width or height, whichever is the bigger...Hope this helps...
-
@tig said:
You use
camera.aspect_ratio = width/heightwhich WILL change the image to have gray areas... so don't use it!It's possible to export image from a viewport that doesn't have the grey bars. Just specify the output width and height with the same ratio as the camera. I do that with my V-Ray Toys plugin. (
vr_camera.rb-def self.export_viewport(diag, param)starts @ line: 136) -
But he doesn't even need to bother with setting the aspect_ratio at all - and changing it the way he does without thought of the screen's ratiowill give him gray areas... No need to over complicate it ?
-
Hey! Look y'all! ...
Ben's been SketchUcatized !!!
... welcome to the community Ben.
-
Thanks for that!
I did actually need the aspect ratio to be right as I'm using (trying to at least) Image Magick to interrogate the images.See what you think.
require 'sketchup.rb' require"quick_magick.rb" def start puts "************************" ##changeable stuff########################################################################### #you need to swap all \ backslashes for / forward slashes #you also need to put a / on the end of the path imagePath = 'C;/Users/Ben/Desktop/BVN/skTestImages/' #the field of view is in degrees and must be between 1 and 120) cameraFOV = 120 #this trims the image ever so slightly so that it doesn't #include the lines around the face insetFactor = 0.05 startTime = 13 #hours in 24hr format endTime = 15 #hours in 24hr format hourDivs = 2 #how many chunks to chop the hour into i.e. 4 = 15 minutes outputWidth = 500 ############################################################################################# model = Sketchup.active_model #entities = model.active_entities #ent = model.entities currentSelection = model.selection model.shadow_info["DisplayShadows"] = true m = 60/hourDivs result = UI.messagebox shadowInfoString + "\n\nAre these details correct?", MB_YESNO if result == 6 # Yes #this writes a message to the status bar (SB_PROMPT means the left bit) Sketchup.set_status_text "great, lets get going", SB_PROMPT itWorked = windowLooker(imagePath, cameraFOV, insetFactor, startTime, endTime, hourDivs, currentSelection, m, model, outputWidth) if itWorked puts "that all seemed to work out" end else Sketchup.set_status_text "OHNOES!! Set the location settings and try again", SB_PROMPT end end def windowLooker( imagePath, cameraFOV, insetFactor, startTime, endTime, hourDivs, currentSelection, m, model, outputWidth) for hour in (startTime..endTime) for minutes in (0...hourDivs) # three dots ignores last value i.e. 0...3 ==> 0,1,2 for i in (0...currentSelection.length) if (currentSelection[i].is_a?(Sketchup;;Face)) # make the face local for the rest of this loop face = currentSelection[i] if isFaceHorizontal(face, i) && isThisFourSided(face) #set the time # Time.utc( year [, month, day, hour, min, sec, usec] ) timeNow = Time.utc( 2010, "Jun", 21, hour, m*minutes, 0) model.shadow_info["ShadowTime"] = timeNow #get information about the face normal = face.normal centroidPoint = face.bounds.center height = (face.bounds.corner(4).distance face.bounds.corner(0)).to_mm width = (face.bounds.corner(0).distance face.bounds.corner(3)).to_mm #setup for the camera camera = Sketchup;;Camera.new camera.description = "camera looking at window " + i.to_s() aspectRatio = width/height camera.aspect_ratio = aspectRatio camera.fov = cameraFOV #this shrinks the view to account for prudence and window frames width = width * (1-insetFactor) eyeDistance = calculateEyeDistance(camera, width) normalPoint = [] normalPoint[0] = centroidPoint[0] + (normal[0]*eyeDistance) normalPoint[1] = centroidPoint[1] + (normal[1]*eyeDistance) normalPoint[2] = centroidPoint[2] + (normal[2]*eyeDistance) eye = normalPoint target = centroidPoint up = [0,0,1] camera.set eye, target, up #get the material and hold it, the face #must be white to avoid problems of translucency holdMaterial = face.material face.material = "white" #change the view view = model.active_view status = view.camera = camera #save the image Dir.chdir( imagePath ) fileName = 'window' + ("%03d" % i) + "_" + hour.to_s + "_" + (m*minutes).to_s + '.png' view.write_image fileName, outputWidth, outputWidth*(1/aspectRatio), false inspectImage(imagePath, fileName, aspectRatio) #change the material back to what it was to begin with face.material = holdMaterial view.refresh puts "face " + i.to_s() + " successful at " + hour.to_s + ";" + (m*minutes).to_s end end end end end end def isThisFourSided(aFace) if aFace.vertices.length == 4 return true else puts "face " + i.to_s + " probably isn't a window" return false end end def isFaceHorizontal(aFace, identifierOfFace) if aFace.normal == [0,0,1] || aFace.normal == [0,0,-1] puts "face " + identifierOfFace.to_s + " is horizontal " + aFace.normal.to_s return false else return true end end def calculateEyeDistance(theCamera, faceWidth) eyeDistance = ((faceWidth/2)/Math.tan(theCamera.fov.degrees/2)) eyeDistance = eyeDistance/25.4 #to fix the crazy inch bug if eyeDistance == 0 eyeDistance = 1 puts "eye zero failure" puts "width was " + faceWidth.to_s puts "Math.tan(camera.fov) was " + Math.tan(radToDeg(theCamera.fov)/2).to_s end return eyeDistance end def shadowInfoString #extract shadow information to show to the user shadowInfo = Sketchup.active_model.shadow_info message = ""#declare an empty string outside the scope of the 'each' shadowInfo.each_pair {|key, value| message += "#{key} is #{value}\n" } return message end def cropImage(path, fileName, iar) i = QuickMagick;;Image.read(path+fileName).first cropW = i.width.to_i cropH = ((1/iar)*cropW).to_i offsetTop = ((i.height/2)-(cropH/2)).to_i offsetleft = 0 puts "iar " + iar.to_s puts "cropW " + cropW.to_s puts "cropH " + cropH.to_s puts "offsetTop " + offsetTop.to_s puts "offsetleft " + offsetleft.to_s #geometry spec is in the format "widthxHeight!+leftOffset+topOffset" # the ! ignores the aspect ratio #more here http://www.imagemagick.org/script/command-line-processing.php#geometry geometrySpec = cropW.to_s + "x" + cropH.to_s + "!+" + offsetleft.to_s + "+" + offsetTop.to_s puts "geometrySpec " + geometrySpec i.crop geometrySpec i.save(path+fileName) i = QuickMagick;;Image.read(path+fileName).first numColours = i.colors #i.convert "QuickMagick;;Image.read(path+fileName).first -colorspace rgb -colors 10 -format \"%c\" histogram;info;" i.draw_text(100, 100, "cropped " + geometrySpec + " colours " + numColours.to_s) i.save(path+fileName) sleep 0.5 end def inspectImage(path, fileName, iar) i = QuickMagick;;Image.read(path+fileName).first numColours = i.colors #i.convert "QuickMagick;;Image.read(path+fileName).first -colorspace rgb -colors 10 -format \"%c\" histogram;info;" i.draw_text(100, 100, " colours " + numColours.to_s) i.save(path+fileName) #sleep 0.5 end start -
A few notes:
method windowLooker
array normalPoint = [] can be defined in 1 statement:normalPoint = [ centroidPoint[0] + (normal[0]*eyeDistance), centroidPoint[1] + (normal[1]*eyeDistance), centroidPoint[2] + (normal[2]*eyeDistance)]method isFaceHorizontal, if the normal is vertical, you need to return true (not false) and v.v.
boolean methodnames in Ruby should always end with '?'
isThisFourSided?
isFaceHorizontal?
etc...
(*leaves open the option to have attribute getter and setter methods: isFaceHorizontal and isFaceHorizontal= )puts/$stderr.write/$stdout.write etc:
String concatination is slow because Ruby creates a new String object for each + operation. Instead have Ruby only create 1 String object (when it reads the 1st literal,) and then use the String append method << as in:
puts 'Welcome, Mr. '<<name.first<<' '<<name.last<<"\n"-
This also goes for String a+=b, which Ruby expands into a = a + b, just use a<<b (refering to the shadowInfoString method's each loop.)
-
Just be careful when making assignments. My lateset booboo here looked like:
url = baseref<<subfolder
which gave url OK, but also messed up baseref -
Also try to use single quote strings for speed, as Ruby does not have to parse them for regular expressions or #{var} replacements; especially in loops, or methods that will be called from loops.
Otherwise, you might be a newbie at Ruby, but I can tell you've programmed before. Java? Python?
-
-
The aspect_ratio of the image will be the screen's UNLESS you try and set it !
Then you have to set it appropriately reading the displays values - it's easier to set your eye+target points so that you see the whole face, it's then 'zoomed' so it all shows in the view - as I coded - taking the width as the height, if the height is bigger etc etc... There is no need to mess on with the aspect_ratio as presumably all of the views should be the same proportion ?I think you are making this a lot more complicated than it needs to be ?

As I see it you just make a list of the faces and for each face, get its center [the 'target'] and its normal - which is the vector to offset this target-point as the 'eye'. Then you get the face's bounds and get the larger of the bb's width & height and take that as the view's 'width' [+ some tolerance so it's wholly in the view]. Now as you know the 'fov' angle you can then do some trigonometry Math to work out the distance the eye needs to be from the target so that you'll see all of the face. Use that distance to offset the target-point to become the eye-point. Now you have the data necessary to reset the camera [note you need to set
up=Z_AXISorup=Y_AXIS if face.normal.z.abs==1### i.e. horizontal]
-
Ben, so I haven't hear you ultimate objective for this script. I know you want to see if windows are in shadow, but what will that information be used for. I fell like I've been peddling OpenStudio on a few posts for this purpose recently, but just thought I'd make you familiar with it. With this plugin, which is an interface to run the free EnergyPlus energy simulation software, you can get reports back showing what percentage of windows are in shadow at a given time of day or year. There are standard reports for equinox and solstices, but you can create more detailed reporting as needed.
I can't find the link I was looking for, but can provide more detail if you are interested. Here is a link to general post on OpenStudio.
http://forums.sketchucation.com/viewtopic.php?f=323&t=27908 -
@unknownuser said:
(aka notionp ) at Google Sketchup Devlopers Group in 'taking pictures with cameras'":1wsabykr]Hi,
This is a bit of a dirty hack, but it will save switching from modelling to analysis tools all the time.The ultimate aim is to take a picture of the shadow that falls on a face, then use image majick (or similar) to find out how much of it is in shadow.
Looks like more than windows.
And two tools are always better than one.
Besides, he's a'learnin' Ruby... he had to pick some learning project that interested him.
-
I've got this to the point with this that I'm happy to call it 'working'. Thanks for all the advice. I've tried to take as much of it as I can on board.
I still can't get my head around ImageMagick, but that's a whole different kettle of fish.I think that looking seriously into OpenStudio is a good idea. I'd looked at energy plus already and given up because of overwhelming complexity, but if there is a friend;y front end now that'd probably be a much better solution.
I've learnt a hell of a lot through doing this though!
If anyone has any more comments then I'd love to hear them.
module BVNtools
  module Voyeur

    #require 'quick_magick.rb'

    if( not file_loaded?('makeTheFaces.rb') )
      # This will add a separator to the menu, but only once
      add_separator_to_menu('Voyeur')

      plugins_menu = UI.menu('Plugins')
      voyeur_menu = plugins_menu.add_submenu('Voyeur')
      voyeur_menu.add_item('make analysis faces') { makeAnalysisFaces }
      voyeur_menu.add_item('Window Looker') { start }

      toolbar = UI;;Toolbar.new 'Voyeur'

      cmdFM = UI;;Command.new('Face Maker'){ makeAnalysisFaces }
      cmdFM.small_icon = 'FM24.png'
      cmdFM.large_icon = 'FM16.png'
      cmdFM.tooltip = 'Makes offset faces for analysis'

      cmdWL = UI;;Command.new('Window Looker'){ start }
      cmdWL.small_icon = 'WL24.png'
      cmdWL.large_icon = 'WL16.png'
      cmdWL.tooltip = 'photographs windows for their shadows'

      toolbar = toolbar.add_item cmdFM
      toolbar = toolbar.add_item cmdWL
      toolbar.show

      file_loaded('makeTheFaces.rb')
    end

    class << self

      def isThisFourSided?(aFace)
        if aFace.vertices.length == 4
          return true
        else
          return false
        end
      end

      def getAnalysisDetails
        #this asks the user for some input to the process
        #OUTPUT it returns an array of strings that explain the various inputs
        #it'd be better/clearer if it returned a hash of formatted values
        #          [0                                        1           2                 3             4           5                 6                         7                   ]
        prompts  = ['image path',                                'cameraFOV','inset factor %', 'start hour', 'end hour', 'tests per hour', 'image width in pixels', 'Analysis Layer Name']
        defaults = ['C;\Users\bdoherty\Desktop\BVN\skTestImages','120',      '3',              '13',         '15',       '2',              '500',                   'Analysis'           ]
        lists    = ['',                                          '',         '',               '',           '',         '1|2|3|4|5',      '',                      ''                   ]
        input    = UI.inputbox prompts , defaults, lists, 'fill in some information'
        result = {;imagePath   => input[0].to_s.strip,
                  ;cameraFOV   => input[1].to_f,
                  ;insetFactor => input[2].to_f * 0.01,
                  ;startTime   => input[3].to_i,
                  ;endTime     => input[4].to_i,
                  ;hourDivs    => input[5].to_i,
                  ;outputWidth => input[6].to_i,
                  ;analysisLayerName => input[7].to_s
                 }
        return result
      end

      def isFaceHorizontal?(aFace)
        #This function checks to see if a face is horizontal,
        #i.e. if its normal faces directly up or directly down
        #INPUT it takes in a face, and an identifier that is
        #used to provide an error if it is horizontal.
        #OUTPUT returns true if it is horizontal, false if it isn't
        internalNormal = aFace.normal
        if internalNormal == [0,0,1] || internalNormal == [0,0,-1]
          return false
        else
          return true
        end
      end

      def calculateEyeDistance(theCamera, faceWidth)
        #calculates the distance that a camera needs to be away from
        #a face in order to see it with a given field of view
        eyeDistance = ((faceWidth/2)/Math.tan(theCamera.fov.degrees/2))
        eyeDistance = eyeDistance/25.4 #to fix the crazy inch thing
        if eyeDistance == 0
          eyeDistance = 10000
        end
        return eyeDistance
      end

      def shadowInfoString
        #extract shadow information from the model to show to the user
        shadowInfo  = Sketchup.active_model.shadow_info
        message = ""#declare an empty string outside the scope of the 'each'
        shadowInfo.each_pair {|key, value| message += "#{key} is #{value}\n" }
        return message
      end

      def inspectImage(path, fileName, iar)
        myImage = QuickMagick;;Image.read(path + fileName).first
        numColours = myImage.colors
        #i.convert "QuickMagick;;Image.read(path+fileName).first -colorspace rgb -colors 10 -format \"%c\"  histogram;info;"
        #hold is there because it seems that if you assign to a variable, then the program waits
        #for a return value, otherwise it just keeps going without anything to process.
        hold = myImage.draw_text(100, 100, 'colours ' << numColours.to_s)
        hold = myImage.save(path + fileName)
      end

      def findAMaterial(listOfAllMaterials, name)
      #INPUT   A string name of a material
      #RETURNS the material object that corresponds to the string name given
        for i in (0...listOfAllMaterials.length)
          if listOfAllMaterials[i].name == name
            return listOfAllMaterials[i]
          end
        end
      end

      def bound( valtoCheck, lowerBound, upperBound )
      #INPUT a number
      #RETURNS that number if it is between the boundaries, otherwise the boundary that it hits
      #i.e. bound(10,5,15) ==> 10
      #     bound(20,5,15) ==> 15
      #     bound( 0,5,15) ==>  5
        if valtoCheck > upperBound
          return upperBound
        elsif valtoCheck < lowerBound
          return lowerBound
        else
          return valtoCheck
        end
      end

    	def formatPath (pathString)
      #this adds a trailing / to the path if it doesn't have one
      #it also swaps the slashes from \ to /
        pathString.gsub!("\\", '/')
        if pathString[pathString.length-1] == '/'
          puts '/ not added'
          return pathString
        else
          return pathString + '/'
        end
      end

      def getAnalysisDetailsFM
      #this asks the user for some input to the process
      #OUTPUT it returns an array of strings that explain the various inputs
      #            [ 0                       1            2              ]
        prompts  = ['Offset Distance (mm)', 'LayerName' , 'Material Name']
        defaults = ['10',                   'Analysis'  , 'Analysis'     ]
        lists    = ['',                     '',           ''             ]
        input    = UI.inputbox prompts , defaults, lists, "fill in some information"
        result = {
                  ;offset   => input[0].to_f,
                  ;layer    => input[1].to_s.strip,
                  ;material => input[2].to_s.strip
                 }
        return result
      end

      def findALayer(listOflayers, layerNameToMatch)
      #INPUT   A string name of a layer
      #RETURNS the layer object that corresponds to the string name given
        layerToMatch = nil
        listOflayers.each{|l|
          if l.name == layerNameToMatch
            layerToMatch = l
          end
        }
        return layerToMatch
      end

      def layerFilter(setToFilter, layerNameToMatch)
        #INPUT   a set of entities to filter through & a string layername to search for
        #RETURNS an array of all the entities in the input set that are also on the input layer
        filteredSet = []
        #get the layer as an object so that the comparison
        #isn't on the string name of the layer
        layerToMatch = findALayer(Sketchup.active_model.layers, layerNameToMatch)
        #start filtering
        setToFilter.each{|e|
          if e.layer == layerToMatch
            filteredSet << e
          end
        }
        return filteredSet
      end

      def propertyFilter(setToFilter)
        newSet = []
        setToFilter.each{|e|
          if e.is_a? Sketchup;;Face
            if isFaceHorizontal?(e) and isThisFourSided?(e)
              newSet << e
            end
          end
        }
      end

      def start
        puts "\n\n\n"

        result = UI.messagebox shadowInfoString << "\n\nAre these details correct?", MB_YESNO
        if result == 6 # Yes
          #this writes a message to the status bar (SB_PROMPT means the left bit)
          Sketchup.set_status_text "great, lets get going", SB_PROMPT

          userInput   = getAnalysisDetails                          #there needs to be / on the end of the path, formatPath does that
          imagePath   = formatPath(userInput[;imagePath])           #the field of view is in degrees and must be between 1 and 120)
          cameraFOV   = bound(userInput[;cameraFOV],  0, 120 )      #this trims the image ever so slightly so that it doesn't include the lines around the face
          insetFactor = bound(userInput[;insetFactor],0,50)         #this is percentages between 0 and 1, i.e. 50% is 0.5 and 5% is 0.05
          startTime   = bound(userInput[;startTime]  ,0,23)         #hours in 24hr format
          endTime     = bound(userInput[;endTime]    ,startTime,24) #hours in 24hr format
          hourDivs    =       userInput[;hourDivs]                  #how many chunks to chop the hour into i.e. 4 = 15 minutes
          outputWidth = bound(userInput[;outputWidth],50,2000)      #width in pixels of the images, height is set by the aspect ratio
          analysisLayerName = userInput[;analysisLayerName]         #the name of the layer that all the analysis faces are on
          #############################################################################################

          model = Sketchup.active_model
          #entities = model.active_entities
          #ent = model.entities
          filteredSelection = layerFilter(model.active_entities, analysisLayerName)
          filteredSelection = propertyFilter(filteredSelection)
          model.shadow_info["DisplayShadows"] = true
          m = 60/hourDivs

          itWorked = windowLooker(imagePath,         cameraFOV,   insetFactor,
                                  startTime,         endTime,     hourDivs,
                                  filteredSelection, m,           model,
                                  outputWidth)
          if itWorked
            puts "that all seemed to work out"
            Sketchup.set_status_text "that all seemed to work out", SB_PROMPT
          end
        else
          Sketchup.set_status_text "OHNOES!! Set the location settings and try again", SB_PROMPT
        end
      end #def start

      def windowLooker( imagePath,        cameraFOV,   insetFactor,
                        startTime,        endTime,     hourDivs,
                        currentSelection, m,           model,
                        outputWidth)

        Dir.chdir imagePath
        for i in (0...currentSelection.length)
          #builds a folder name from the current face's attributes
          folderName = imagePath + 'apptNum_'   + currentSelection[i].get_attribute("analysisInfo","apptNumber") +
                                   '_apptType_' + currentSelection[i].get_attribute("analysisInfo","apptType")
          #if the folder already exists, don't try and make it again!!
          if not File.directory? folderName
            Dir.mkdir(folderName)
            #puts 'made  ' + folderName
          end
          Dir.chdir folderName

          for hour in (startTime..endTime)
            for minutes in (0...hourDivs) # three dots ignores last value i.e. 0...3 ==> 0,1,2
              Sketchup.set_status_text "#{hour.to_s};#{(m*minutes).to_s}", SB_PROMPT
              # make the face local for the rest of this loop
              face = currentSelection[i]

              #set the time  Time.utc( year [, month, day, hour, min, sec, usec] )
              timeNow =      Time.utc( 2010,   "Jun", 21,  hour, m*minutes,  0)
              model.shadow_info["ShadowTime"] = timeNow

              #get information about the face
              normal = face.normal
              centroidPoint = face.bounds.center
              #0 = left front bottom              #1 = right front bottom
              #2 = left back bottom               #3 = right back bottom
              #4 = left front top                 #5 = right front top
              #6 = left back top                  #7 = right back top
              height = (face.bounds.corner(4).distance face.bounds.corner(0)).to_mm
              width  = (face.bounds.corner(0).distance face.bounds.corner(3)).to_mm

              #setup for the camera
              camera = Sketchup;;Camera.new
              camera.description  = 'camera looking at window ' << i.to_s
              aspectRatio = width/height
              camera.aspect_ratio = aspectRatio
              camera.fov = cameraFOV
              #this shrinks the view to account for prudence and window frames etc.
              width = width * (1-insetFactor)
              eyeDistance = calculateEyeDistance(camera, width)

              eyeOffset = normal.transform( Geom;;Transformation.scaling(eyeDistance))

              eye          = centroidPoint.offset(eyeOffset)
              target       = centroidPoint
              camera.set eye, target, Z_AXIS

              #get the material and hold it, the face
              #must be white to avoid problems of translucency
              holdMaterial = face.material
              face.material = "snow"

              #change the view
              view = model.active_view
              status = view.camera = camera

              #save the image
              timeString = "#{"%02d" % hour}_#{("%02d" % (m*minutes))}"
              apptNum = 'apptNum_' + currentSelection[i].get_attribute("analysisInfo","apptNumber")
              fileName = apptNum + '_at_' + timeString + ".png" #'window' + ("%03d" %  i)
              view.write_image fileName, outputWidth, outputWidth*(1/aspectRatio), false

              #TODO this is all the image magick stuff,
              #inspectImage(folderName, fileName, aspectRatio)

              #change the material back to what it was to begin with
              face.material = holdMaterial
              view.refresh
              statusText = apptNum + " successful at #{timeString}"
              puts statusText
              Sketchup.set_status_text statusText, SB_PROMPT
            end       #for minutes in (0...hourDivs)
          end         #for hour in (startTime..endTime)
        end           #for i in (0...currentSelection.length)
        Sketchup.active_model.entities.erase_entities(currentSelection.to_a)
      end             #windowLooker

      def makeAnalysisFaces

        mod = Sketchup.active_model
        ent = mod.entities
        #sel = mod.selection

        userInput = getAnalysisDetailsFM
        analysisLayer = mod.layers.add userInput[;layer]
        analysisMaterial = findAMaterial(mod.materials, userInput[;material])
        faceCounter = 0

        ent.each{ |e|
          if e.is_a? Sketchup;;ComponentInstance
            e.definition.entities.each { |newE|
              if ((newE.is_a? Sketchup;;Face) and (newE.material == analysisMaterial))
                #make an empty group
                tempGroup = ent.add_group
                #make an offset face
                normal = Geom;;Vector3d.new(newE.normal).normalize
                offsetFactor = userInput[;offset].mm
                offset = normal.transform( Geom;;Transformation.scaling(offsetFactor))
                newPoints = []
                newE.vertices.each{|vertex| newPoints << vertex.position.offset(normal)}
                #make a new face in that group
                face = tempGroup.entities.add_face newPoints
                face.layer = analysisLayer
                #apply a transformation to the group taken from the instance of the component
                tempGroup.transformation = e.transformation
                #set some attributes for that face. They will be used later to indicate where the face came from.
                face.set_attribute "analysisInfo", "apptType",   e.definition.name
                face.set_attribute "analysisInfo", "apptNumber", e.name
                #remove the group, the face stays where it is
                tempGroup.explode

                faceCounter = faceCounter + 1
              end       #if newE.is_a? Sketchup;;Face
             }          #e.definition.entities.each
          end           #if e.is_a
        }               #ent.each
        status = "Made  #{faceCounter.to_s} planes"
        Sketchup.set_status_text status, SB_PROMPT
        puts status
      end               #makeAnalysisFaces
    end                 #class
  end                   #facemaker
end                     #voyeur
Issues that I can see with it:
It gets really slow with big models, I'm not sure where the slowness comes from, but I presume it is the filtering for the right entity.
Most of the functions could be a lot more defensive
nearly all the methods should really be tagged onto existing classes so it is
myFace.horizontal ==> truerather thanisFaceHorizontal?(aFace)but... it does the job for now, and maybe I can do that if I come back to it.
p.s. Dan - mostly c# scripting languages in the past.
-
@ben.doherty said:
nearly all the methods should really be tagged onto existing classes so it is myFace.horizontal ==> true rather than isFaceHorizontal?(aFace)
I actually avoid that - I don't add my own methods to Ruby's and SketchUp's classes as then you move outside your own namespace and you have no assurance that some other script implement the same method.
So while it looks nicer, and produce cleaner code, it's prone to conflicts since there are so many plugins sharing the environment.
-
@ben.doherty said:
...nearly all the methods should really be tagged onto existing classes so it is
myFace.horizontal ==> truerather thanisFaceHorizontal?(aFace)I've actually (2.5 weeks ago,) written that method up as part of an SKX extension for Face and Vector3d classes. But have not yet submitted it into the SKX forum. (They are really candidates for C implementation, as in pure Ruby, guys like TIG and ThomThom would not use them as they just add an extra method call into the mix. We'd want them added to the API in C so they are fast.)
My version has a ? on the end, and is a one-liner:
def horizontal?
return self.normal.parallel?([0,0,1)]end
I have a bunch more as well: downright?, downward!, downward?, facing_upright?, upward!, upward?, vertical? (the ! methods reverse the face, if the normal is not in the direction wanted.)
Same named methods, similar functions for Vector3d class.@ben.doherty said:
p.s. Dan - mostly c# scripting languages in the past.
I knew it had to be something like that..
-
You can use the constants X_AXIS, Y_AXIS and Z_AXIS instead if creating the vector array [0,0,1] etc.
-
Oh the arrogance. Nearly finished indeed!
I tested this on a real model rather than my toy model and it had a complete fit.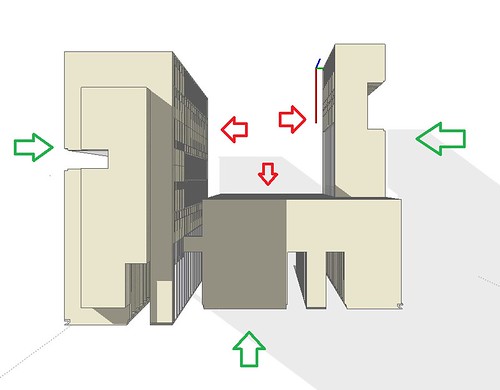
it seems that even though you've set the eye point, SketchUp takes pictures from the edge of the universe.
This means that the images taken from the green positions are fine, but the ones taken from the red directions are actually taken from the outside of the building.I reproduced this to prove that I'm not mad.
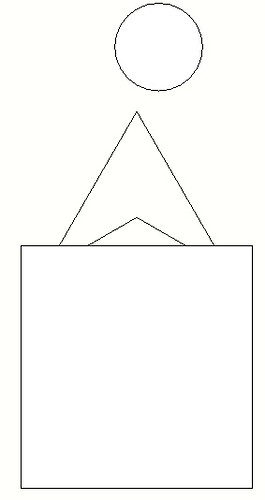
The spikes are the view cones of 120 degree camera and a 60 degree camera. the circle is a cylinder behind the camera.
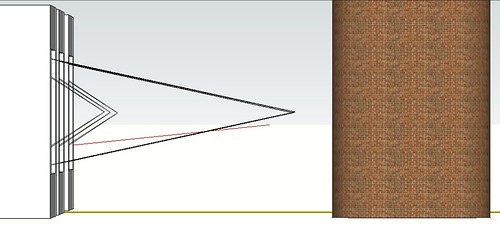
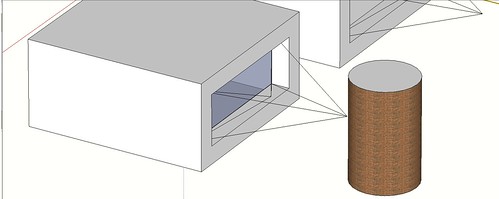
If you take a picture from this position the cylinder is clearly visible in the image. Grrrr

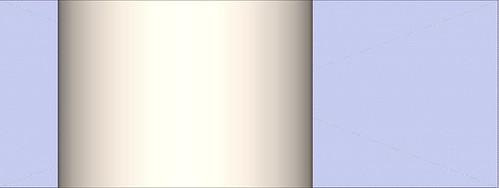
If you use the walk around tools in the UI then you can go in front of the cylinder, but I couldn't find anything to do with this in the API.
The thing that seemed to be the most likely to help was the section plane, but this seems to affect the shadows which isn't a lot of help.I think it might be time to start looking very seriously at OpenStudio, but it's a shame to have come this far to be thwarted at the end!
Any ideas?
-
The other solution I suppose would be to select everything in the halfspace behind the camera and set it's material to a transparent png as suggested here http://groups.google.com/group/SketchUp3d/browse_thread/thread/2ce1ef1f54e7b6dc?pli=1 .
That really is going to slow things down if I have to do 2 material sets for each entity.
-
@ben.doherty said:
If anyone has any more comments then I'd love to hear them.
OK, this is a little one... but a very important one!
You do not want to iterate directly (and EVER change anything within,) the C++ collections while your in the process of iterating them. You need to make Ruby Array copies of them, and iterate the copies, so they are 'frozen'. Otherwise the C++ side changes the collection, and you either iterate entites more than once, or your loop misses entites.
The change is easy... insert .to_a in between the collection call, and the loop method, like:
was:
ents = model.entites.each {|e| ...
should be:
ents = model.entites.to_a.each {|e| ...See if that helps speed things up. You may have been double testing the same entites.
Umm... how about:
      def isThisFourSided?(aFace)
        if aFace.class==(Sketchup;;Face)
          return aFace.vertices.length == 4
        else
          raise(TypeError,"in `isThisFourSided?', Sketchup;;Face argument expected.")
        end
      end
Lastly.. File.join(arg1,ar2,ag3,...) concatenates pathstring segments using the Ruby's File::SEPARATOR character (usual /) and then File.expand_path(arg) will both expand it to an absolute path, and convert all '**'s to '/**'s.
-
@ben.doherty said:
The other solution I suppose would be to select everything in the halfspace behind the camera and set it's material to a transparent png as suggested here ...
If I had to mess with objects that are behind the camera, not supposed to show, but do anyway.. then my 1st course of action would not be to change things like their materials... but instead use the 'hidden' attribute.
Just as in other OOP languages, subclasses in Ruby inherit methods from their superclasses. Objects like that cylinder (probably grouped,) will inherit .hidden= and .hidden methods. Everything that can be 'drawn' in a model, is a subclass of Sketchup::Drawingelement (where those two methods [and their boolean opposites: .visible? and .visible=,] are defined.)
Obviously, controlling visibilty, in Sketchup, is easier and faster if you group objects. Then you can hide the whole group, without needing to hide the individual elements. Even faster, is to use layering. Put common groups on the same layer, and turn on/off the entire layer with it's .visible= method. (The API implies class Layer does not have the 'hidden' opposite methods.) It's best to always have basic elements (Edges, Faces, etc.) always on Layer0 and then group (or component them,) and set the group/component to another layer.
-
Hiding or making materials transparent will have the same problem with shadows as using a section cut.
It does seem odd that you are seeing objects behind the camera position. I could see issues like this coming up with parallel projection, but it sounds like you are using perspective cameras instead.
-
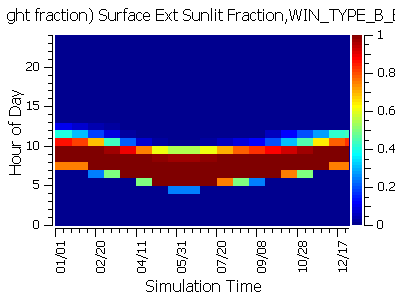
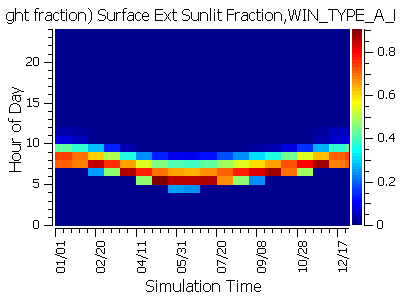
Ben, I had some time to post a video demonstrating how to use OpenStudio, EnergyPlus and ResultsViewer to study window shading over the entire year. The video doesn't have any annotation yet, but I'll add that soon. Below are some screenshots. The first is from SketchUp/OpenStudio. The color of the windows relate to the fraction of the window in the sun. While typically viewing simulation data in SketchUp is ideal, here the sketchUp shadows work well on their own. We can look at a window and see that about half of it is in the sun. In this case ResultsViewer's flood maps are an excellent way to study the entire year at a glance. You can quickly see which times of day or year are the problem times. I have shown a Type A and Type B window for the south and east. The Type A and B windows are the same except the Type A has the shade directly above it, while the Type B windows have the same shade offset five feet vertically. This is a simple example, but you can imagine how you can quickly study a variety of window designs and look at the strengths and weakness of each one.
YouTube link (may not work yet)
http://www.youtube.com/watch?v=60lmAnY81ds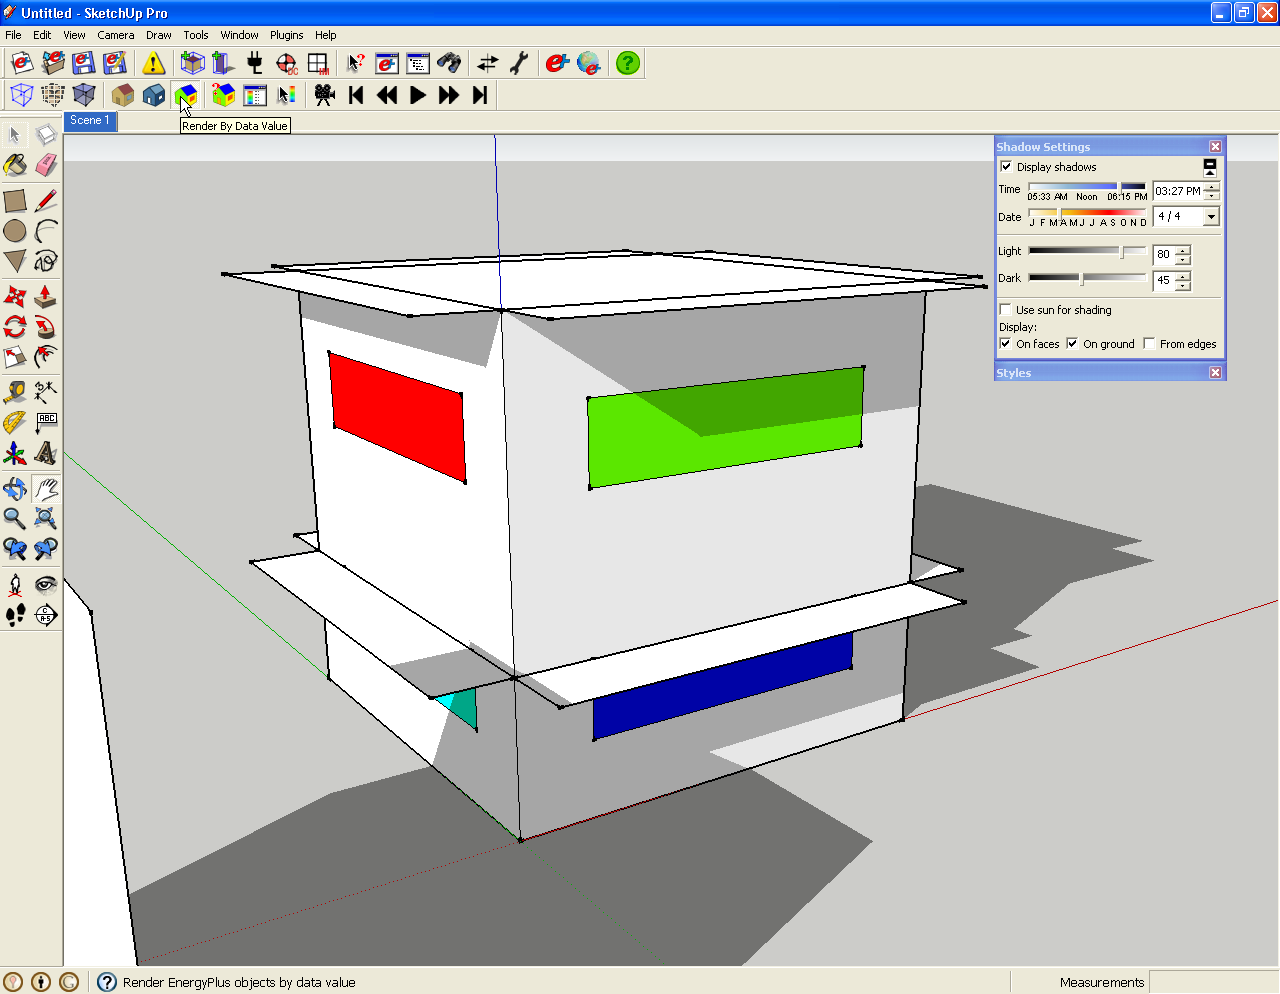
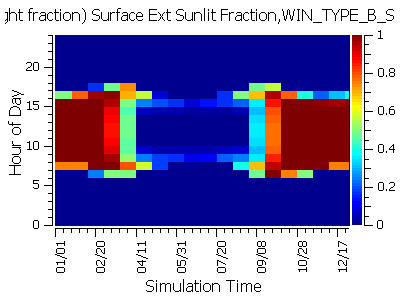
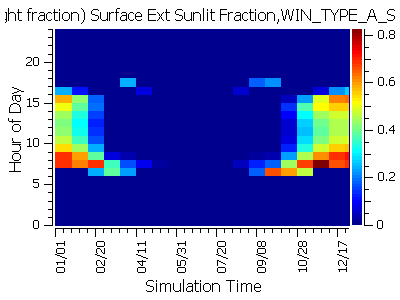
Advertisement


