Non-coplaner "face segments"
-
I have a program to design consoles with, here is my problem, I export the design as a DXF/DWG, when I go to import it in SU, I end up with diagonal lines on every face, if I erase a line the face goes to pieces. If I right click smooth (coplaner or not)it works ok, but if I use the paint bucket I may have to apply paint in several places. Or in another example if I reverse faces both areas on the sides of the diagonal line may reverse opposite so it never goes all "front". Any ideas?, Plugins?
-
This may have been discussed several times before in other threads to do with import export of dxf dwg.
One thing to do is make a copy of your dwg for export, making sure that you flatten z values (that is, make sure that you have been drawing all of your lines on the xy plane, get rid of thicknesses(assigned vertical heights), take the fat out of polylines, simplify the number of layers, and so forth. Basically make the drawing as dumb as dirt.
There is a plugin called makefaces around here somewhere, possibly at Smustard, or Ruby Library Depot.
See if any of this helps, and maybe wait for other responses. -
I did some checking on a model I imported, I exploded it into its component parts, then took one part and looked at it very closely, it was a simple desk top.
None of the 12 edges actually went straight along any axis. -
I am guessing here, but perhaps your original input was not constrained to the orthogonal planes. If it was all vector input or extrusions, you could use the snap controls. I assume this was Autocad?
-
I am only guessing here but you may right, base on the evidence, this company has a rather lengthy tutorial on importing the "drawings" into Autocad. So I can assume they used Autocad at least in part.
I am not sure if it was vector or extrusions, I have no way of knowing.
Where do I find these snap controls you refer to? -
The snap controls I am referring to are in Autocad. Where you do a command like "line" and Shift+ right click to bring up a context menu list of salient points such as intersection, endpoint, midpoint, and others. One thing to watch out for, is something I keep doing accidentally when working Sketchup and Autocad simultaneously is not to use shift with pan(press scroll wheel button down) in Autocad, because that will cause the camera to skew away from "high noon". If you do this, you can be sure that you will draw non orthogonal stuff. I have to find the top view button and reset the camera back to high noon, meaning pointing directly down on the xy drawing plane. Any way, many of the snaps work in Autocad 3d also.
Sketchup has snaps also, but not quite the same, since you simply hover the cursor over end points, or midpoints or along an edge. If you don't want the cursor to jump to the snaps you zoom in very near to click where you want.
Probably way too much info here. -
I don't have Autocad, I don't have access to the Autocad file. These files are generated by the design program I have. I have a selection of parts that I put together to make the design for the consoles. The program saves those in a native format to that program. I can however export dxf/dwg in to SU from the original file. Whats interesting is I have an Autocad viewer and when I open the exported dwg/dxf file, it works, and the files appear to be fine and the faces look good. I have not however looked at them closely.
-
OK
I misunderstood. I thought you were using Autocad.You did not name the design program you are using.
Perhaps this program has different tolerances for precision/ accuracy than Sketchup.Just as a test, do this. (and control z it later if this doesn't provide any info.)
Hover over one of the triangulated faces, select circle, draw a circle with a diameter larger than the face at center and the adjacent face combined. Orbit around and zoom in to inspect the adjacent face displacement. If the model is intended to be xyz orthogonal, move a vertex along the blue inference until it contacts the circle surface. Do the same for the other vertices of the face, if any. Also, you can hover the cursor out near the model, select Circle, click shift to lock it to the xy plane and you should have a blue circle, click on the face and make the circle. Select the circle and the faces it overlaps, right click, intersect, intersect selected, and then erase excess circle and any protruding geometry.Maybe someone else can weigh in on some possibilities.
-
Or I can just smooth the whole thing, then paint it, for my purposes that will work, but I know it will bug me.I have been in contact withe he software vendor about this situation, however, no replies so far.
-
I notice that the model is composed of nested components. Just an observation.
Yes smoothing is your option. Of course you know you can do this selectively with Control+Eraser. Since I am not experienced renderer, I am not sure if the hidden edges will have any effect on textures, materials or renders in 3rd party apps. I do know that sometimes porting a Sketchup model into Autocad brings in problems having to do with the differences between surface modeling and solid modeling.
You evidently have more experience than I thought. Please excuse my misinterpretation. -
Here I use a 'Troubleshooting' Style to show non-axial edges [black], reversed faces [blue] and hidden/smoothed geomtry - dotted]...
You can see that many of the faces do not have axial edges and are therefore not coplanar etc...
The 'CAD' file is a mess...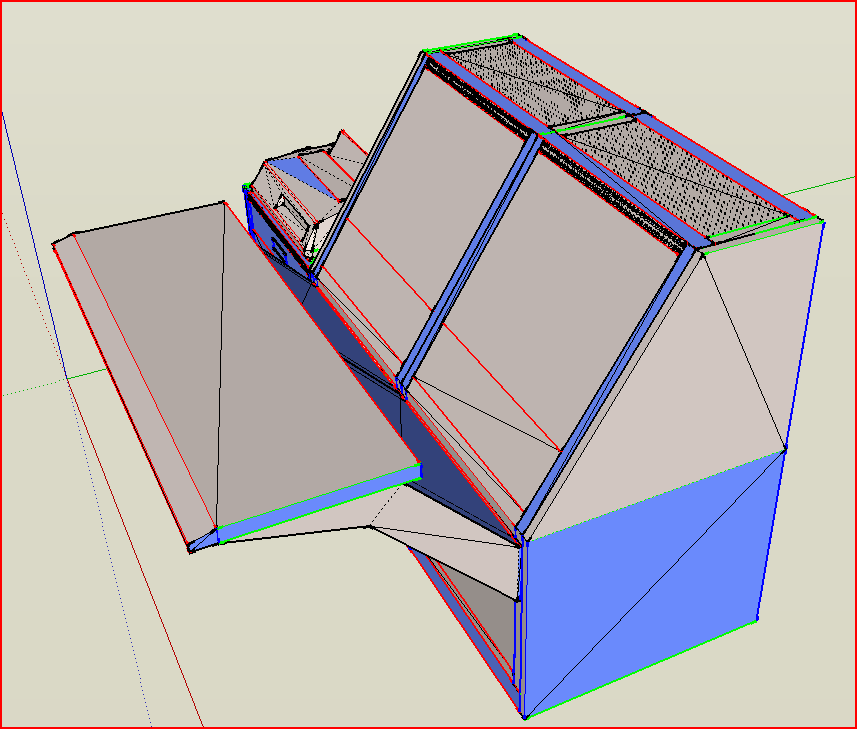
-
mitcorb I have a fair amount of experience, up until my old computer died I was running Intellicad, then less than a year (like 6 months) ago I discovered SketchUp, it was love at first "sight". It did everything I wanted, and I am sure there are still things I have not tried. Here is a link to my 3D warehouse page http://sketchup.google.com/3dwarehouse/search?viewer=14171324581335292174&scoring=m
have a look around. -
@TIG:
This troubleshooting style- is this a tool you created? Looks very helpful. -
Here it is TroubleshootingStyle.zip
unzip it and put the '.style' file into the Styles folder: remember that you can add it as style to your default template so it's in every [new] model and then so you don't have to install it every time...
Hello! It looks like you're interested in this conversation, but you don't have an account yet.
Getting fed up of having to scroll through the same posts each visit? When you register for an account, you'll always come back to exactly where you were before, and choose to be notified of new replies (either via email, or push notification). You'll also be able to save bookmarks and upvote posts to show your appreciation to other community members.
With your input, this post could be even better 💗
Register Login


Advertisement