Dome Model In Reality
-
@d0me said:
Just out of interest, why did you set the caption "DOmes for developing countries"?
Just seeding ideas.

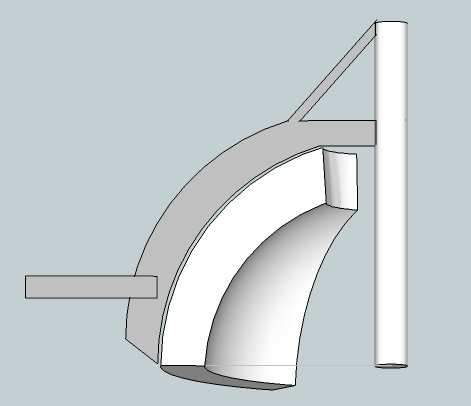
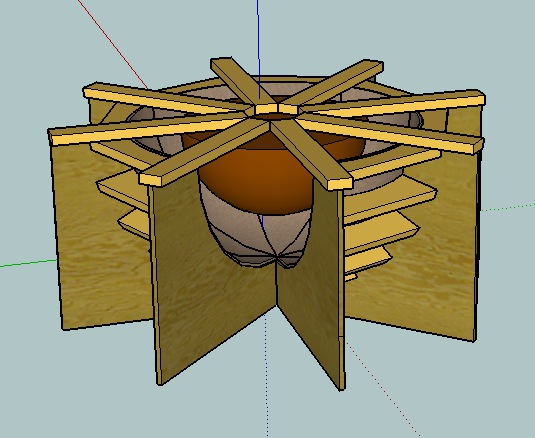
And here is a v rough sketch of a "spinner". It would need a big spigot at the base and the screeders (for sand mould, inner and outer domes) will need collars to spin around with the pipe. Another spinner would have a blade to cut the bung; another a collar with six wires to cut the segments. A circular baseboard would be needed with six slots in order to be able to cut through near the base.
Basic method:
Set up baseboard with spigot and pole.
Build up sand mould and screed.
Build up dome layers with stiff mix and screed.
Cut bunghole (sorry!).
Discard bung.
Cut segments.
Take out pole.
Fill in with sand.
Pour new bung + hand finish.or something like that.
-
Hi Chris
Thanks for that. I think we have something going here.
Sounds like a plan to me.My apologies for the questions to follow. To be honest, some of the terms are gibberish to me but I more or less understand it in context so I'll try and re-iterate what you just said in my own way and please correct me if I am wrong.
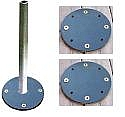
- A Spigot - My understanding of this term after googling it, is a plug for the bung hole. I tried to find some pics of it but nothing really. Do you know of any? After reading further down the page, I notice u mentioned the spigot needs to be attached to the base board, so I'm little confused here.
- Screeders - From what I've read Here, a screeder is someone who levels and removes air bubbles from wet concrete.
- Collar - What sort of collar should I ask my hardware store for?
I got a good idea of what you have in mind, just need to get more detail on finer bits.
Gai: Is it possible for us to draw whatever Chris has mentioned, basically labeling each item so I can get a much better understanding of how this puzzle fits together.
By the way Chris, your idea is brilliant. It will save me money on creating a mold, as well as time and effort in learning how molds are created. As Jeff mentioned, you need to have experience with Complex Curved Construction. Maybe if this oven is a success and I do decide to go commercial, I can look at a mold at a later stage or just stick with this method, whichever works best.
Thanks
-
@d0me said:
Gai: Is it possible for us to draw whatever Chris has mentioned, basically labeling each item so I can get a much better understanding of how this puzzle fits together.
I would say anything could be possible - first at least one of us should understand what Chris is suggesting. I am definitely nor technically oriented enough to be sure that I get the idea...
-
Hi Gai
I'm not technically orientated either but because I have been researching this oven a bit, i can grasp a little of what Chris is saying.
Hopefully Chris and the guys here can detail this a bit more in simpler terms so we can put pen to paper or should I say Mouse to SU.
Thanks
Regards
D0me -
i don't get why you want to do it in 6 parts..
isn't the thing only 3 1/2' in diameter?make it one piece and you'll save a bunch of headaches in terms of sealing/joining/leaks etc.. you're going to need machinery to move six individual pieces so you might as well use that machine to carry only one piece and not have to worry so much about assembly.
-
i looked at the other thread and yeah, make it one piece..
if the dimensions are roughly 42" outside diameter and 7" thick then it's going to weigh ~1150 lbs...
one-sixth of that is 190lbs so you're still going to need a forklift..make it solid and you'll eliminate many problems.. not to mention crushed fingers..
-
@d0me said:
- A Spigot -

@d0me said:
- Screeders - From what I've read Here, a screeder is someone who levels and removes air bubbles from wet concrete.
Yes but I used the term for creating the surface geometry for any cast-able material. These non-human screeders here are curved and they need to be moved to create the curve on another axis curve - think
followme.@d0me said:
- Collar - What sort of collar should I ask my hardware store for?
A two piece pipe bracket or holderbat that can be clamped onto the pole at predetermined positions
-
@unknownuser said:
i looked at the other thread and yeah, make it one piece..
if the dimensions are roughly 42" outside diameter and 7" thick then it's going to weigh ~1150 lbs...
one-sixth of that is 190lbs so you're still going to need a forklift..make it solid and you'll eliminate many problems.. not to mention crushed fingers..
From what I understand from Gaieus' approach it is more important to follow the brief than specify the solution (from a learning viewpoint)
-
Well, it wasn't my approach - D0me wanted to model it that way. It would've been certainly easier to do it in one piece. Maybe the "sections" are only for the moulding?
-
if you're planning on making a few of these, you might want to go in this direction.. (if you want to make a whole bunch (15+), get a legit one made out of metal).

set that on a vibrating table or use a handheld vibrator (i like this project -- so far it incorporates vibrators and bungholes
 )..
)..you'll need to incorporate something to hook cables onto the oven to pick it out of the mold as well as transport it etc...
-
-
A bit of off-topic if you don't mind, guys...
Jeff, how do they keep those "basins" clean? And what happens when it rains? Aren't they filled up with water?
-
brooms/blowers for cleaning.. standard drainage techniques for keeping the water out..
most of the times we'll bring the grade up so the bowls are actually above the pre-developed land which makes drainage a lot easier.. (especially in places like florida where you can dig down a couple of feet and hit water.. the structures are basically like swimming pools and there's a possibility of empty pools floating out of the ground if they're built sub water table) -
chris' method is doable too but shotcrete is going to better because it will make it easier to fill voids..
that's how we build these domes: (as well as the one i showed on pg 1 on this thread)
form the edges and one side then screed/hand finish the other side..
-
Okay, thanks!
(I guess they would be full of mud in a bunch of other places around the world already)
-
@gaieus said:
Okay, thanks!
(I guess they would be full of mud in a bunch of other places around the world already)
ha. snow too.. we do a lot of parks in colorado and when snow gets in there, you just have to wait til spring.
-
Hi Guys
Jeff, the reason i chose to do this in 6 parts is because someone told me that casting it in 1 piece may cause the dome to crack due to Expansion and Contraction due to the extreme heat the oven will produce. Also, the oven will probably be moved around and this could cause further damage to the dome but this may not be true. Maybe you can give me more insight?
Crushed Fingers!!! Ouch, don’t want that to happen else I would have to add medical bills to the budget .
I looked at the model you created and seems like a good way forward.. There are 2 concerns however.- As you mentioned, I would need equipment to lift the dome out from the mold and this could be costly.
- How do I go about physically making the mold you drew? Will it be difficult and complicated?
Chris, thanks for the explanations. It makes more sense now.
Gaieus, the sections were only for the mouldings and I guess that would change now since Jeff and Chris explored new methods to do this.
I think the best route for me right now, cost effective and less complicated is that which Chris mentioned. If it's ok to go ahead and cast this oven in 1 piece (Jeff and Chris can help decide this), I would proceed with the following sequence of events.
- Place the spigot centred onto my base board.
- Stick a pole into the spigot. How thick should the pole be?
- Fit onto the pole a wooden spinner. Is it possible to have 1 spinner but allow me to have it such that it will be a guide for different thicknesses as I go along plastering my dome?
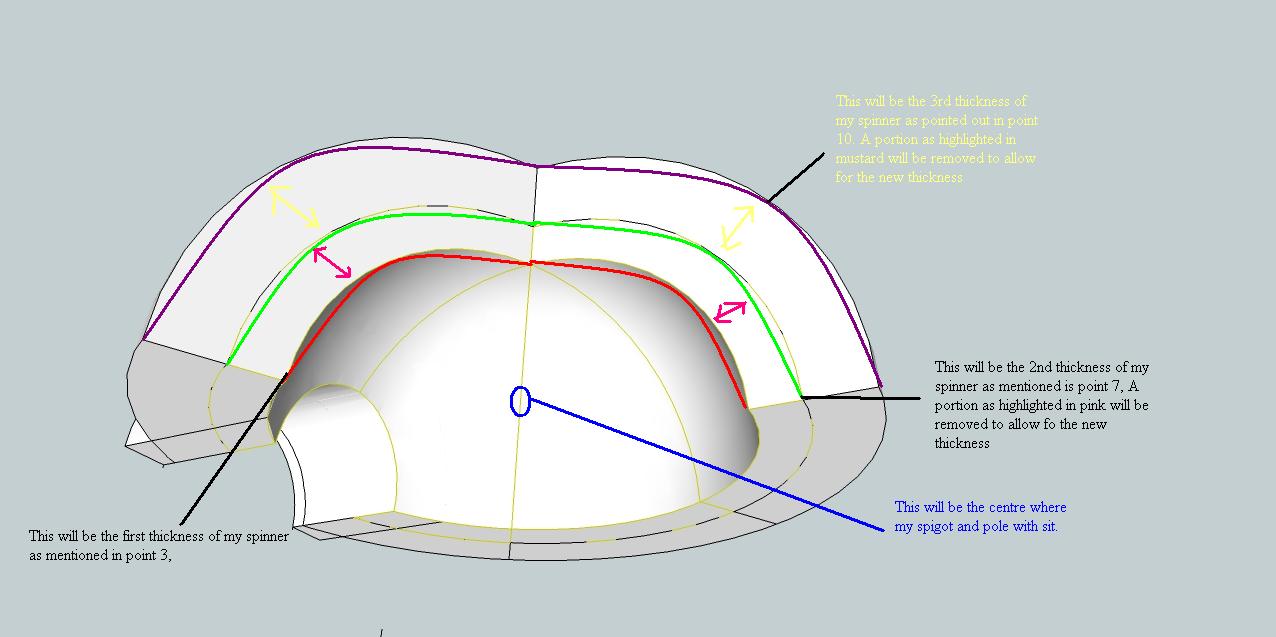
- Start building my Sand Dome around the pole until I reach the thickness of the starting point of my inner dome as I have pointed out in red on the picture attached.
- Once I have reached the first layer of my inner dome using sand, I will remove whatever attachment or contraption you created to allow me different thicknesses on the spinner.
- My spinner will now have a new thickness which will stop at the end of the inner dome as pointed out in green in the picture attached.
- I will begin plastering my refractory cement onto the sand dome and this will end at my current spinner thickness which will be at the point shown in green on the image.
- I will then once again remove whatever attachment or contraption we create to cater for new different thicknesses on my spinner.
- My spinner will now be at a new thickness and different point or guideline for my dome as I have pointed out in purple.
- I will repeat step 8 only this time using insulation as my material, and this will stop at the point or guideline of the spinner as pointed out in purple on the image.
- At this stage, I will remove the pole and indirectly this would create the bunghole or not? Chris, you can guide me further with regards to the bung. Never the less, I will pour sand into the area where the pole was and then fill is with cement and insulation.
- After completing, I can dig out the sand through the oven opening and then work on further cosmetics to the oven. I can say that once the dome is created, the hardest part is done.

I guess that would now complete the dome in one entire piece.
I was wondering whether I should cement the dome as I am plastering each layer to the surface of my stand (which will be a concrete slab) rather than cementing the entire piece after it is done as this will be harder requiring me to pickup the dome and then place cement and set the dome into that cement to hold it in place on my concrete slab..Sounds easy in 13 steps but I know I'm in for some surprises along the way but I'm preparing myself for it.
You guys have brought me a long way that I don’t need to tell you to please change anything that may seem a miss.
Look forward to hearing from you'll
Regards
D0me -
@unknownuser said:
You guys have brought me a long way that I don’t need to tell you to please change anything that may seem a miss.
Search the perfection is one of the more sweet thing!

@Jeff : astonishing site!

-
@gaieus said:
Well, it wasn't my approach - D0me wanted to model it that way. It would've been certainly easier to do it in one piece. Maybe the "sections" are only for the moulding?
I meant your approach to teaching!
-
OK, I see.
Well, in any case, D0me should now be able to remodel the whole thing in whatever variation!

Advertisement


