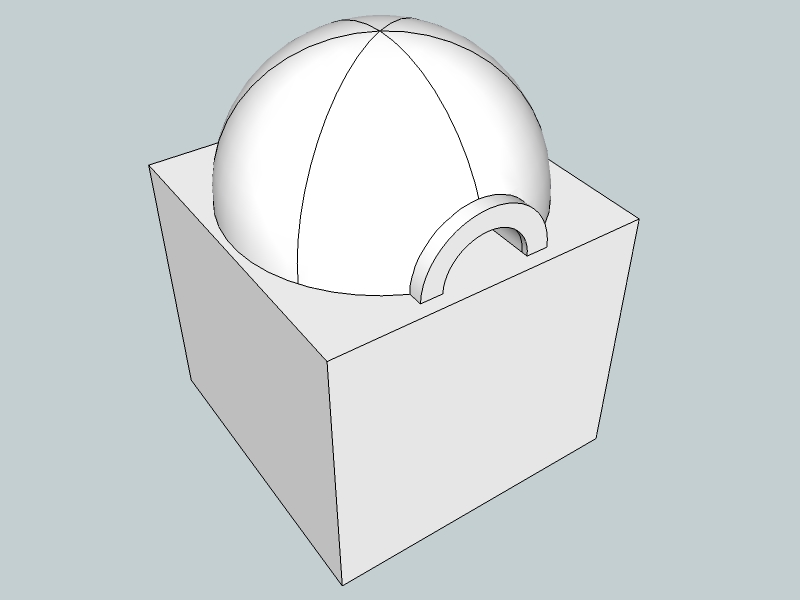
Help Me Draw A Dome [TUTORIAL]
-
@unknownuser said:
That base part you mentioned somewhere above? Texturing? Putting some elements on hidden layers (according to what and when we want to display - just open your layers dialog from the window menu and see what and how changes when you change the scene tabs!)
Making sections and printing to scale? There are so many things you can do with a ready model - presentation, printed material... Exporting the whole model to a 3D PDF document so that anyone can see, rotate and such...
Yes, the base. Also everything else you mentioned sounds interesting and challenging and has my curiosity levels running high. SU is powerfull might I say. Really looking forward to this.
@unknownuser said:
But of course, practising the modelling part is always the first step (otherwise you do not have anything to present)
100% true. You can't run before you walk.
So I guess we can start with the base.
I'm gonna sit and think about how I want the base in terms of dimensions.Will have something for you by tomorrow.
Take care
Regards
D0me -
Okay, looking forward to it!

-
Hi Gai
I hope you are well.I have thought long and hard, putting myself in every practical situation to try and derive a dimension for the stand and I think I have it.
The stands width and depth needs to be such that the dome will sit on it and leave a 1 inch spacing on the back and 2 sides. The front/opening needs to have a 2 inch spacing. The height of the stand will be +- 1 Metre. The stand will be fabricated from metal.
Please improvise wherever you feel the need.
Regards
D0me -
-
Hi Gai
Something like that with a few cosmetic changes and a little bit of detail in the drawing.
I have attached your picture with a explanation. I hope it makes sense, knowing my explanations are really bad but if you need me to clarify anything further, let me know
Thanks
-
Okay then - you should now figure out the overall dimensions. Let's say this flat face is one of the sides. Try to figure out how you would divide it, how thick those steel thingies and the concrete slab shouild be and draw them in with simple lines.
This is not only a "practice" but also, giving me some clue what you really want. I made a "Scene" the tab of which you click on, the model will always go back too this position. It actually says "Front" in the window but this is because we are looking at the front of the side now ("Front" by default is always to the south in SU and we made the front to the east but if it is confusing, we can always change later)
-
I say we put Gaieus up for a service award. This series, I believe, is refreshing and educational.
-
The meeting of a studious sympathetic student with a great kind teacher, so they give us a beautiful lesson.
The first of this kind in theses forums I guess..
Applauses:


 simon
simon -
Just hang on, guys, we still need to see how effective and successful (in terms of the real project target) this whole thing will be!

-
Hi Gai
I trust all is well.
Glad to see the interest everyone has in this tutorial. I guess it can't be helped with the great lessons Gai is providing.I've drawn all that I can think of for now. I colored them in as well and I even got them at the exact dimensions I wish to use.
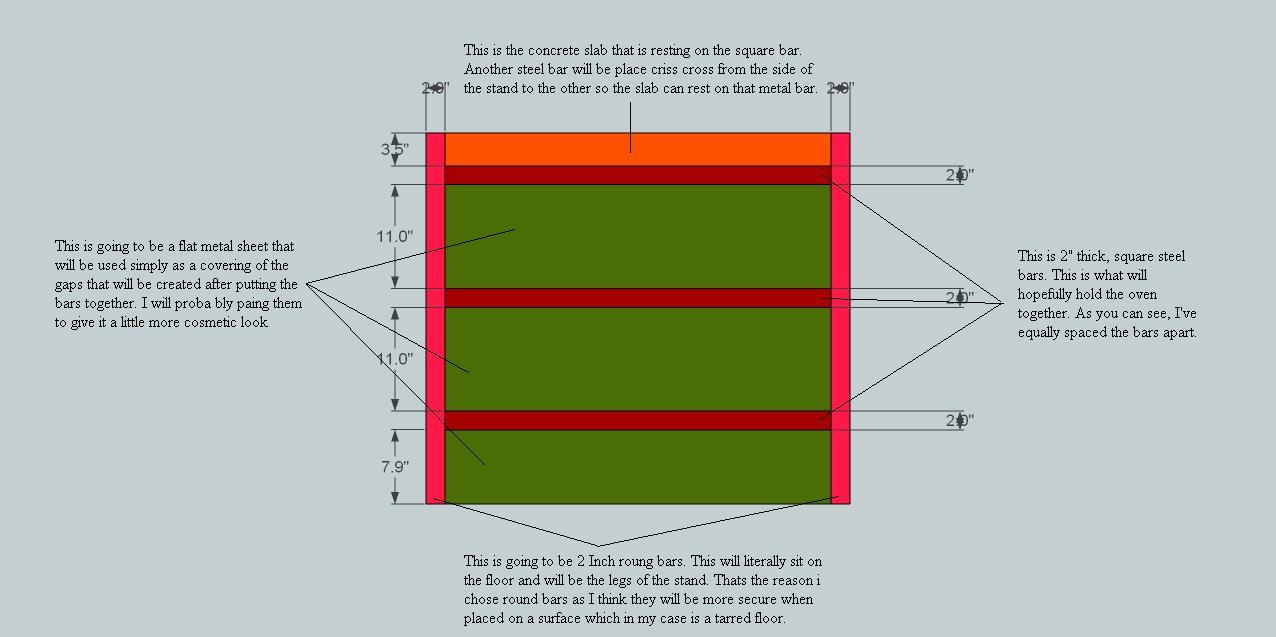
Can't wait to see how we going to get this in a 3D form.
ThanksRegards
D0me
-
Okay, these are pieces that will have several instances in the model so we are going to make components of them again. Note that though with our "Hide rest of model" strategy, we could work in our original dome model, too, we are now practising a new strategy - when you work with external files and will reload them into the original model later just like another member in this topic.
First, let's see those horizontal bars. Select one (practically either the top or the bottom) and make it a component (right click menu). Make sure that the "Replace selection with component" box is checked (this is generally not checked by default when your selection touches other, connected geometry). Give a meaningful name and a description if you wish (these will also appear in the component browser)
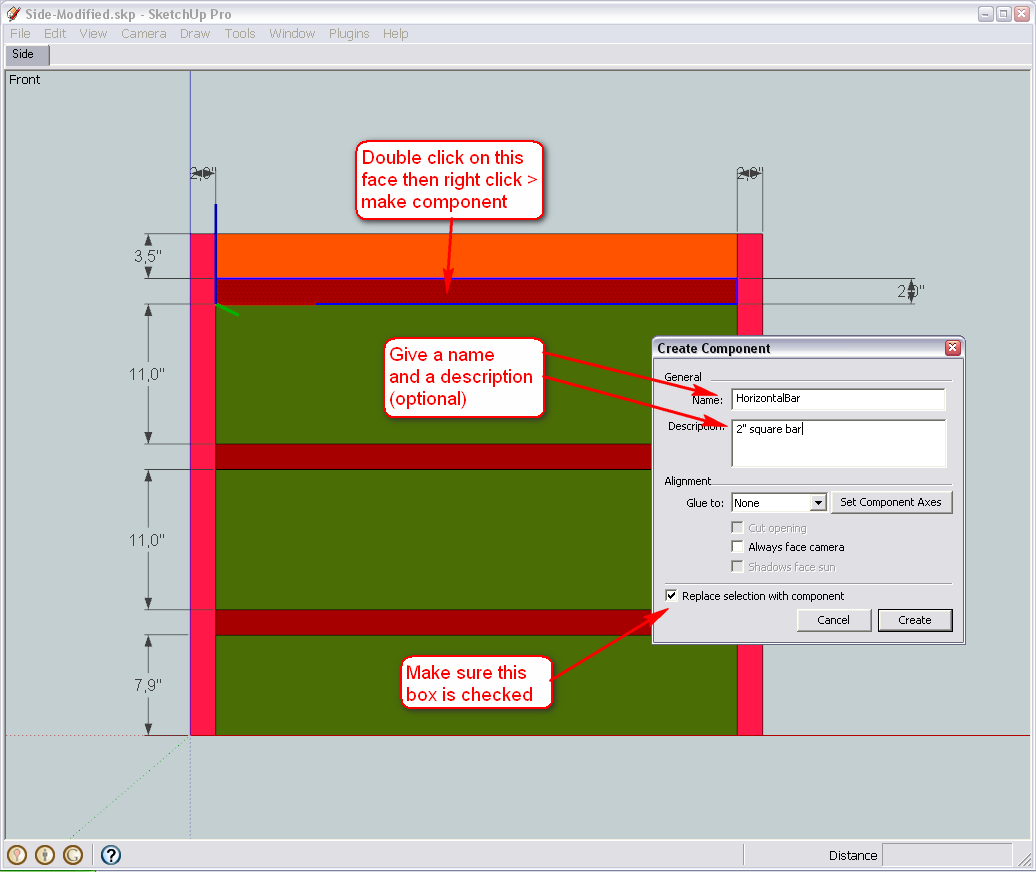
Now delete the faces of the two, similar horizontal bars (we are going to replace them with our new component). Select the component then the Move tool and press the Ctrl key. This will make the Move tool not only move but make copies (just like we have already practised with the Rotate tool ).
Move it from one endpoint to the other - then type x2 and hit Enter(this is called "Linear array" - with the Rotate tool, it was "Radial array").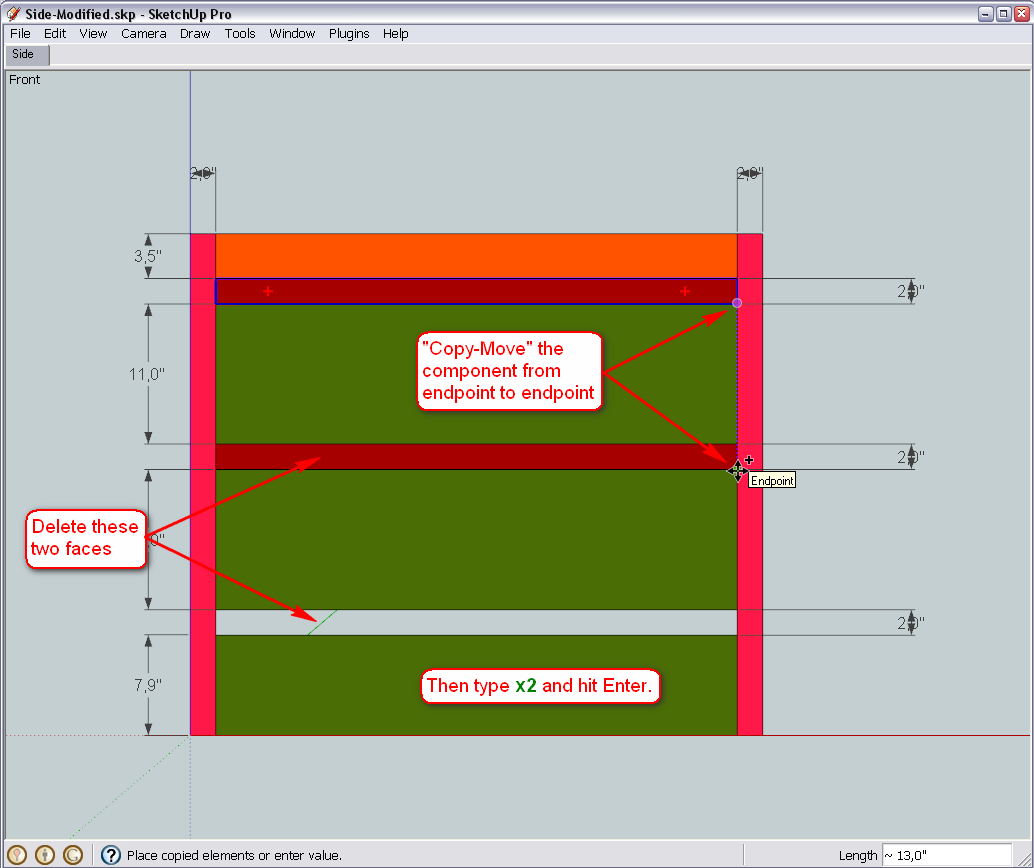
Now do the same with the vertical bars (of course, we are not going to copy more than one instance now) but at the end, also flip the copy around its red axis (as it is oriented in our drawing now - in other cases, other direction would be correct). This is only needed if our component will not be perfectly symmetrical at the end but for now, let's be accurate whatever will happen later.
(BTW what the hack is "roung"? Should it be "round"?)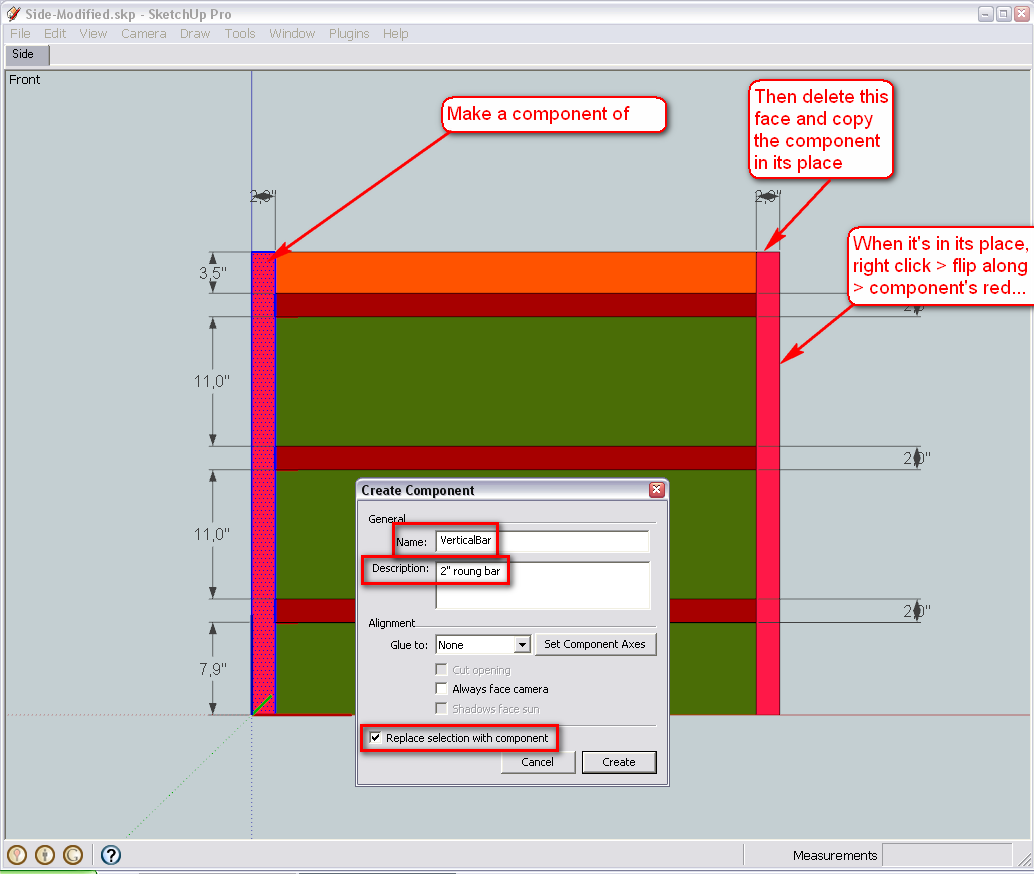
Now comes the two, similar pieces of the siding... Do what we've done above - make a component and replace the other piece with this component.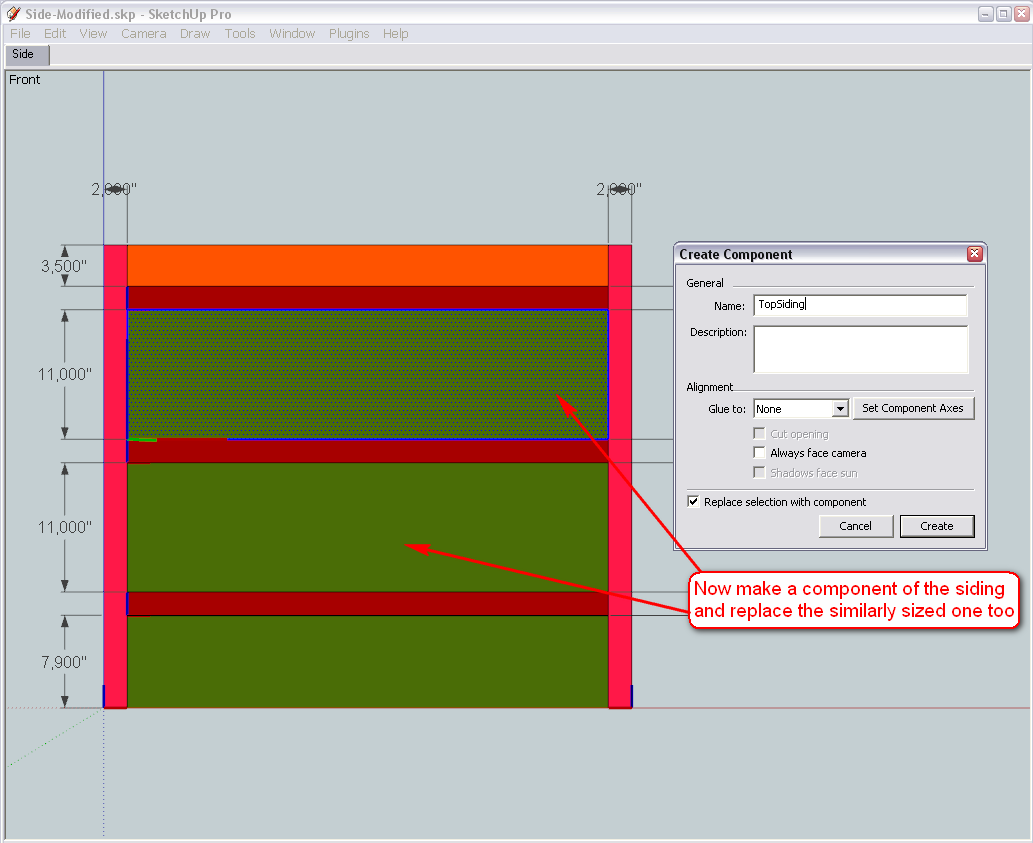
Finally the rest - here we do not Move-Copy anything as these two pieces are individual ones so there is only one instance of either going to be in the model...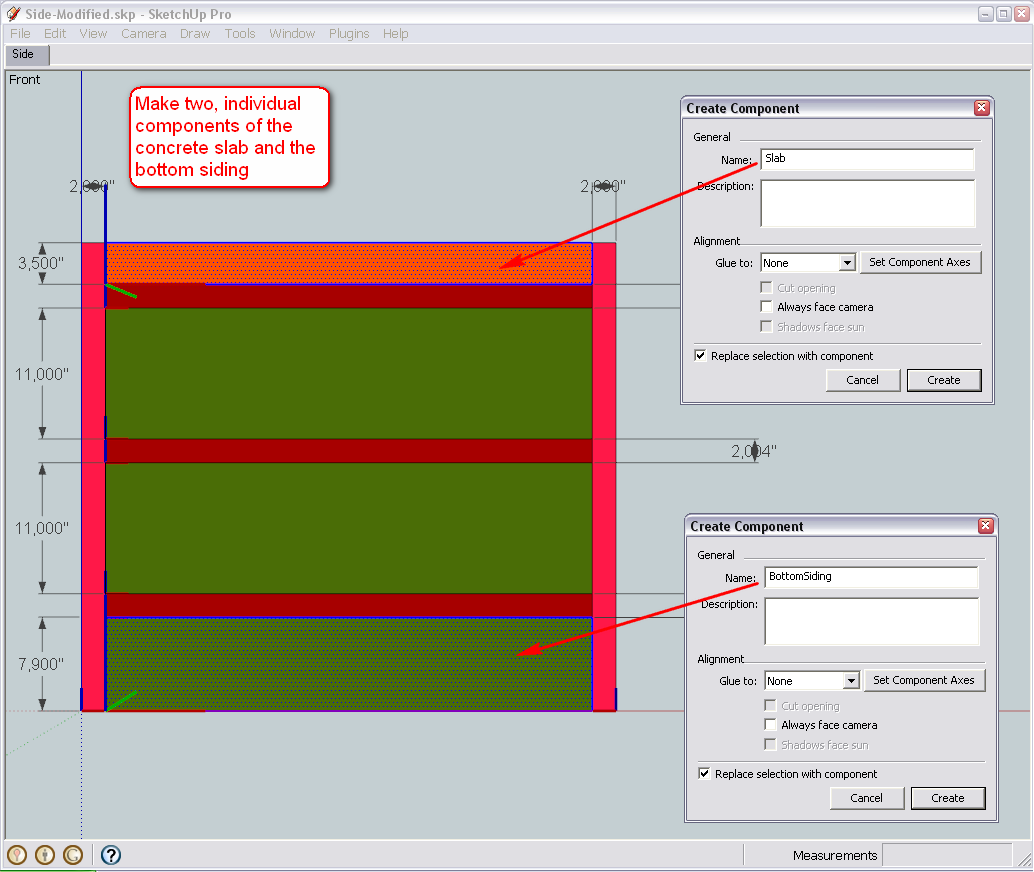
-
Hi Gai
I'm on track now.
After working with the dome, what you made me do makes so much of sense now. Each piece is now components and will much be easier to work with
Thanks
D0me
-
Okay, next, easy step is to open the dome model again (the version where we last made this side rectangle a component and exported it) > right click on that component > Reload... navigate to this one above (wherever you saved it) and open...
What you will see is that inside that side compoent (that we are going to explode soon), all that you modelled in this one, will appear.
One little correction first however - there are 4 instances of the horizontal bar component in your model (instead of just 3). The top one is a duplicate. Select it (clikc on it) - it will obviously just select one of the two - and delete. You will see that there is still one "below" and save your model before reloading like above.
-
Hi Gai
@unknownuser said:
(the version where we last made this side rectangle a component and exported it) > right click on that component > Reload... navigate to this one above (wherever you saved it) and open...
Im a little lost here. Is the version you're talking about found in this post http://forums.sketchucation.com/posting.php?mode=reply&f=79&t=24930&sid=8b51657489c975201327d144508f981e#pr217001 .
If it is, when I right click the Right Side component, I don't get a Reload option in the popup menu. Where could I be going wrong?Thanks
-
Sorry, in this post (originally I may have not uploaded the correct version - just did it myself).
BTW when you post a link, you always post it to a reply window (where you are supposed to write the answer) not to the post itself.
-
Hi Gai
OK, I've managed to reload the picture.
Ready to continue@unknownuser said:
BTW when you post a link, you always post it to a reply window (where you are supposed to write the answer) not to the post itself.
How do I go about doing so? I assume you would like me to post links whereby I can put a description of the link rather than the url address of the link?
-
Hm... Sorry again - I do not know what I screwed up above (more exactly I do - see below - I just cannot imagine how). Your component should've come in vertically. The glitch is in the original model I uploaded and pointed you to - please, use this new one I attach here to redo the whole thing.
I will have to go now and when I come back, we will have a little meandering and side notes about components, skp files and the importance of their axis location (which was wrong in my model).
Otherwise the stand - from here - is really a piece of cake only.

-
@unknownuser said:
Hm... Sorry again - I do not know what I screwed up above (more exactly I do - see below - I just cannot imagine how).
No Problem. I actually saw that the side piece did not fit in vertically but I thought it was normal and we would put it right later. Anyways, all seems fine now. Just one modification I made. The metal sheet covering at the bottom of the stand has been removed. I decided not the cover the piece right at the bottom.
Thanks
-
Okay, now it looks fine. We'll go on from here then.

-
Cool.
Ready to go on.
Hello! It looks like you're interested in this conversation, but you don't have an account yet.
Getting fed up of having to scroll through the same posts each visit? When you register for an account, you'll always come back to exactly where you were before, and choose to be notified of new replies (either via email, or push notification). You'll also be able to save bookmarks and upvote posts to show your appreciation to other community members.
With your input, this post could be even better 💗
Register LoginAdvertisement
