Help Me Draw A Dome [TUTORIAL]
-
You can do it in two ways:
- either just type 48s "into the thin air" and hit Enter (in the meanwhile, you can see what you are typing at the bottom right, in the Measurement box but do NOT click in there to type)
- or after you drew the circle, right click on its perimeter and select "Entity info" until you affect your circle with other geometry, you can manually type in the segment count changing the default.
Now we will do the same with the arc which has 12 segments by default but we want double so select the arc tool and type 24s followed by Enter.
Navigate/orbit your model so that you are not looking down but almost horizontally. This will let you align the arc tool easier on the blue axis once you placed both ends of it (on the proper ends of the diameter of the inner circle - possibly along either the green or red axis). Start bulging the arc and when you see the blue, dotted line and the tooltip "on blue axis", type 13 and hit Enter.
Let me know when you succeed with this. -
I think I've succeeded. I placed the starting point of the arc on the inncer circle right on the red line (axis) and then set the next point on the same circle a little bit away and then started bulding towards and past the center until I saw blue axis. I then entered 13 as you instructed and this is what I came up with.
-
Nono,
You have this (are the endpoints oof your arc on the endpoints of the same diameter???):
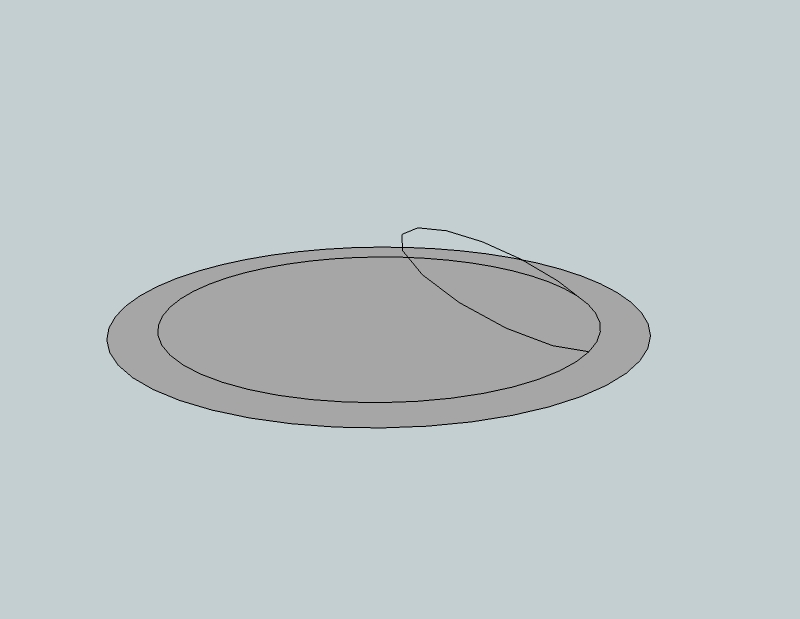
while you should have this: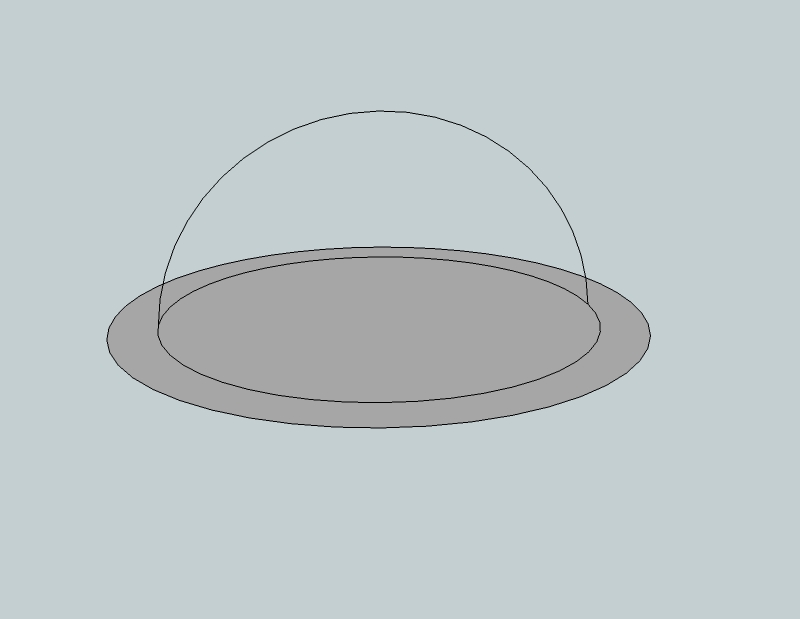
Moreover, you haven't changed the segments of the arc.
You don't necessarily need to - but that's part of today's lesson (we want to end up with a nice piece of cake)!

-
-
SketchUp forms everything from straight lines and flat faces. Smooth, curved edges and surfaces are just a visual effect. Have a look at the picture below. There is a half cylinder "from inside". I exploded the two curves (arcs) so that you can see the endpoints dividing the straight segments of the curve if you turn on endpoints in the Style dialog (Window menu).
You can also see the softened edges (dotted) which bound the facets of such a smooth surface as a cylinder if you turn on hidden geometry (View menu).
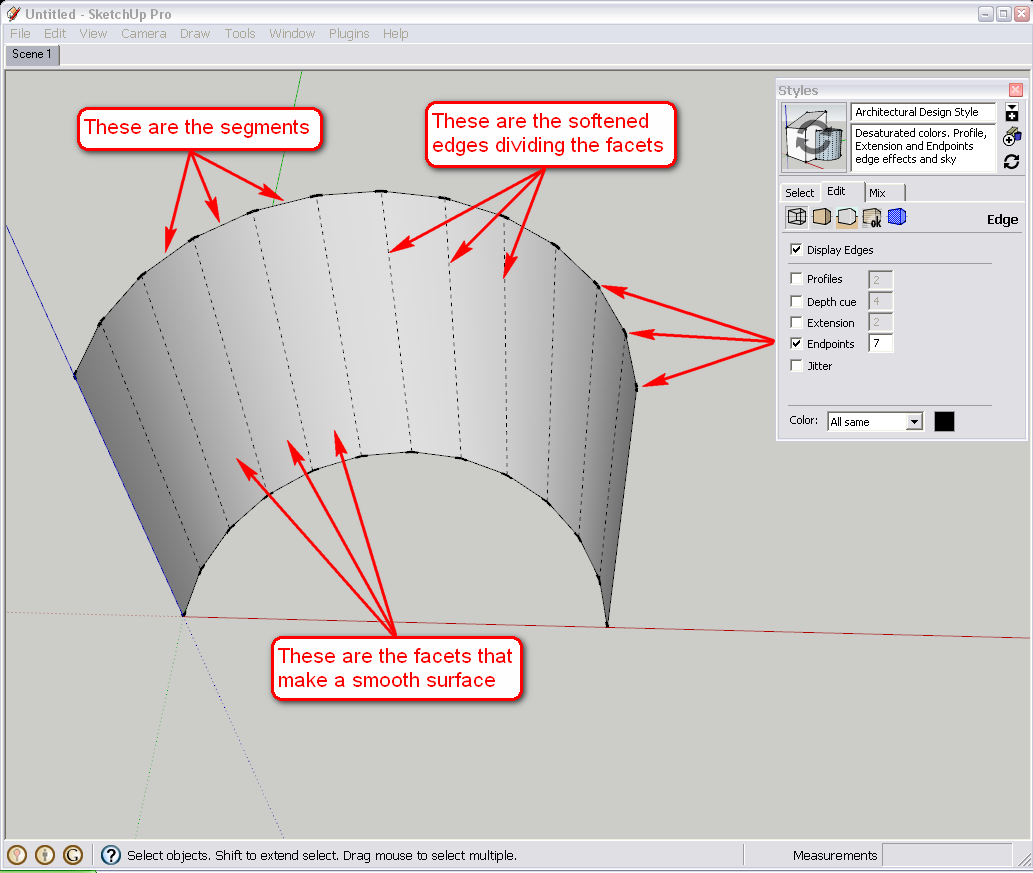
Now it always depends on the purpose how many segments we want to work with. If there is a tree in the background (especially if covered with a coarse bark material), about 6 segments for the trunk will do to keep polygon count low. When there is a fine object like a detailed, technical something you want to display from close, some more segments are always welcome - especially if your model won't eventually be extensive.
Now let's go on with the lesson.
Next step is to define the outer arc that will give us the final thickness of the watermelon (or what we are building). Select the Tape measure tool and from the topmost endpoint of our previous arc, start "measuring" up along the blue axis then type 3 and hit enter. It will leave a guide point there where we can snap our arc next.
If our previous arc were a half circle, we would not need this step as the outer arc would also be a half circle and we get fine inference tooltip for half circles.OR - add the height of our smaller arc (13") plus the thickness of the outer ring (3") and draw your outer arc 16" high according to this in the next step and skip this one (with our easy counting, it is also viable - in other cases construction geometry like guide points can be more handy because complex modelling elements all around).
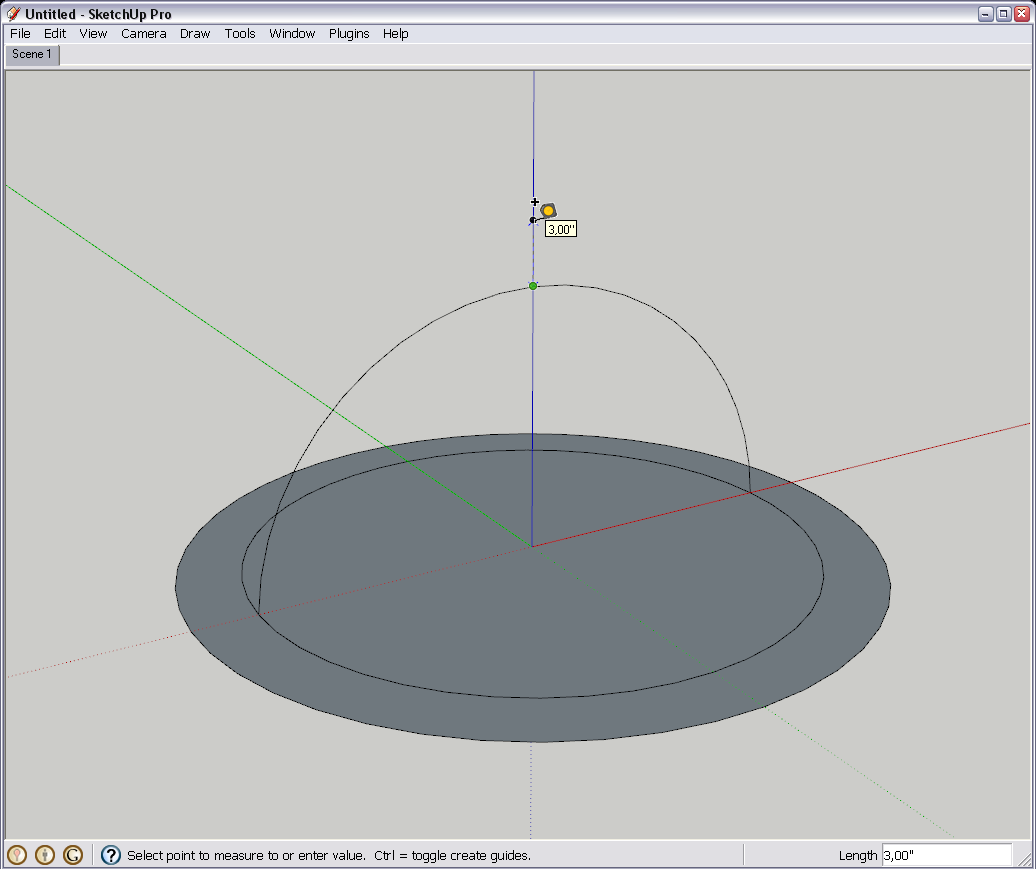
Now draw your outer arc snapping to this guide point: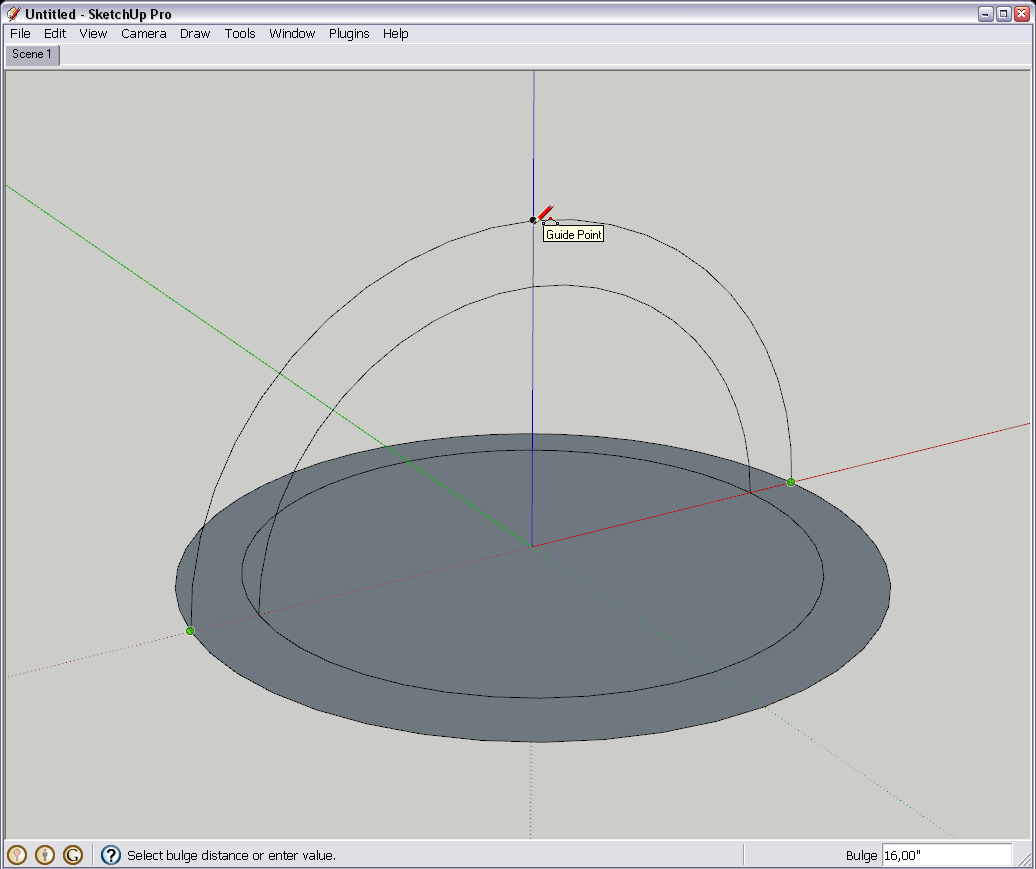
Finally with the line tool, close the face between the two arcs. This face is what we are going to use for the follow me tool in the next step.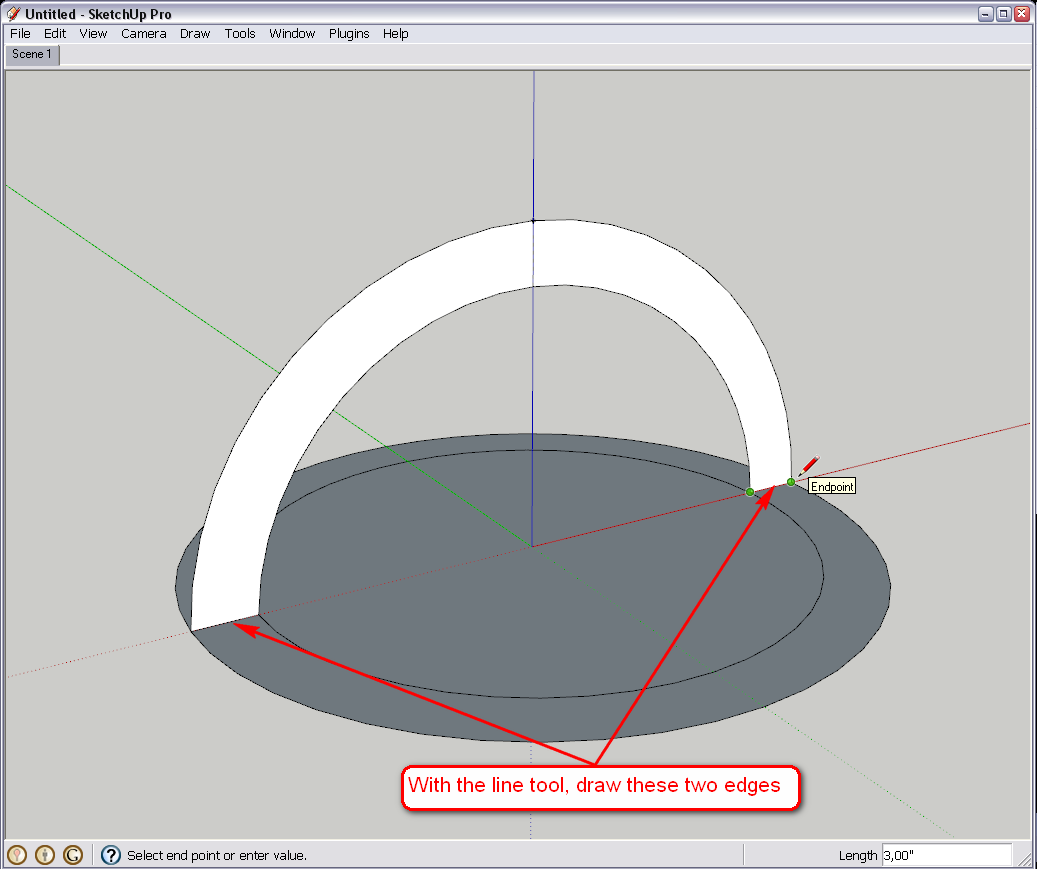
Okay, now I also attach the skippy so that you can check if you did everything fine.
-
Incredible. It's so easy when you see it done and obviously guided from a pro like yourself.
ThanksBefore we continue, there are some modifications. The dome has some additions. The initial thickness of 3 Inches will stay but there is a further 4 Inches that needs to be added but shown as a different colour. Another 1 Inch will be added ontop of the now 7 Inches. I'm still contemplating on adding further to that but I'm sure once I have the know how of how to pile additional inches, I can do the further additions.
Secondly, this dome will be sitting on a platform with its own dimensions. Do you need those dimensions now, or can we leave that for further in the lesson. The platform also comprises of thicknesses which I'd like to show.
Let's continue, Sir.
-
Hm. I don't really understand the modifications again. Where would the further 4 inches go? Adding it to the 3 (so altogether 7) or would there be a dome with double shell? Or adding totally up like below?
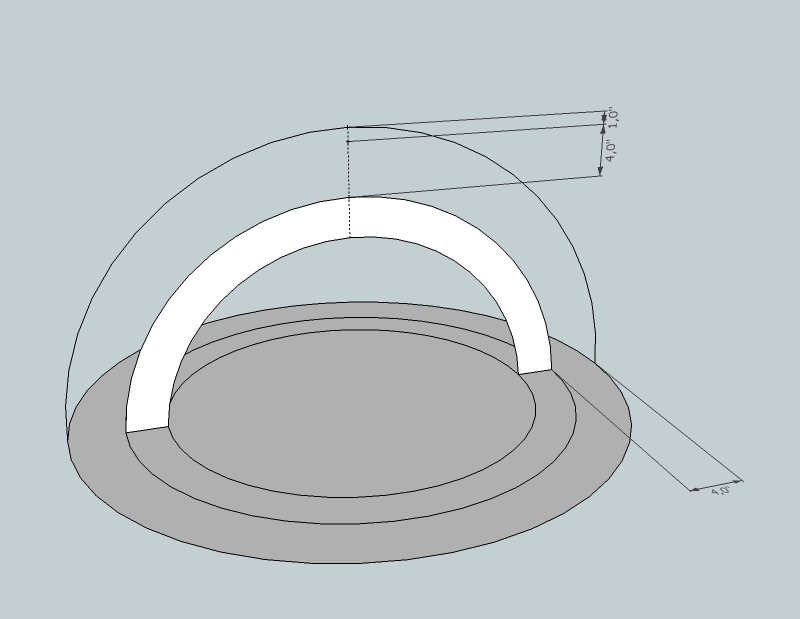
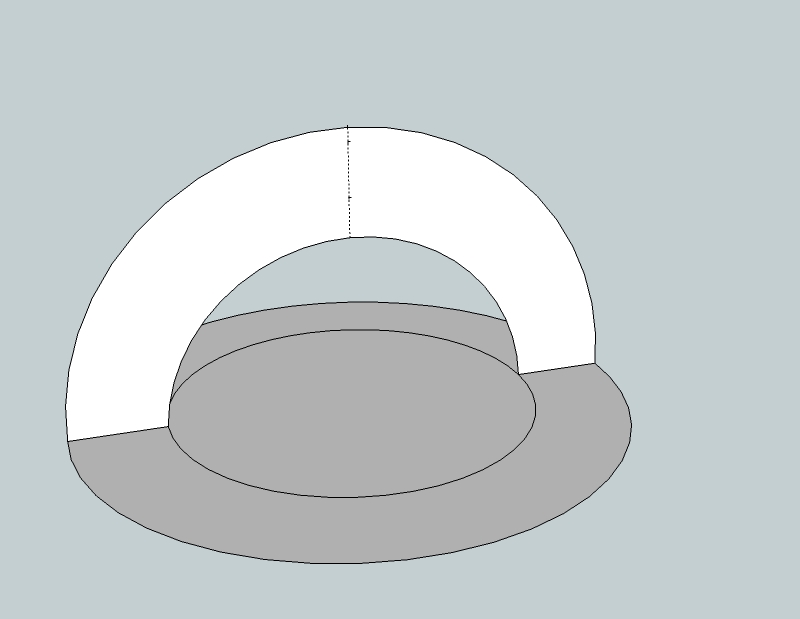
See the state of the two models below.
If this is what you want, the way to modify is almost exactly the same as we have been advancing so far (with the exception that the top arc is now an exact half circle so it is even easier).
-
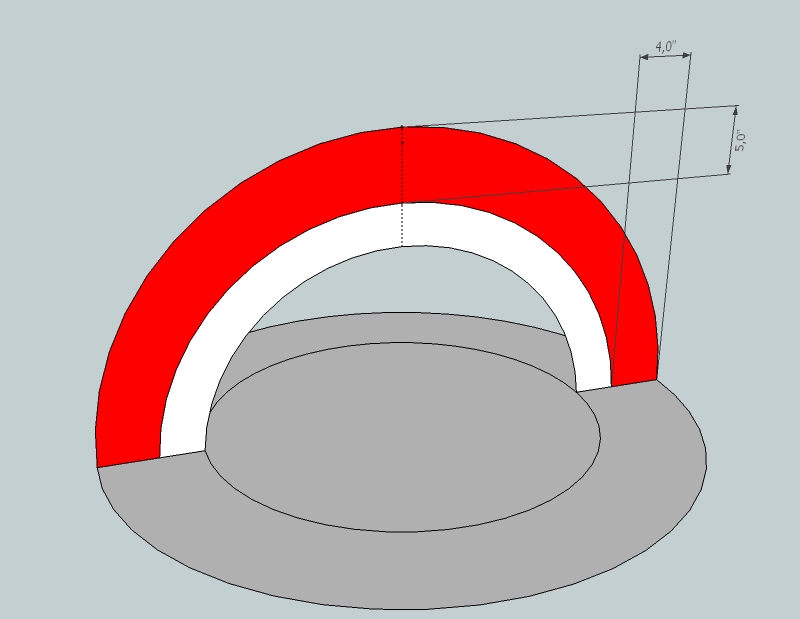
Yes, that is exactly what I want. The 4 inches will be added to the 3 inches. Its all 1 dome at the end of the day.
The file learning2 is correct except that the additional 4 inches should be in red for example so I can mark measurements for each thickness seperately. -
But that's not exactly 4" additionally 'cause we have added an extra inch on top.
-
Hi
Is the extra inch on top unavoidable?
I was wondering also whether the sides of the extra 4" is 4" exactly and only the top has moved to 5 Inches. Maybe to uncomplicate things, we can leave that out. I can manually make a note on the drawing of the 4". It's not imperative that it be there. I just thought I'd put as much detail as possible so theres less room for mistake.
Thanks
-
It can be there - it wouldn't cause any extra work or issue. Just mentioned (and of course, the two arcs of the red stripe are not parallel now but c'est la vie).
Well, in nay case, if you modify the drawing now by adding the extra ring of circle as well as the extra arc (and connect the ends) just like the steps for the previous one, simply do not delete the mid-circle and the inner arc but leave it there so we will make a dome with a double shell.
-
That's Cool
So where do go from here?
-
shhh,,
a very cool "private lesson" dear Gai.. well done.
 Just watch in silence and follow..
(Hi Dome, you could have fallen on a worst professor do you know , may be it would be better to go to the end of the first demand before add some complex further steps...)
simon. -
Have you finished it with the double arches and circles?
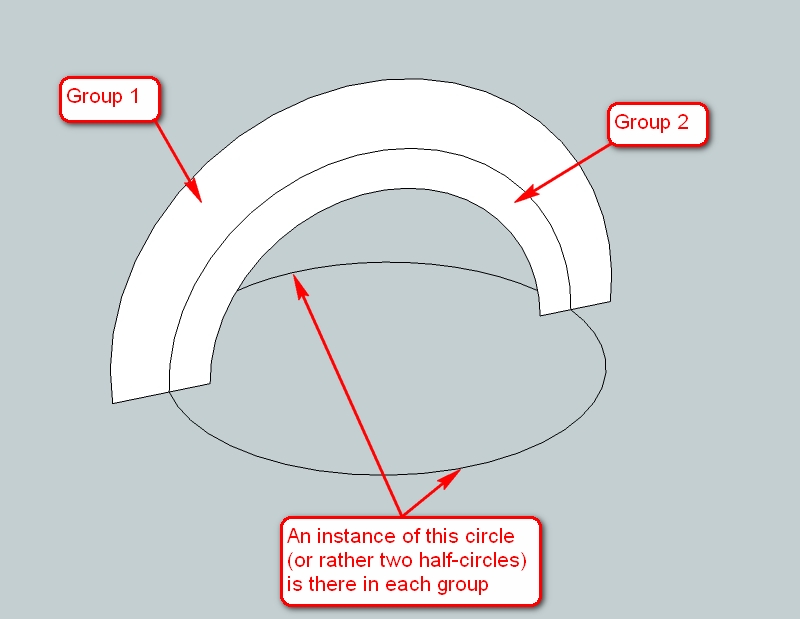
Now as we have quite complex and touching geometry (I don't mean it emotionally but that the two, separate shells of the dome will inevitably touch and affect each other's geometry whatever we do with them), we need to separate the two domes. This goes by grouping.
We will group two sets of a circle and a stripe of arc face together. By double clicking on a face, you select the face AND its bounding edges. When there are more entities to select in a "bunch", keep the Shift key pressed while clicking.
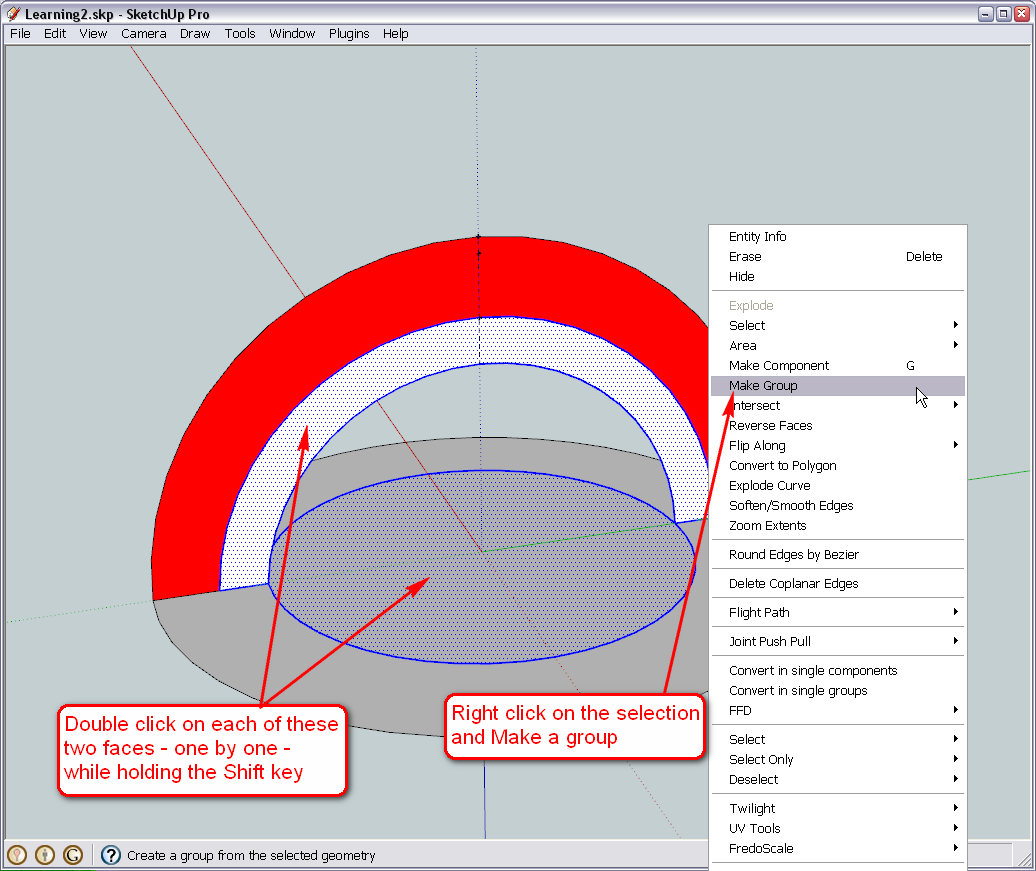
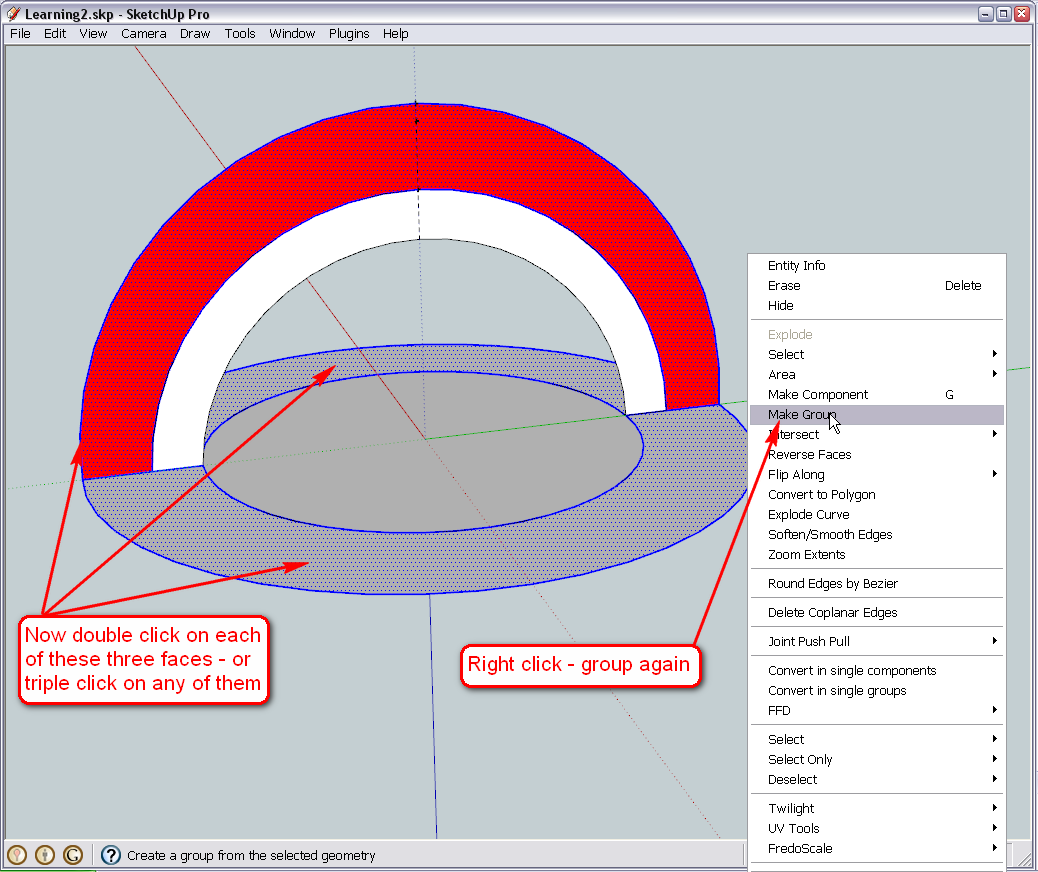
Now the other set - again, Shift key + double click - but we have one more face to select as our ring is divided into two.Another method could be to triple click anywhere - this will select everything that is connected in the same editing context (i.e. not what's in the group any longer - after all that's what grouping is; separating geometry). This is why we could not use triple clicking above - it would have selected everything.
@simon le bon said:
a very cool "private lesson" dear Gai.. well done.

 Just watch in silence and follow..
Asx well as I keep following your extensive and excellent tutorials, Simon!

Cheers;

-
Hi Simon.
I wouldn't ask for a better teacher than Gai. He has certainly impressed me and I'm sure alot of others on this forum.
And again Thanks Gai
-
There is a handful of secondary school students (14-15-y-o) I give some extra tutoring of SU weekly. A lot of fun I have to say.

So where are you at with the grouping?
-
Ok Done.
I hope I've done it correctly. Please check.I am going to be on the road for a few hours, so I will continue a little later.
Let me know what to do next.Thanks
-
Well, some arc segments again

But in fact, the ideal solution is somewhere between yours and mine. I uploaded a new version that is cleaned up and "optimised" for further work.
-
Hi Gai
Sorry for the delayed reply.I've Downloaded the optomised version.
Ready to continue, Sir. -
Hi D0me back.
Okay, it seems that it was not very well optimised (see below) but without a plugin, we cannot do it better anyway.
So let's see - let's deal with the inner dome first. We need to "get inside" the group to be able to work with the geometry. This is called "editing" and you can do it tree ways:
- select the group > go to Edit menu > Group (at the bottom) > Edit.
This is tiresome however. - select the group > right click > edit.
well, somewhat better. - double click - and you are already in - so let's use this
We are going to use the Follow me tool to "lathe" the dome face around the circle. First step is to establish the path we are going to spin (lathe) the face around so select both halves of the circle:
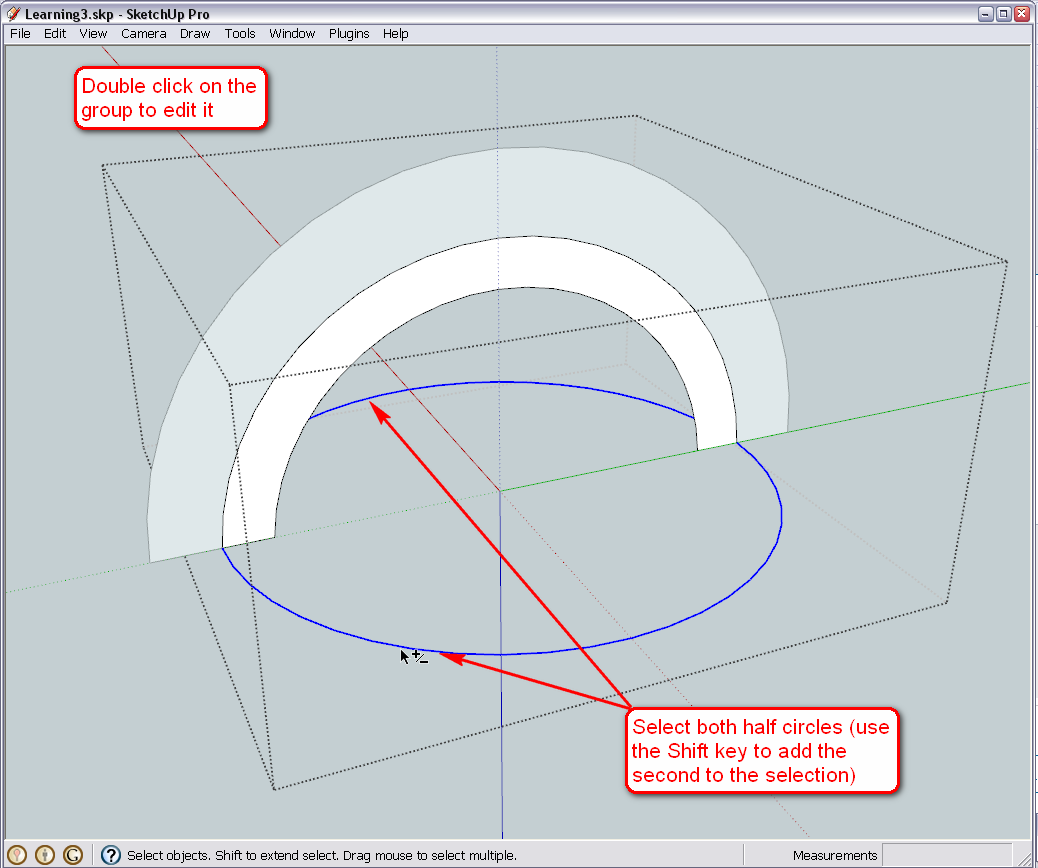
Now select the follow me tool from either the Tool menu or better to activate the Modification toolbar from the View > Toolbars menu and click on the dome face. Don't worry if you see your circle deselected when you pick the Follow me tool - SU will "remember" the path.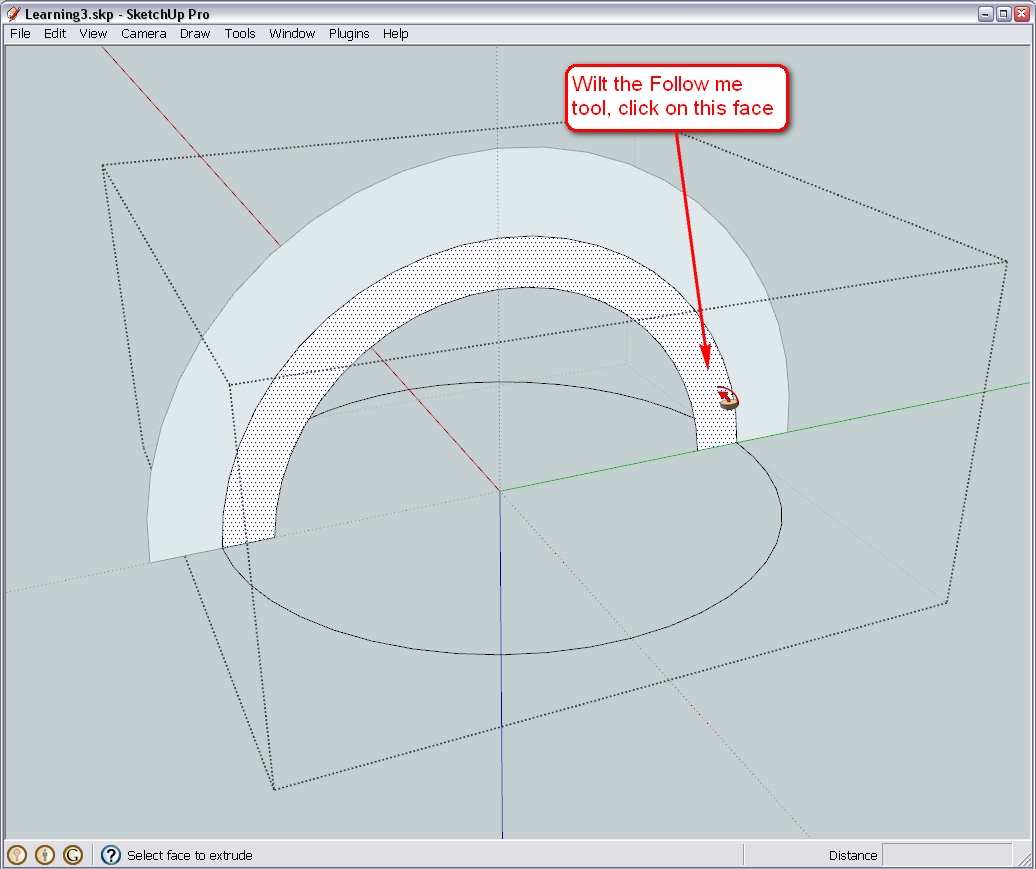
Now this is something you end up with. More often than not, the faces are oriented correctly and the dome is generally smooth - now this is not probably because due to the two arcs meeting, the arc entity was exploded at a point (we could have welded it with a plugin but leave plugins for later).
So first, we reverse all back faces so that we can see only the front faces: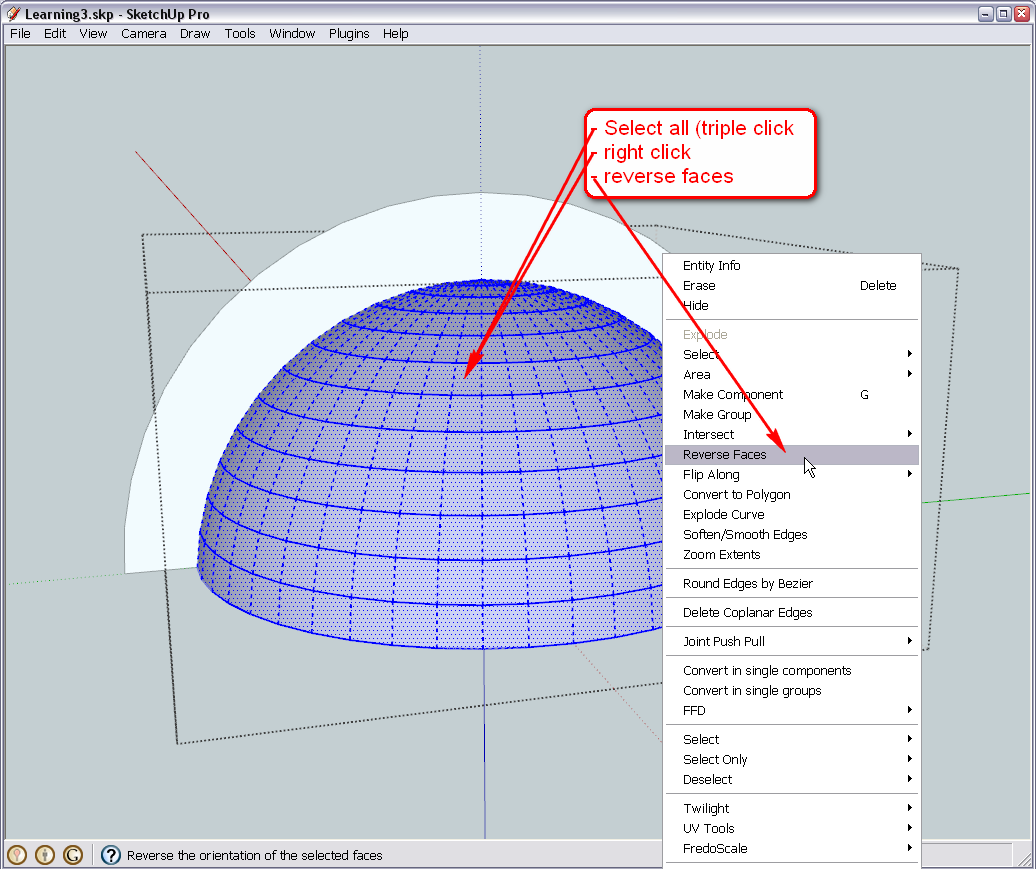
Now let's smooth the dome while it is still selected (if you lose the selection, triple click again).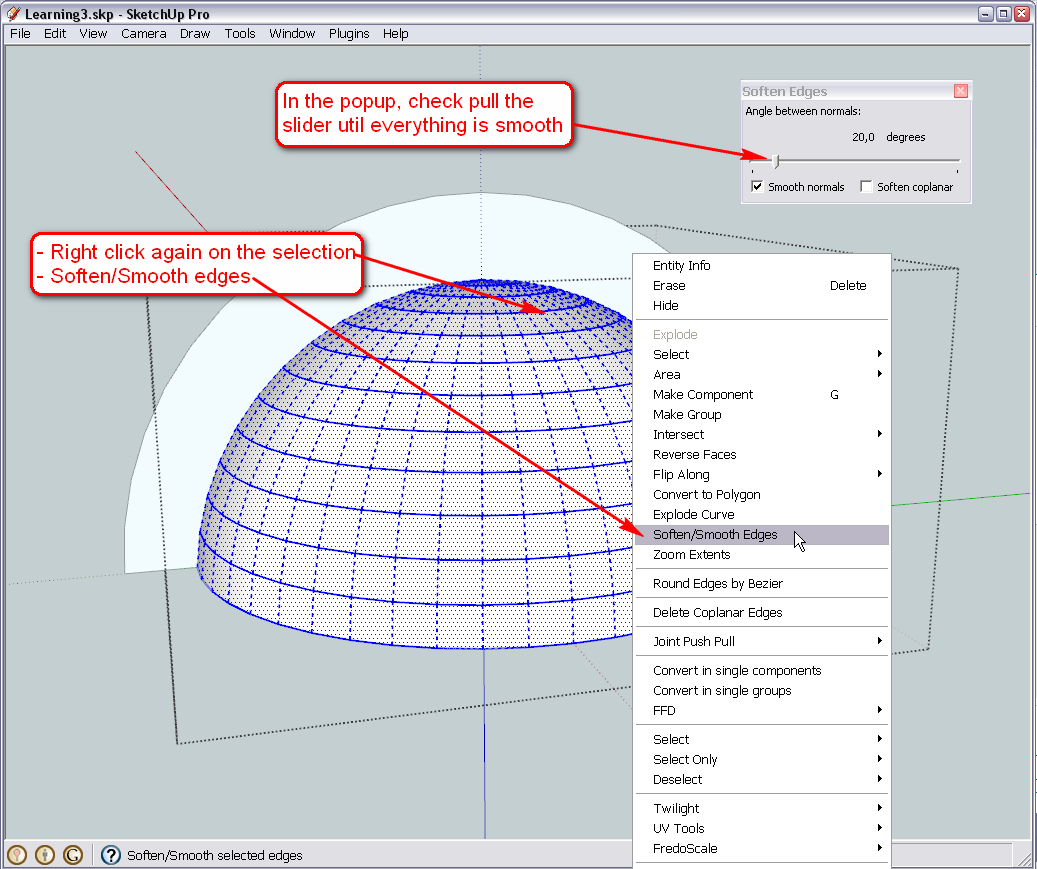
Let me know when you are done - but you can repeat the steps with the outer dome on your own - they are exactly the same (maybe no need for reversing or softening but even better). - select the group > go to Edit menu > Group (at the bottom) > Edit.
Hello! It looks like you're interested in this conversation, but you don't have an account yet.
Getting fed up of having to scroll through the same posts each visit? When you register for an account, you'll always come back to exactly where you were before, and choose to be notified of new replies (either via email, or push notification). You'll also be able to save bookmarks and upvote posts to show your appreciation to other community members.
With your input, this post could be even better 💗
Register LoginAdvertisement


