How do you set up a decent viewpoint for a render
-
Hi Guys - I'm a total newbie to rendering and was inspired by all the amazing images generated here to invest in Twilight and I have also downloaded Kerkythea. I have a model of a new project I am working on with a very small footprint - How do I get a decent view set up to show the complete kitchen whilst still being in the room? I'm not a photographer either so any help on this will need to be in very simple terms!!!
Thanks
-
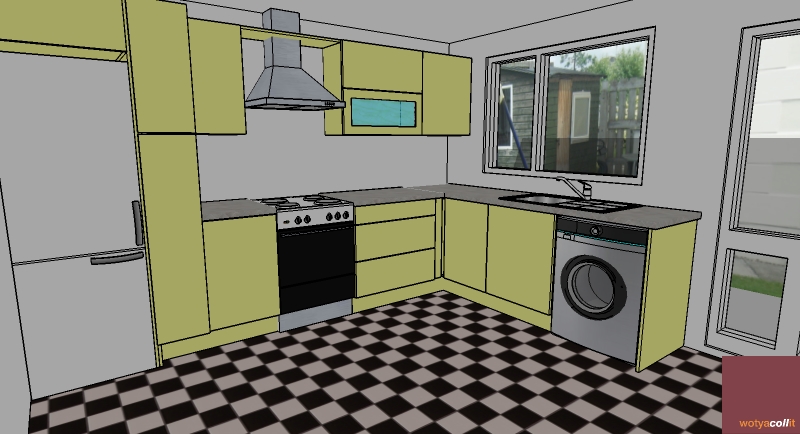
The way I do it with a scene like this is use the Position Camera command and choose a point from above the scene in the corner of the room.
You can then use the Look Around command to get the correct view.
I would play around with FOV. In the attached image and skp, I have set it to 50, but you can use whatever you feel looks best.
Once you have things setup as you need, create a Scene so you can get back to your view anytime.
-
Thanks Dylan
I need to do quite a bit of work to get anywhere. I am slowly going through the tutorials on Twilight and trying to get some decent materials selected so that i can show something resembling a room shot - not looking forward to the c&c too much though LOL!!!
Dermot
-
If you need to look from outside of the room, you can use section planes to see through geometry which would ordinarily block your view.
This lets you place the camera outside the room for a better perspective.

Al Hart

IRender nXt from Render Plus -
Hi Al
Just tried that and light came flooding in via the wall which was removed by the section plane. How do I prevent this from happening?
-
Here is a good place to start.
As for Al's suggestion about using section's, if not a compositional problem, just adjust the sun angle.
-
@dermotcoll said:
Hi Al
Just tried that and light came flooding in via the wall which was removed by the section plane. How do I prevent this from happening?
The section plane idea works better if your renderer can process SketchUp section planes.
Al Hart
IRender nXt from Render Plus -
Thanks Al & honoluludesktop
I am using Twilight and this is my first attempt at a PR render!! When I ran it I got a huge big white square where the model was supposed to be and a picture I inserted in the background was the only thing visible during the render.
Not a great start. I did say I was a newbie and boy am I provong it now!!!
Photographic composition is definitely an area I need to work on Honolulu and I appreciate the heads up on what I should be aiming for here.
I will post the image I get when I pluck up the courage!!
Thanks again
-
my way of doing it, not necessarily THE TRUTH.
if you look at the pictures taken by the best architectural photographers, you will never find converging verticals (unless, of course, the viewer is in front of a tall building looking up).
how to get that in a scene or render: make your viewer look to a point the same height as his eyes so that the eye beam is parallel to the ground. to make sure this happens i put a vertical edge where the viewer should be and another where he is looking at (chris fulmer's vertical line maker is very handy at that), then with camera position selected i click on the first stick, keep my finger on the mouse and drag it to the second one.
if you put all your camera positions in a layer, you can always go back to them.
-
@honoluludesktop said:
Here is a good place to start.
This was good to read - and to remind myself that composition is not just looking at the SketchUp images and choosing the best one.
However, I noticed that the author of this article had almost no interiors. It is often easier to position people in nature (except for some chopping or merging problems he mentions), then to find a good position for an interior. (Because the people contrast to the rest of nature - so it is often obvious was the focus is and what the background is. In a Kitchen, it is not always obvious what we are trying to highlight)
SketchUp tends to make us lazy, because it moves both the eye and the target point as we adjust the image. I was tempted to write a second orbit tool for SketchUp which just moved to eye, or the target point, but not both, so we could see some other perspectives easier.
Al Hart
IRender nXt from Render Plus -
@edson said:
if you look at the pictures taken by the best architectural photographers, you will never find converging verticals (unless, of course, the viewer is in front of a tall building looking up).
(In camera class we learn how they used to use a special camera to keep the lines vertical even when photographing a building from the ground)

We were discussing this earlier today. Next weeks Rendering Tip will about using more 2 pt perspectives to keep those vertical line vertical. (As long as the camera and eye have the same height, they stay vertical, but sometimes you want to look up or look down and not have the vertical lines converge.)

(Here we are looking down on the framing, but keeping the lines vertical)
Al Hart
IRender nXt from Render Plus -
This is what I got after my first attempt and I've shown the view I set up for render - I have absolutely no idea what went wrong - help!!!!


-
To me it likes like either your camera is stuck inside a wall, try to move it forward a little, or if the renderer you're using has camera controls, your zoom is set to high and you're getting a closeup of the oppisite wall.
Mike
-
Thanks for the comments alpro. The view I am trying to render is shown in the attached picture and the output was as you can see - a green rectangular square of nothingness. I know my models are very basic but I thought i could get some sort of decent output after spending time trying to get the materials set up in Twilight. Is there someone out there who has a step by step guide to rendering a simple interior shot that I can follow?
-
@dermotcoll said:
This is what I got after my first attempt and I've shown the view I set up for render - I have absolutely no idea what went wrong - help!!!!
Click Zoom Out in SketchUp and render again.
If what you see in the rendering is a wall, surrounded by the background, then you renderer may not support section planes.
Al Hart
IRender nXt from Render Plus -
Dermotcoll, Not working with Twilight so can't help you there, and I don't think you understand alpo's comment. Hide the wall faces on a off layer, or move the camera (that makes the view). It looks like you placed the camera inside a wall.
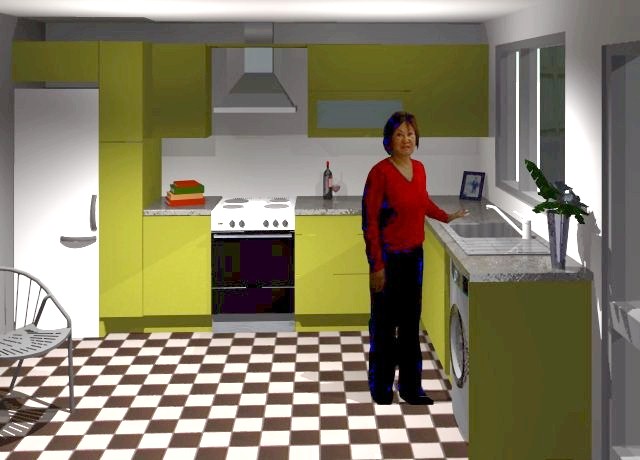
Here is something that took about 45 minuets to do. The render needs a lot more work, but its a start. You got to have a good model to begin with. See the diagonal line with the chair, sun light and figure, the rule of thirds, the triangle with the vase, the asymmetrical composition, (like the photo tut. suggest?), etc. Because your floor is a photo image, it will not render much.
I use some lights (this is a interior render), several objects, reflected and bumped some surfaces, Another hour or two would make it for me. Of course there are others who could do much better in that time:-)
-
Hi Honolulu and Al,
The view i have set up is shown in the above post - there is no wall!! My question is this - why does the renderer not render the view you see in SU?
I have tried others and they are showing wide angled views of the whole model - it is very frustrating - my screen can consider itself very lucky it hasnt got my shoe through it 10 times tonght!!!!
I am really showing my lack of experience here and I know I have to crawl before I walk but boy is it frustrating. IS there a really dumb user help desk I can seek advice from as you guys are really at a much higher level than me?
-
Hmm......, Can you upload the model exactly with the scene that fails, The original model had no ceiling, and presents a view looking down. I no longer have the model I rendered, otherwise I would upload it to you.
-
Hi Honolulu
I have binned it! I am going to start from first principles again and remodel the building so that I can layer the walls etc. I need to try and accept my limits at the minute and get good models produced first and then work towards decent renders.
I appreciate all the community efforts to help but I must "pull my horns" in as they say here and calm down and work slowly to ensure I understand all aspects of this brilliant design medium.
-
have you checked out the Twilight forum? there are some excellent tips and discussions over there and if you post your problems they can advise you or find out if its a bug or not. may be helpful for you and them.

Hello! It looks like you're interested in this conversation, but you don't have an account yet.
Getting fed up of having to scroll through the same posts each visit? When you register for an account, you'll always come back to exactly where you were before, and choose to be notified of new replies (either via email, or push notification). You'll also be able to save bookmarks and upvote posts to show your appreciation to other community members.
With your input, this post could be even better 💗
Register Login


Advertisement