sketchucation logo sketchucation
    • Login
    โ„น๏ธ Licensed Extensions | FredoBatch, ElevationProfile, FredoSketch, LayOps, MatSim and Pic2Shape will require license from Sept 1st More Info

    Apples ( play whit UV ruby

    Scheduled Pinned Locked Moved Gallery
    34 Posts 14 Posters 3.9k Views 14 Watching
    Loading More Posts
    • Oldest to Newest
    • Newest to Oldest
    • Most Votes
    Reply
    • Reply as topic
    Log in to reply
    This topic has been deleted. Only users with topic management privileges can see it.
    • majidM Offline
      majid
      last edited by

      thank u all for your kind words , ... also i used other maps for shinness and bump map in kt , and sorry for not to sharing them .... but I hope the tutorial can help u to make your own textures...
      majid

      My inspiring A, B, Sketches book: https://sketchucation.com/shop/books/intermediate/2612-alphabet-inspired-sketches--inspiring-drills-for-architects--3d-artists-and-designers-

      1 Reply Last reply Reply Quote 0
      • T Offline
        Teezer
        last edited by

        @unknownuser said:

        i did some more renders , and think one of them is better ....

        I love the first one. The out-of-focus foreground gives it a seriously close-up feel, and the lighting on the dented apple in the back is perfect. ๐Ÿ‘

        This image belongs on one of those "you won't believe it's not a photograph" postings that pop up on DIGG every now and then... ๐Ÿ’š

        Real life is just another website, albeit a rather boring one.

        1 Reply Last reply Reply Quote 0
        • MALAISEM Offline
          MALAISE
          last edited by

          Thank you Majid for sharing your know-how. Very close to reality theses apples. How long did you work on such a drawing ? It's near perfect ๐Ÿ‘ ๐Ÿ‘

          MALAISE

          La Connaissance n'a de valeur que partagรฉe

          1 Reply Last reply Reply Quote 0
          • majidM Offline
            majid
            last edited by

            @malaise said:

            Thank you Majid for sharing your know-how. Very close to reality theses apples. How long did you work on such a drawing ? It's near perfect ๐Ÿ‘ ๐Ÿ‘

            MALAISE

            sorry for so late answer ... First i take a foto using my cellphone and about 2 days later i started the modeling and texturing .. it tooke me about half day , and 2 or 3 hours for rendering ( to finde a true material setting + lights - also i made a HDRI file as background_).
            cheerss majid

            My inspiring A, B, Sketches book: https://sketchucation.com/shop/books/intermediate/2612-alphabet-inspired-sketches--inspiring-drills-for-architects--3d-artists-and-designers-

            1 Reply Last reply Reply Quote 0
            • romboutR Offline
              rombout
              last edited by

              @majid said:

              hi all ,i did a try whit uv ruby to texture these apples ,what a usefull ruby , hope to be improved soon . cheers

              http://i34.tinypic.com/2rnhmz7.jpg

              http://i37.tinypic.com/9zqbk3.jpg

              http://i33.tinypic.com/xel6vc.jpg

              http://i34.tinypic.com/2rnhmz7.jpg
              http://i37.tinypic.com/9zqbk3.jpg
              http://i33.tinypic.com/xel6vc.jpg
              cheers majid

              wow this is great. i also understand the mapping in photoshop.... but how did you map it correct in SU, im missing that part

              1 Reply Last reply Reply Quote 0
              • Z Offline
                zumo
                last edited by

                well done these are the most realistic thing I have seen on sketch up to date!

                1 Reply Last reply Reply Quote 0
                • FrederikF Offline
                  Frederik
                  last edited by

                  @rombout said:

                  .... but how did you map it correct in SU, im missing that part

                  You should take a closer look at the [Plugin] UVTools v0.1 thread... ๐Ÿ˜‰

                  Cheers
                  Kim Frederik

                  1 Reply Last reply Reply Quote 0
                  • romboutR Offline
                    rombout
                    last edited by

                    oke... but how do you apply it to a mesh. cause the top and the side of the apple is at a different place. how do you place it on your mesh

                    1 Reply Last reply Reply Quote 0
                    • romboutR Offline
                      rombout
                      last edited by

                      i understand the wrapping but how does the "top" of the apple wrap at the the top of the mesh. If you open the map in PS you'll see a image skin in width and the top of the apple somewhere at the left

                      1 Reply Last reply Reply Quote 0
                      • majidM Offline
                        majid
                        last edited by

                        @rombout said:

                        i understand the wrapping but how does the "top" of the apple wrap at the the top of the mesh. If you open the map in PS you'll see a image skin in width and the top of the apple somewhere at the left

                        It is all about good texturing . I've made a mini tutorial and shared it at previos page . it's name is "MIZ2" . please take a closer look at it. i guess it'd help you

                        My inspiring A, B, Sketches book: https://sketchucation.com/shop/books/intermediate/2612-alphabet-inspired-sketches--inspiring-drills-for-architects--3d-artists-and-designers-

                        1 Reply Last reply Reply Quote 0
                        • romboutR Offline
                          rombout
                          last edited by

                          @majid said:

                          @rombout said:

                          i understand the wrapping but how does the "top" of the apple wrap at the the top of the mesh. If you open the map in PS you'll see a image skin in width and the top of the apple somewhere at the left

                          It is all about good texturing . I've made a mini tutorial and shared it at previos page . it's name is "MIZ2" . please take a closer look at it. i guess it'd help you

                          oke oke oke...
                          you dont get it.... atleast i dont get it... i understand everytihing about making a map and so... but if you have your mesh and you apply your map. How do you get the top of the apple at the correct place and the side at the side. You need to apply a map to the mesh unwrap this with a different application and than put your mapping to that unwrapped image. but this is not written in the tut

                          1 Reply Last reply Reply Quote 0
                          • majidM Offline
                            majid
                            last edited by

                            UVTool v1.0 is very simlpe . it doesnt unwrap , but simply it adds 2 new commands to your right-click menu that lets you to have "spherical" or "cilinderical" mapping to your mesh, it desn't undersyand which mesh you have selected, but remaps it as a sphere or a cilinder. it desnt separate mesh parts

                            My inspiring A, B, Sketches book: https://sketchucation.com/shop/books/intermediate/2612-alphabet-inspired-sketches--inspiring-drills-for-architects--3d-artists-and-designers-

                            1 Reply Last reply Reply Quote 0
                            • romboutR Offline
                              rombout
                              last edited by

                              oke i think i need to explain it better. you had your apple mesh how did the map got applied so perfect to the apple.
                              cause if copy the apple delete the map and remap it within SU. Than how do you place the map perfect around the apple so the top is at the top and the bottom at the bottom. I understand the plugin. I want to know how apply the image perfect to your mesh.

                              1 Reply Last reply Reply Quote 0
                              • J Offline
                                Jackson
                                last edited by

                                Rombout,

                                Make a vertical grouped plane next to the apple which is exactly the same height (a simple method is to pushpull a grouped box so that it is fits around the apple, then move it to one side). Import your image, scale it to the same height as the plane, explode it and then apply the map using UVTool. The same principle applies for applying an exact sized texture to any geometry.

                                Jackson

                                1 Reply Last reply Reply Quote 0
                                • romboutR Offline
                                  rombout
                                  last edited by

                                  @jackson said:

                                  Rombout,

                                  Make a vertical grouped plane next to the apple which is exactly the same height (a simple method is to pushpull a grouped box so that it is fits around the apple, then move it to one side). Import your image, scale it to the same height as the plane, explode it and then apply the map using UVTool. The same principle applies for applying an exact sized texture to any geometry.

                                  great jackson,
                                  thank you very much. that was what i meant. I thought i saw a different map of the apple in here. where it has a separate top and bottom view. This mapping trick is real handy. ๐Ÿ˜

                                  1 Reply Last reply Reply Quote 0
                                  • FrederikF Offline
                                    Frederik
                                    last edited by

                                    Rombout,

                                    If you had only taken some time to read some of the postings made in the [Plugin] UVTools v0.1 thread, I'm sure you would have figured things out... ๐Ÿ˜‰

                                    Cheers
                                    Kim Frederik

                                    1 Reply Last reply Reply Quote 0
                                    • romboutR Offline
                                      rombout
                                      last edited by

                                      hahahaha.. sorry! my BAD, just a graphic designer in a hurry ๐Ÿ˜‰

                                      1 Reply Last reply Reply Quote 0
                                      • J Offline
                                        Jackson
                                        last edited by

                                        rombout,

                                        It works for the apple just the same as it does for a sphere. Sadly I tested the cylindrical UV wrap and it doesn't work for bananas!
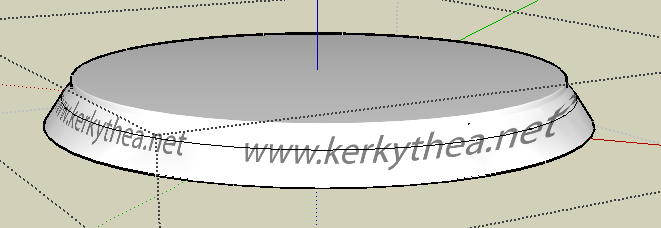
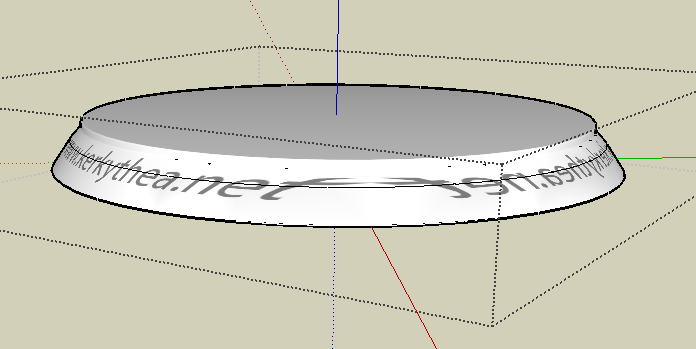
 ๐Ÿ˜ž ๐Ÿ˜†

                                        Jackson

                                        1 Reply Last reply Reply Quote 0
                                        • romboutR Offline
                                          rombout
                                          last edited by

                                          me again,
                                          is there a way to get this text mapped nice around this object. Ive tried to tilted the text. making it in a circle. I thought i needed to tilt the text a bit so it matches the angel of the border. That didnt worked out properly


                                          Afbeelding 21.png


                                          Afbeelding 22.png

                                          1 Reply Last reply Reply Quote 0
                                          • majidM Offline
                                            majid
                                            last edited by

                                            dear rombout, you have projected the texture, but if you install uvtool you can do a right-click over the same material and the adjust is as cilynderical textureing. maybe then you need to adjust material size using material editor.

                                            My inspiring A, B, Sketches book: https://sketchucation.com/shop/books/intermediate/2612-alphabet-inspired-sketches--inspiring-drills-for-architects--3d-artists-and-designers-

                                            1 Reply Last reply Reply Quote 0
                                            • 1
                                            • 2
                                            • 2 / 2
                                            • First post
                                              Last post
                                            Buy SketchPlus
                                            Buy SUbD
                                            Buy WrapR
                                            Buy eBook
                                            Buy Modelur
                                            Buy Vertex Tools
                                            Buy SketchCuisine
                                            Buy FormFonts

                                            Advertisement