sketchucation logo sketchucation
    • Login
    1. Home
    2. Duncan MacLeod
    3. Posts
    ℹ️ Licensed Extensions | FredoBatch, ElevationProfile, FredoSketch, LayOps, MatSim and Pic2Shape will require license from Sept 1st More Info
    D
    Offline
    • Profile
    • Following 0
    • Followers 0
    • Topics 1
    • Posts 12
    • Groups 1

    Posts

    Recent Best Controversial
    • RE: Construction Technique Pointers Request

      @dave r said:

      I've read through your list and looked at your latest version of the model. I think I have some ideas for you for the list and I'll write them down as soon as I can.

      Cool. Take your time.

      @dave r said:

      Since you've removed the materials from most of the model, you could delete at least the MDF texture to reduce the file size. Then you could post it here if you wish.

      SketchUp told me it was still in use, but I couldn't see where. No matter. I deleted it anyway - huge difference! That's a pretty big texture file, no wonder my puny little laptop was chugging! LOL!

      @dave r said:

      What format do you intend to use for the plans for this thing?

      How do you mean? Like PDF file format, or do you mean like A3, or ArchD, etc.? I was going to output to PDF in a hybrid magazine article/shop drawing kinda thing, if that makes sense.

      Basically a letter size portrait layout for the "Article" portion (the assembly procedure), with an "Appendix" of shop drawings, also letter sized but landscape oriented, if they are needed. Just so the average Joe can print the plans out on a regular desktop printer.

      If you've got other ideas, I'm all ears - this is my first time, so I'm just wingin' it!

      Workflow:
      SketchUp->LayOut->PDF->(maybe)InDesign, if it needs a polish.

      Thanks for looking
      -Duncan

      posted in Woodworking
      D
      Duncan MacLeod
    • RE: Construction Technique Pointers Request

      Doh!

      Sic semper fatuus. πŸ˜•

      posted in Woodworking
      D
      Duncan MacLeod
    • RE: Construction Technique Pointers Request

      I'm afraid I don't know who Mr. Wilkes is, so no, I have not.

      posted in Woodworking
      D
      Duncan MacLeod
    • RE: Construction Technique Pointers Request

      Hi Dave,

      Check your PM for the assembly list and a link to the latest iteration of the booth model - it was slightly too big to attach to a PM.

      Heh, yeah. I thought about the staggering of the fasteners just as I was posting. I'll fix that in edit. πŸ˜„

      Thanks for the clarification on the bracing. I figured that was the way to do it, but I just wanted to be sure. By the way, do you foresee any problems with screwing so close to the edge of the MDF?

      It took me so long to get back here because I had a bear of a time trying to figure out the best way to mount the blower, but still make it accessible for repair in case the blower needs to be replaced or something.

      I ended up going with a sort of slide out panel in the bottom of the booth. Lay the booth on it's back, slide out the blower mount, replace the blower, slide the mount back in, stand the unit back up, and you're all set - no disassembly required.

      I had to rack my brain for that one. Hopefully it works the way I envision it.

      Thanks again for the help.
      -Duncan

      posted in Woodworking
      D
      Duncan MacLeod
    • RE: Construction Technique Pointers Request

      @dave r said:

      http://farm5.static.flickr.com/4089/5003771969_16f7eb519c.jpg

      Sorry, Dave, one more question that I forgot to ask the other day; Am I to assemble the corner joints as you have described here, screwing the face to edge, and then (I'm assuming) glue the corner bracing into the inner corner?

      Or should I be screwing into the bracing as shown here:

      corner_assembly.jpg
      Sorry for the noob question, but this is unknown territory to me. Also, I've worked out a rudimentary construction/assembly procedure, if you have some spare time, would you care to critique?

      posted in Woodworking
      D
      Duncan MacLeod
    • RE: Construction Technique Pointers Request

      Cool, thanks for that dedmin.

      Progress pics soon.

      posted in Woodworking
      D
      Duncan MacLeod
    • RE: Construction Technique Pointers Request

      @dave r said:

      Sorry to be vague on the rise/run bit...

      Sorry? Don't be. I can be pretty slow sometimes. I totally understand what you are talking about now, I had just never heard it called "rise and run" - I must have missed that name while watching "This Old House." (I never miss an episode)

      re: screws; Flat head wood screws with pre-drilled and countersunk holes. Check. I know the hazards of using things like drywall screws for something like this. Don't ask me how I know.

      Also, regarding the plexi pieces; I'm thinking of just replacing the top piece with wood, and only using the plexi for the front, so the end user can better see into the booth.

      Just FYI, for anyone who cares: that front piece actually serves an important purpose in the design: it helps to channel the air flow more efficiently down into the bottom of the booth. Without it, the air may eddy at the top of the booth, disrupting airflow and making the blower fan less efficient.

      Thanks for sharing the updated model, that'll save me a lot of time. Right now I've got to crash, but I will pick up work on this tomorrow. I'll post my progress as I get it.

      See you then.

      posted in Woodworking
      D
      Duncan MacLeod
    • RE: Construction Technique Pointers Request

      LOL I'm gettin' there! I work a little slower than you guys do. Plus I got sidetracked by research into fasteners, so your "doodle" is quite timely, and quite demonstrative, too. I understood what you meant, but that confirms my assumptions. Thanks.

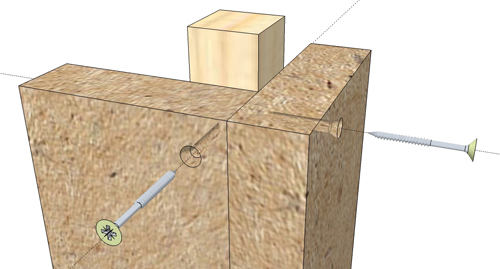
      I'm wondering if you can help clear up a question I have, speaking of fasteners; I have read conflicting opinions about what type of fastener to use with MDF - there seems to be two (or more) schools of thought, with one camp saying "don't use wood screws, use Confirmat screws," and others saying "use drywall screws."

      I know that drywall screws don't have the 'shear' strength, but would be the cheaper route to go, and I've read all over that guys say they are plenty strong for smaller projects. I have also read that the only proper way to secure MDF is to use the Confirmat bit and screws. What would you recommend for a 'cabinet' of this size? Also, won't I be screwing into the bracing? I thought I was trying to avoid screwing into the end grain like that. Or am I confused (It's possible πŸ˜‰ )?

      I know you guys will chastise me, but for my own personal build of this booth, I'm going to use 3/4" ply, as I have a bunch on hand, and can't justify (to myself, or the 'finance dept.' [read 'old lady']) the cost, no matter how small, of getting a sheet of MDF just for this.

      I will however be producing the plans with the recommendation of MDF, so I'm not discounting what you guys are telling me, it's just that I wanted to use up the ply, and settled on this in order to do so. So I'll proceed as if I were building with MDF, in order to be accurate, but just be aware that I, personally, will be subbing plywood.

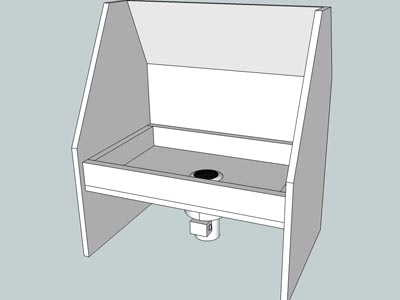
      Regarding the overall design, there were just a couple of more things that I needed to work out, like adding some bracing below the booth bottom, as the blower motor will be hanging from it, and those motors aren't exactly light. So I wanted to make sure the bottom is secured strongly enough.

      I'm also struggling with how to fasten the blower to the bottom of the booth. As it stands, the blower motor has two small sheet metal screws holding on the little circular screen, and I thought at first of just using longer screws to go through the booth bottom, through the spacer block, and into the housing.

      But that seems a bit too flimsy to me, so I was thinking of some small diameter bolts instead, recess drilling the seat for the bolt head. I'd like to put the bolts in with the head side in the housing (and the nut in the recess in the booth bottom, but I don't think I can get them in that way, as the squirrel fan is in the way. Did I explain that clearly enough?

      And also perhaps adding two more bolts for added stability. When the blower starts, it wants to twist, so I think I may need to strengthen it. Thoughts?

      I put in the pole sockets and dowel as well - perfect. What a great idea! Thanks for that.

      Ok, that's it for now. But I'll be plugging away at this tonight, so progress soon. And be patient with me - I'm a slowpoke. πŸ˜›

      posted in Woodworking
      D
      Duncan MacLeod
    • RE: Construction Technique Pointers Request

      Oh, wow Dave. That really looks sharp! The textures really helped to bring it to life. Thanks for all of your interest, too. I'm happy that this project has piqued your interest like it did mine. I found that the commercial booths were out of the range of most hobbyists (including myself), and all the available DIY plans left a lot to be desired. So, I did some research, and voilΓ , here I am.

      And no, I don't mind the modifications one bit; you and the rest of the folks here know infinitely more about cabinet making than I do. I just wish I was a better woodworker, so I wouldn't have to go back and re-do things. The help is most welcome.

      re: corner blocks; I follow. I thought you meant all the way up the seam of the back of the booth. I understand now. I may try to figure out a way to reinforce the upper, angled backsplash though. I think that may be the weak point in the booth, as it's just kind of free floating with only a few screws. I'll work on it.

      re: components; Oh, duh. I should have caught that one on my own. I will remedy that.

      @dave r said:

      Instead of using specific angles I adjusted things slightly to use rise and run. That would make it easier to layout the cuts because it can be done with a ruler or tape measure instead of a protractor.

      I had to look up "rise and run," and understand the general concept of usage (e.g. staircases), but could you expand on what you mean a little for me? [noob alert] I'm not sure what you did, and anything that makes construction simpler is a must have. πŸ˜‰

      The hangar from the gable ends is a great idea. I'll put that in here at some point, as well as a clip to hold the airbrush. Also, I had read somewhere (I can't remember where ATM) that an overhead light, like the fluorescent in the model, can cast unwanted shadows, and a light source from the front (like a clip light) is ideal. Any thoughts on that?

      Again, beautiful work. I hate to ask, but is there any way you could share the improved model? The suggested modifications may take me a while to figure out. That is, if you don't mind "collaborating," of course. I don't wish to take credit for your work.

      Thank you so much for taking the time for me. I have learned a ton already, and I agree that others will benefit from the effort.

      posted in Woodworking
      D
      Duncan MacLeod
    • RE: Construction Technique Pointers Request

      @dave r said:

      Hi Duncan,

      Hi.

      @dave r said:

      I would probably build it with some blocking inside the corners to add some strength. The blocking could be simple 3/4" square stock of 1x2 (3/4" by 1-1/2"). If you build it with the ends over lapping as shown on the front, glue and screw the blocking flush to the ends of front and back panels. then glue and screw the ends into the blocking. This will be much stronger than screwing into the edge of the plywood. Chamfer the exposed edges of the blocking above the screen.

      Something like this? Or should it be more like the one not being pointed to?

      blocking.jpg
      The flush one (not being pointed to) might be tough to do on the upper, angled area. But again, it might just be me. The bottom of the booth might be a bit more stable, though, as the filter shelf and booth bottom will help stabilize the structure, right?

      front_removed.jpg

      @dave r said:

      I do agree with Jeff that MDF would be a better choice for the sheet goods.

      Ok, ok. I get it. πŸ˜„

      @dave r said:

      ...it would make the neatest joint if you miter both edges splitting the angle. That way there won't be an overhanging lip. Considering the angle, though....I would be inclined to just leave the edges square pretty much as you drawn them. If the box is to get painted, the gap could be filled with Bondo or something.

      Ok, I changed the rear of the booth placing the panels inside of the gable ends, and got the below results. Comments?

      miter_gap.jpg

      @dave r said:

      ...I would use components instead of groups to make editing easier and less work, later and to make the model more efficient. When you make the pieces components, change the axes on the upper backsplash and the angled Plexiglass piece so they will report correctly if you make a cutlist. It looks like you could move the angled back piece (Backsplash) so it fits against the ends better. My preference is to draw models so they sit on the ground plane (red/green plane)so it I want to use shadows, the shadows fall correctly.

      Done, done, and done. I will update the SketchUp file in my original post. Please re-download for an updated copy.

      @dave r said:

      So what is your audience for this spray booth. Is this for modelers of scale trains, cars, etc.?

      Correct. Pretty much anything that isn't too big. Military modelers may need something bigger if they work with ships/submarines/big planes, etc.

      Thanks again.

      posted in Woodworking
      D
      Duncan MacLeod
    • RE: Construction Technique Pointers Request

      @Jeff Hammond:
      Thank you. Point taken - but don't be deceived by the pictures, This is actually very small; the booth is only about 27"W x 30"H x 18" D. The ply should be pretty stable even without underlying structure, but I'll definitely keep that in mind.

      posted in Woodworking
      D
      Duncan MacLeod
    • Construction Technique Pointers Request

      I'm planning on constructing a small, downdraft style airbrush spray booth, but my skill set falls more in the software arena, rather than the woodworking arena. So I would like to humbly request some assistance in the planning stage before I start cutting wood.

      The plan is to use one sheet of 3/4" plywood, the bare minimum of tools (circ. saw, screws & glue, etc.), the least amount of cuts, and an easy to follow procedure. Not for my sake per se, but because I'm planning on sharing the plans with the hobbyist community, and I would like to keep the project as accessible and low cost as possible (a DIY special, if you will).

      So if anyone is interested in pitching in with some advice, I would be most appreciative. Any advice, as a matter of fact, as the most complex thing I have ever built was a sandwich.

      Some caveats;
      There are some other cuts of wood in these plans at the moment, but I'm considering just using the plywood in order to reduce material needs, so bear that in mind.

      I like the overall size and design of the booth - I looked at a lot of other homemade booths, compared and contrasted with the available commercial booths available, and fell on this design for efficiency of airflow (CFM rate vs. blower size), general size constraints (bench top space), and of course cost.

      I think that's all the caveats for now; here's a look at the overall design:

      The booth, the whole booth, and nothing but the booth.
      Here are some specific questions, just to get the ball rolling:

      1). Should the gable end butt joints be inside (like F below), outside (like R below), or can they be mixed, as the picture shows (or does it even matter)?

      Butt joints.
      2). What's the best way to mate these two surfaces (just cutting the top piece flush leaves a small overhang), is mitering the two surfaces the easiest way? (I'm thinking some amateurs would have issues with setting the angle of the circular saw blade, but it may just be me.)

      Miter joint.
      Again, any SketchUp specific or design specific help would be most appreciated.

      Here is the SketchUp file:
      <Edit>File removed due to updates; read down for newest version</Edit>

      Thank you for any help,
      -Duncan

      posted in Woodworking
      D
      Duncan MacLeod
    • 1 / 1