Hi Guys
Jeff, the reason i chose to do this in 6 parts is because someone told me that casting it in 1 piece may cause the dome to crack due to Expansion and Contraction due to the extreme heat the oven will produce. Also, the oven will probably be moved around and this could cause further damage to the dome but this may not be true. Maybe you can give me more insight?
Crushed Fingers!!! Ouch, don’t want that to happen else I would have to add medical bills to the budget .
I looked at the model you created and seems like a good way forward.. There are 2 concerns however.
- As you mentioned, I would need equipment to lift the dome out from the mold and this could be costly.
- How do I go about physically making the mold you drew? Will it be difficult and complicated?
Chris, thanks for the explanations. It makes more sense now.
Gaieus, the sections were only for the mouldings and I guess that would change now since Jeff and Chris explored new methods to do this.
I think the best route for me right now, cost effective and less complicated is that which Chris mentioned. If it's ok to go ahead and cast this oven in 1 piece (Jeff and Chris can help decide this), I would proceed with the following sequence of events.
- Place the spigot centred onto my base board.
- Stick a pole into the spigot. How thick should the pole be?
- Fit onto the pole a wooden spinner. Is it possible to have 1 spinner but allow me to have it such that it will be a guide for different thicknesses as I go along plastering my dome?
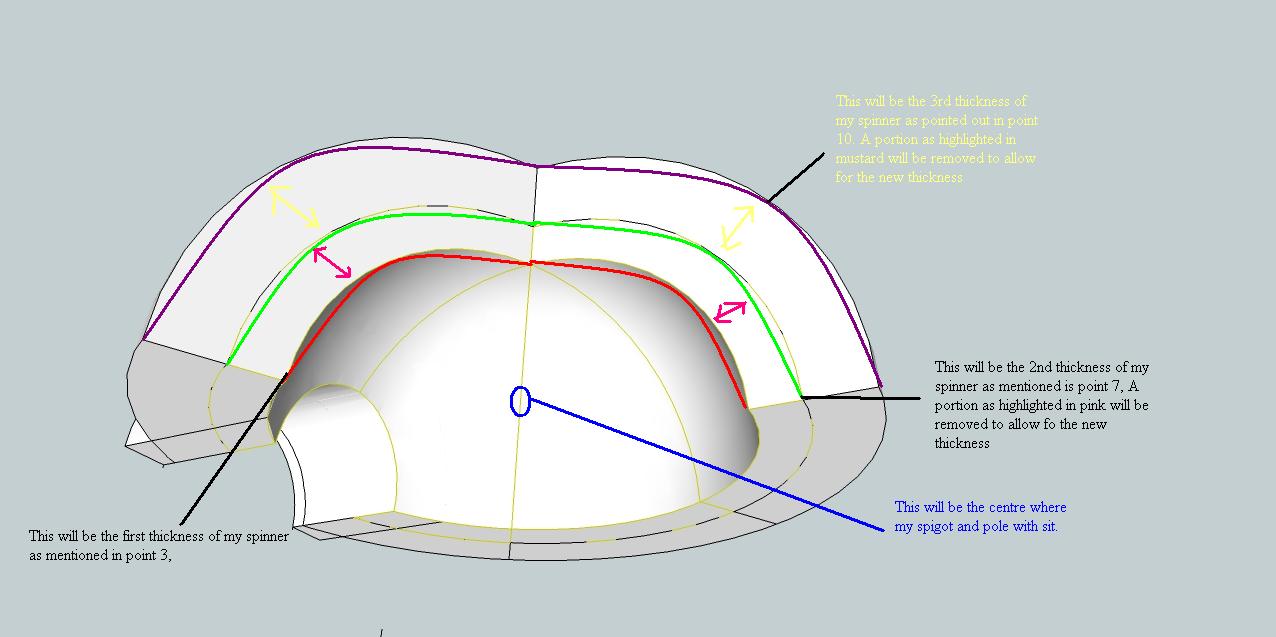
- Start building my Sand Dome around the pole until I reach the thickness of the starting point of my inner dome as I have pointed out in red on the picture attached.
- Once I have reached the first layer of my inner dome using sand, I will remove whatever attachment or contraption you created to allow me different thicknesses on the spinner.
- My spinner will now have a new thickness which will stop at the end of the inner dome as pointed out in green in the picture attached.
- I will begin plastering my refractory cement onto the sand dome and this will end at my current spinner thickness which will be at the point shown in green on the image.
- I will then once again remove whatever attachment or contraption we create to cater for new different thicknesses on my spinner.
- My spinner will now be at a new thickness and different point or guideline for my dome as I have pointed out in purple.
- I will repeat step 8 only this time using insulation as my material, and this will stop at the point or guideline of the spinner as pointed out in purple on the image.
- At this stage, I will remove the pole and indirectly this would create the bunghole or not? Chris, you can guide me further with regards to the bung. Never the less, I will pour sand into the area where the pole was and then fill is with cement and insulation.
- After completing, I can dig out the sand through the oven opening and then work on further cosmetics to the oven. I can say that once the dome is created, the hardest part is done.

I guess that would now complete the dome in one entire piece.
I was wondering whether I should cement the dome as I am plastering each layer to the surface of my stand (which will be a concrete slab) rather than cementing the entire piece after it is done as this will be harder requiring me to pickup the dome and then place cement and set the dome into that cement to hold it in place on my concrete slab..
Sounds easy in 13 steps but I know I'm in for some surprises along the way but I'm preparing myself for it.
You guys have brought me a long way that I don’t need to tell you to please change anything that may seem a miss.
Look forward to hearing from you'll
Regards
D0me


