Push Pull Tool for making grooves
-
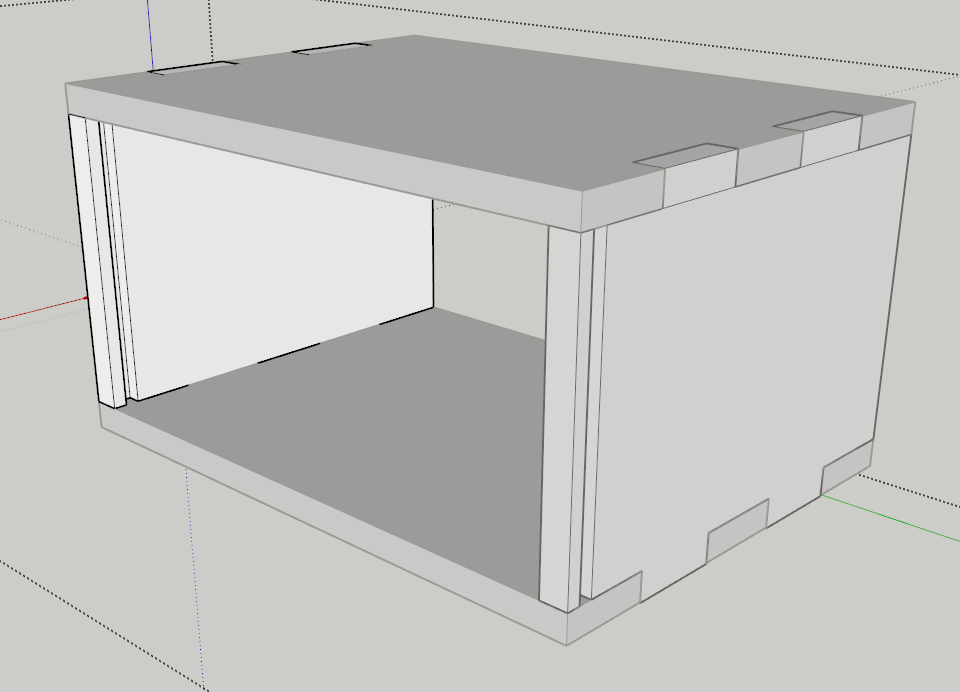
I'm fairly new to SketchUp so I'll apologize in advance for this beginner's question. I'm designing a simple box (see attached file) and need to create stopped grooves in four sides. Once assembled, the grooves will hold the back panel of the box in place. The will be 1/4" wide and deep and are positioned 1/4" in from the rear edge of the box. They begin and end 1/2" in from the outside edges of the sides. (As you can see from the attached file the box uses large finger joints instead of miters. If I were using miters I would' have to worry about stopped grooves.)
The box is made of two pairs of components: top and bottom, and left and right sides. I've tried several ways of making the groove when the parts are apart from each other but each has failed for various reasons. With the box assembled, perhaps there is a way to use push/pull and follow-me tools to run the groove all along the sides in the rear of the box. But I haven't figured out how to do this.
Any help would be appreciated.
-
Welcome.
So for the sides, the groove doesn't need to be stopped. I would open one of the side components for editing and then select he back inside edge. Use Move/Copy to make copies of that edge. Move the first copy in 1/4 in. Then hit Enter and type x2, Enter. This will create two new lines that define the edges of the groove. Push that face in with Push/Pull.
For the top and bottom, open one of them for editing. Use the Rectangle tool to outline the space between the grooves on the two sides. Then Push the face of theat rectangle in 1/4 in. Done.
One thing you need to do before cutting the grooves is flip one instance of each component to create a mirrored copy. Flip the side aloing it's green axis and the top on its blue. Right click on one at a time and select Flip Along> and the appropriate direction.
I made a silent video or maybe you want a short "live" demo?
-
Dave, thank you! The video is a huge help. I understand with the mirrored image you are saving time by cutting only one face and having it replicated in the matching face. But since the sides are pairs of components won't that already happen? (I didn't get that far before because I was only testing approaches with a single side.)
-
@one60fourth said:
I understand with the mirrored image you are saving time by cutting only one face and having it replicated in the matching face. But since the sides are pairs of components won't that already happen? )
The same thing does happen to both instances of the component but without flipping it to create the mirrored instance, the groove will be cut on the wrong side.
Some people would rotate one copy around it's vertical axis but that would result in the groove on one side showing up at the front.
-
Got it. Thanks a million.
Hello! It looks like you're interested in this conversation, but you don't have an account yet.
Getting fed up of having to scroll through the same posts each visit? When you register for an account, you'll always come back to exactly where you were before, and choose to be notified of new replies (either via email, or push notification). You'll also be able to save bookmarks and upvote posts to show your appreciation to other community members.
With your input, this post could be even better 💗
Register Login


Advertisement