Medeek Wall Plugin
-
Version 0.9.7d - 10.09.2018
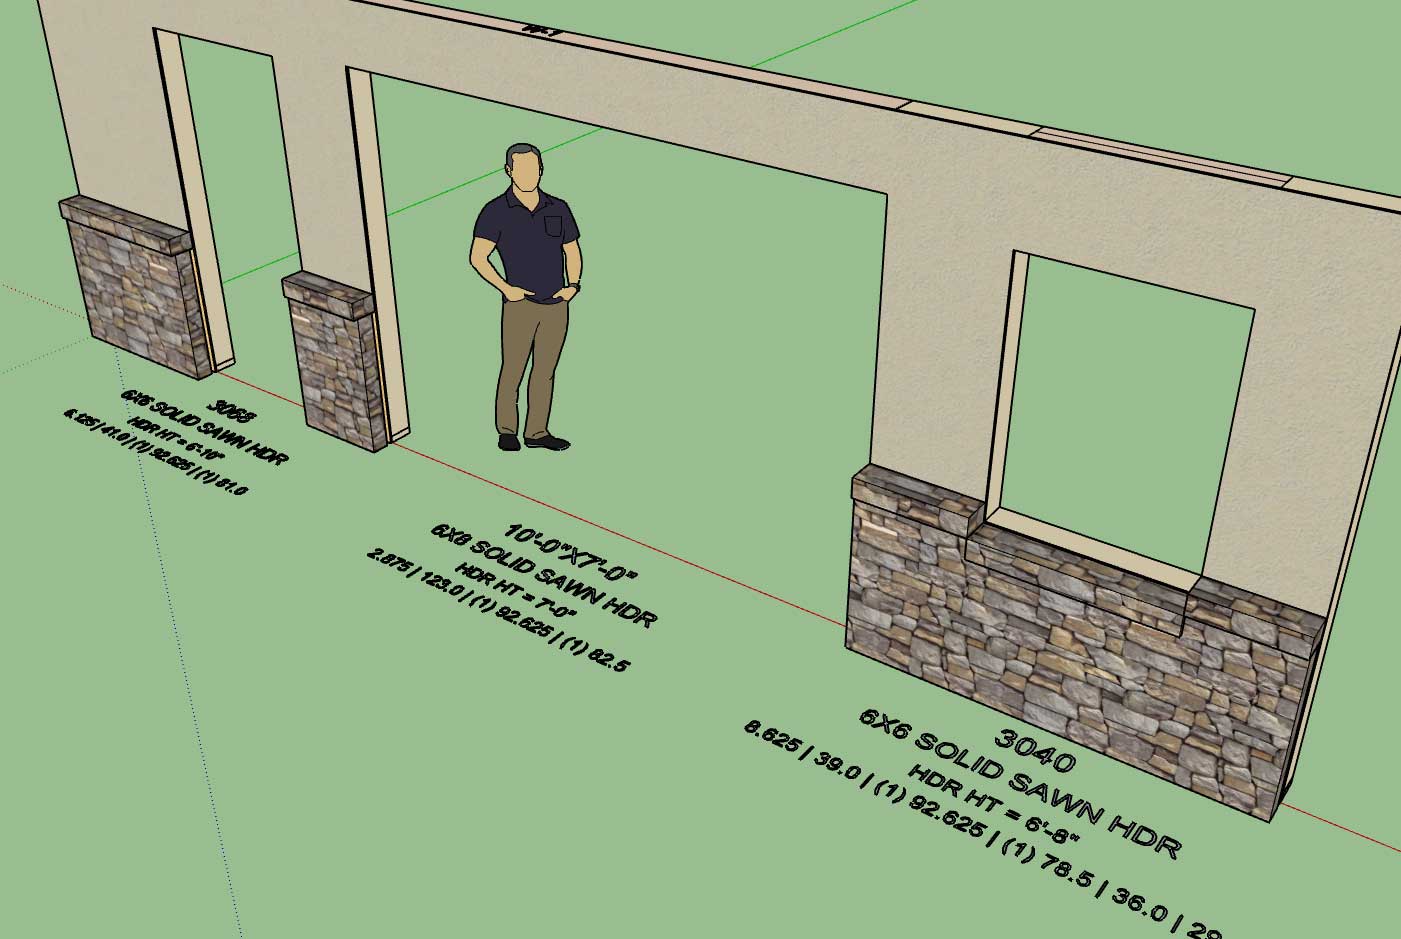
- Added header and framing callouts for garage doors, windows and doors.
-
Version 0.9.7e - 10.10.2018
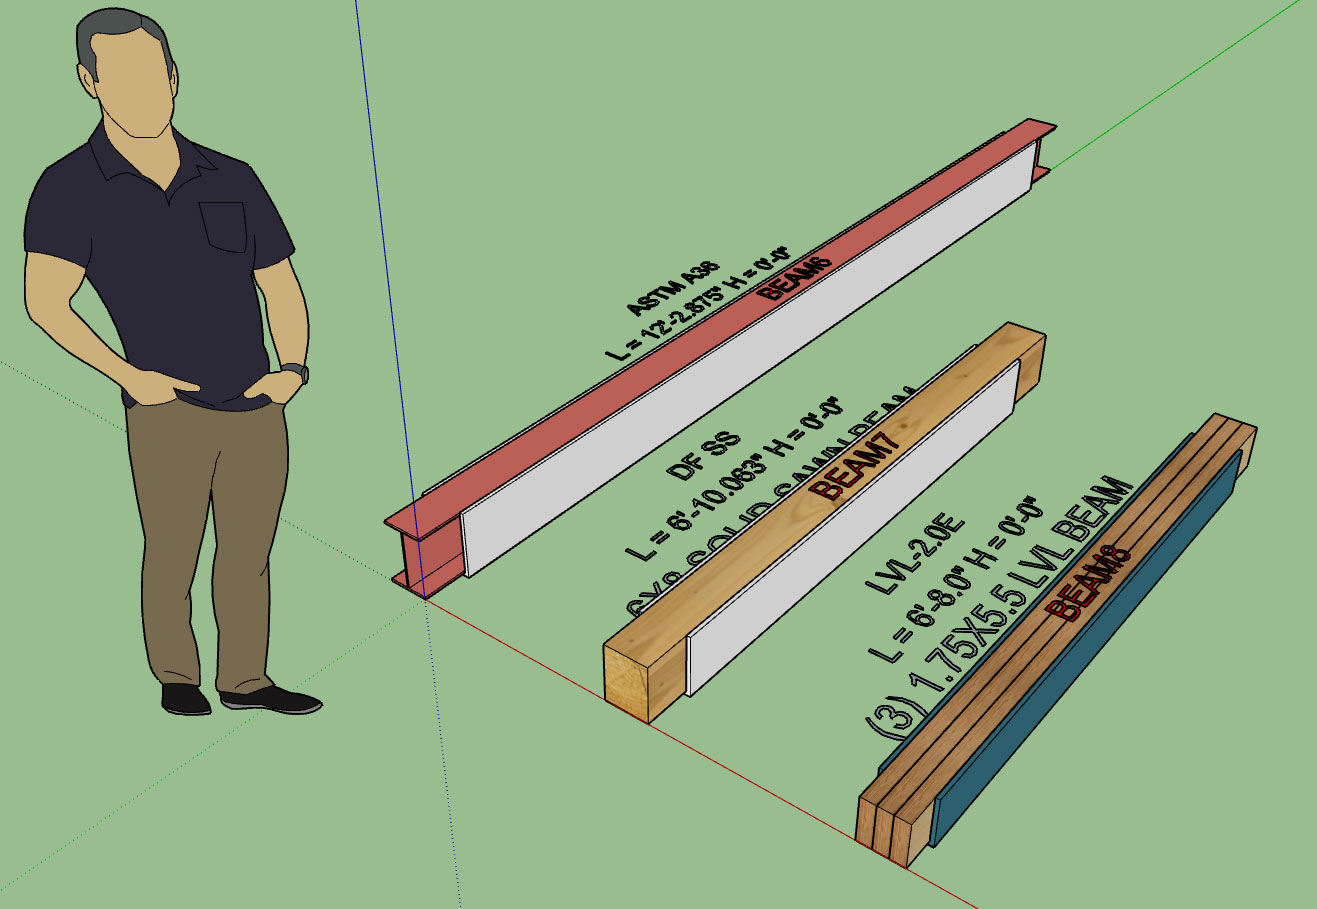
- Added labels and callouts for all beam types.
- Beam label prefix can be customized in the General tab of the Global Settings.
- Beam Z Floor parameter included in draw and edit menus (used to establish height of beam from sub-floor).
- "Regen Beam Assembly" action added to context menu for beams.
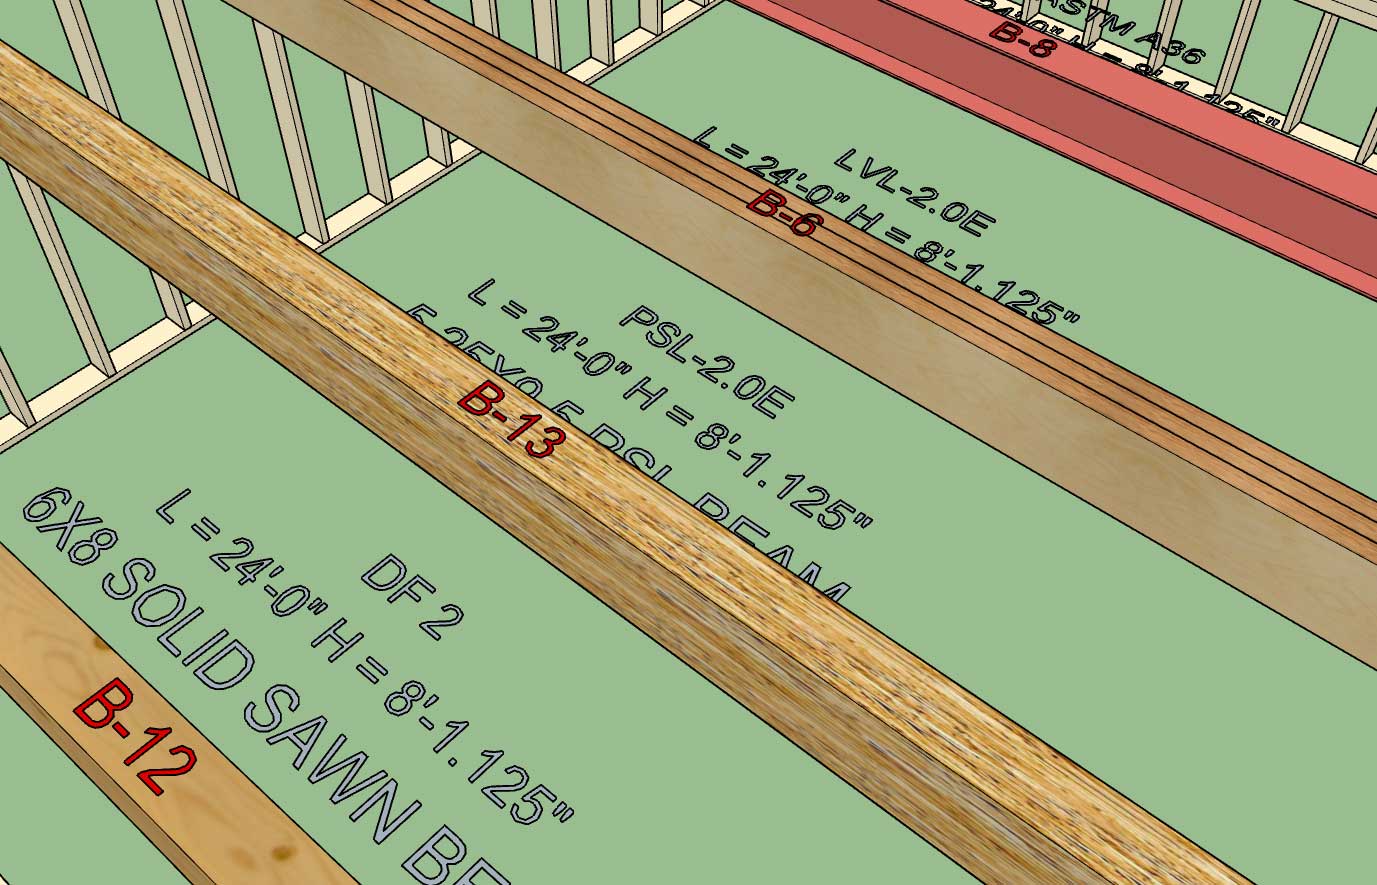
Labels and callouts for beams now up to par with the rest of the plugin (walls, windows and doors).
If the framing callouts are enabled then the beam length, beam height (bottom of beam to floor) and grade and species are displayed. The Z floor parameter allows one to establish where the floor should be referenced from.
The primary purpose of the regen action is if a beam is moved (with SU's native move tool) in the Z direction, this will recalculate the beam height.
-
Tutorial 2 - Drawing Walls:
-
Tutorial 3 - Beams and Columns:
The model used in the tutorial video can be downloaded here:

3D Warehouse
3D Warehouse is a website of searchable, pre-made 3D models that works seamlessly with SketchUp.
(3dwarehouse.sketchup.com)
-
Intro Video - The Vision:
The model for this video can be view here:
3D Warehouse
3D Warehouse is a website of searchable, pre-made 3D models that works seamlessly with SketchUp.
(3dwarehouse.sketchup.com)
I am also renaming the Extension Suite/Library to "mdkBIM":
The target audience/disciplines are:
1.) Designers/Architects
2.) Engineers
3.) Estimators
4.) Contractors -
Version 0.9.7f - 10.11.2018
- Window sill qty. callout added to the framing callouts for windows.
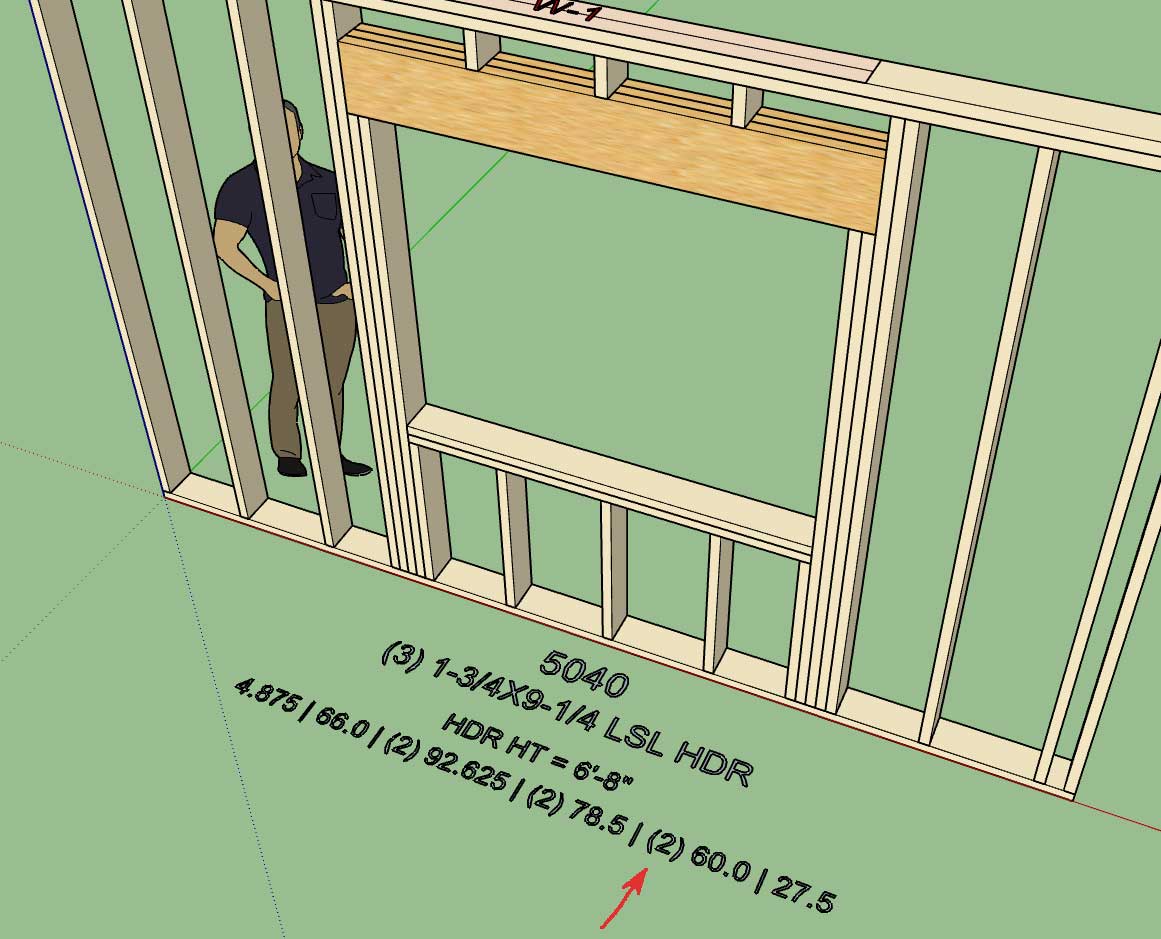
Looks like I forgot to add the quantifier for the window sill plate.
-
Maybe the trimmer and king stud # should be total? (four not two)
-
@pbacot said:
Maybe the trimmer and king stud # should be total? (four not two)
I don't know should it be the total or per side? I prefer per side but that is just me, what is the industry standard?
-
The framing algorithm for stacking windows and doors is going to get very messy, what if the trimmer and kings studs don't exactly lineup? Then the framing gets really interesting.
A larger or smaller opening above another will also call for different framing solutions.
This one is going to take some serious thought.
Why do you designers have to make things so difficult? This one is not really that high on the todo list but it is giving me some serious headaches just contemplating it.
Does anyone have any examples (drawings or pictures) of this sort of situation(s)?
-
Necessity is the mother of invention as they say, and as I was creating a small two story model of a garage for local customer today it quickly became painfully obvious that I still do not have a good stair plugin or module.
The toolbar for the stairs module will start out with the following two icons, there will probably be additional ones added for concrete or steel stairs in the future:

The basic parameters for the Draw Stairs Menu will be:
0.) Stair Assembly Name: Auto assigned by the plugin but user can edit this parameter.
1.) Stair Type: Straight, L-Shape, U-Shape
2.) Stair Width: 40 inches or 1000mm
3.) Stair Height: (This will be determined by the picking of points and the bottom floor plane) ft-in or mm
4.) Max. Riser Height: 7.75 inches or 200 mm
5.) Draw Risers: YES/NO
6.) Riser Thickness: 3/4" or 19 mm
7.) Riser Material: Lumber, Lumber PT, OSB, PLY
8.) Top Tread Flush: Yes or No (this option will make the top tread flush with the upper level/deck
9.) Tread Depth: 10" or 255 mm
10.) Tread Thickness: 1.25" or 32 mm
11.) Tread Nosing: 1.25" or 32 mm
12.) Nosing Shape: SQUARE or ROUND
13.) Tread Material: Lumber, Lumber PT, OSB, PLY, Oak, Birch, Maple, Pine etc... (custom material from material manager in global settings.
14.) Stringer Qty: 2, 3, 4, or 5
15.) Stringer Depth: 11.25" or 285 mm
16.) Stringer Thickness: 1.5" or 38 mm
17.) Stringer Material: Lumber, Lumber PT, LSL, LVL
18.) Stair Framing: YES, NO, 2D
19.) Advanced Options YES or NOThe advanced options or parameters are tentatively:
1.) Thrust Block: None, 2x4, 2x6, 2x8 or metric sizes for metric templates
2.) Hanger Board: Yes or No, will default to 3/4" or 19 mm OSB
3.) Landing Tread: Yes or No ( will default to a 3-1/2" landing tread with bull nose to match stair treads)Eventually I will add other advanced options such as hand rails, skirt boards, gypsum spacers, blocking, brackets etc...
I'm not an expert on stairs but I do have a couple of details where I've considered the various elements of a typical stair case:
http://design.medeek.com/cad/autocad/STAIRHEADER_SECTION.pdf
http://design.medeek.com/cad/autocad/STAIR_SECTION.pdf
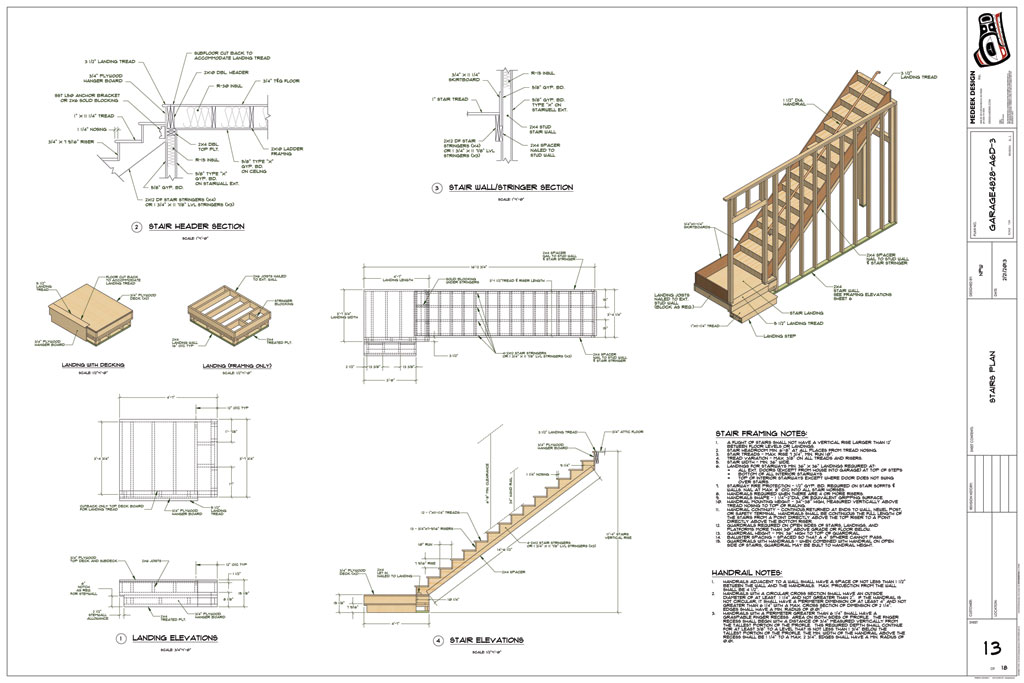
L-Shapes and U-Shapes get quite a bit more complicated with the inclusion of a landing. I will start with just a straight run of stairs first.
Right of the bat I will start with HTML draw and edit menus, no point in messing around with the traditional UI, especially with such a long list of parameters already.
-
Version 0.9.7g - 10.13.2018
- Created icons for the stair module.
Still putting together the HTML menus. It may be a couple days before this module actually produces useful output.
-
Version 0.9.8 - 10.14.2018
- Critical update with the global settings module.
- Critical update with the auto-corner configuration module.
I noticed an error that seemed to be common across a number of users and after digging down through the code I think I unearthed the bug that was causing this error. This error was actually caused by a recent change in the code where I was attempting to improve the performance for larger models (0.9.6).
I believe this fix should address the bug and also augment the performance for large modules. Sometimes when you try to fix things you break things but in the end it will all work out.
-
Version 0.9.8b - 10.15.2018
- Fixed a typo/bug in the window module (casing).
This bug was only an issue in imperial templates and when you enabled casing but not ext. trim.
-
Wall Presets often seem to be confusing many of our designers so I've put together a short video trying to clarify some of this functionality and possible quirks that users should be aware of:
-
Version 0.9.8c - 10.17.2018
- Removed the wall justification parameter from the draw and edit wall menus.
- Interior wall door casing properly configured for both sides of the wall.
Today was one of those busy days where most of the day was consumed by emails and phone calls. Its safe to say that most of the day was spent interacting with people and less time spent on the code, not that this is a bad thing. Since I could not dive deep into the gable or stair projects I put out a couple small fires that were a bit lower on the list. Its always nice to knock out some low hanging but troublesome fruit.
Prior to this fix all doors created within interior walls were installed with ext. trim on the wall's exterior side. In reality interior doors should have casing on both sides of the wall.
-
Here is a first look at the gable wall matrix:
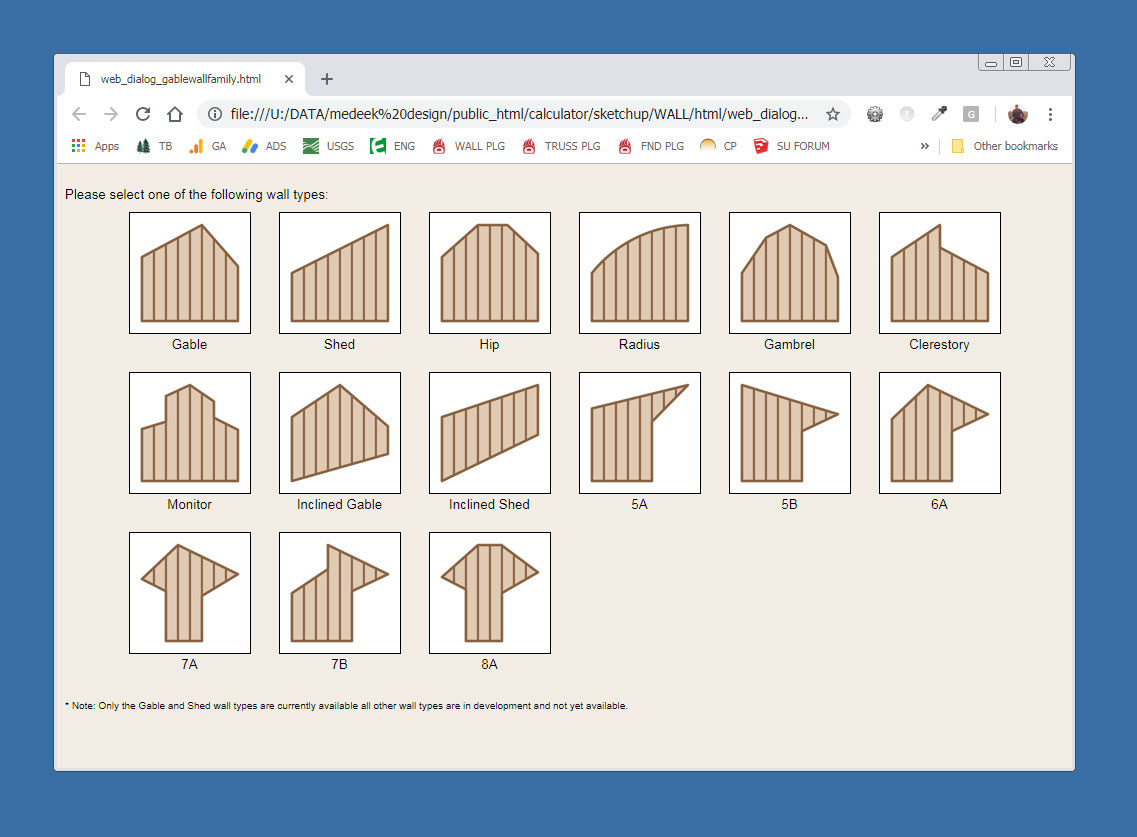
The rabbit hole is going to get really deep. I am initially concentrating on the standard gable wall and then onto the shed wall.
Some of these wall types will also require a mirrored version (just another parameter in the wall menus).
Note, that a triangular wall is nothing more than a degenerate gable wall where the wall height is zero at the start and end of the wall. A shed wall with the lower wall set to zero height is a right triangle. The same sort of logic can be applied to all the other various wall types shown.
Things get a little interesting when you start moving these type of walls or walls that are adjacent to these walls (attached at the corners). Each wall type may require its own special auto-corner configuration algorithms. As long as I keep things modular all of this complexity shouldn't be too big of a problem.
-
As I was going down through the list this morning and my notes I've also noticed that there has been quite a demand for multiple layer gypsum walls (firewalls).
To do this I would need to create a new attribute library folder which basically means that this would break backward compatibility of the plugin again.
Under the advanced options I would add in a new parameter called:
Advanced Gypsum Options: Yes or No
Then under a new heading:
Advanced Gypsum Options:
Interior Layers: 0, 1, 2
Int. 1 Thickness: in or mm
Int. 1 Material: (utilize materials from Material Manager as well as one default built in material)
Int. 2 Thickness: in or mm
Int. 2 Material: (utilize materials from Material Manager as well as one default built in material)Exterior Layers: 0, 1, 2
Ext. 1 Thickness: in or mm
Ext. 1 Material: (utilize materials from Material Manager as well as one default built in material)
Ext. 2 Thickness: in or mm
Ext. 2 Material: (utilize materials from Material Manager as well as one default built in material)A total of eleven new parameters. Let me know your thoughts on this, is there a better way to present these options or somehow condense this information into a simpler form?
Since the user can specify the material independently for each layer (4 different layers) its possible to use other materials other than gypsum (ie. tile, cement board, OSB, Plywood, cedar paneling etc...)
For example one could install a layer of foam under a layer of gypsum or OSB under the gypsum or any other possible combination.
-
Version 0.9.8d - 10.18.2018
- Created the gable wall matrix selector for the new gable wall module.
- Added the ability to wrap beams with gypsum and updated the beam menus with this new feature.
*** WARNING ***
This update will break backward compatibility for beams created in previous versions of the plugin.
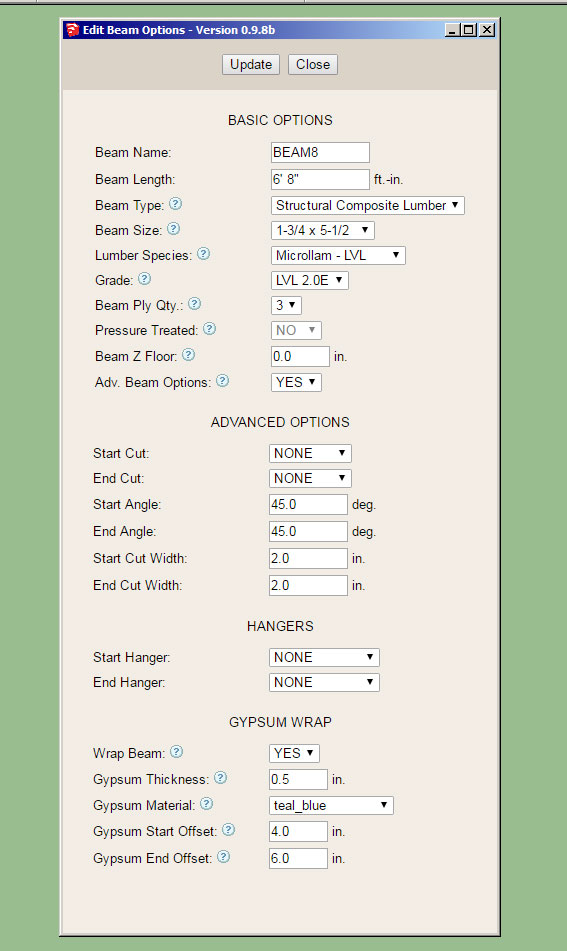
Note that the material used to wrap the beams can be chosen from the custom materials so technically any material can utilized.
The start offset and end offset allow the designer to pull back the wrap any specified amount to allow for beam pocketing or in the case where the beam extends beyond the wall to the exterior of the building.
The wrap covers the sides and bottom of the beam. Thickness can also be specified as shown above.
-
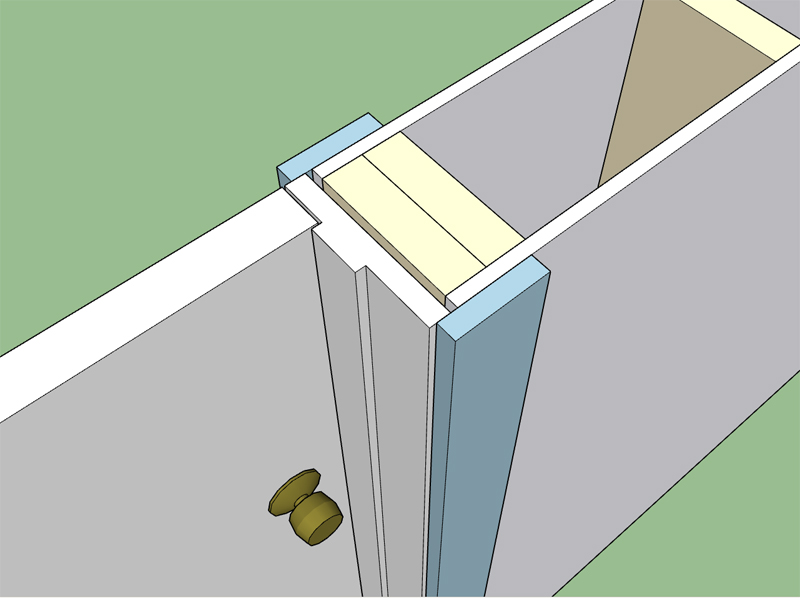
This screenshot shows an application where the gypsum offset comes into play:
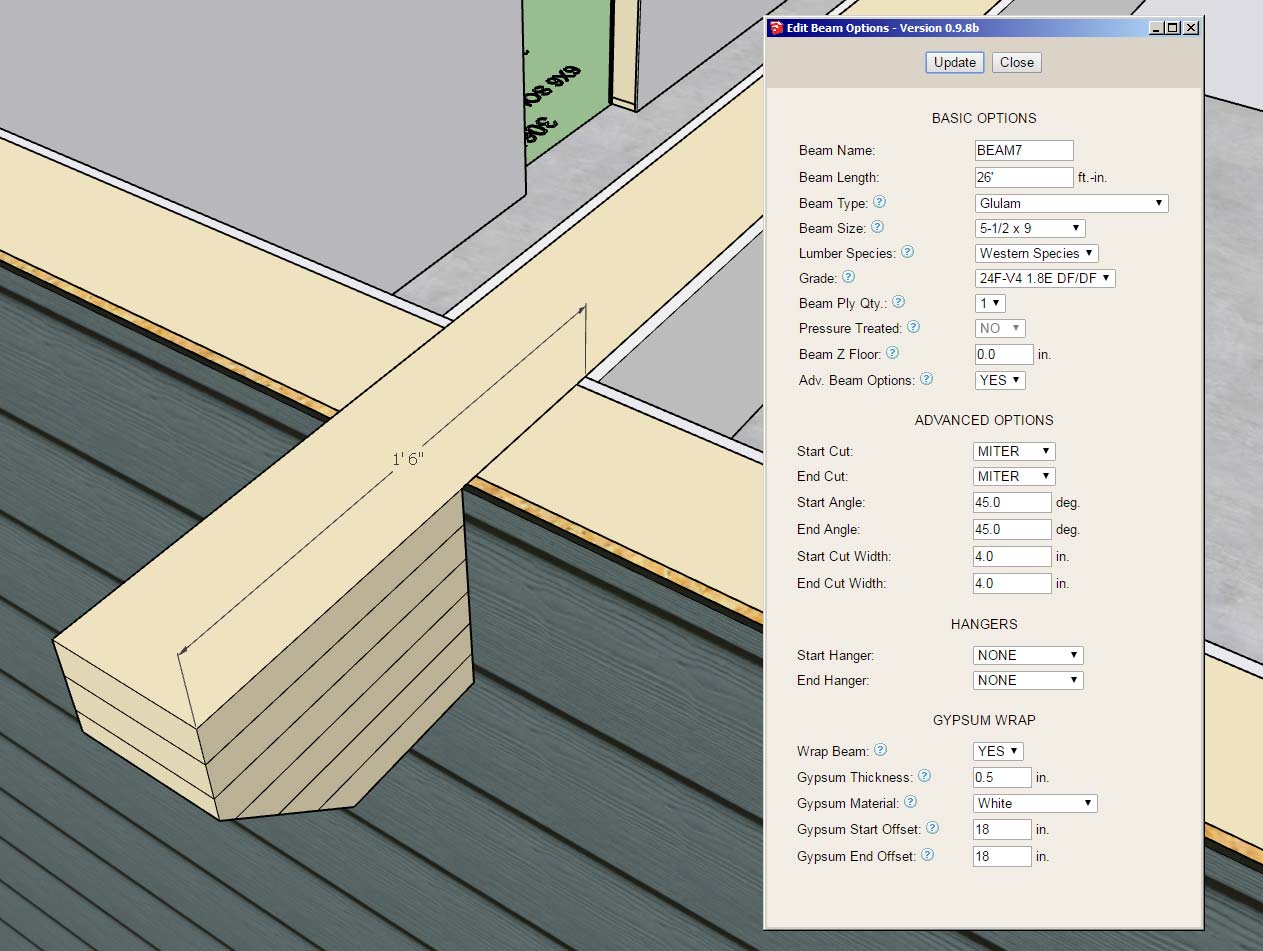
Note the 18" offset from the end of the beam. Also note the use of the miter cut and the notching out of the gypsum, sheathing and cladding (advanced options for the column with beam pocket).
Surprisingly there is quite a lot going on here even though the geometry looks relatively simple.
-
Per user requests I've enabled an additional parameter for windows so that you can assign a manufacturer to the installed windows (door also coming soon). Note that the window geometry itself is not manufacturer specific but is controlled by the users preferences.
In the near future I will also be creating a window and door preset feature so various options can be pre-configured.
If manufacturer's logos are enabled in the Material tab of the Global Settings and a manufacturer is assigned then the plugin will affix a label to the window in order to quickly and easily identify the window manufacturer:
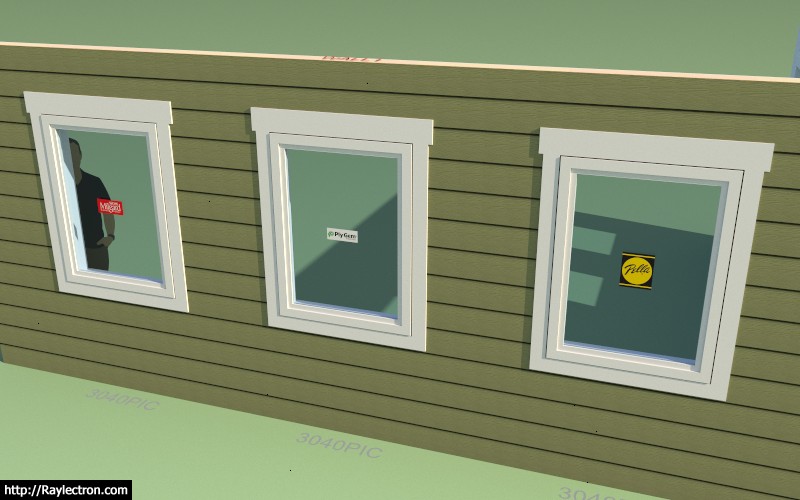
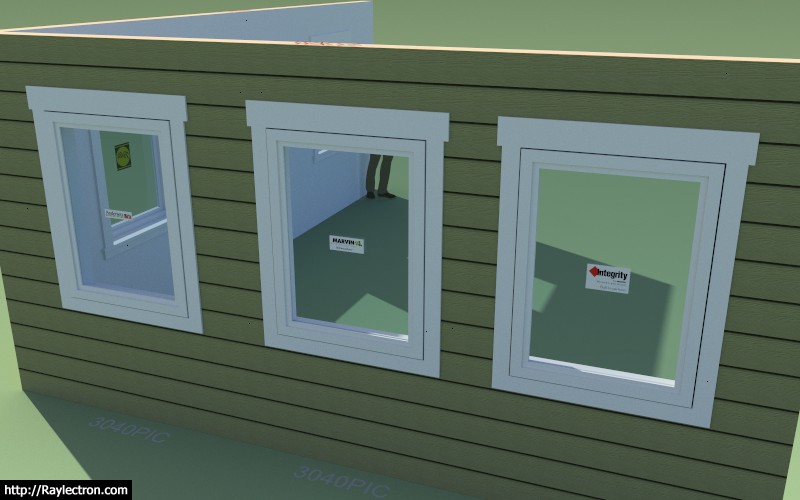
The label is actually its own group/face on the dimension 3 layer and can be toggled by turning this layer on or off.
In the future it might be useful to enable a tool that allows one to switch all of the windows and door from one manufacturer to another with the single click of a button. If a cost database is setup for the various manufacturers then the estimating module can create comparative cost estimates depending on the manufacture of the fenestration.
I've initially added the following manufacturers/brands:
Pella, Milgard, Marvin, Integrity, Plygem, Jeld-Wen, Alside, Andersen, Atrium, Harvey, MI, PGT, Simonton, YKK-AP

The label is constrained to a square 8"x8" and offsets the window glass by 0.125 so that it does not z-fight with the window glass.
Please send me any window and door manufacturers that you would like to see added to the plugin.
Hello! It looks like you're interested in this conversation, but you don't have an account yet.
Getting fed up of having to scroll through the same posts each visit? When you register for an account, you'll always come back to exactly where you were before, and choose to be notified of new replies (either via email, or push notification). You'll also be able to save bookmarks and upvote posts to show your appreciation to other community members.
With your input, this post could be even better 💗
Register Login


Advertisement