Medeek Wall Plugin
-
Mostly putting out fires today and catching up on emails while I was out of the office for nearly a week.
As I was testing out a rather large user generated model (100+ wall segments) I did notice that the performance of the plugin became quite slow while editing or otherwise updating a wall panel.
After further testing I've decided that in order for the plugin to better manage extremely large models with a large number of wall panels I will need to change up the auto-corner config algorithm (which also handles tee intersections) slightly.
What this means in actual performance terms is a slight drop in speed for smaller models (<5 wall panels) and a major increase in speed for large models
-
Version 0.9.6c - 10.05.2018
- Improved the auto-corner config and tee intersection algorithms to better handle large models (100+ wall panels).
If you are creating large models with the plugin with lots of walls you should see a significant improvement in performance with this latest upgrade.
-
Version 0.9.7 - 10.06.2018
- Wall labels option added to the General tab of the Global Settings.
- Wall labels can be drawn/shown in all framing modes.
- Added two additional layers to the Layers tab of the Global Settings for dimensioning and annotations.
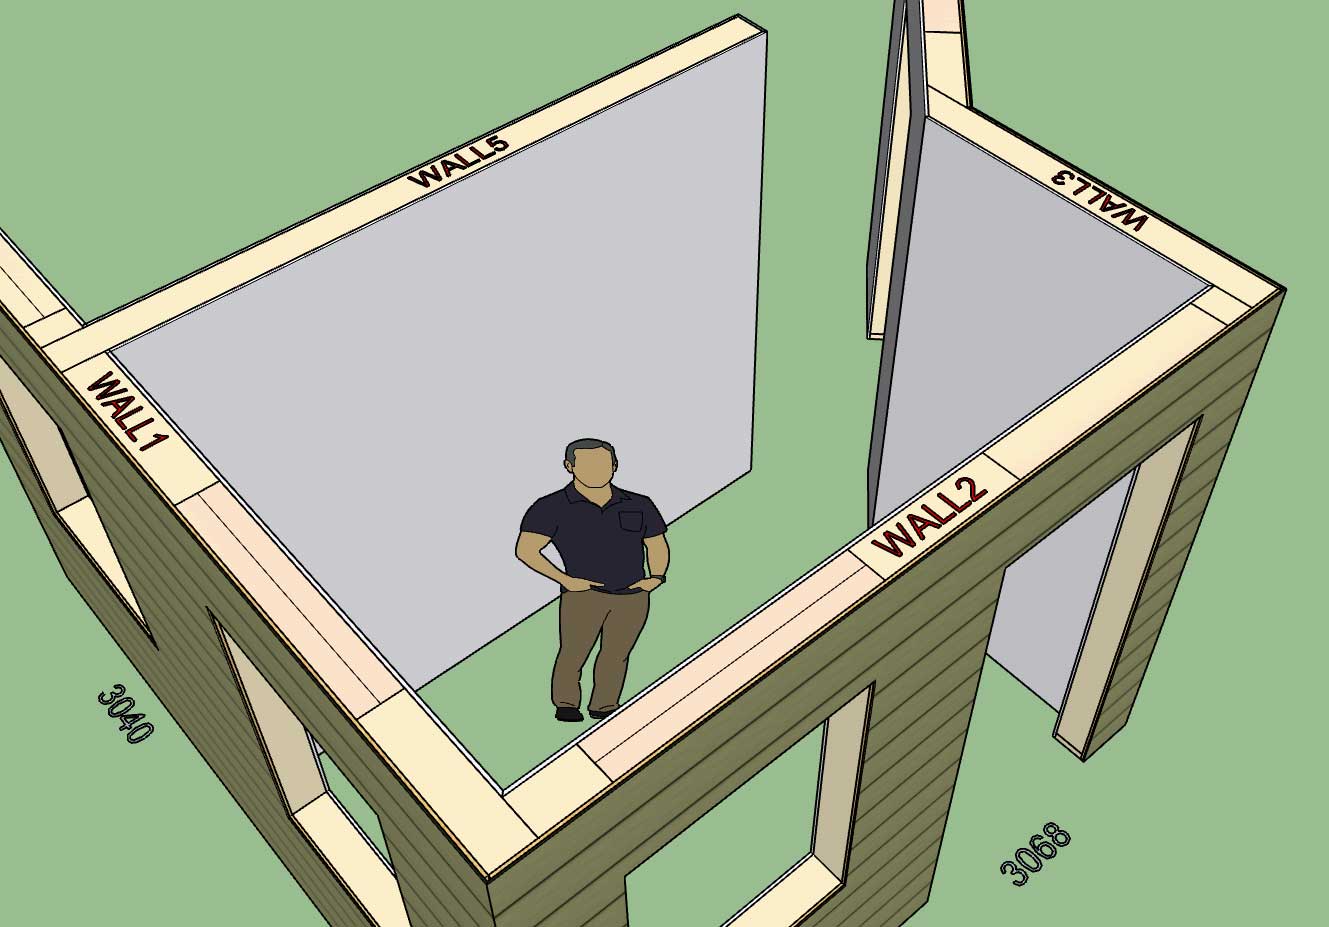
Note that wall labels are drawn on Dim Layer 3, Dim Layer 2 will be reserved for framing annotations (headers, cripples, trimmers, kings etc...), Dim Layer (1) is for standard callouts for windows and doors and their symbols. The idea being that even if you decide to enable all of the callouts you can easily toggle them by turning on and off the various dim layers.
-
I should have figured on the wall label prefix as being user definable. I will go ahead and add a label prefix parameter to the global settings. This prefix can also be set to nil (blank) so that only numbers are used to label the walls.
Note, the wall label is given by the wall name in the wall edit menu, this can be changed at any time.
-
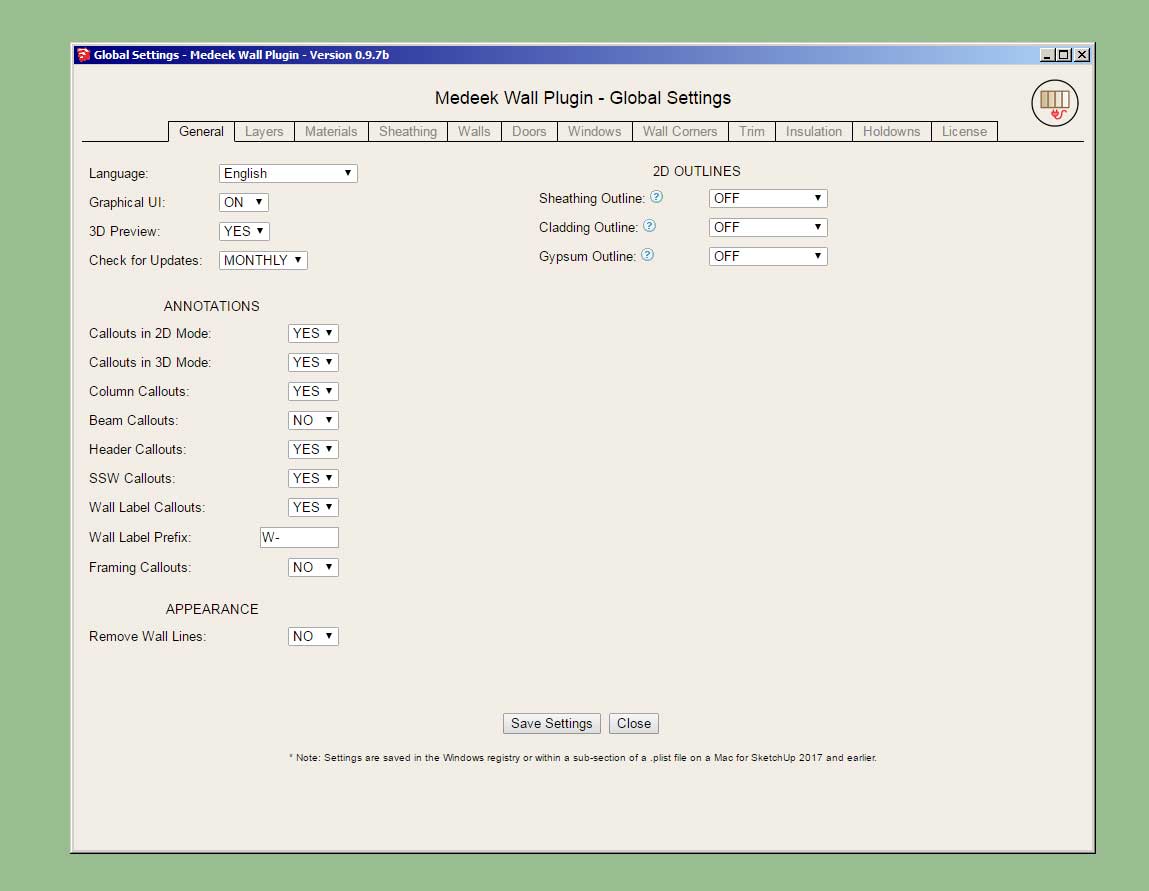
The wall label prefix can now be defined in the global settings:
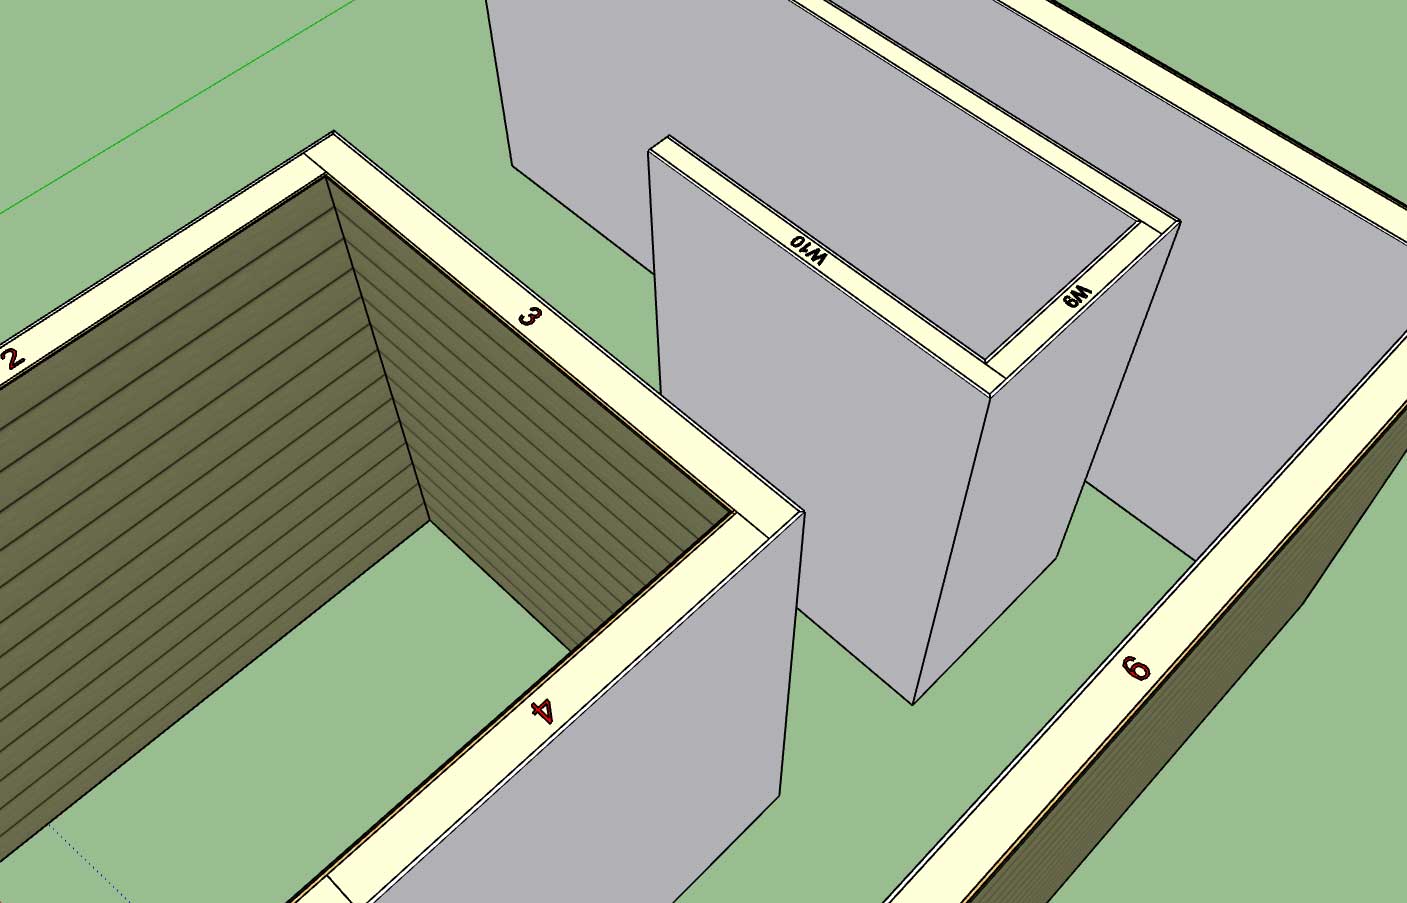
If left blank the wall name/label will be just a numeric value as shown.
-
Version 0.9.7b - 10.07.2018
- Wall label prefix can be customized in the General tab of the Global Settings.
- Licensee name now appears in the License tab of the Global Settings when plugin is registered.
This weekend I've managed to quickly knockout 1,2 and 6 of the list I gave previously after I got back from basecamp. There is so much more to do its staggering and a bit overwhelming at times.
In addition to the work that needs to be done with the wall plugin there is also the rewrites of the truss and foundation plugins that need to happen, primarily to make them fully parametric and also include all of the estimating and engineering features.
I've easily got another two years of full time programming before I get everything where it needs to be. However, if I can snowball this thing and get a little more momentum going it would be nice to bring on some additional hired help with some of the programming and accelerate the development even further.
Just the debugging alone manages to consume quite a bit of time. The complexity of all the moving parts in this thing make for some interesting possibilities and the chance for many states that may not have been foreseen. Luckily I have managed to cut my teeth on the truss plugin and so this time around my programming skills and organization have dramatically improved and matured. Keeping everything nice and tidy (modular) has made all the difference and kept this rather large programming project manageable for one person.
Admittedly there is still a lot of checking and debugging to do, especially with the metric side of the house. I initially test everything in the imperial templates since that is what I'm used to but I also have to keep an eye on the metric side as well.
I have held off on the final implementation of the gable walls since I wanted to fully wrap up the standard rectangular wall before I started in a new direction. Part of my reasoning with this was also to work out all of the bugs and problems with the standard walls first that way I would be well positioned to attack the more complex gable and shed walls.
A good example of this is the way I am currently handling holdowns. I would rather treat shear panels and their holdowns similar to how I handle windows, doors and SSW's. In other words multiple shear walls/panels can be added to any given wall panel rather than an entire wall panel being made into a shear wall. Segmented shear walls are typically broken up in a given wall line and may or may not involve an entire wall panel. With this in mind I will probably augment the current SSW toolbar with regular shear walls or add a completely new toolbar for them.
I am also working with some component and wall panel manufacturers and I am in the process of providing some feature that will work well with their workflow but optionally can be enable/disabled by the user who has no need for those features.
-
At SketchUp Basecamp I was excited to see that both PlusSpec and Framer for SketchUp were in attendance. These two softwares seem to be the primary competitors to my own SketchUp Extension Suite.
PlusSpec seems to be a bit further along than I am and I think they began putting together their product about the same time I began working on the Truss Plugin (2015). Framer by John Brock is a much newer offering and was only just released this last month or so. Both plugins appear to be legitimate competitors and offer similar features to my plugins.
Price wise PlusSpec is the more expensive of the two, $773 if billed annually. Framer is currently $79 per year but it appears the price is scheduled to jump to $99 per year. Both plugins are subscription licensing which personally I find not to my liking but I can fully understand the reason for going this direction.
If you purchase all three of my plugins at full price you are into it for $250, however this is a one time purchase. Upgrades are free for two years after the purchase. After that you pay a reduced upgrade fee to renew the license for further upgrades (new releases).
As I mentioned in my panel talk it would be nice if I could just make these plugins available to everyone at no charge and I really do believe that deep down, but other revenue models such as Patreon did not garner any interest from the SketchUp community so I am forced to a more conventional business model. In order to really pursue the development of these plugins like I would like to I need to commit full time and I need to somehow make a living while doing it. Whether this is realistic or not is yet to be determined.
Even though the competition may keep me up at nights it is still for the better. Competition helps keep us all on our toes and drives progress. In my opinion, part of the reason Revit is such a horrible product is due to its real lack of competition in the 3D modeling world.
I am hoping that in the next couple of years we can develop these plugins to a level that they provide a viable alternative to Revit and begin to sway more of the mainstream design community over to SketchUp. If SketchUp/Trimble continues to improve Layout and we mature our BIM offerings I think that we will surpass Revit and AutoDesk in functionality, ease of use and just a better product all around. SketchUp is already a joy to use and with a few well crafted plugins it becomes almost fun to use and work with, work is no longer work. I really do believe that SketchUp has the potential to become the BIM standard in the design world, at least that is what I'm aiming for.
-
Version 0.9.7c - 10.08.2018
- Fixed a bug in the door and garage door modules (affects both metric and imperial templates).
This is a critical update. If you load a previously created model, and prior to inserting any new walls, you attempt to add a new door or garage door and select advanced options in order to install the actual door or garage door the plugin will throw an error since it does not have the previously utilized gypsum, sheathing and cladding thicknesses loaded, in order to properly calculate the offset of the door within the wall.
This fix is designed to address that issue.
This is yet another situation where there are many states possible and the tree of all possibilities is rather vast so finding all of the holes and making sure they are patched is a lengthy process.
-
I'm looking for a good stone / cultured stone material to add as a hard coded default into the plugin for cladding and wainscoting. Any suggestions?
-
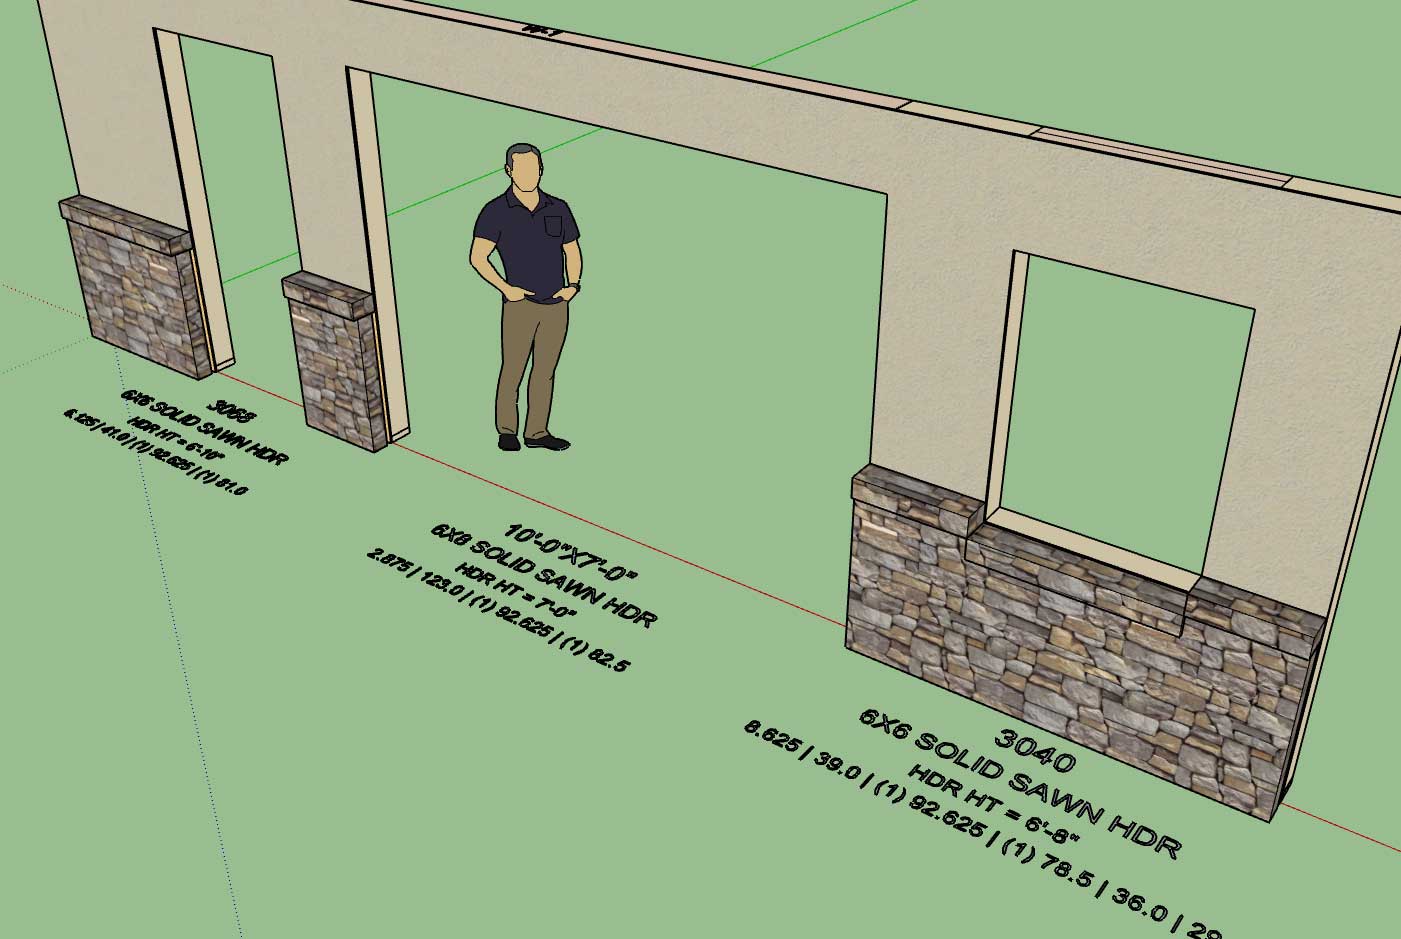
Per requests from wall panel and component manufacturers I am adding in some additional framing callouts:
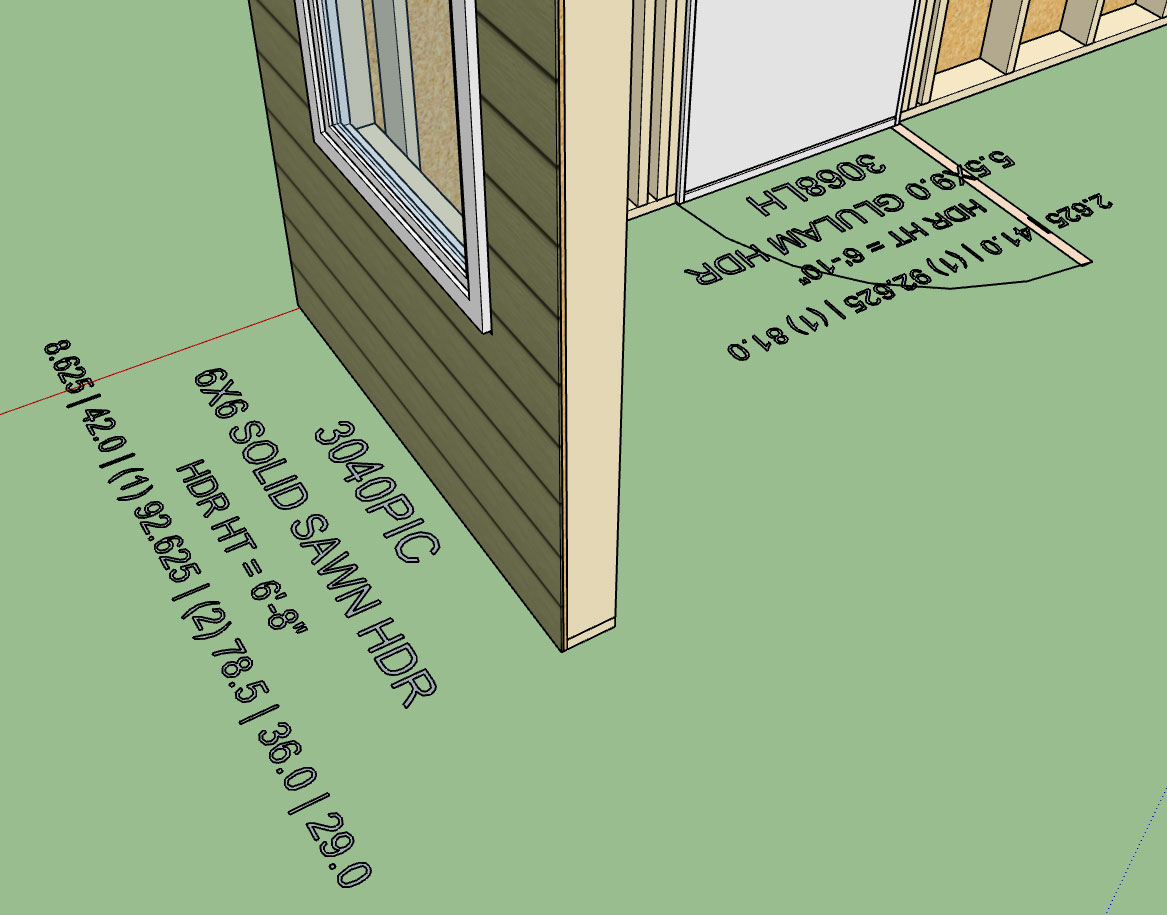
The first line is the standard window or door callout and is on dim layer #1. This has not changed from previous versions of the plugin.
The second line gives the header information (I will also need to add a species and grade callout ie. DF No. 2) and is toggled on by the header callout parameter, this line is on dim layer #2.
The third lines give the header height from the base of the wall (bottom of sole plate) to the bottom of the header. The value is in ft-inches or millimetres. This line is toggled on by the framing callout parameter and is also on dim layer #2.
The 4th line is the most interesting. For windows it gives six pieces of information for doors it gives four pieces of information:
Window: top cripple length, header length, king stud qty. and length, trimmer stud qty. and length, sill length, bottom cripple length.
Door: top cripple length, header length, king stud qty. and length, trimmer stud qty. and length
This line is also toggled on by the framing callout parameter and is on dim layer #2.
-
Version 0.9.7d - 10.09.2018
- Added header and framing callouts for garage doors, windows and doors.
-
Version 0.9.7e - 10.10.2018
- Added labels and callouts for all beam types.
- Beam label prefix can be customized in the General tab of the Global Settings.
- Beam Z Floor parameter included in draw and edit menus (used to establish height of beam from sub-floor).
- "Regen Beam Assembly" action added to context menu for beams.
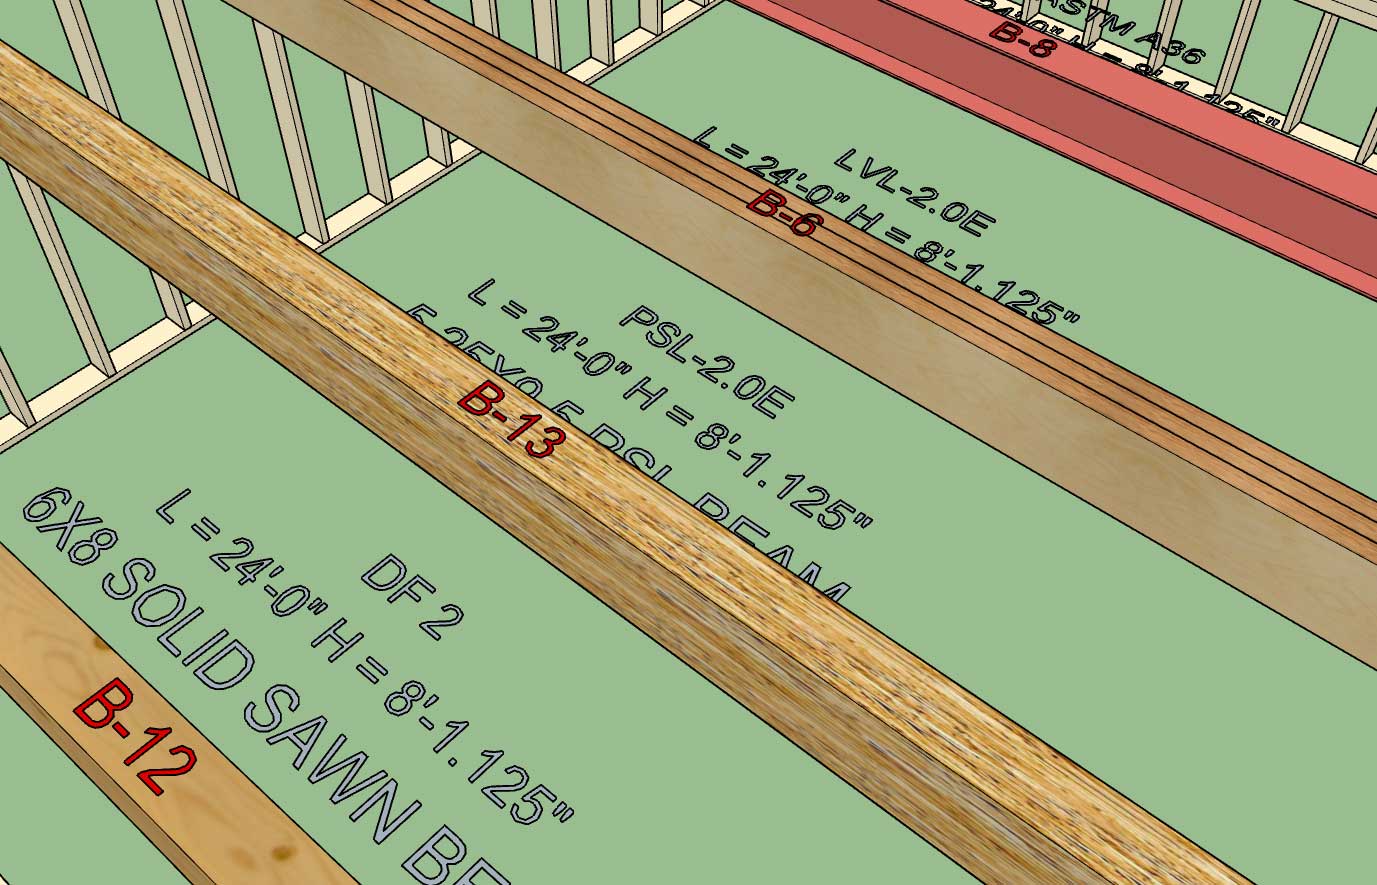
Labels and callouts for beams now up to par with the rest of the plugin (walls, windows and doors).
If the framing callouts are enabled then the beam length, beam height (bottom of beam to floor) and grade and species are displayed. The Z floor parameter allows one to establish where the floor should be referenced from.
The primary purpose of the regen action is if a beam is moved (with SU's native move tool) in the Z direction, this will recalculate the beam height.
-
Tutorial 2 - Drawing Walls:
-
Tutorial 3 - Beams and Columns:
The model used in the tutorial video can be downloaded here:
3D Warehouse
3D Warehouse is a website of searchable, pre-made 3D models that works seamlessly with SketchUp.
(3dwarehouse.sketchup.com)
-
Intro Video - The Vision:
The model for this video can be view here:
3D Warehouse
3D Warehouse is a website of searchable, pre-made 3D models that works seamlessly with SketchUp.
(3dwarehouse.sketchup.com)
I am also renaming the Extension Suite/Library to "mdkBIM":
The target audience/disciplines are:
1.) Designers/Architects
2.) Engineers
3.) Estimators
4.) Contractors -
Version 0.9.7f - 10.11.2018
- Window sill qty. callout added to the framing callouts for windows.
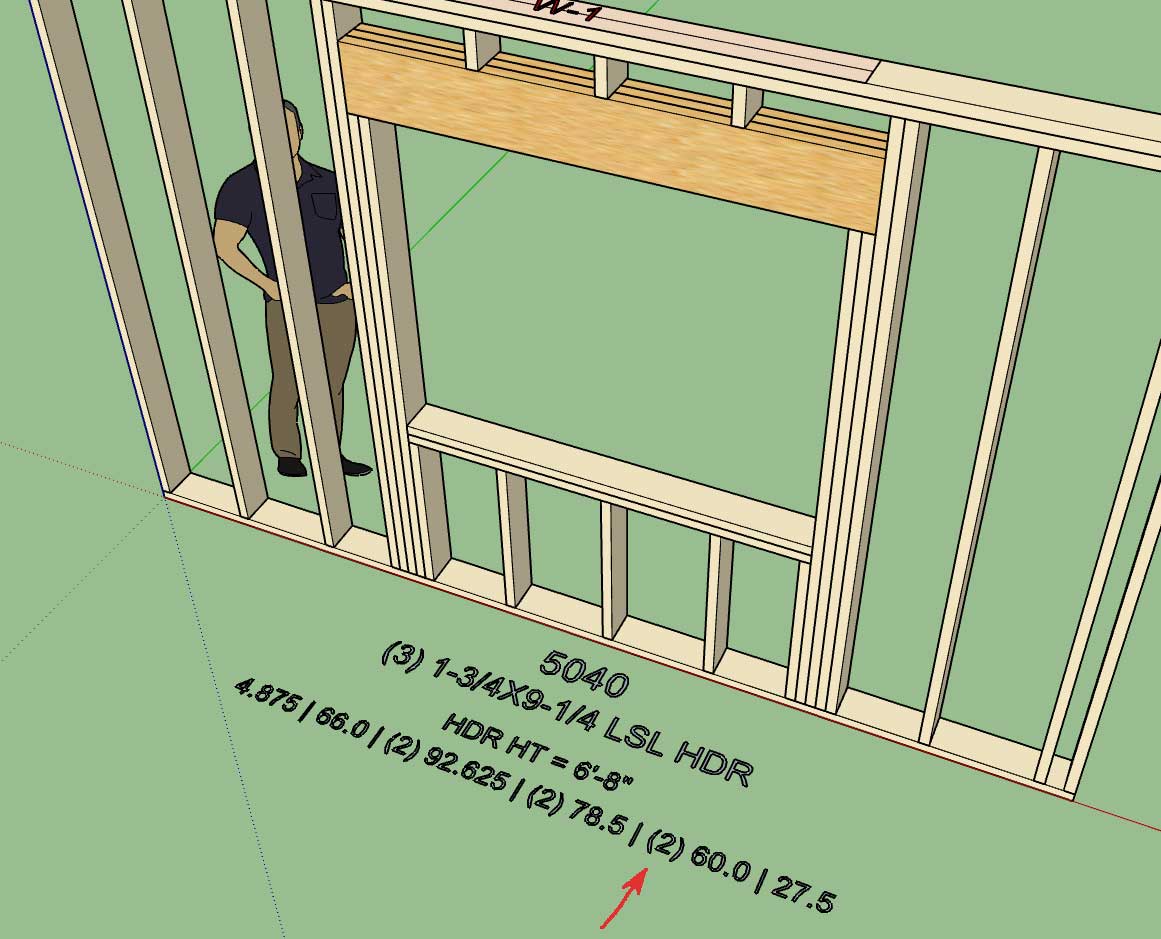
Looks like I forgot to add the quantifier for the window sill plate.
-
Maybe the trimmer and king stud # should be total? (four not two)
-
@pbacot said:
Maybe the trimmer and king stud # should be total? (four not two)
I don't know should it be the total or per side? I prefer per side but that is just me, what is the industry standard?
-
The framing algorithm for stacking windows and doors is going to get very messy, what if the trimmer and kings studs don't exactly lineup? Then the framing gets really interesting.
A larger or smaller opening above another will also call for different framing solutions.
This one is going to take some serious thought.
Why do you designers have to make things so difficult? This one is not really that high on the todo list but it is giving me some serious headaches just contemplating it.
Does anyone have any examples (drawings or pictures) of this sort of situation(s)?
-
Necessity is the mother of invention as they say, and as I was creating a small two story model of a garage for local customer today it quickly became painfully obvious that I still do not have a good stair plugin or module.
The toolbar for the stairs module will start out with the following two icons, there will probably be additional ones added for concrete or steel stairs in the future:

The basic parameters for the Draw Stairs Menu will be:
0.) Stair Assembly Name: Auto assigned by the plugin but user can edit this parameter.
1.) Stair Type: Straight, L-Shape, U-Shape
2.) Stair Width: 40 inches or 1000mm
3.) Stair Height: (This will be determined by the picking of points and the bottom floor plane) ft-in or mm
4.) Max. Riser Height: 7.75 inches or 200 mm
5.) Draw Risers: YES/NO
6.) Riser Thickness: 3/4" or 19 mm
7.) Riser Material: Lumber, Lumber PT, OSB, PLY
8.) Top Tread Flush: Yes or No (this option will make the top tread flush with the upper level/deck
9.) Tread Depth: 10" or 255 mm
10.) Tread Thickness: 1.25" or 32 mm
11.) Tread Nosing: 1.25" or 32 mm
12.) Nosing Shape: SQUARE or ROUND
13.) Tread Material: Lumber, Lumber PT, OSB, PLY, Oak, Birch, Maple, Pine etc... (custom material from material manager in global settings.
14.) Stringer Qty: 2, 3, 4, or 5
15.) Stringer Depth: 11.25" or 285 mm
16.) Stringer Thickness: 1.5" or 38 mm
17.) Stringer Material: Lumber, Lumber PT, LSL, LVL
18.) Stair Framing: YES, NO, 2D
19.) Advanced Options YES or NOThe advanced options or parameters are tentatively:
1.) Thrust Block: None, 2x4, 2x6, 2x8 or metric sizes for metric templates
2.) Hanger Board: Yes or No, will default to 3/4" or 19 mm OSB
3.) Landing Tread: Yes or No ( will default to a 3-1/2" landing tread with bull nose to match stair treads)Eventually I will add other advanced options such as hand rails, skirt boards, gypsum spacers, blocking, brackets etc...
I'm not an expert on stairs but I do have a couple of details where I've considered the various elements of a typical stair case:
http://design.medeek.com/cad/autocad/STAIRHEADER_SECTION.pdf
http://design.medeek.com/cad/autocad/STAIR_SECTION.pdf
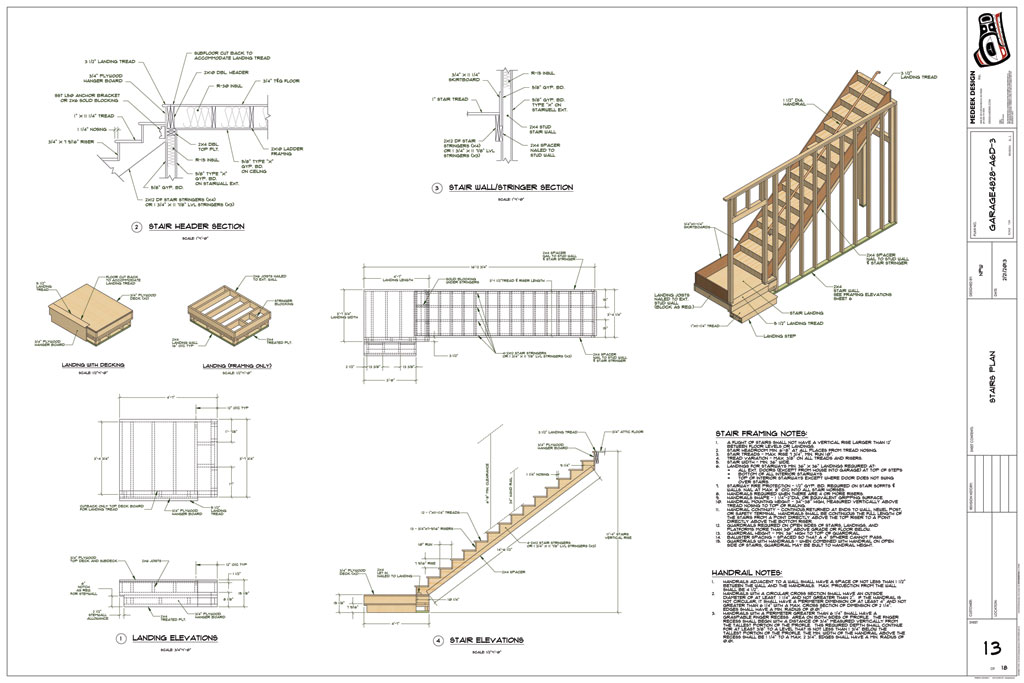
L-Shapes and U-Shapes get quite a bit more complicated with the inclusion of a landing. I will start with just a straight run of stairs first.
Right of the bat I will start with HTML draw and edit menus, no point in messing around with the traditional UI, especially with such a long list of parameters already.
Advertisement


