Forming openings through cavity walls
-
I have been experimenting with forming an opening through a simple insulated cavity wall such as is found in many modern dwellings in England that are built down to being commonly affordable.
This consists of:
1] 110mm Outer Brickwork Skin
2] 50mm cavity,
3] 75mm insulation
4] 140mm Blockwork inner skinHowever forming openings through this specification is proving onerously impossible or nearly so. I have successfully formed and opening treating each layer as a separate entity by drawing the opening onto each face and extruding each singularly. This proves to be not easy and not accurate.
I have attempted to form the opening using solid leaf entities and a plug to pass through the wall to be negated. but that doesn't seem to work even though each leaf and the plug are 'Solid Groups'.
In short how do we do this please in such a way, that say, 10 doors and twenty windows are not two weeks work and that are accurately formed? HELP!
ChrisPSR
-
Also take a look at the following:
There may be others plugins / extensions that may be of assistance as well...
-
I have experimented some with the following: Make an opening once in a piece of wall, make all required variations with doors and windows, trim etc. added in pieces of wall. Snap to your wall line and join to other wall elements. Depends on what you need in the end, you may not even have to "physically" "heal" the wall--but at that level of detail it may be easier to work on aligning, possibly joining, identical wall layers, rather than creating a new opening in the walls over and over.
Just an alternate idea.
-
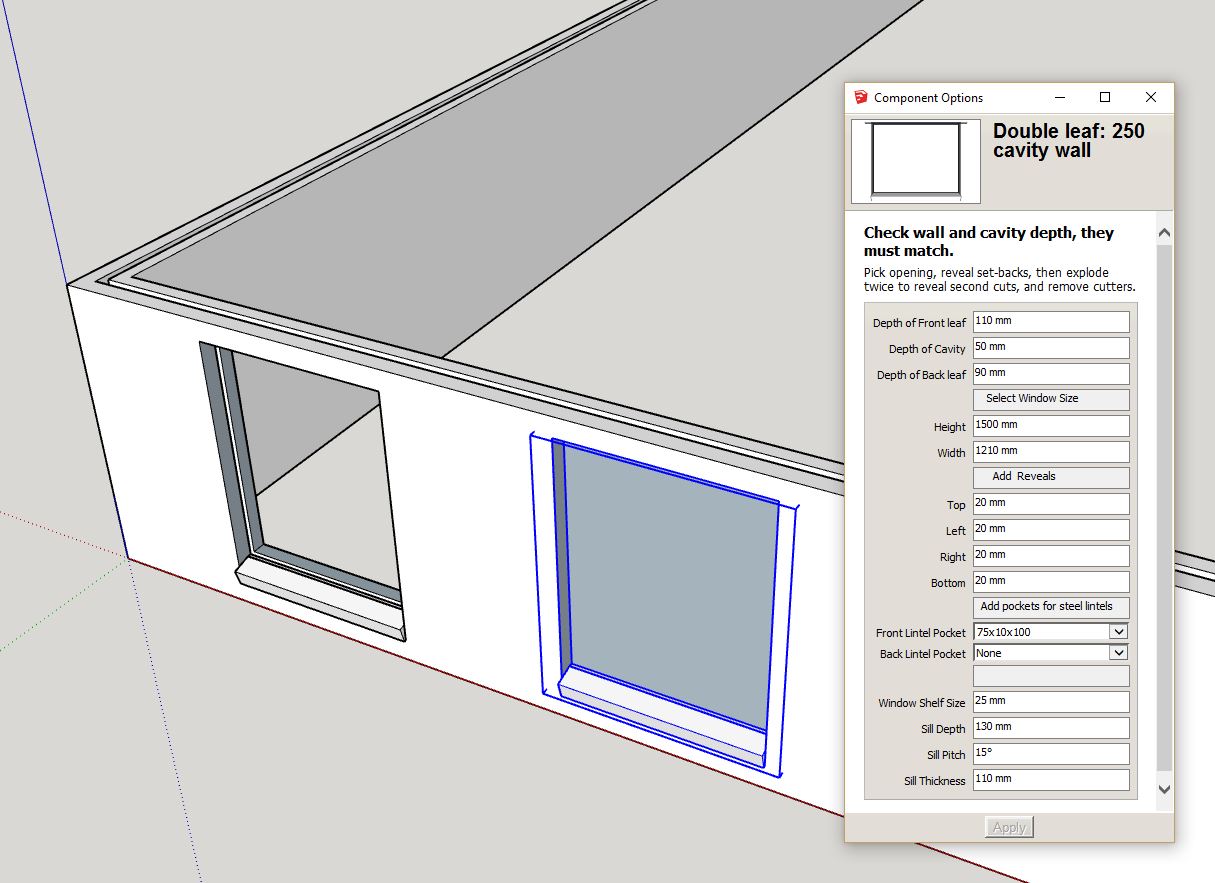
another idea is to develop a DC cutter, but the leafs need to be raw geometry within the group
https://3dwarehouse.sketchup.com/model.html?id=3ea1d7dc922f48723b085f1893a8aea0
thus can have different reveal sizes, sill....to make up time
-
@pcmoor said:
another idea is to develop a DC cutter, but the leafs need to be raw geometry within the group
https://3dwarehouse.sketchup.com/model.html?id=3ea1d7dc922f48723b085f1893a8aea0
thus can have different reveal sizes, sill....to make up time
[attachment=0:3oyy7ame]<!-- ia0 -->Capture.JPG<!-- ia0 -->[/attachment:3oyy7ame]
Another approach I, for one, did not consider. Any way one can start incorporating the creation of return reveals (thickness, so when cut through in plan illustrates correctly) and lintels as well?
Alternatively call it using a ruby that does the extra things you want / need including exploding the cutting component and removing it.
-
@juju said:
Another approach I, for one, did not consider. Any way one can start incorporating the creation of return reveals (thickness, so when cut through in plan illustrates correctly) and lintels as well?
Alternatively call it using a ruby that does the extra things you want / need including exploding the cutting component and removing it.
It depends on how much detail one requires, the lintels can be incorporated, the linings/reveals would be better as part of the window install, a window DC set to scale and nested two deep to survive the double explosion is doable. Then that can be swapped with a detailed one, client choice. Will give it a go over the weekend, plus add the insulation factor.
Philip
Hello! It looks like you're interested in this conversation, but you don't have an account yet.
Getting fed up of having to scroll through the same posts each visit? When you register for an account, you'll always come back to exactly where you were before, and choose to be notified of new replies (either via email, or push notification). You'll also be able to save bookmarks and upvote posts to show your appreciation to other community members.
With your input, this post could be even better 💗
Register Login


Advertisement