3D Truss Models
-
I just saw your pledge this morning, thank-you for the serious vote of confidence. I spent a few minutes and updated the KickStarter page to better reflect the current status of the plugin.
-
In a related note but slightly unrelated I've decided to take a small break from directly programming of the Truss Plugin and apply some effort to the integrated Truss Designer. I've had a number of requests by various parties and individuals to add in plywood gusset plates to the engineering of the Truss Designer, in lieu of standard metal plates (Mitek, Simpson, ITW etc...). This will allow for the design of site fabricated wood gusset connected trusses, something still found in remote agricultural locations. I'm thinking a couple weeks and I will have this programming task complete, at least for the common fink truss, and then put it out there to gauge the response. This new feature will be available from the Truss Plugin when fink trusses are analyzed.
-
Version 1.2.7 - 01.26.2016
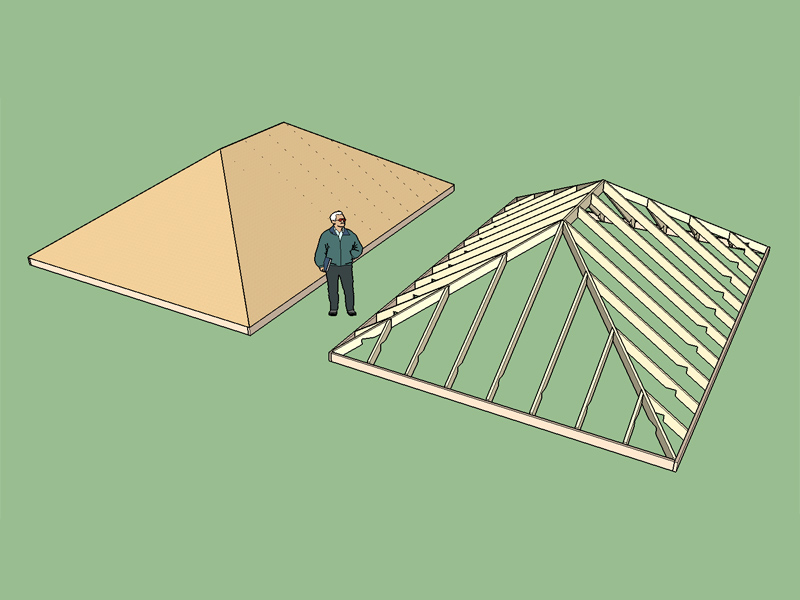
- Added advanced roof options for hip rafter roof (sheathing, fascia).
3D Warehouse
3D Warehouse is a website of searchable, pre-made 3D models that works seamlessly with SketchUp.
(3dwarehouse.sketchup.com)
Couldn't resist adding in these options for hip roof since it was mostly there already from the gable roof module.
Adding in the roof sheathing was also an excellent check to make sure I had the roof planes correctly modeled. I'm glad to report that it all checks out.
At some point I also need to add more properties that tabulate, areas, lineal feet and weights. This information might be useful for engineering and material lists/estimating purposes.
Also note that the fascia boards are not angle at the corners, this is to more easily allow for one to manually push-pull these board to increase or decrease their length.
-
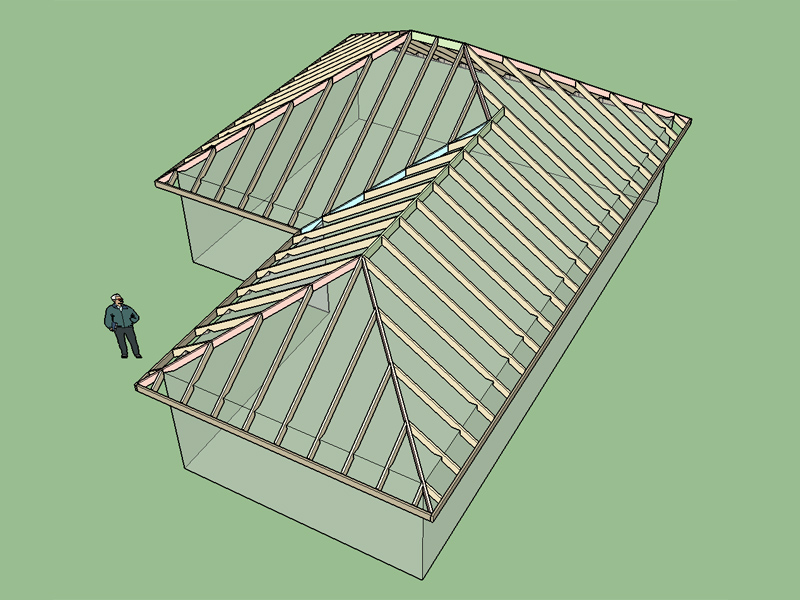
I've uploaded a test L-Shaped structure with a hip roof:
3D Warehouse
3D Warehouse is a website of searchable, pre-made 3D models that works seamlessly with SketchUp.
(3dwarehouse.sketchup.com)
I've created both hip roof primitives with the plugin, that was the easy part.
I then placed a valley rafter with its centerline (top) inline with both roof planes. I think I've got it right. What I am unsure of however is the best way to terminate the framing at the intersection of the valley, lower ridge and flying hip. Once I have a handle on how a carpenter would actually construct that junction I think I can proceed to start work on a secondary roof module for both hip and gable rafter roofs.
-
Rev. 5 is a slight variation of the previous roofs. I have shifted the secondary roof over by 24" to create a T-shaped building. The question is how to best frame the long and short valleys:
3D Warehouse
3D Warehouse is a website of searchable, pre-made 3D models that works seamlessly with SketchUp.
(3dwarehouse.sketchup.com)
-
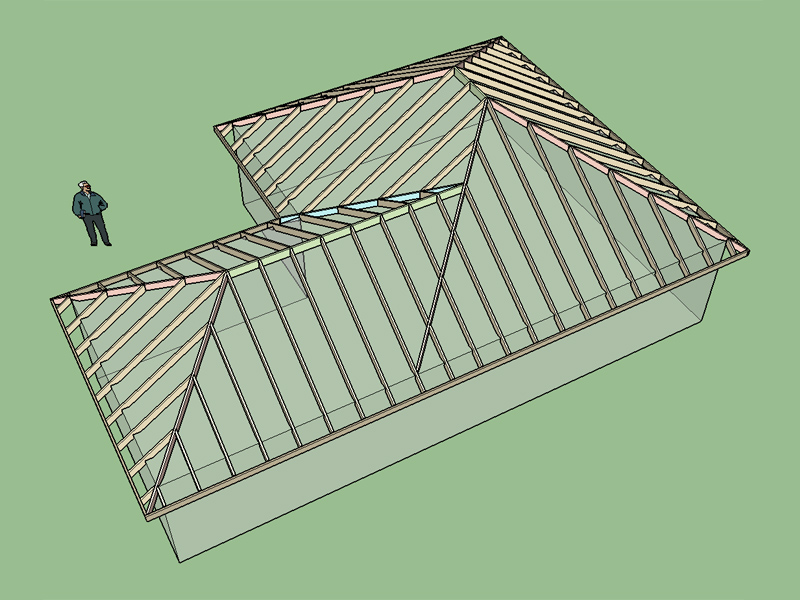
One method of framing this roof configuration is to extend the lower ridge past the joint until it meets the next jack rafter, then the flying hip and valley are miter cut to meet the lower ridge.
I've created a version of the model above with this method of framing at the flying hip/valley/ridge joint:
3D Warehouse
3D Warehouse is a website of searchable, pre-made 3D models that works seamlessly with SketchUp.
(3dwarehouse.sketchup.com)
What is the thinking on this method of framing this particular configuration?
My other concern is the way I have the valley rafter miter cut where it meets the fascia and the corner of the building wall (top plate). Is there a more practical way or better way of making those cuts?
-
Compare Rev 2 with Rev 3:
3D Warehouse
3D Warehouse is a website of searchable, pre-made 3D models that works seamlessly with SketchUp.
(3dwarehouse.sketchup.com)
This version of Hip Roof 4 has the flying hip extending as a full hip to the exterior wall and then the lower ridge framing into it with the valley rafter framed in last.
-
The intersection of the supporting valley rafter, valley rafter and lower ridge I had framed incorrectly. The corrected method is shown below:
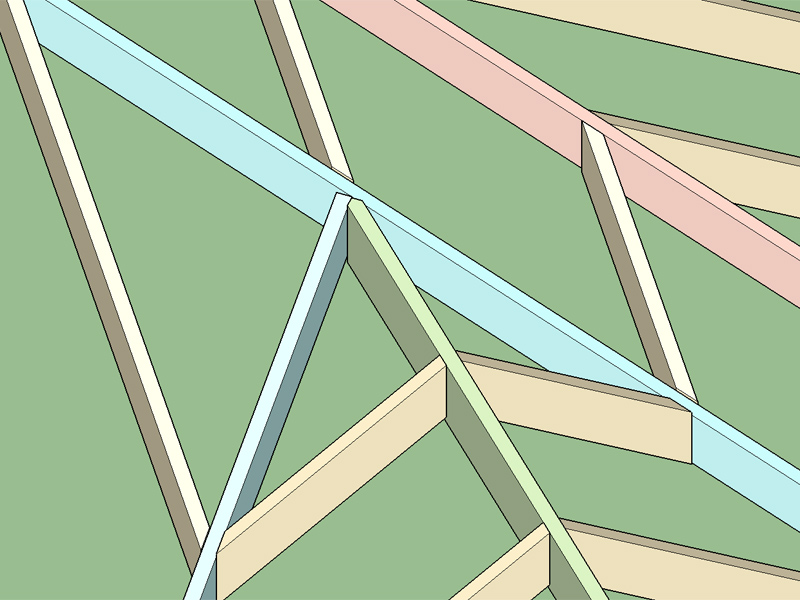
Also note that the segment of the supporting valley rafter between the upper ridge and lower ridge would need to be beveled or "backed" otherwise it clashes with the sheathing. I noticed this when I originally added the supporting valley rafter but confirmed my suspicion when perusing DeWalt's carpentry and framing handbook this morning. I probably should have pulled this book out before beginning this study but it only confirmed everything I had managed to discover myself once I started examining the model.
-
Now that I've got a gable and hip rafter roof I was thinking about adding in a dutch gable roof, but I'm a little unclear on the best method to support the end rafters. Has anyone ever seen something like this used?
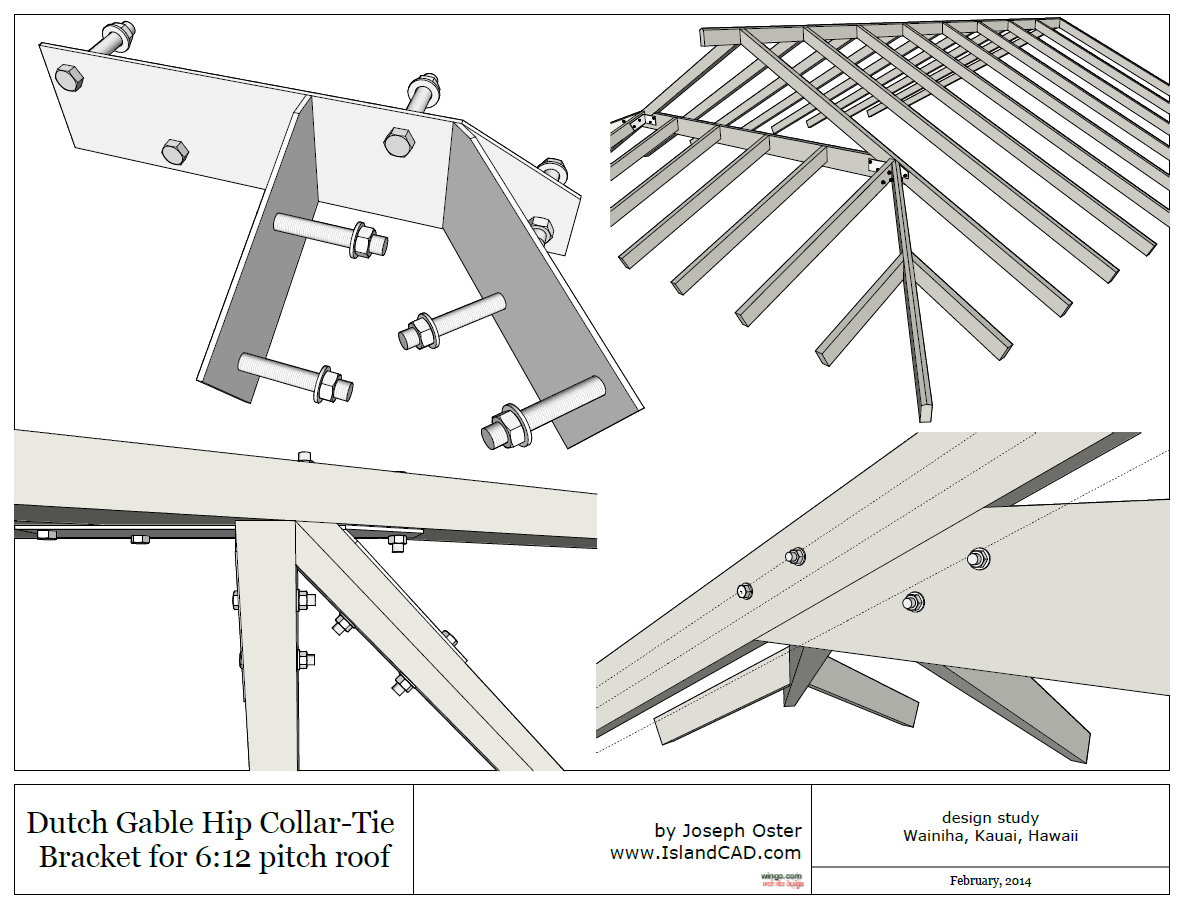
I've checked all of my carpentry and construction books and there is absolutely no reference material on traditional framing of this type of roof, online is also quite scant, any resources, framing diagrams etc... would be quite helpful.
-
This is my first crack at a dutch gable roof framed with rafters:
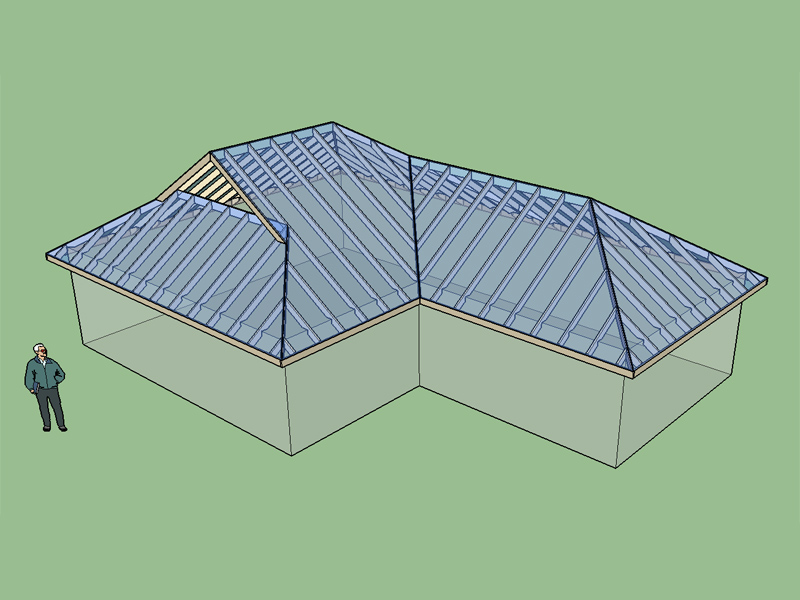
Without the sheathing:
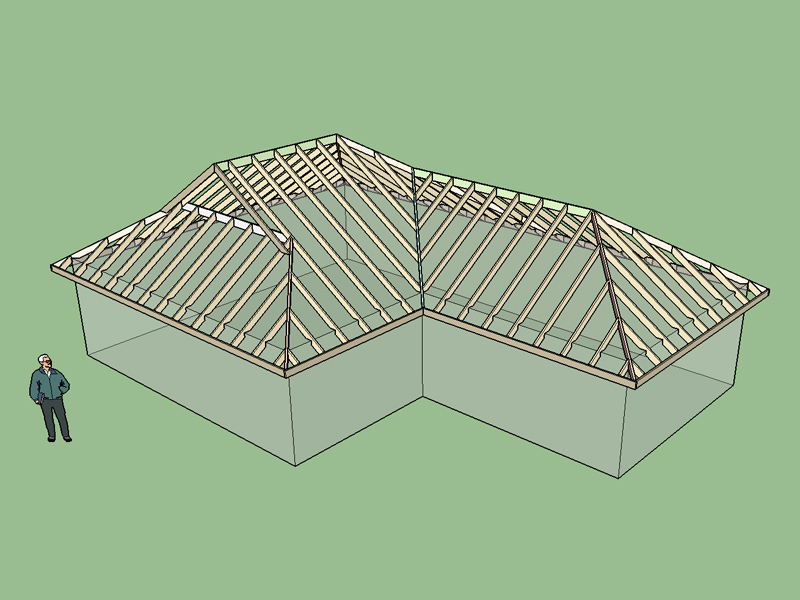
Please examine the model here:
3D Warehouse
3D Warehouse is a website of searchable, pre-made 3D models that works seamlessly with SketchUp.
(3dwarehouse.sketchup.com)
-
Dutch Gable Rev. 2:
3D Warehouse
3D Warehouse is a website of searchable, pre-made 3D models that works seamlessly with SketchUp.
(3dwarehouse.sketchup.com)
Same as previous except for doubled up common rafters at dutch gable.
-
Dutch Gable Rev. 3:
Doubled up gable common rafters with the dutch ridge/ledger is sandwiched between them. Found a paper by Larry Haun, Mar. 1995 "Framing a Dutch Roof" that was published in Fine Homebuilding magazine, that describes a very similar method of framing.
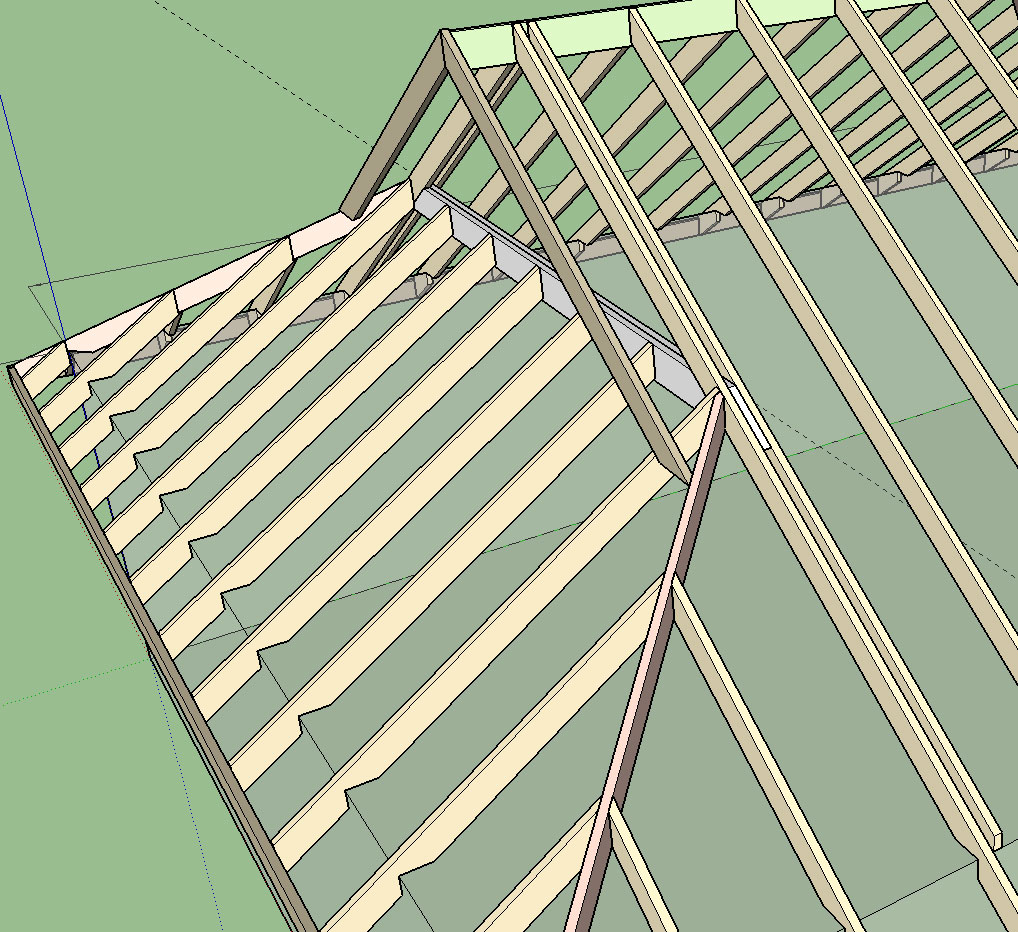
View model here:
3D Warehouse
3D Warehouse is a website of searchable, pre-made 3D models that works seamlessly with SketchUp.
(3dwarehouse.sketchup.com)
Disregard the common rafter sizes they are undersized but look at the method of sandwiching the dutch ridge/ledger between the last common rafters. I would probably also install some blocking between the double gable common rafters. I'm also not showing all of the ceiling joists and bird blocking etc...
If the roof gets large enough then one could go to a double ply dutch ridge, or even a deeper LVL member, assuming there is no internal support available from internal walls.
I think I'm now ready to add the dutch gable roof into the plugin.
-
That looks like a nice way to do it!
-
There is more than one way to skin a cat with this stuff but if I'm going to put something out there I want it to conform as best as possible to current construction methods. Some of these details may be above and beyond what is required but this is the stuff that keeps me up a night.
-
I've also realized that for hip roofs I need an option to set the depth of the hip rafters since they are often larger members than the common or jack rafters.
Here is the new icon for secondary roofs:

This category will contain the following items:
- Gable Roof Minor
- Hip Roof Minor
- Dutch Gable Roof Minor
- Gable Dormer
- Hip Dormer
- Shed Dormer
-
Version 1.2.8 - 02.02.2015
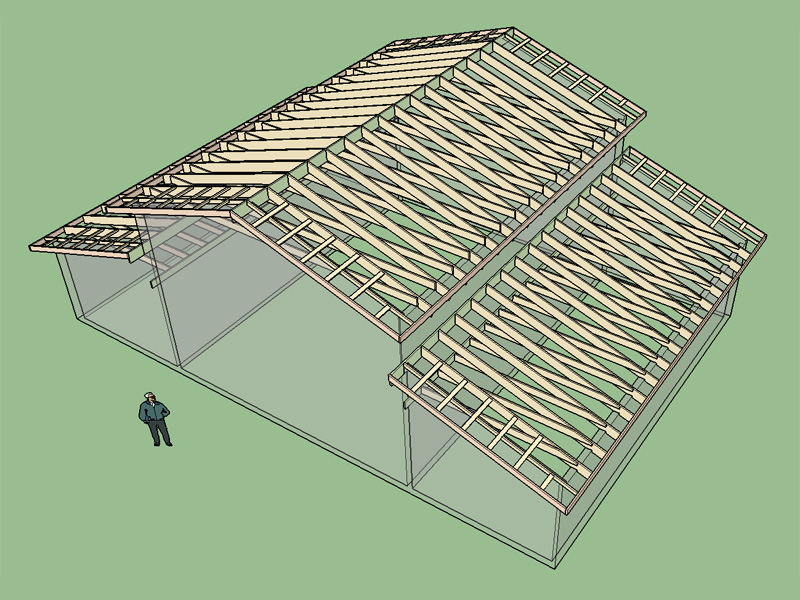
- Added Shed Rafter Roof with Ledger (all advanced options enabled).
- Added ceiling joist option for Shed Rafter Roofs.
- New submenu item and toolbar icon added for secondary (minor) roofs.
View model here:
3D Warehouse
3D Warehouse is a website of searchable, pre-made 3D models that works seamlessly with SketchUp.
(3dwarehouse.sketchup.com)
I used this option to create a monitor style roof line but it can also be used for porch roofs, carports etc... I still need to add a standard shed roof with and upper and lower birdsmouth cut.
Also note that with both gable and shed roofs the ceiling joist option is available, with the option to raise them above the top plate. In this model the shed roof ceiling joists are raised 6 inches.
-
I've created a listing in the SketchUcation PluginStore:

SketchUp Plugins | PluginStore | SketchUcation
SketchUp Plugin and Extension Store by SketchUcation provides free downloads of hundreds of SketchUp extensions and plugins
(sketchucation.com)
-
Looks nice!
-
More "Fun with Roofs".
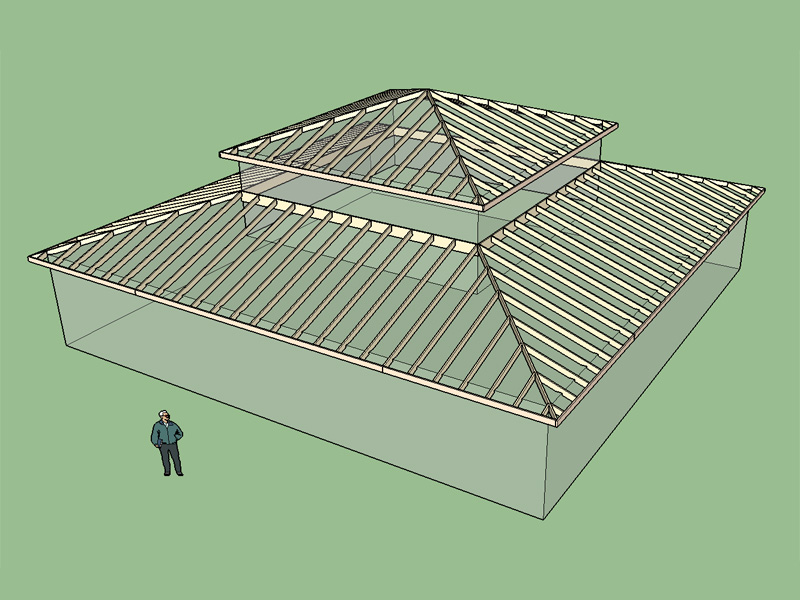
This roof was generated by first creating a hip roof primitive then deleting all but 3 components which were then copied and rotated into place for the lower roof hip corner. The shed roof /w ledger component was created with one primitive and then copied and rotated into place. Overall a fairly painless process now that I am somewhat familiar with navigating my way around SketchUp. The fascia required a couple of trims.
The pyramid at the top required no manual intervention. Approximately 10-15 minutes of work for a fairly substantial roof.
View model here:
3D Warehouse
3D Warehouse is a website of searchable, pre-made 3D models that works seamlessly with SketchUp.
(3dwarehouse.sketchup.com)
-
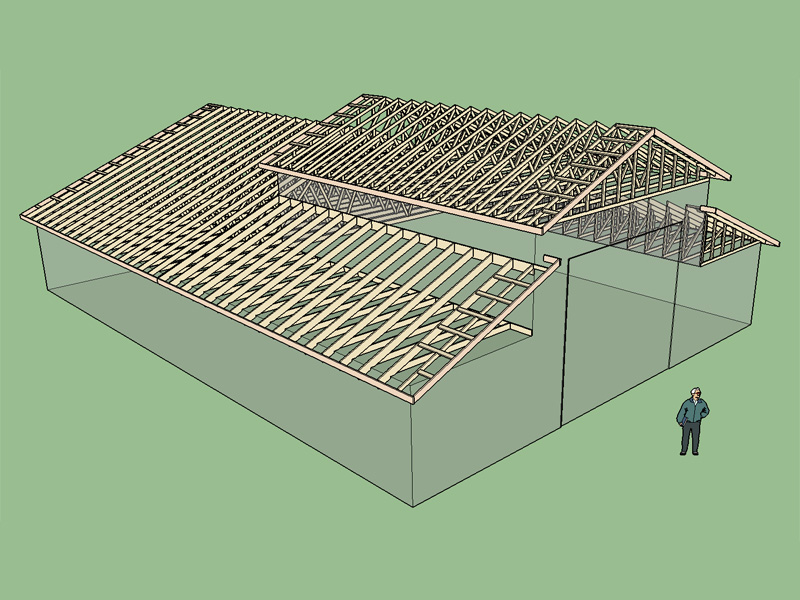
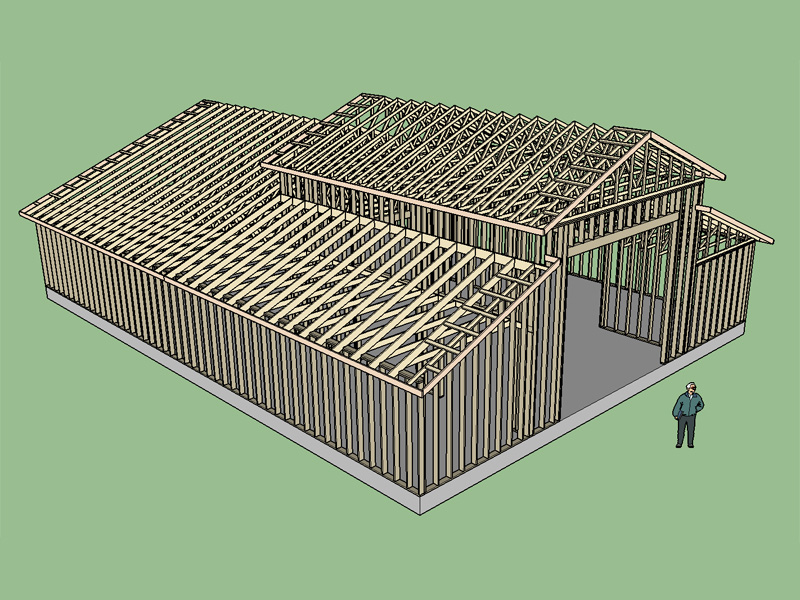
Testing the real world application of the Medeek Truss Plugin. This model combines a double fink truss, raised heel fink truss, monopitch truss and shed roof with ledger. While creating the shed roof special attention to the birdsmouth cut was required to ensure that the fascia height of the rafters and trusses lined up. Also note the use of the raised heel type truss on the upper roof portion. Structural outlookers were specified for all gable overhangs.
5:12 pitch roofs with rafters and trusses 24" o/c. I did not apply a level cut to the rafter overhangs but that would probably be a given. Span of the double fink is 48 feet with 2x6 top and bottom chords.
View models here:
3D Warehouse
3D Warehouse is a website of searchable, pre-made 3D models that works seamlessly with SketchUp.
(3dwarehouse.sketchup.com)
3D Warehouse
3D Warehouse is a website of searchable, pre-made 3D models that works seamlessly with SketchUp.
(3dwarehouse.sketchup.com)
If anyone has some real world applications using the plugin that they are willing to share I would be very interested to see how it is being used and it would also give me some direction for further development and improvements.
Advertisement


