[Plugin] GKWare Door Maker
-
@krisidious said:
Drag option seems to put drawer on backwards starting from bottom right dragging to top left. all other start points put drawer off to sides.
There are 3 drag options - All work from bottom left to bottom top.
The bottom left hand corner of the door / drawer is based on the first point chosen.If you bottom right hand corner then top left hand corner then the door will be place backwards as if you are on the other side of the cabinet.
@krisidious said:
can I 'select the area' make doors or drawers.
Ability to select lines while in menu to read entity info.
I'm not sure what you are asking?
-
@unknownuser said:
There are 3 drag options - All work from bottom left to bottom top.
The bottom left hand corner of the door / drawer is based on the first point chosen.If you bottom right hand corner then top left hand corner then the door will be place backwards as if you are on the other side of the cabinet.
got it. a note to that effect in the info text on the bottom might be good.
like "pick bottom left corner"these are two different questions...
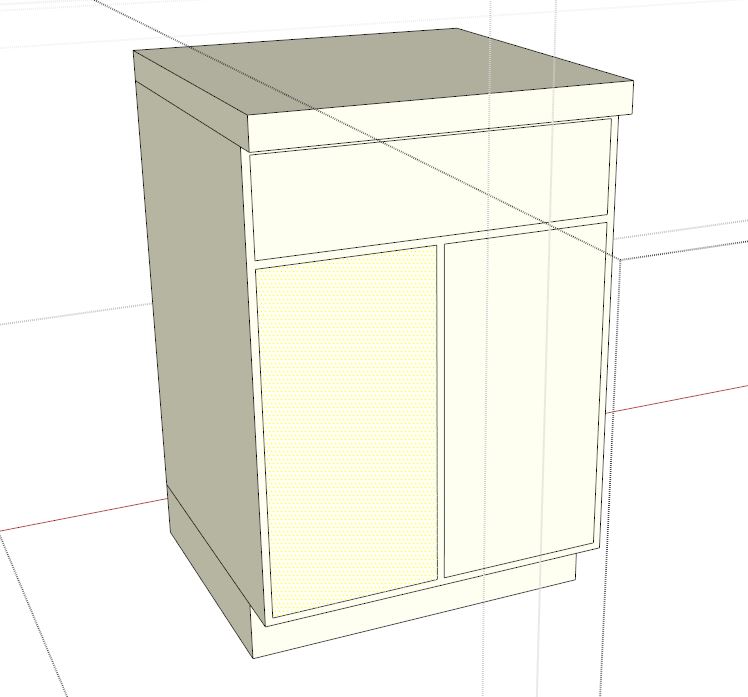
Can I 'select the area' make doors or drawers. I draw cabinets out or use my stock base and upper units, then I decide things per project like drawer fronts and tolerances. as you see in the screen grab If I could select a face I want to be drawer or door that would be awesome.
Ability to select lines while in menu to read entity info.
If I can't select a face and make it a drawer or door, then it would be nice if when I forget to find out what the size of door and drawer fronts are, I could click out side the menu, back in the model, while leaving the menu open. A few plugins do this, most don't. -
@krisidious said:
got it. a note to that effect in the info text on the bottom might be good.
like "pick bottom left corner"Good idea! I will add this to my "to do" list for next version. It would also be simple to let user pick top left hand corner and then bottom right hand corner.
@krisidious said:
Can I 'select the area' make doors or drawers. I draw cabinets out or use my stock base and upper units, then I decide things per project like drawer fronts and tolerances. as you see in the screen grab If I could select a face I want to be drawer or door that would be awesome.
I think what you are asking is for a different interface where you pre select 1 or more face, bring up menu, set up tolerances and select door, drawer etc. Then click "OK" and convert ( delete and replace ) the faces with the door / drawer.
This would mean for each face I would have to detect which side is in and which side is out otherwise doors / drawers could be put on backwards. What happens if the faces aren't rectangular or if they are on a weird plane? I'm thinking there are a lot of tests.
Next version may include items like door handles ( positioning and selection ), user added profiles for edge and for panel raising etc.
I'm not sure that I could work with multiple faces and figure out door pull positions at the same time. I suppose for example, if user picked multiple faces where all of them could have a handle on the same relative location, that might work. But it might just add to the confusion because it would mean doing things in a very specific order.
@krisidious said:
Ability to select lines while in menu to read entity info.
If I can't select a face and make it a drawer or door, then it would be nice if when I forget to find out what the size of door and drawer fronts are, I could click out side the menu, back in the model, while leaving the menu open. A few plugins do this, most don't.Are you saying you want to suspend the door / drawer operation so you can perform some other sketchup operation like right click a line and read entity? So that you can get its length etc.
Currently if you make changes to the door menu (input box) and click OK or press enter, then the settings are still intact when you go back into the door menu. So you could:
- make changes to door menu
- click ok or press enter - box disappears and mouse cursor changes to door insert
- press escape, choose a line, right click and choose "entity"
- go back into door menu - last choices are all still intact. Adjust something based on what is in "entity". press enter or click ok.
Leaving a menu open means a rewrite for the interface. Change the sketchup inputbox to a web dialog box.
-
Kristoff,
Version 1.0.20
- Fixed the draging operation. User can now chose any corner and drag to the opposite diagonal corner.
- Added config folder. Users should put their edited defaults.txt and or textures.txt files in this folder. They will be preserved with future updates.
- Added Chinese(Simplified) language file zh_cn.lang
-
Koooool. I'll give it a try.
-
Thanks for the plugin!!
I have created the Spanish Language file. -
I am now working on the "pro" version of door maker.
New menu items
- Add Edge Profile
- Add Panel Raise profile
- Add Handle
New input values / drop downs
- Handle Style including "None"
128 mm bar pul
96 mm wire pull
96 mm flat bar pull
Round knob - Handle location drop down possibilties:
Top Left
Top Center
Top Right
Center
Bottom Left
Bottom Center
Bottom Right - Handle Offset input value
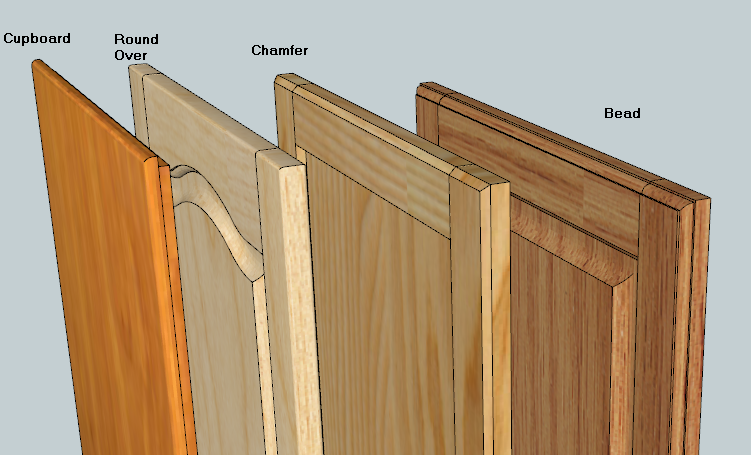
- Front Edge profile drop down default values include:
None
Round over
Bead
Chamfer
Cupboard - Back Edge profile drop down default values include:
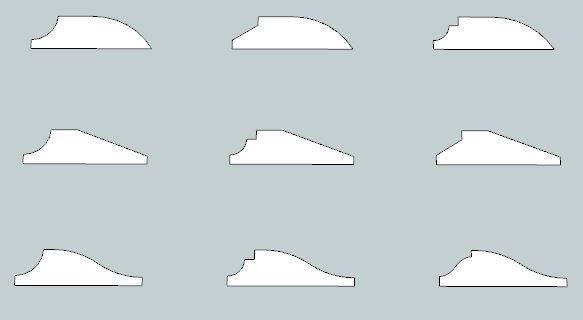
- Panel profile drop down default values include:
Cove with bead
Cove with ogee
Cove with slant
Slant with bead
Slant with ogee
Slant with slant
Ogee with bead
Ogee with ogee
Ogee with slant - Lower Rail height input value
- Lowest Panel height input value
-
Looks great Garry...
-
You will also be able to add door handles and pulls into the gkware_doormaker/handles folder and they will appear in the drop down list of handles.
You will get 1 skp file with Edge profiles and 1 skp file as panel profiles. You can add more profiles and use the Add Edge Profiles button or Add Panel Profiles button. This will go through the geometry and add a file into the appropriate folder. The entries will then appear in the various drop down lists.
These are examples of the supplied edge profiles.
The one marked "Cupboard" is designed for the old style American Face Frame construction complete with a 10 mm x 10 mm rabbet. This can be accomplished by choosing "inlay" and by setting the gap to 8 mm and the protrusion to 12 mm.
-
Thanks for the plugin! Very nice and complete.
I have created the italian language file.
I hope you helpful.
-
Very nice options! Adding some more profiles and handles is very useful too, e.g. many customers want longer handles.
What would be the pricing for the pro version of your DoorMaker plugin?
-
@unclebim said:
Very nice options! Adding some more profiles and handles is very useful too, e.g. many customers want longer handles.
What would be the pricing for the pro version of your DoorMaker plugin?
You'll be able to add profiles and handles to the library as you wish and I think the price will be between $10-$20US. Not sure though.
-
Kristoff is correct. That is the range for the pricing for the Door Maker Pro.
Here is the Input Box for Door Maker Pro.If anyone has suggestions or comments - now is the time to start talking.


-
I can't think of anything I would add Garry...
-
It all looks great.
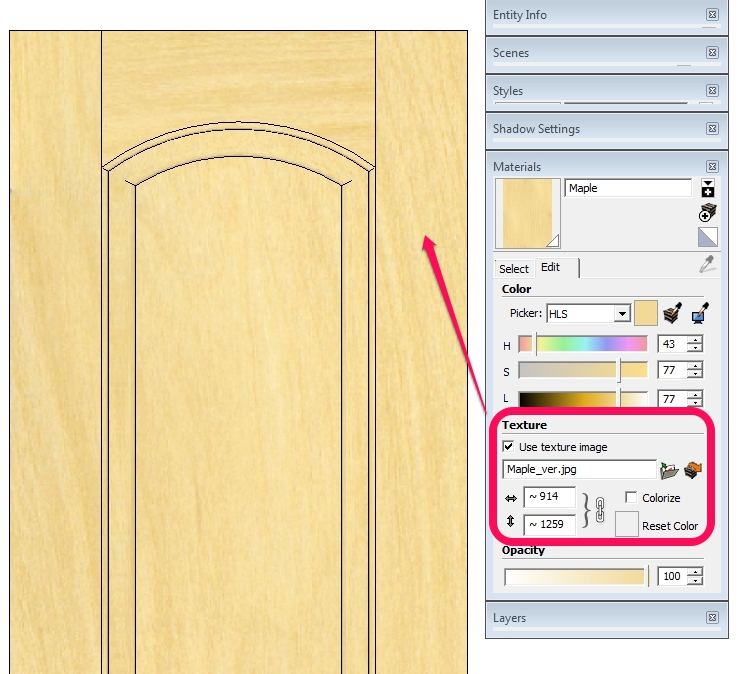
Something about the materials though. The textures provided with the DoorMaker plugin so far are not seamless and . I made a quick seamless version of the images provided within the images subfolder in the .rbz file and you may find them attached. Some don't look good but the source texture file has too little of the wood grain. If you need some assistance with the textures I would be happy to help.
Besides the applied material's size is too large for the most of the materials.
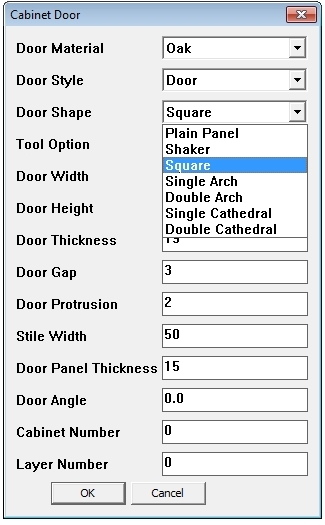
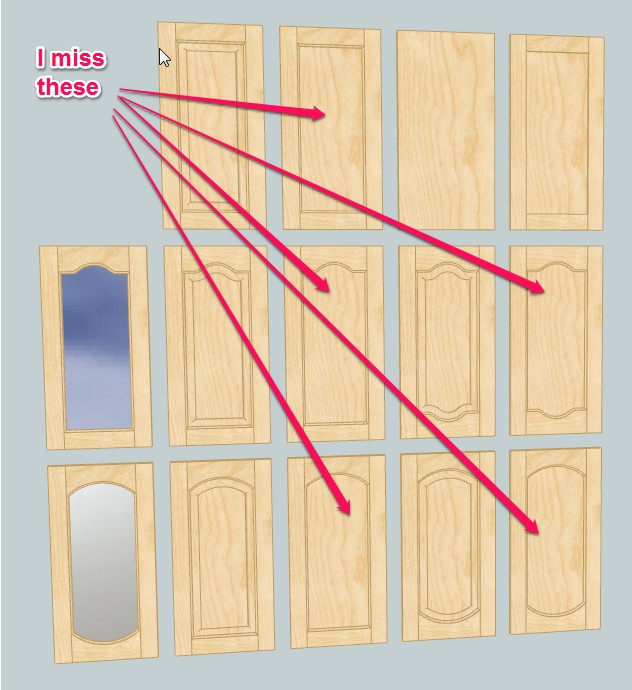
One more issue: I am missing some style of the doors referring to your manual, what am I doing wrong:
-
To get your missing doors it is actually quite simple.
All you need to do is adjust the thickness of the panel.Change it to something like 6 mm. What the code does is for any panel that is 15 mm or thicker it brings the panel face flush with the stiles and rails. Any panel that is thinner than 15 mm it puts it behind the bead and drops the cove cutter (no panel raise).
And of course I would love to learn more about textures.
I pulled most of these from here:
http://www.fritz-kohl.de/en/preview-veneers.28.0.0.0.0.htmlHere are a couple of other interesting places to look for wood grain patterns:
http://www.woodmagazine.com/materials-guide/lumber/wood-grain-textures/
http://forums.sketchucation.com/viewtop ... lit=madhav
http://www.veneeronline.com/species.asp ... ory=lwdbdlPerhaps you noticed the textures.txt file. It contains the name of the texture a coma and the length. So I'm assuming you want to play around with this number - I just set it to 36 for all textures.
The required _ver is because I used to carry vertical and horizontal patterns. I was able to drop the horizontal one but the _ver is still there for backwards compatibility.
-
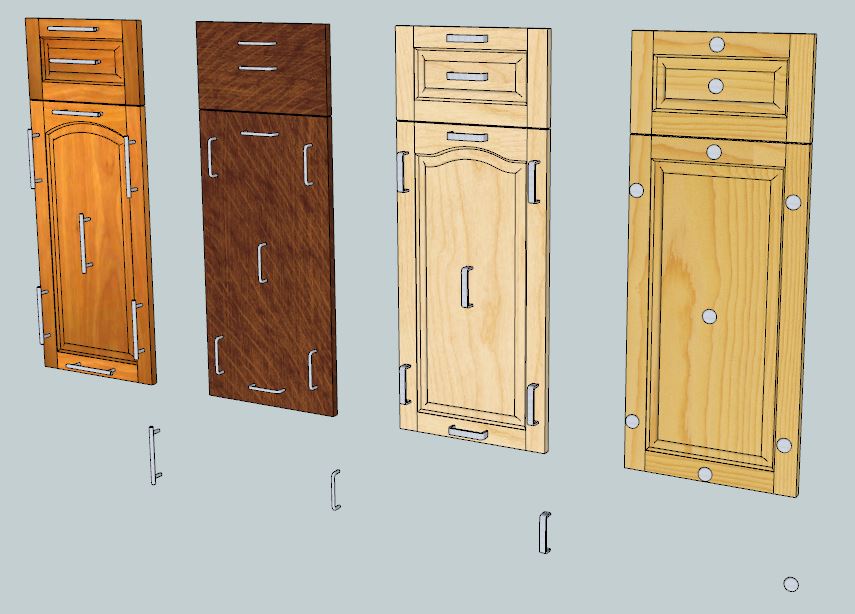
The pro version is in final testing. Here are some doors that can be made along with a sketchup file that I've used to create these profiles.
Keep the geometry simple. Arcs are 3 to 5 segments. Straight lines are not divided.
When you are happy with a profile just select the face and click the new "Add Profile" button. Select which profile group and give the new profile a name. We simply add a txt file into 1 of the 4 profile group folders.The next time you run Door Maker Pro - the profile will be in the drop down list.
Here is the contents of gkware_doormaker/panel profiles/Ogee.txt
0.000000,0.342090
0.000000,0.000000
1.181102,0.000000
1.181102,0.078740
1.069553,0.087210
0.960561,0.112427
0.856627,0.153812
0.760133,0.210415
0.663639,0.267019
0.559705,0.308404
0.450714,0.333620
0.339164,0.342090


-
Awesome Garry...
-
Door Maker Pro lets you build passage doors. Just set the Stile Width to say 4-5 inches and set the Bottom Rail to 8-10 inches. You can set it to what ever you want.
Some of these examples make use of the new "Glass Combo" choice where the Top Panel is glass and the other panel(s) are your door material.
Also notice that doors that are >= 30 mm thick have the panel raise and moulding on both sides.


-


Advertisement