Calculate the number of tiles I needed in my floor plan
-
Hi,
I'm trying to do the renovation for my new house and I attmpted Sketchup to design and to plan.
I had managed draw up the 3D model of the house using my floorplan and I like to include tile.Wondering can sketchup help me calculate the number of tiles I need for my floor area?
Pls advise on- how to use sketchup to model the exact number of tiles I need?
- How to lay the tile repetitively on the floor.
- I have problem pushing out my door to create a void
 - wondering is there anythings I need to look out for ?
Thanks.
-
Hi Ade, hi folks.
Let F = floor area in whatever unit you want.
Let T = tile area for one single tile using the same unit as the floor.
Let N = number of required tile
Then, N = F/T
To be safe, add 10% for losses and you should be good.
Now, to find F with a complex shape, sketchUp can help.
Draw the perimeter of your floor as well as you can using a good measuring tape. The Text tool gives the area by default when applied to a face.
If you want to get real fancy, continue reading.
Once you have the floor drawn, group that to avoid any other geometry from interacting with it.
Draw a tile using its exact measurement. Make a component with it.
Position the tile on some spot of the floor.
Copy it along one direction, to get a row, taking into account the grout joints. For example, if you have 12 in x 12 in tiles and you want 1/4 in joints, you shall move the copies by 12.25 inches.
Copy the row to get an array.
Make enough copies to cover the whole floor and then some.
Select the floor group and move it around to get the best visual effect and also to minimise cuts.
Take these cuts into account to calculat waste. For example, lets say that you end up with 1/3 tile along one wall and 1/2 tiles along another. You will not waste 2/3 and 1/2 tile each time since one tile can yield the 1/2 and the same can yield the 1/3.
When done, you can estimate the required amount of tile very precisely, to the nearest tile. Then, you may add a few just in case you break them while cutting. Maybe 5% extra will prove sufficient.
Just ideas.
-
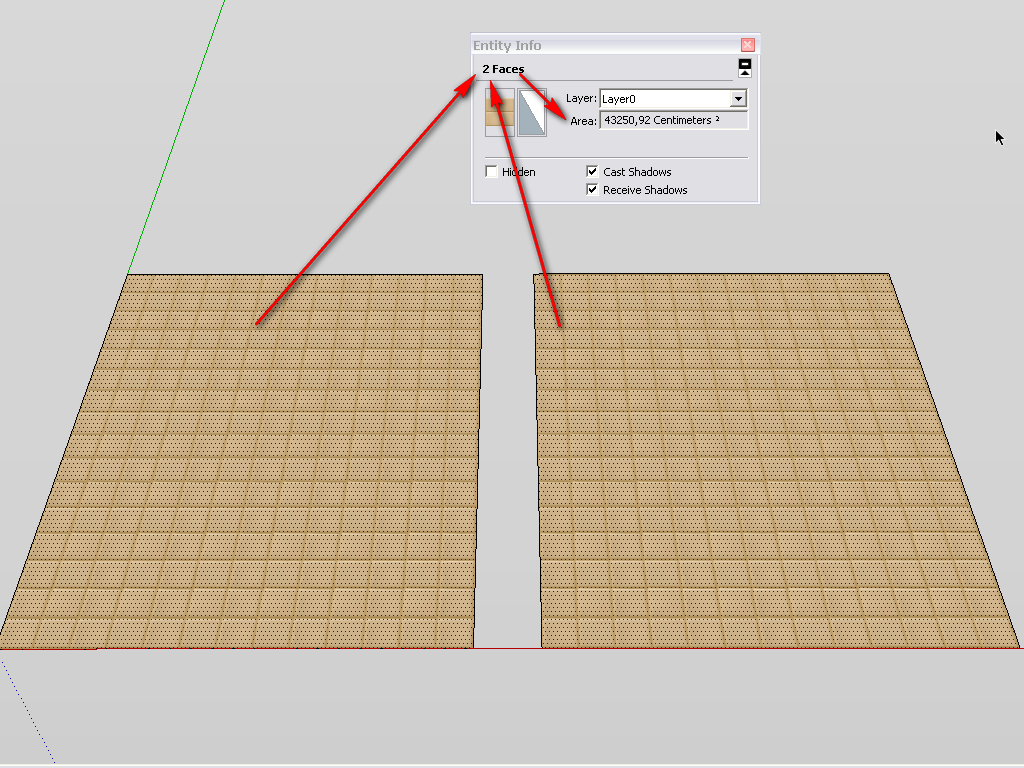
To carry on along Alan's suggestion, when you select all faces with the same material in the model, you get the compound area of those faces in the Entity info box and you can divide this by the area of a tile . Now this is of course just a rough guideline of how many tiles you actually need (you will probably cut some of them etc.) but can be a good starter.
-
Thanks guys!
 I shall try it!
Wish me luck!
-
Another method would be to get a seamless tile pattern off the Net (or use the one I got in the attached file...or even one of those supplied with the program). import it into your model...size doesn't matter. Then on the Edit tab in the Materials browser, scale it to the correct size. This one happens to be 8 tiles square, so I scaled it 8'x8'...a little more if you want to allow for grout. An applied pattern will automatically align itself with the origin, but you can get the whole tiles to align along any wall you want by right clicking the surface and choosing Texture > Position from the context menu. This will enable you to drag the entire floor pattern in any direction you choose.

Hello! It looks like you're interested in this conversation, but you don't have an account yet.
Getting fed up of having to scroll through the same posts each visit? When you register for an account, you'll always come back to exactly where you were before, and choose to be notified of new replies (either via email, or push notification). You'll also be able to save bookmarks and upvote posts to show your appreciation to other community members.
With your input, this post could be even better 💗
Register Login


Advertisement