Blend Image Help Please
-
Matte, would it be easier to adjust the size of the Shaderlight output instead? Only one image to resize instead of several. Or could you rexport the sketchy line images to be the same size as the rendered image?
-
Thanks Dave,
I'll try to modify the images to match the shaderlight, unfortunatly the shaderlight proportions came out different then the others,(it actually looks better!), so I'll try to manipulate the images in SU and see how it goes, I just remembered if I make a texture I can adjust the X or Y proportions seperatly. I'll post the first test result as soon as I get it done. Thanks again for your advice, I always appriciate it greatly!
Matte -
Thanks again Dave,
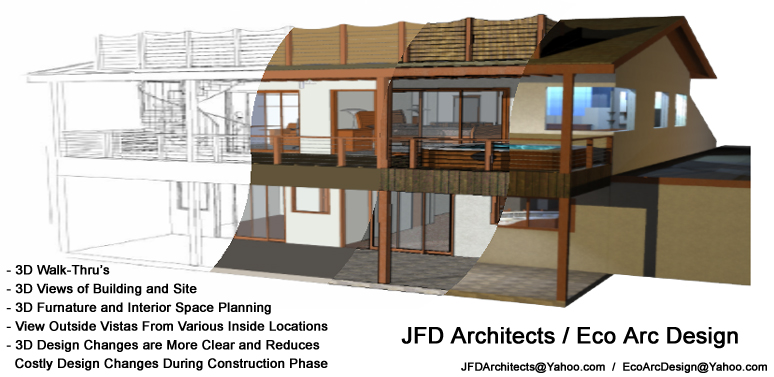
It worked, I only used SU to do it all, which is a good thing! The less programs needed the better (and faster), attached is a test of what I was trying to do. Though it is a bit boring/ugly, it's Ok it was just the concept I was trying for. If my friend thinks it has potential I will make a more professional attempt with a better building.

-
@Matte:
Verify spelling in your ad copy. -
Matte, that looks pretty good. As mitcorb says, you might want to check the text for spelling.
When you do this in the future, I would suggest that you sort out the rendered image size so it comes out to be the same as your other exports. This should help make combining the images easier.
For this image I set the rendering size (in Kerkythea) to be the same as the export size from SketchUp. Then it was a simple matter of pasting the line image onto a layer over the rendered image in the image editor.
If, as it sounds might the case for your line style, you want a smaller image size for the lines you can resize the larger image down to the smaller image's size maintaining the aspect ratio. Using the Jefferson lap images desk for example, the small one is 640 x 424 and let's say the render is at 3000 pixels wide. Make the the render match the aspect ratio by setting it to 3000 x 1988. After the render is complete, resize it to 640 wide and you should be all set.
-
Thanks,
I didn't check the spelling for this test image it was late and I was getting a bit lazy. I'll be sure to do it on the real one. I like better the way you faded the image from one to the other it is much cleaner looking, I'll have to learn to do it the way you did. Thanks you both for your advice. -
I don't think you want to learn to do it the way I did it. I think I was doing it the hard way. I made a gradient for line image so it fades out to transparent and then overlaid it on the rendered image. I guess it works alright although the render itself could use some help. It was just to prove to myself I could do it.
-
Nice work, I like the effects you are creating.
As a useful tip Shaderlight matches the width of the render with the width of the SketchUp window. So to get the images to match directly you need to resize either the Shaderlight image, or the SketchUp screen image to be the same width. Then you can change the Canvas Size in Photoshop to cut the required image down to size.
Hope this helps.
-
Thank Guys,
I'll have to learn to do the gradient type transition like you did Dave; it looks much better that way smoothly transitioning from one image to the next. Another thing to add to the infinite list if things to learn! I'll have to test my Shaderlight output setup again, as it seamed to make a slightly different field of view render then the standard SU outputs? But, I was just throwing things togather just to see if the idea had any potential and did not pay too much attention to the details. Besides with my head swimming a bit along with this 103 degree temperature makes things a bit more challanging to do.
Thanks again,
Matte -
Matte, I hope your fever has come down.
Here's a quickie for the process I used to create the gradient. The pros probably know a better way but this works. The table is Christian Becksvoort's classic Shaker table. In this example I am just using exports direct from SU. One is textured with lines turned off and the other is Hidden Line using my Pencil MP1 style. Both images were exported at 3000 pixels wide because I wanted the pencil lines to be thin and light.
I used Photoshop Express but I guess the process would be similar in any image editor. I opened both images. In the textured one, I created an additional layer I called Lines and then copied and pasted the hidden line image to that layer. I put the textured layer on top. I could have copied the textured image to a new layer in the hidden line image and eliminated the step of rearranging layers but that's not a big deal.
Then I selected the Gradient tool and set it to go from transparent to white and made sure Transparency was selected. I used a linear gradient for this but there are other options.
Then it was a simple matter of clicking and dragging to indicate where the gradient would be. The shorter the line, the steeper the gradient--the more quickly the image blends from one to the other. I played with different angles and directions to find something suitable.

Christian Becksvoort's Shaker Classic textured and in pencil
Advertisement


