Oops, your profile's looking a bit empty! To help us tailor your experience, please fill in key details like your SketchUp version, skill level, operating system, and more. Update and save your info on your profile page today!
🔌 Smart Spline | Fluid way to handle splines for furniture design and complex structures. Download
[Tutorial] Creating and Hatching in LayOut
-
From a PM to explain how to create and use hatch patterns in LO I thought I would share this simple process.
I’ll example as a straight square tile hatch.
CREATING HATCH (SEE HATCH.LAYOUT ATTACHED)
- Open a new LO doc – set page size say 200mm x 200mm / no margins / set grid 10mm / grid snap on / object snap off
- Using the line tool draw a line say (1px wide) down one side and copy across each grid interval,
- Now turn snap to objects on, select all and rotate + crtl to copy rotate through 90deg,
4.Export image as PNG say 500 x 500 pixels to keep it clean, note the larger the image the more LO will struggle when this is imported back in.
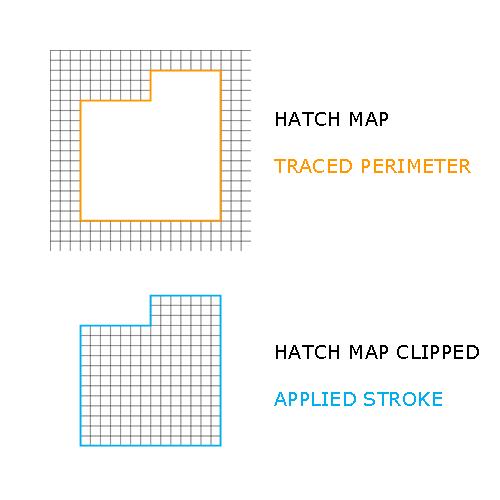
USING HATCH (SEE IMAGE BELOW - HATCH USE)
- Open you working doc (the one you want to apply hatch to) drag and drop the PNG hatch image in,
- Place it where you wish to hatch and scale appropriately, and push it backward so it is behind the rest of the work,
- Now draw a line around the perimeter of the area you want hatched (I will assume this is less than the size of the hatch map – more later) and ensure this perimeter closes,
- Select both this traced perimeter and the hatch map, right click on them and from the context menu select “create clipping mask” – DONE!!!
AREAS TO BE FILLED LARGER THAN THE HATCH MAP
- DO NOT try to duplicate the hatch map multiple times and then clip with one perimeter clip map! This will work first time yes BUT if you try to edit it later well ALL HELL will break loose!
- To fill areas larger than the map, break the area up with multiple copies of the map and multiple clipping masks!!
NOTE
- If you want a border around the hatched area simply select the clipped item and assign a stroke,
- If you have used multiple maps and clips and want the whole area to have a border select all clipped items, turn off any stroke and then trace around the whole perimeter, assign a stroke with no fill. These can then all be grouped – again DO NOT try to clip multiple copies of the map – you have been warned!
CREATING A SCRAPBOOK LIBRARY OF HATCHING
- Open a new LO doc,
- Drag in all your hatch patterns and arrange as suits,
- Save doc as scrapbook – name file as wished!
HOPE THIS HELPS!


-
Thanks Richard! This tutorial is excellent and much appreciated.
-
Pleasure mate, I know the question has arisen a fair few times so better to make a full explanation.
Advertisement


