My Xtratuf W.I.P
-


Modeled from this boot:

-
I like following your workflow. I'm learning a lot of it.
How did you connect and smooth the surface? with subdivide and smooth oder with the SU smoothing function?
-
Hi, no I didn't use any plug-ins. I had a component that was like a slice of a boot and i would copy that and scale it to match two profiles I had drawn of the boot. Since each slice had the same number of edges it was easy to connect the endpoints and then smooth it out.
I imagine the plug-in is useful, but I haven't taken the time to try it.
I had hidden geometry turned on when I was working but I always turned that off to take a picture and post it.

I finished the boots now, I'll post a picture.
-
@joshua said:
Hi, no I didn't use any plug-ins. I had a component that was like a slice of a boot and i would copy that and scale it to match two profiles I had drawn of the boot. Since each slice had the same number of edges it was easy to connect the endpoints and then smooth it out.
I imagine the plug-in is useful, but I haven't taken the time to try it.
I had hidden geometry turned on when I was working but I always turned that off to take a picture and post it.
I finished the boots now, I'll post a picture.
Great ! especially without plug-ins
 (don't know if I could without)
Hope to see more of you in thye future.
Flapsy
-
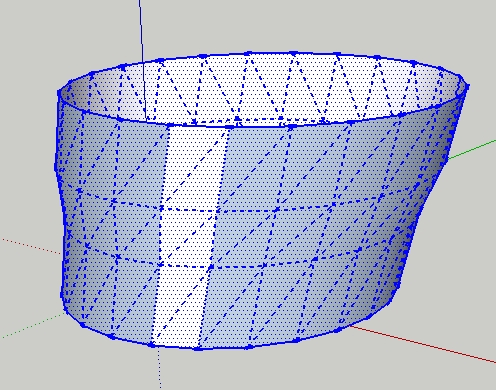
Joshua, This is a mesh, yes? Like:
-
@joshua said:
Yes, it looks like that mesh.
Now I'm trying to put the label on.

- make an outline of the logo image
- make the outline a group
- open the outline object and extrude it until it completely intersects the boot
4)close the logo shape group - select the boot mesh and the logo shape group and intersect selected
- delete the logo shape group
- Explode the logo image and it becomes a texture
- select the exploded logo texture right click and select texture and make it a projected texture
- use the material selection eyedropper (hold down alt while you are in the paint bucket to sample the exploded and projected logo material
- with hidden lines turned off now you can paint that projected logo texture onto the patch of the boot that conforms to the shape of the logo
- now you can hide the lines that define the shape of the logo or soften them.
voila you have the logo on the curved surface.
there are other ways but this is just the old fashion way that I use.
-

-

-

-
Yes, it looks like that mesh.
Now I'm trying to put the label on.

Hello! It looks like you're interested in this conversation, but you don't have an account yet.
Getting fed up of having to scroll through the same posts each visit? When you register for an account, you'll always come back to exactly where you were before, and choose to be notified of new replies (either via email, or push notification). You'll also be able to save bookmarks and upvote posts to show your appreciation to other community members.
With your input, this post could be even better 💗
Register Login


Advertisement