Animating Before & After of Terrain Modification
-
Anyone have a method of showing an animation of the transition between a before/unimproved and an after/improved drawing of terrain. I'm trying to find the best way of visually displaying what I want done in terms of leveling and drainage to a lot I am going to build a house on. I have both the before and after drawings complete, but cannot figure an elegant way to show the difference between the two.
Thanks in advance,
F. -
You could use section cuts transitioning in SektchUp. Or an image transition of the rendered raster images in flash or something like that. Can you attach the two files?
-
-
OK, here is a version where in each group, I placed two section planes and made two scenes for the whole model (click on the scene tabs to see the "transition" between the Unimprovedand Improvedterrains).
Level Difference Animation.skp
Now the trick is:- you can have one active section plane in every editing context (i.e. in this case in one in each group - plus you could have one "top", at model level - this is the case in the video below for a bit "more simple" explanation).
- in each group there is an active and an inactive section plane - obviously the active one will "cut" the group.
- In each scene the "activity" of the section planes are shifted from one to the other which makes the visual animation effect of them.
- since there are two groups with their respective active/inactive section plane set (just the activity is set "reversed"), while one is being hidden, the other is being unhidden my the animated section planes (actually, two, different section planes; one for each group).
Maybe it sounds a bit difficult this way but in reality, it's quite easy and with a bit of practice, you can achieve quite interesting effects this way.
Here is a short video about how to do it easily:
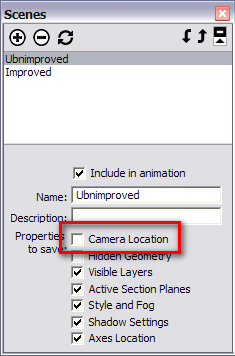
[flash=560,340:1p3xuiac]http://www.youtube.com/v/Vtnryqm9jjo&hl=en&fs=1&[/flash:1p3xuiac]Note how they explain how NOT to include the camera position into the animation - something I also did here as it would (could) be distracting but you can add the camera position and update your scenes in the scene manager any time if needed.

-
Thank you very much Gaieus. I will experiment with the method in the video.
Advertisement


