Create solid-appearing 3d models of a subsurface
-
The view without edges is okay, but some of the drama is missing. The lighting also appears "overexposed" to my taste when the edges are turned off. I would very much like the Profiles edge style if all the edges other than the perimeter edges would remain hidden, which they won't. The no edges view is better on close-ups (see second attachment), probably because it does look so washed out by the lighting. I thought I had remembered from my review of the video tutorials that there were lighting settings possible, but I can't find those now. I have a very full featured lighting controller (with five spot directions possible) in a geophysical 3d visualizer package--I think I was thinking SU had the same.
-
@gealagie said:
...I thought I had remembered from my review of the video tutorials that there were lighting settings possible, but I can't find those now...
Maybe it's simply the Window > Shadow settings dialog?
-
I have also played just a little bit with Styles and Shadows. Most of those Styles are cool but a little too arty for my technical application. I think Simple Style (under Default styles) is my choice among those (see attached). I didn't play with Shadows much--the model naturally faces north so unless I can get the sun to rise in the ne and set in the nw, I would have to rotate the whole shebang. I can do that, of course, in a saved alternate file. I might try that.
-
Even better to go to Window > Model info > Location and there you can set the North angle without even touching your model.
-
I know I am loading this forum up ahead of responses, but today I'm going to present the work so far to The Deciders (at 3pm US CST), so I'll probably try a few more things and then I want to poke around with Look Around, Position Camera and Walk--which until now I've not even tried out! Somehow I got the impression early those were basically tools to "shoot" an animation, rather than ways other than the zoom, pan and orbit tools to observe the model. I want to know more about creating a fly-through animation--beginning with whether it's possible without additional software--but today I'll have no time to learn all that.
-
Well,other than they ask you to show things separately, no. But then you can always open the "intact" file saying this is your presentation file while that is your working one.
-
Yes Gaieus those are exactly my thoughts.
Wow Pos Cam and Look Arnd are cool but being set to the scale of a mere human (i.e., 5' 6" over the surface) my model is a bit overwhelming! Here's something I had not foreseen: in Look Around I type the elevation I want my eyes to be (above the surface I'm standing) and I get weird things happening--usually I end up beneath the surface. Then I remembered--in all these imports the Z (blue) is negative. The entirety of my model is underground with a small exception. It would be helpful to adjust a setting where the little Position Camera icon man "lands" his eyes about 200-300 feet over the surface, rather than at 5' 6". Do you know how?
-
Well,these tools are mainly meant for architectural walkarounds and such but...
When you position the little dude, you can type 200' and hit Enter easily.
-
Yes, I typed 200' and Enter, but it appears to get a little confused when you are standing 1860' below the surface!
 I'll tell you though, the Walk tool is the solution to being able to view features down in the "canyons". Before this I viewed and edited in those places by making groups obstructing my view invisible. Walk sets the camera without regard to what geometry is behind you. Dhuh!
  Like touring inside a building! Hey, I'm still an infant, okay?
 -
@gealagie said:
Hey, I'm still an infant, okay?
Yes, I can see that.

Problems with the walk tool may appear if you want to "jump" onto a higher level than 22" (a max./fairly high step height). That's why I meant it's more for architectural use.
-
Thanks for the advise, Gaieus. And thank you, Chris. Although I would like to very much, I may be unable to share the file of this stuff with you. This IS of a confidential oil "bidness" nature--and I really need the whereabouts of this actual geology keep secret (my personal info as well, Gaieus!). I don't want the Government of Madagascar, no, Corsica (Tasmania? Falklands?) to become upset that their area has been exposed.
As it turns out I have a reprieve to a later date for the meeting I mentioned, so I can explore a few more things to better sell the idea of replacing 2d map representations of 3d geometry with solid 3d modeling.
-
I don't know if this has been mentioned, but have you tried using scenes for your presentation rotations?
-
That's a great idea, Dale. That's one more thing I have no knowledge of yet! I am looking for the video tutorial on scenes--I'm sure I watched on once before. I might as well explore that area and animations in general. Can you point me to a source?
-
So is an animation just a collection of still scenes? Like a power point presentation? Or can it be a true, continuous fly-through movie?
-
You should rather consider scenes as "control points" of your animation. When you right click a scene tab and choose "Play" (or export it into a movie), SU will connect the "control points" with a series of smooth transitions.
Note however that if you have problems with orbiting in your model, it will be jagged using scenes as well. There should be a "preload" function in SU to prevent this but there isn't.
-
I'm discovering the jumpiness in my large model. It's not too bad, but definitely jumps to the new scene in steps, rather than continuously smooth camera flow. I think I'm getting the hang, but i don't see the place to save various animations (various collections of scenes).
-
Scenes are actually fairly easy to use. I use them when someone else in our office is going to do a presentation without being present myself because they are fairly foolproof, so they don't get caught floundering around trying to make things work.
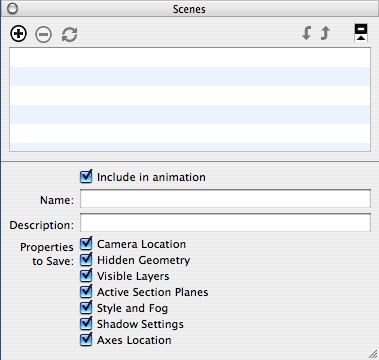
I think it should still work quite well even with your file size.Drop down the "Window" menu from your menu bar, and select "Scenes"

The "scenes" menu will be added to your desktop and should look something like the above.(I'm on a mac currently so it may be slightly different)
If you rotate your model to where you would like to start and press the "+" button (at the top of the scenes menu) it will add the scene. At the top of the SketchUp desktop you will see "Scene 1" will appear as well it will be in the Scenes menu as well.
Rotate your model again and find the second position you like and once again hit the"+" button in the scenes menu and it will add Scene.
You can add as many scenes as you wish to show the model.
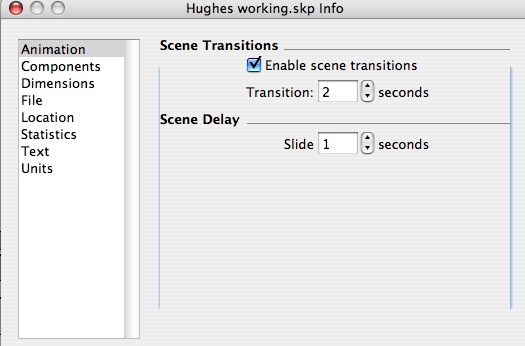
Now go to the "View" menu in your main drop down menu, select "Animation" and from the drop down menu choose "Settings"
This dialog box will allow you to set the number of seconds the scene remains static (Scene Delay), and how fast you move from scene to scene (Scene Transition)
You can play with these setting until you get the combination you like.To get the animation to work without manually clicking each scene, check the "Include in animation" check box which is in the "scenes menu"
This is really just the basics, and I hope I haven't confused more than helped -
Sorry I'm a little late as there have been several posting since my last one.
This isn't the best form of animation, but you can make some pretty simple and dynamic presentations with it.
-
It's a very good overview, Dale. Thank you. I'm having fun with this. Now that question again: can I save multiple animations?
-
Actually I'm not sure you can without creating separate files, but I'll do a little digging.
Hello! It looks like you're interested in this conversation, but you don't have an account yet.
Getting fed up of having to scroll through the same posts each visit? When you register for an account, you'll always come back to exactly where you were before, and choose to be notified of new replies (either via email, or push notification). You'll also be able to save bookmarks and upvote posts to show your appreciation to other community members.
With your input, this post could be even better 💗
Register LoginAdvertisement


