Viewing a model in a photo's perspective
-
Is there a method in SU to create a view of a model over a photo, that will facilitate approximating the perspective and scale of the photo--so the object is made to look like it is in the photo. I saw this demonstrated in FormZ.
I hope this is clear. I tried to add more explanation, but it gets more confusing as I write.
-
This can be done with the photo match feature.
The basic sequence of events goes like this:
- Import an image with the 'use for photo match' button selected. (file->import)
- Move the little lines and origin around to show SU the perspective on the building.
- Start tracing over the top of the building with the usual drawing tools.
Once youve done that you can also use the original photomatch picture to texture the model, although i cant remember exactly how its done, and the results arent particularly good.
-
Yeah, photomatch can do it fine. Make a scene with the photomatched model so that you can go back there any time.
-
Thank you.
I was thinking more if you have an object modeled, like a car and then you get a showroom picture and make a view as if it is in the showroom.
But I think photo match (and I've watched some of those tutorials) might work. I'll try it.
Actually I have a site photo and I want to model a building and view it against the photo--then take it from there to some sort of presentation. It seems clear that you need some rectilinear objects or layout on the photo, with some relationship to a level plane and some dimensional knowledge about the site. I actually have a foundation to work with in the photos--so this would be a good test project.
-
You could also set up the image as an overlay, and then orient your model so it feels like it fits well into the image.
Chris
-
A similar method to what Chris is saying: you can go into your current style and make the photo the watermark. I've done this a few times with pretty good results. It allows you to move your model around and keep your photo still.
-
Ahh, I guess I could have been more clear with my terms, I did indeed mean to say watermark. I don't normally use the feature and my brain failed me. Once you choose to set a watermark, you can then choose to put it as a background item or an overlay. So choose whichever you think works best.
Thanks for pointing out the real name there Eric,
Chris
-
No problemo.
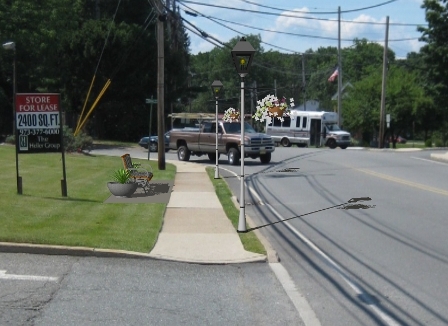
pbacot, here's a quick and dirty example of something I did using this method. (bench and street lights are SU just in case you can't tell
 )
)
-
Thanks for the ideas and especially posting the picture. That looks good. I was asking about the possibility of something built-in and relatively fool proof--because I have tried winging this sort of thing in another modeler (Design Workshop) and it can be a hassle for larger sites/ buildings. I will try Photo Match and see what I get.
Then there is the lens distortion that probably can't be figured in(for the likes of me anyway).
Peter
-
If you use the photomatch method, try to go through and get your axes and vanishing points lined up correctly. Then draw in a few important vanishing points. Perhaps the sidewalk in fron the building you're adding, that one is invaluable! Then once you have the ground set up correctly, the vanishing points matched and the scale worked out, its relatively easy to model your new building into the photo, then take it all to photoshop to merge them smoothly.
And Photomatch takes in to account lens distortion somehow or another. It will freak out if you use a photo that has been cropped because it will be distorted unevenly - unless you undistort using David Goldwasser's method (posted here http://www.sketchucation.com/forums/scf/viewtopic.php?f=15&t=10895 ).
Anyhow, have fun!
Chris
-
Thanks for the link Chris. That's interesting. I see what David is trying to do but not exactly what he does. I didn't get the three horizons (and that's his first statement!). But there's nothing like fooling with it to clarify the issues.
Advertisement


