New Character for Fuel & Fire
-
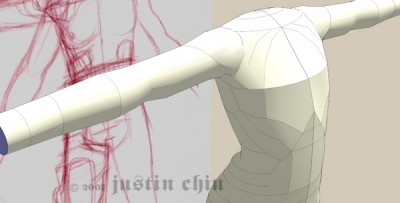
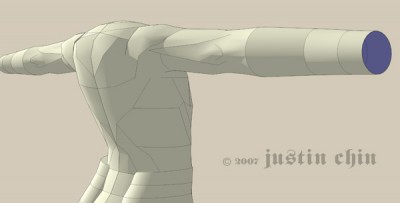
I started modeling a new character for my comic, Fuel & Fire. Consider this a work in progress. More updates will follow, both here and on my blog.
You can learn some of her important details on my blog and see a sketch of her garb:
http://www.giantmonster.tv/giant/?p=298As of this post I've only done about 60 minutes of actual modeling work. You can view that time (compressed to 10 min) on youtube:
I posted an image showing the end results after my 60 minutes on my blog:
http://www.giantmonster.tv/giant/?p=305 -
Here's an update to the Sam character model.


-
Justin,
Your work is absolutely incredible - I have watched for your posts lately and am glad to see that I will get to see more and more on this forum! - thanks for all the WIP's they are just awesome and beautiful. I am very impressed. -
Coen! You made my head explode.

(it's a good explosion though, thanks!)
I think I get what you're saying, and I don't know if I see huge time savings. I still have to draw the contour, which in itself is not a precise process (given my rough sketch). In the end, I still tweak Almost every CV, so there's still a lot of work to be done.
Or maybe I'm missing something? I'll re-read your post a few times and perhaps it'll click. I'll have a new post showing my latest progress today.
Perhaps Alan F has some tidbits to share as well, because he's a madman the way he cranks out the human figures.
-
CV = Control Vertex
SU "hides" these points from the user. You can move them individually, but you can't select them in the traditional sense. Most other 3D apps let you select them.
I push and pull those like a madman. That's how I make the muscle groups that are in the prior images.
Yeah, the posing is the tricky part. I had to re-orient the arms of one of my other models a few days ago, and ugh, what a pain. I have a simple technique that helps, but as I worked I kept thinking about starting over and completely rebuilding the arms I was moving and the portion of the torso I was blending it into.
-
I should also add that your technique would work perfectly well. Some of the things I do are because I use a tablet, and because I have a "flow" of working. SU is very zen and meditative for me. Sounds funny, but I just get into a state of working and sometimes it's hard to stop. It really uses my creative brain.
That said, I'm always looking for new techniques, all the better to reach nirvana.
Rock on!
-
amazing work, i always wanted to try character modeling.
this is such a great insight. -
Coen! Cool, dude! Reminds me of Syd Mead/Empire Strikes Back! Cushy ankles!
Here's the results of today's zen meditation in SU. Still more work to be done, but it was a good days work. As always you can find more information on my blog:
http://www.giantmonster.tv/giant/?p=310.

-
Sweet work guys!! Coen, that thing is cool! I want to see it running and crushing things!
Monster...what can I say?! How you can create the soft shapes is beyond me! Impressive! Now, what's your new character gonna DRIVE?!!!!

I too am a huge motorhead, so I'm looking forward to any of your new vehicular creations!
Nice work guys, really!
Cheers,
- CraigD -
Monster, I showed your vid to another more advanced user at work and we were both like 'wow, amazing'... I never thought of modeling a character like that.
I was thinking, while watching it, the same thing Coen has mentioned, I would align my view looking 'down the barrel of the tube of faces' and use the crossing window to select all the unwanted planes at once, then just 'g' quick key on my computer to group them, and hit 'delete' key. but other than that I learned a lot from your vid and really like your work/style. appreciate your sharing it with us!
Coen, that's a great model too... thanks for sharing it again... would love to render it.
-
New Sam image on my blog:
http://www.giantmonster.tv/giant/?p=313CraigD - Oh, I must not have been clear in my posts. She pilots this:
http://www.giantmonster.tv/giant/?p=315
(She also has a motorcycle strapped in the cargo bay)Fletch - I'm not sure what "crossing window" means.
Coen - I have a perspective toggle shortcut set to the "tab" key which I constantly use.
-
Amazing work Justin. I wish I could indulge in that LOD but I have to keep the polys at around 2.5K, so mine look pretty clunky by comparison. I'd even toyed with the idea (which seems to be pretty standard in the games industry...you'd know more about that than me.) of making an initial high poly model, then mapping a render of that to a lower poly version, but it would just take too long.
As Coen says, I tend to work from modules. I'm gradually amassing a collection of body parts in various items of clothing, so if I wanted something like your g-suit type legwear, I'd probably start with an existing leg in combat pants and start adding scratch pads and map pockets etc. Unfortunately, when I changed my PC system last year, despite checking and rechecking everything...and backing up some stuff about 3 times...the one thing I don't seemed to have copied was that library of parts...so I'm having to start all over again by canibalising existing models.
As for adjusting the poses; I've found that you can select a leg, say, then place the rotate tool over the hip joint and rotate about 10° or so without too much distortion...nothing that can't be fixed by a little vertex shifting. Any more than that and it's easier just to group the limb, move it to the new position, then start stitching everything back together again. Time consuming whichever way you look at it.
I keep promising myself that I'll turn some of the more useful figures into 3ds and just rig them, so I can really crank out some different poses, but that's going to triangulate everything even more....so maybe I'll just keep on doing what I'm doing.
-
Hell yeah, Monster! Now THAT'S a vehicle! I love the look...huge sets of wheels, very aggressive down-turned nose and lotsa ENGINES! Sweet dude!
I prolly would have notice the killer wing, but I got mesmerized by the video of you tweaking Sam! Incredible!
You've got mad skills my friend. There's a few of us at Sketch that are watching your work on the comic. Can't wait to see it all when you get it out of your head!
Where can I see Sam's bike?

Cheers,
- CraigD -
I was in the mood to figure out the problem with an old video I recorded quite a while ago and couldn't post on Youtube. To keep a long story short, I'll just say, I fixed it.
This video shows how I tune the model up from tube shapes to the muscle groups in the arm and the torso. Watch it here:
Wow. I hadn't realized that I didn't answer Craig's last post. The bike will be made at the very last minute, since it doesn't play a part in the story until the end. It'll be a low slung drag racing style shape but with an old school frame and mechanics. Plus some nice pipes.

-
monster,
I actually cannot believe that anyone is so talented! you're work should be on the cover of every SketchUp book and advertisement, you are the pinnacle of SU work! Keep it! I can only hope to get 1/10th as good as you one day!
-
the very last minute, since it doesn't play a part in the story until the end. It'll be a low slung drag racing style shape but with an old school frame and mechanics. Plus some nice pipes.

[/quote]No worries Monster, you've been busy! I'll check out the video...I'm sure it's mind boggling!
About the bike...I'm a huge motorcycle nut (having 7 motorcycles currently!...3 are my wife's) so if you want to bounce any mock-ups off of me, you know how to reach me!
I'm looking forward to seeing more!
Cheers,
- CraigD -
Will03
Thanks for the compliments! There are those people out there kicking butt, we see it here in the gallery all the time. I just pimp my stuff a lot. Plus, all my models are made for looks, not efficiency so I'm a cheater, cheater, pumpkin eater. (don't tell anyone)Craig
It'll probably be built pretty fast since I'll design it on the fly purely in SU. Your comments will have to come fast and quick Perhaps it'll inspire another month long marathon. I'm dying to do another one of those!
 -
Coen - cool tips!
The show/hide thing I'll look into that - it could be very useful! I'll have to figure out how to fit it into my work flow.
The camera thing is my zen, it helps me picture the future of the piece in my imagination. I personally don't like swishing the scroll wheel rocker back and forth. It just seems odd and unnatural to me. Plus, I use a tablet, and my buttons are very limited. In my next video you'll see why the tablet is so important in how I work.
-
@unknownuser said:
@monsterzero said:
- Show/Hide Component Instances available from your Model info panel (I believe it's called the Components/Groups section where it is to be located (not on home PC now)). Bind a shortcut to the function to quickly turn on/off external items while editing a Group or Component. You can do the same with Components to show/hide the other Instances.
I've been using this lately (shortcutting it to "c") and its been really helping me out. Thanks Coen!
-
Futhermore, you can remove hidden faces from the tube in various ways. Your method is probably one of the fastest, but there is a faster way even: select the top and bottom Faces and Control/Option+Click the segments (not the connecting Edges) and Group them, Hide the Group. Triple-Click the geometry (which sits in the same position) and Erase it. Bring up Hidden Geometry (powerusers have a shortcut key for this) and UnHide the Group. Explode the Group.
This may seem as more steps but believe me it will speed things up even more.
Alternatively you can select the to-be-Erased Faces and then Group the selected Faces and Erase the group, as demonstrated in this video (skim the timeline to about 80% into the movie).
[/quote]Holey Toledo Coen! That is the single most useful tip I've gotten. It has knocked the current #1 off it's perch - eraser+crl+click.
Am I a power user yet?
Hello! It looks like you're interested in this conversation, but you don't have an account yet.
Getting fed up of having to scroll through the same posts each visit? When you register for an account, you'll always come back to exactly where you were before, and choose to be notified of new replies (either via email, or push notification). You'll also be able to save bookmarks and upvote posts to show your appreciation to other community members.
With your input, this post could be even better 💗
Register LoginAdvertisement


