Face and Component Painting for Newbies
-
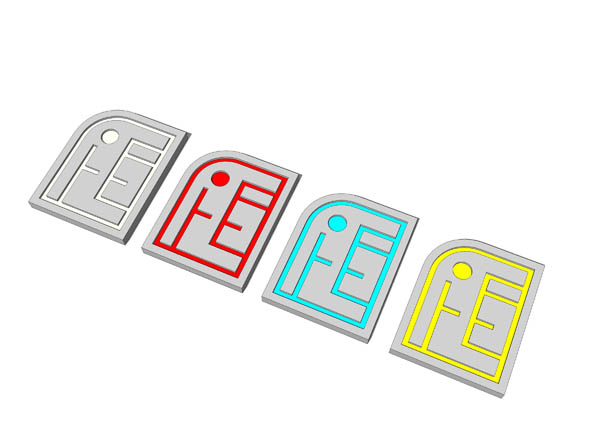
There is a distinct difference between painting individual faces and painting an entire group or component. In the attached model there are 4 castings. The first is just raw geometry...ungrouped. The other three are the same component....even though they are different colours.
The basic component looks exactly like the first ungrouped casting...every surface has been painted light grey except for the incised lines, which have been left the default face colour.
To paint a component, you don't need to select it, you just need to click on it with the Paint tool. In this case, you don't even need to click on it over the part you wish to colour...the incision...anywhere will do.
When you paint a component (or group) the entire entity gets painted the same colour, except for those parts that have been given a surface colouring by painting individual faces. In other words, the component colour acts like an undercoat while the face colour acts like a top coat.You will find that you can instantly repaint the incised lines on the three components by simply painting the object with any colour you choose. You will only see the lines change colour because all the rest is hidden under the grey.
In practical terms, this means that you could have a single car component, for example, that has had all its rubber, plastic, steel and chrome parts painted (by face painting), but the bodywork left blank. You could then have multiple instances of this vehicle in your model, which could then be instantly painted with different body finishes, by painting the component, not the bodywork surface itself. However it would still only register as a single component....just as these three castings do.
Turning to the leftmost casting, it's worth repeating the advice from the Help file regarding painting shortcuts.
If you paint one of the top surfaces a darker shade of grey, then just that single surface will paint. Now paint one of the other top surfaces while holding down Ctrl (on a PC). This time you will see that not only has the top surface been painted, but also the extruded sides of the incision have darkened too. Holding down Ctrl will paint all contiguous surfaces of the same colour. Obviously, this means it will stop when it gets to the unpainted section at the base of the groove.Now hold down Shift instead of Ctrl and paint the top surface at the edge of the casting. This time you will notice that all of the remining light grey gets replaced...even the bits that aren't connected. Holding down Shift will perform a complete colour replace throughout the entire model or group. If, before using Shift + Paint, you had duplicated the ungrouped casting, it would have painted all the grey surfaces on the duplicate too. It won't affect any geometry protected inside a group or component, however.

-
Thanks Alan for this. As per usual spot on!
Mike
Advertisement


