Marin Mountain Bike (WIP)
-
@unknownuser said:
This whole thing has been a tease. I wanna see the finished bike already! Haha, no rush though.
I would love too see the finished bike too!! When I first thought about doing this I hadn't really intended to go into quite so much detail as I have, but I don't really have enough spare time to do as much as I'd like to with this.
I'm glad I have gone into as much detail as I have, and I am determined to get this finished eventually!! but I will be glad when it's complete.
-
Keep up the good work! We're all pulling for you!
Cheers,
- CraigD
-
-
Just browsing the forum and noticed a recent reply to this...
It's a shame that I haven't done any work on this since my last update (as the dates are all wrong after the forum transfer I've no idea when that was - a few months at least!), but I just haven't had the time to do this or much other su work for that matter
Perhaps I will finish it one day...
-
Hi there,
I can only be in admiration for this great modelizing work !!
Anyway, I dare be doubtful about using SU in this case ... I'm just a beginer using Sketchup but I'm originaly (long time ago) specialised in CAM (for Computer Aided MAnufacturing or Machining) operations (using CATIA and Applicon Bravo).
This modelizing work for assembly/conception is a common task using enhanced solutions, even some free solutions emerging from the free community (some say they're pretty much useable, but I never) ...
I think positionning, exploded view generation or assembly could be really painful using SU.Is my question relevant ??
Aegedus -
This model is incredible!
-
Haven't done anything with this for a long time, but got the urge to resurrect this model yesterday...
So here are the new parts...
The chain...

and
A Pedal...

-
 Mind blowing just mind blowing....
 -
nice...so glad you're back into this! new parts look awesome, as usual
-
@rsw said:
Haven't done anything with this for a long time, but got the urge to resurrect this model yesterday...
...silver_shadow has presented inspiration?


-
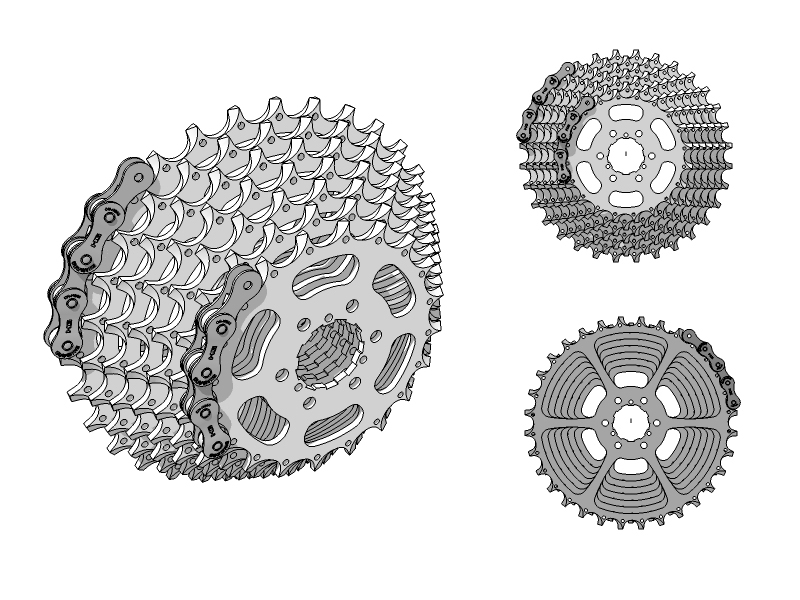
OK, this has taken a few attempts to get right - the first time went completely wrong, the second time I modelled the whole thing at the wrong size. The difficult bit was making sure the distance between each tooth was the same for each gear, and in the end I resorted to using autocad to set the basic shapes up.
I still need to model the final two gears and connecting parts but here are the first 7 gears.
-
have to use all the tools available to you
hahalooks awesome..love how you've got the taper on the tooth and everything!
-
Very good stuff. This thread has been fun to watch. Aren't modern rear cogs now on a spider rather than put on individually?

-
they're usually assembled into a cassette, like he has drawn.. held together by a few bolts... and slide onto a splned hub on the rear wheel..
-
@schreiberbike said:
Very good stuff. This thread has been fun to watch. Aren't modern rear cogs now on a spider rather than put on individually?
I'm modelling what was on the standard spec bike (which is no longer listed on the marin website and shows how long I've been doing this thing!!), which according to the details I have was an SRAM pg970 cassette
Maybe I'll upgrade the SRAM 970 for a SRAM pg990 - (if I ever finish this)

-
You certainly have a lot of patience Richard! Great work!
-
Hi Richard. I just came across this thread. Its a shame that I can only see the last couple of pix that you have posted. I have been wanting to model my mountain bike as well. It will be a long time before I can come any where near your quality of work. VERY impressive detail. I am also a welder by trade and was hoping to see what your welds turned out like. My first attempt is ok but I am not sure how I would wrap them around the miters in the tube. I have also tried to model some chain and cogs. The chain isnt to bad but I see where you came across the problem of making the teeth the same distance apart on different size cogs.
If you are ever up in the Vancouver area PM me and we can go for a ride.
S
-
@slimdog said:
Hi Richard. I just came across this thread. Its a shame that I can only see the last couple of pix that you have posted. I have been wanting to model my mountain bike as well. It will be a long time before I can come any where near your quality of work. VERY impressive detail. I am also a welder by trade and was hoping to see what your welds turned out like. My first attempt is ok but I am not sure how I would wrap them around the miters in the tube. I have also tried to model some chain and cogs. The chain isnt to bad but I see where you came across the problem of making the teeth the same distance apart on different size cogs.
If you are ever up in the Vancouver area PM me and we can go for a ride.
S
Slimdog,
I changed servers on my website a while ago, and didn't transfer all the images over - I've uploaded most of them back to their original locations, so you (or anyone else who is interested) should be able to see these now.The spacing of the gears was quite difficult hence why I ended up using autocad. I seem to remember finding the chain quite difficult aswell - taking the non-uniform shape that the chain followed and making sure it was made up of an equal number of uniform sized segments was quite awkward.
Unfortunately I haven't had time to work on this since my last post. I haven't really had time to work on any other sketchup models either (apart from work related ones). One day I'll get more time and start doing stuff like this again and visit these forums more often.
I also posted the 'welding' tutorial here aswell.
I doubt i'll ever be in the vancouver area (i'm in the uk), but thanks for the offer!
Richard
-
fantastic work, amazing detail!

-
It seems unlikely that I'll ever finish this, so I have decided to share the models with you. It was modelled from images so sizes are approximate (note i have modelled the whole thing 10 times actual size). I think most things are reasonably well split into groups/components.
Separate files for convenience:
frame.skp - 13.40MB
disc_brake.skp - 0.06MB
chain.skp - 0.41MB
pedal.skp - 0.80MB
gear.skp - 2.24MB
saddle.skp - 0.55MB
wheel.skp - 1.18MBThought it may be useful for someone
Enjoy!!


Hello! It looks like you're interested in this conversation, but you don't have an account yet.
Getting fed up of having to scroll through the same posts each visit? When you register for an account, you'll always come back to exactly where you were before, and choose to be notified of new replies (either via email, or push notification). You'll also be able to save bookmarks and upvote posts to show your appreciation to other community members.
With your input, this post could be even better 💗
Register Login


Advertisement