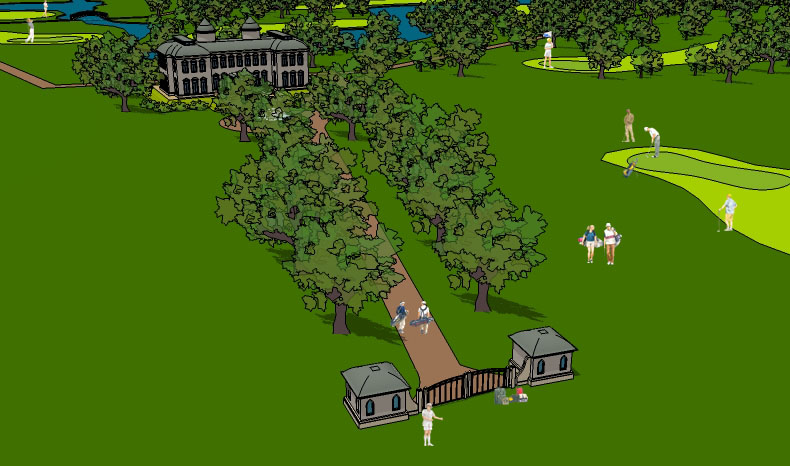
Work in progress: Golfcourse
-
It is really progressing, thanks for sharing this again!
What came into my mind though was that OK, people arrive in their cars and obviously won't drive them all into the course - so some parking lots would really be needed. Maybe on the two sides of that drive-in lane, still within the alley but that would surely ruin the appearande of the main building when approaching.
-
Very nice - I think the trees are just the right transparency. My only suggestions would be to tone down the intensity of the colours a bit and the edges of the bunkers could maybe do with hiding/softening.
-
very good. i would just make the dark green grass a little lighter so that the trees can stand out.
-
I couldn't resist. I just threw the people in at any size. Just for fun.
Edson what a marvelous project.

-
@sorgesu said:
Edson what a marvelous project.
susan, thanks but the project is someone else's.
 bravilor's, or at least he is modelling it.
 -
I'm senile
-
@sorgesu said:
I couldn't resist. I just threw the people in at any size. Just for fun.
That's the one part i do not have the right components for.. people playing golf...
So if anyone has these and wants to share, or knows a place to download from, please let me know or else i'm afraid i'll have to use 'that guy holding two kids' again
The next couple of days i'll make more bunkers in the remaining unfinished holes, create tees (good tip), copy those trees arround a few houndred times, create a parking lot, create a driving-range and work on the detailing arround the buildings...
i have no reason to be bored untill christmass

thanks for the comments!
-
try formfonts
there ara a whole bunch out there. -
Gee Alexander, thanks a bunch.
The golf people that I posted can be had from my site.
in the search box search on "golf" AND on SKP so you don't get the PNG ones. -
thanks for the tips on the components.. but stuborn (and poor
 ) as i am i made a few silhouets of golfers myself, they will also do....
i hope to post new pics very soon now, just the tees, more detailing arround the buildings and Photoshop-postproccesing is left now.... the file is starting to irritate me now because it's so rideculously slow due to the 'sandboxed-landscape', a LOT of trees and detailed buildings so lets hope i can bring up the motivation to finish it

-
I would hate to try and hit out of those sand traps. Usually there is a gradual increase in depth maybe some steep sides but not a clean cut extrusion like a swimming pool.
add some tennis courts somewhere for the peeps that like to go to the course with daddy but don't play golf.
-
@unknownuser said:
I would hate to try and hit out of those sand traps. Usually there is a gradual increase in depth maybe some steep sides but not a clean cut extrusion like a swimming pool
i'm aware of that phil, but the problem is that the underground is created with the sandbox-tool and the bunkers are 'stamped' in.... first of all i wouldn't even know how to fix that and second there are like 30 or so bunkers on the course so whatever solution there may be it's going to take me an enormous amount of time and effort to make them better looking... this will just have to do i guess

-
To "fix" the sandtraps: just select a few of the bottom edges of each and move them up a bit with the alt key depressed (so the extra geometry is created automatically)...you could maybe do them all at once with one move from the bottom of the model :`)
-
No worries Bravilor It's just an illustration.
One simple method might be:
assumung that the topography is a component already>
make a simple rectangular plane somewhere flat anywhere where it will not be ontop of existing geometry.
double click that plane and make it a group
now copy that group and position it over the top of a sand trap do this in top view with perspective off.
now edit the group so that it is larger than the sand trap
now position and rotate etc. the plane until it is just underneath the grass surface for the entire area of the trap.
now edit the group and select all and intersect with model.
now erase the outside unwanted stuff
now paint the plane the sand color.
bingo you have a new sand trap bottom that is not as deep as the original one and its been trimed to fit the hole.
now you can edit the new "bottom" an offset it and extrude it and contour it etc as much as you want since it's a seperate component it will not interfere with your existing topography.
at some point you can merge the two together if desired.
again just a suggestion. I'm sure there are other ways to sculpt the existing traps to be more shallow at the perimeter but by the looks of it you are quite capable modeler so I assume that if you wanted to you could do anything you put your mind to.
Advertisement


