[Plugin] GKWare Cabinet Maker
-
HEllo,
I'm a cabinet maker and a newbie regarding this plugin, but I've spent several hours on it to try to see if it could work for me. So I already have 2 questions:
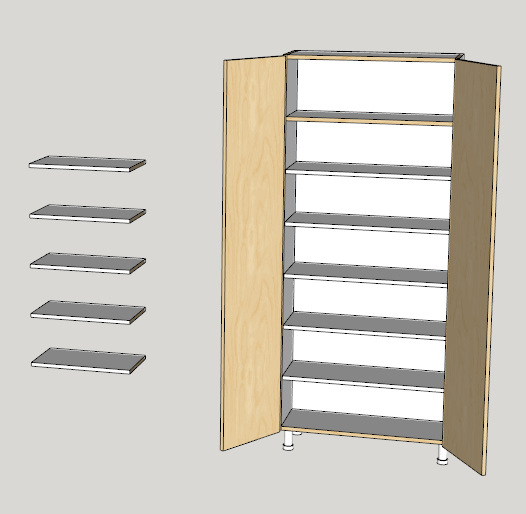
- IS there a way to prevent modifications to "disappear" when i update something with the edit windows? I know I should try to use the edit tools as much as possible, but I guess it is not always doable. For example, I did this with a tall cabinet. I looked for a while and I think this is not doable in edit mode.
but now, if i open the edit mode to change a little thing, it will re-asign the cabinet type template and my vertical divider will be back in the center, from bottom to top, my shelves shortened to havf the cabinet and my larger fixed shelve (that i copied from the top) will disappear. I started with a tall cabinet with a "left closet" type.
And now I want to move one of my handle (heigth). But when i see how this is handled by the plugin, it seems to me I'll have the same problem.
- Is there a way to make real flush back? I did it selecting "back dado: 18mm", "slide in" and "extend back upper". But maybe there is another way? It is not perfect, because doing it my way the sides will be to deep. The plugin consider that I will make a groove, but I wont.
best regards,
- IS there a way to prevent modifications to "disappear" when i update something with the edit windows? I know I should try to use the edit tools as much as possible, but I guess it is not always doable. For example, I did this with a tall cabinet. I looked for a while and I think this is not doable in edit mode.
-
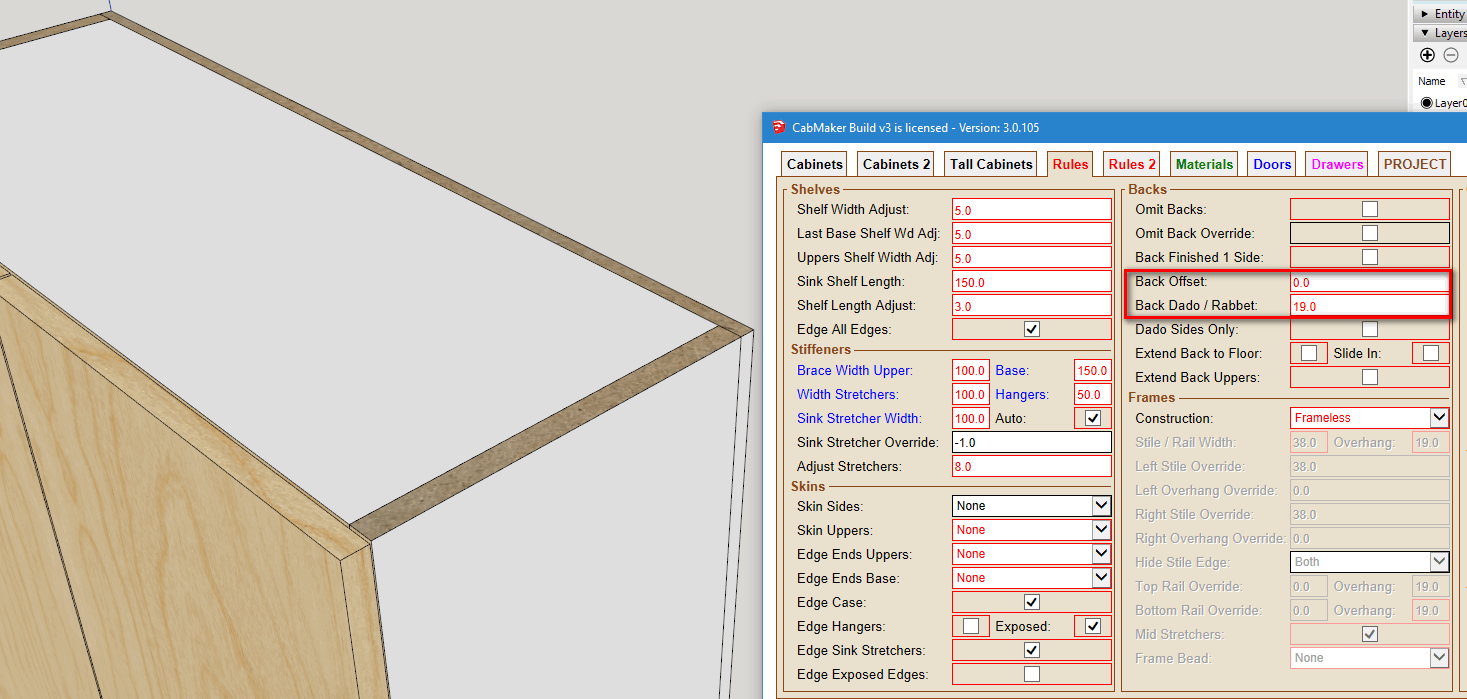
Let's first set up a plant on back. The solution is to set the back offset to 0 and to set the dado depth to the same value as the thickness of the sides.
Here I have 19 mm sides and a 12 mm back.
-
Next let's set up the overall dimensions for my example.
I want a cabinet 1800 tall, 300 deep and 800 wide with 2 doors and I want to raise the handles 750 from the bottom edge of the door.
Choose Tall, Base cabinet and set the overall dimensions.
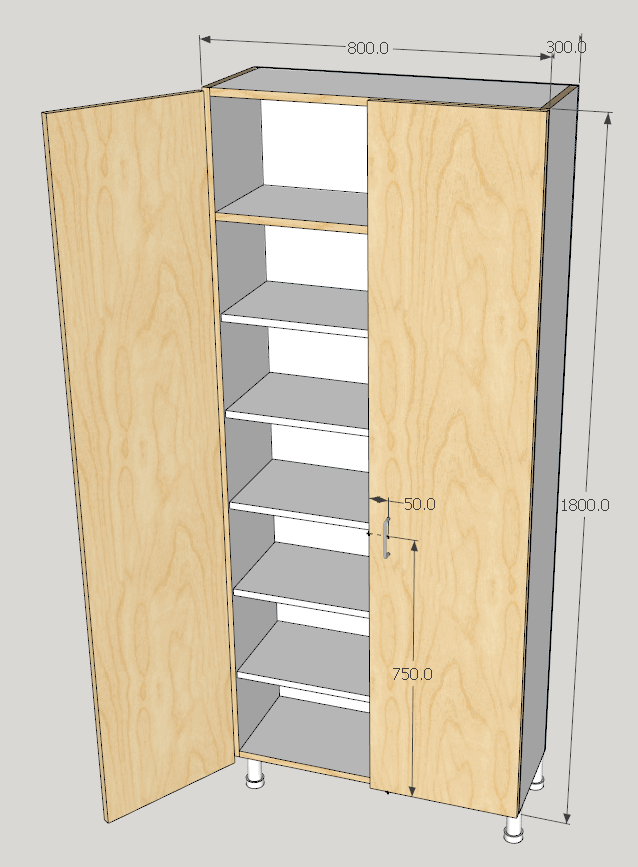
In the tall section I will use the Middle section because you can adjust the handle height and add shelves.
Set the Top section height to 0 and set the mid section height to the full 1800.
I want 5 adjustable shelves spaced 230 apart and a top fixed shelf with a 1475 spacing.
6 openings of 230 + 5 shelves @ 19 thick
(6 * 230) + (5 * 19) = 1475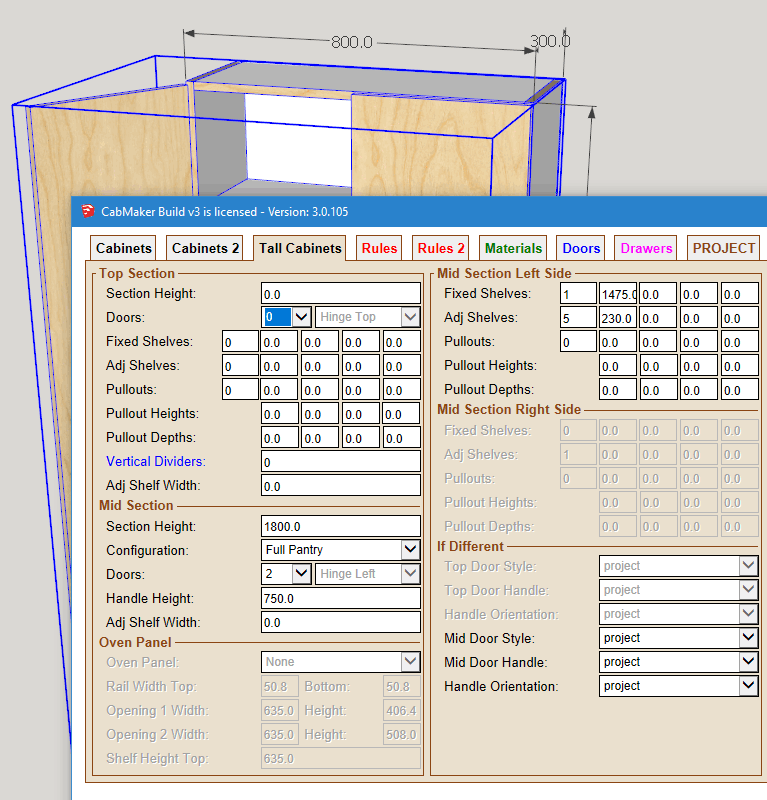
-
Next select 1 of the adjustable shelves and copy it. Then click outside of the cabinet and get all the way out of all components. Paste the shelf somewhere so you can work with it.
Now edit the shelf and change it's width by 250. Then choose move and press Control key (so we are making a copy). move upwards a bit and type 249 (230 + 19) and press enter key then immediately press *4 and then the enter key. This simply makes 4 copies with equal spacing.
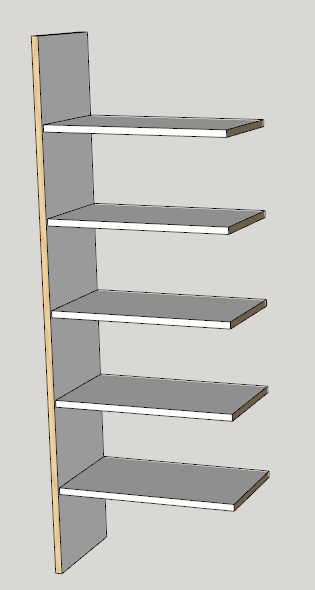
Next create the fixed partition. We know that the partition is 1475 high and 288 deep (300 - 12) and 19 wide. Starting at the bottom back left corner of the bottom shelf make a rectangle.
Type in 1475,288 to get the measurements correct. Then push pull it 19 and paint the front edge. Turn it into a group or component.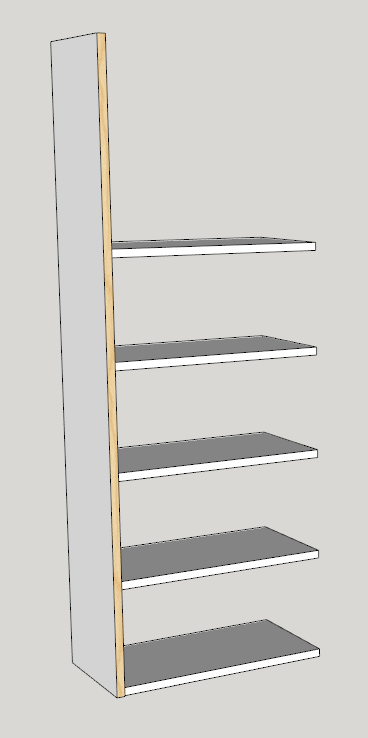
Next select and move the partition downwards by 230 and then move it away from the shelves by 1/2 the shelf gap which is 1.5 in my case.
Select the partition and all 5 shelves and make a group.
-
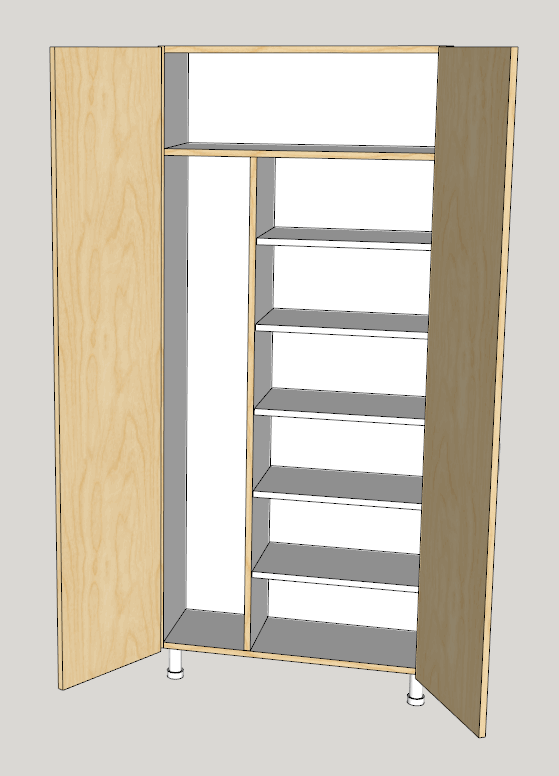
Edit the cabinet and change the number of adjustable shelves for the middle section to 0. Then move the sub assembly over. It is 250 mm from the inside left (the exact amount of the change to the shelf width).
Since the sub assembly is outside of the cabinet it won't be deleted when you edit the cabinet. This is just a work around but the plugin can get you close.
-
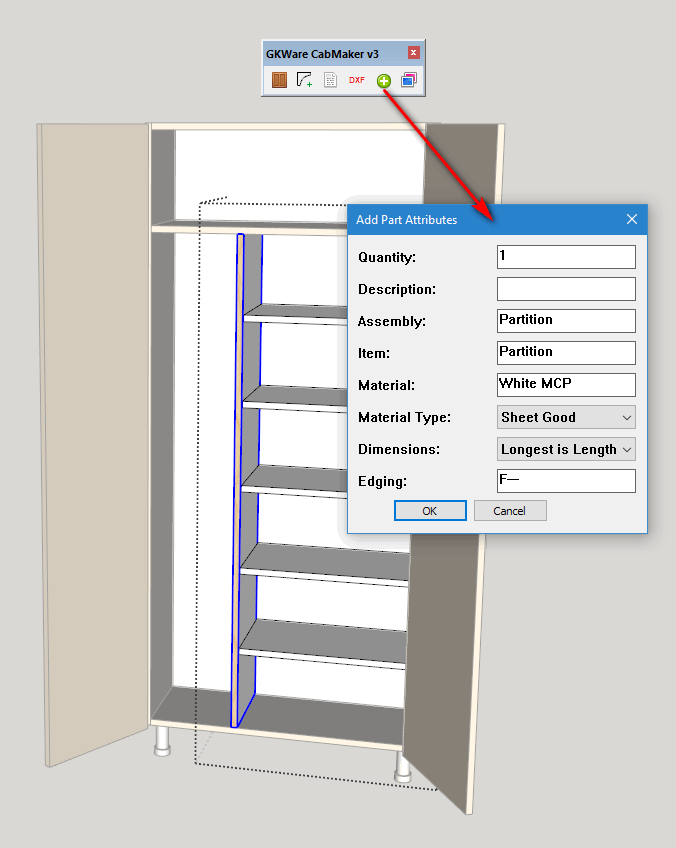
I should also mention that if you require a cutting list then you can add these parts using cabmaker's add attributes.
In this case after I paste the first shelf I would explode it and then turn it into a component prior to making 4 copies.
-
That was a very complete answer! Thank You Garry.
-
Martin - did you perform the steps yourself?
-
Here is a video showing the steps
-
Hi everyone,
I have another question for custom build. But this time I think it is a bit more complicated, because:
- It is not a one time cabinet, I want to be able to draw a lot of those cabinets.
- I'm modifying sides (and not the optional shelves) so i can't just use the trick to edit the cabinet and cancel those pieces when I'm done modifying the first sides as I want... I guess?
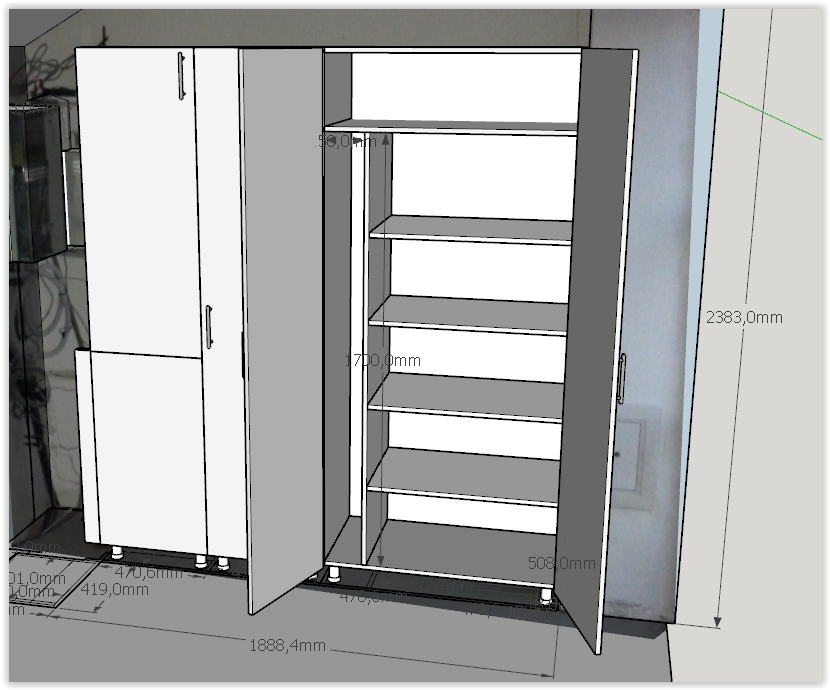
So here is the results I want
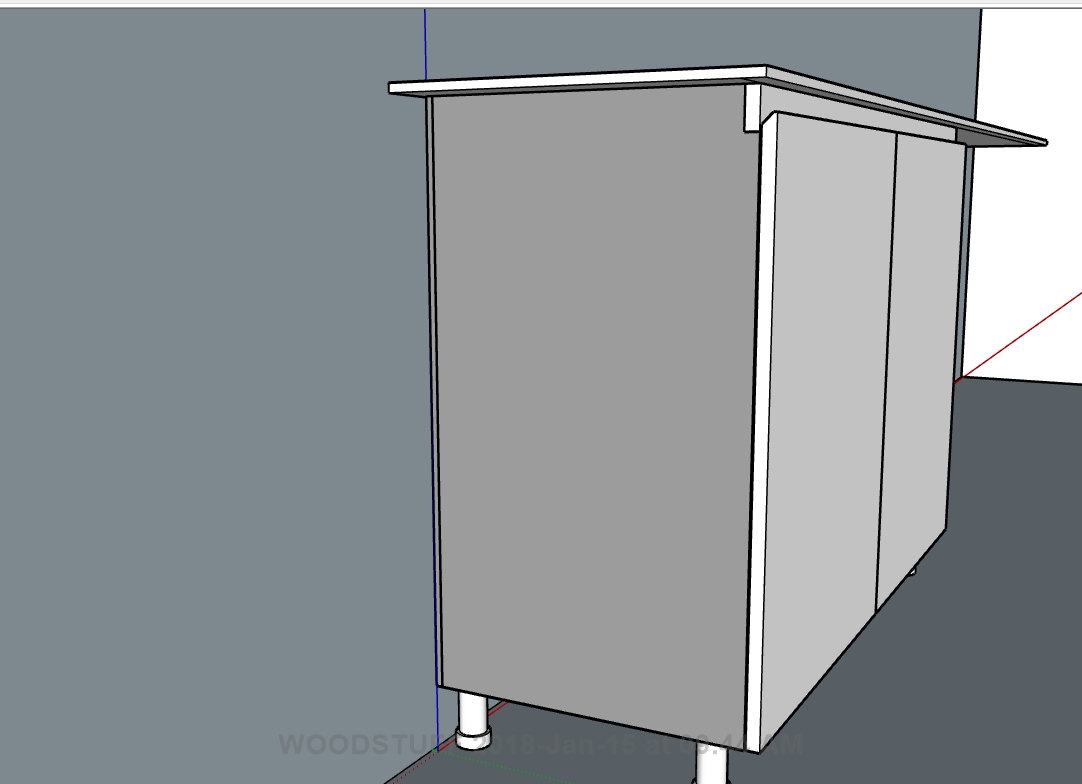
AS you can see the sides have been modified as to let the finished board go from one side to the other. Indeed this pieces will be several meters long, going in front of several cabinets.
I got how to edit the sides, copy them outside the cabinets, so they are not deleted by changes to the cabinet. But I have no way to prevent new side to be generated each time I enter the edit windows, do i?
Could I make a new cabinet style with this kind of sides?
thanks in advance,
-
This does get complicated fast. Often you just extend the door for upper cabinets.
Base cabinets can have different handle less designs. There is also what to do with a bank of drawers. Also what to do with finished end panels (skinned). Some handle less solutions provide clips to fasten the rail for the outermost visible side and notch the rest of the cabinet sides.Current I don't have an easy way to do all this - however I have been thinking about it.
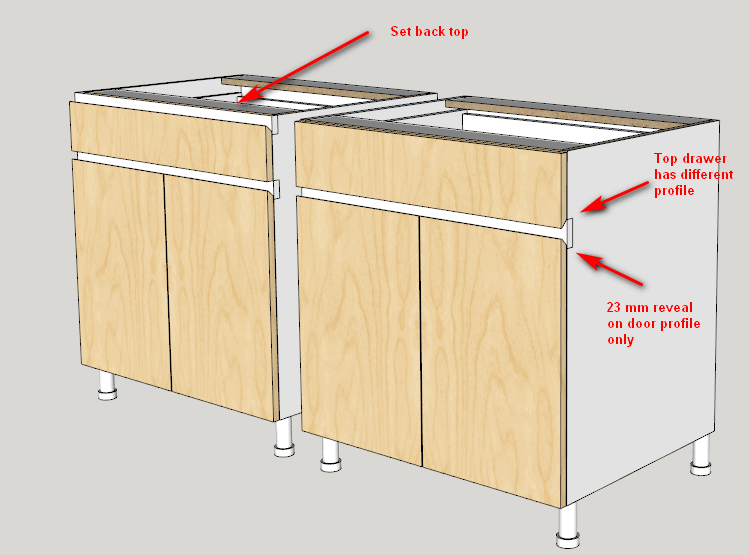
- In some cases the top has to be moved back by the thickness of the rail.
- Have to determine the height of the top rail (similar to a sink rail).
- In some designs like the right cabinet there is a different height rail and 2 separate handle profiles - The top most drawer profile is on the bottom and does not have additional finger room. The finger room is on the door handle only.
-
Yes, i know. It's a pain in the neck. But 3/4 of my clients want this.
Yesterday I was thinking that I should really increase the price for this kind of stuff. Like a lot!
But regarding your plugin. Would it be not too complicated to offer the option to "omit" any part of the cabinet? Not just the back. So we could use the same method you used for my former question. create the cabinet. copy/paste the side outside of it. Edit those sides. Then edit the cabinet again and cancel the sides.
-
I will add that to the list of requests.
Another request that I've had that would help you out is to provide a mechanism to add a cutout and or routed groove into any part. For instance, make a cutout in the back panel for plumbing, or make a cutout for a grommet for wiring in a side panel etc. You could then use this type of a mechanism and make a notch for the vertical rail.
-
Are you planning to add support for lockdowel fastening system or Ovvo
-
When there is enough interest I often add feature requests.
-
while we speak of hardware support, I think for european customers the most common drawers and hinge systems are from Hettich and Blum. And I know that Blum (maybe Hettich too) has all the 3D components ready to use on their site.
But I guess that's still a pretty big work to implement this in Cabmaker. -
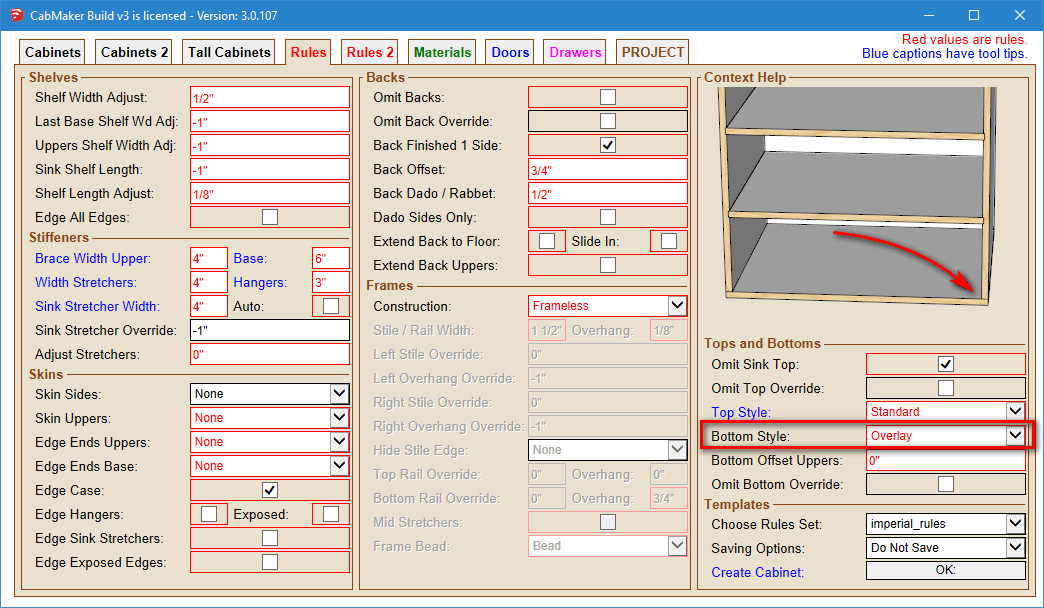
Version 3.0.107 is now available from my web site.
I have added a Bottom Overlay style. You can now sandwich the sides between bottom and top
-
A new version of CabMaker is now available.
Version 3.0.108 – Feb 7, 2018
- PROJECT info was not re read when switcthing models after an edit. Fixed.
- Stretchers had front edge banding with Face Frames and shouldn't have. Fixed.
- Adjustable shelves for tall cabinets came across to CutMaster Fixed Shelves. Fixed.
- Overlay bug for bottom when back is not dadoed into sides. Fixed.
- Added Case Back option to edge backside of cabinet when no back.
- Fixed pullout bug.
A new version of CutMaster is also available from my website.
-
Hi Garry, just wondering if you can explain why this happens when i go to change a cabinet that I did in a drawing a few weeks ago?
Seems to change it back to another set of defaults!!
-
There was a bug back in that old version where the PROJECT settings become the same as a different model that you just edited in the the same Sketchup Session.
The work around is close sketchup - then open it and your old project and the cabinets should maintain their settings.
Hello! It looks like you're interested in this conversation, but you don't have an account yet.
Getting fed up of having to scroll through the same posts each visit? When you register for an account, you'll always come back to exactly where you were before, and choose to be notified of new replies (either via email, or push notification). You'll also be able to save bookmarks and upvote posts to show your appreciation to other community members.
With your input, this post could be even better 💗
Register Login


Advertisement