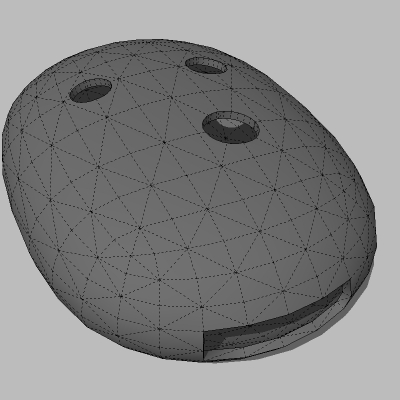
Need a few pointers for training
-
I have been using sketchup make for a few weeks and I understand the tools and actions needed for squares, rectangles, circles, extrusion, changing views etc. Every time I get to a place where I need tubes, half tunes, spheres, partial spheres etc, I get lost.
I have a 3d printer and my latest project is to make a simple sleeve for my car's FOB because the buttons are too sensitive and the car frequently locks or unlocks while the FOB is in my pocket. My idea is to make a little case for the FOB that has smaller holes to reach the buttons so that it takes more effort to push the button and the buttons are recessed further.
It's really simple in concept, I just make a block slightly larger than the FOB and then carve out the middle to fit the FOB. Viewing the FOB from the top, it's basically a rounded rectangle. From the front or back, it pretty much flat with rounded edges. I can make the edge cutouts but I have no clue how to make that cutout "round the cornet for the front edge of the FOB.
In any case, I am looking for training resources, hints, tips for doing this type of stuff. Straight lines, straight shapes, great! Spheres, tubes/pipes on curves etc are big trouble.
Any pointers will be appreciated.
-
The most important thing to know for curvy stuff in Sketchup is you'll need to scale the model up to work, or else Sketchup has trouble creating geometry. Something like 100x is usually good.
If you have more specific questions, post your model or images of what you have so far, and we can help you from there!
-
Okay, x 100 for curvy stuff and "3D Printing with Sketchup" book.
Thank you both for the help.
-
Normally, I'd advise people to get a complete grounding in the native toolset of SU before starting to use plugins, but I hope this example will give you an idea of general work flow. You can navigate the attached model by clicking through the scene tabs...showing how to get from a simple cuboid block to the finished fob case.
How you get the key in there is your problem.

-
Wow, Alan thank you. This is certainly something that I can use for this little project. In addition, I ordered the book 3D Printing with SketchUp so I will get a better grounding in the SU native tool set. I am retired and am really excited about the possibilities with the 3D printer and sketchup.
Once again, thank you.
-
Alan,
I was able to duplicate what you did with the FOB, except for tweaking the mesh to get it less egg shaped. What tool/tools did you use to accomplish that?
-
Got it. Thanks again.
-
Nothing more than the Scale tool. I selected all the faces on one end, except for the final loop that takes you to the centreline. Then I squashed them slightly. Then I did exactly the opposite to the two loops either side of the centreline...stretched them.
Obviously, all you then have to do is to repeat step 1 at the other end. However, as I didn't note the scale factor when I squashed the first end...and to get it exactly the same at the other end, I actually cut the whole lozenge in half down the centreline, duplicated it (using Ctrl+Move) flipped the copy and joined the two halves back together again.
It sounds complicated, but actually took less time to do than describe.
It sounds like you're coming along just fine. I'm sure there will be hurdles...not least making sure the stl file is completely watertight, but you can rest assured that you can print just about anything in 3D from SketchUp...however curvy and organic.
It's a pretty lousy photo on my phone, but I actually managed to turn this
into this.
I lost the fine detail on the end of the barrel...but this was quite a few years back
Advertisement


