Undesired movement of a component in animation
-
Hello forum.
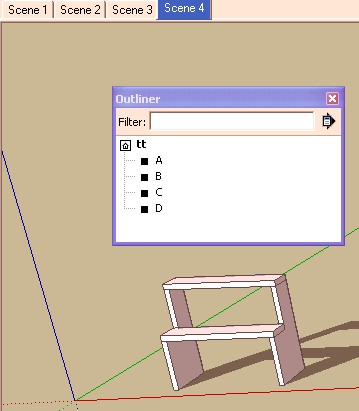
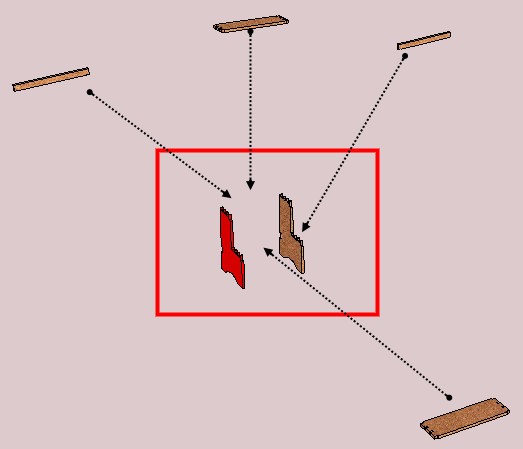
I'm new to using SketchUp and Proper Animation plugin, but already I enjoy creating my first model. In my model, I am attempting to animate an assemblage of parts belonging to a small step stool. The plugin is perfect for making assembled parts look like they are smoothly moving into place. One problem confronts me, however. One of the components rotates 90 degrees, but I want the component to move linearly from one position (#5) to the next one (#6) without any rotation whatsoever. How can I prevent the component from rotating?
Thank you for your assistance. When my animation is complete I will post a link to my YouTube video of the animation so that other users of this plugin can see what animations can possibly be created. I am using Proper Animation V1.09.

-
Hello Pilou.

Thank you for responding. Where can I find the official SketchUp 6 downloadable file? The older versions posted on authorized SketchUp forums declare that they are compatible for Mac and Windows, but not Windows Vista, which is what I am using.
David
-
No, no

When you save a file inside your Version 8 that you are using you can save your file for any other previous versions!
Menu FIle / "save as" little black triangle at the end's line... / V6
If really you want for your collection an old versions go there and scroll!

-
Hello Pilou,
Thank you for letting me know about the ability to save to older versions. I saved my file as type version 6 and added a ▲ to the end of the file name. The Proper Animation plugin is a great tool for my animation needs.
Again, your willingness to help me solve the rotation issue is greatly appreciated.

SketchUp fan,
David
-
Would this movement have anything at all to do with that component's local axes/origin? Just asking.
-
Hello mitcorb,
I don't know enough about SketchUp or the plugin I am using, but your suggestion might be a valid since the left side (red) component is rotating for some reason. I saved every property allowed when saving a scene and I did that for every scene. All those scene properties are new to me so I may have saved or modified something unwittingly. When I started the model the origin of the axes was away from any of the components in the model. There are two sets of similar components; one is wood colored and the other is red colored and that is how I come to have 14 total components and, likewise, 14 layers.
Any further exploration of this is appreciated. I'm looking for some experienced guidance. Thank you.
David
-


-
If you post your file in V6, maybe I can help you
 ("save as" little black triangle at the end's line... V6)
Else for animation Mover By CMD is a little bit more easy than Proper of Animation
 (in my point of view)
-
Pilou, you provided me with a lot of helpful suggestions, especially the ideas of using Mover, keeping all components visible but outside the drawing area, and selecting components from the Outliner tool. I will learn more about Outliner and try to replicate some of the ideas you offered. Also, I will install Mover and review your attached file.

I am laughing for having put the black triangle in the file name.

Thank you for investigating my problem to the extent you did. I learned a lot of things from the information you provided. If I get my animation completed, I will post the file in this thread for everyone to review. Other users may benefit from my efforts, too.

Have a fun day!
David
-
I don't believe that i will refound your rotation problem
That can be so many thing...no update something at the good moment, a bad move, a bad rotation,
a bad selection, bad axes on the component, a bad set get position, etc...
I found the Proper animation system very heavy!
Just a little example with Mover

You have no need more than that for animate anything!
No layers, no list of start End Set Get...
Here all elements are -100The only thing to make is
Select something : Menu Plugins / Remember Position Selected
If you want see the previous position : Menu Plugins / Show Location Preserved PositionIf you want a second move of a same now visible element just select it
make a rotation for example
and Menu Plugins / Remember Position SelectedYou can of course add Layers for visibily or not of an element if you want
(or more easy just select that you dont want see right Click / Hide and Update the active scene)
etc...(made method of the layer on the file linked
No more simple
For unmove -100 an element : Select the element you want inside the Outliner
As you don't see it call the just click on the empty space
move up (blue axe)and input 100 : the element come back at its original position!
Have fun ! Of course for see the animation of elements I believe that Mover must be installed
PS As you can see the rotation is not fine because it's group and axe can't be modify

It's rotate on its own axes!
So better is to use component!
;UI minimalistic


-
Thx for the V6

Why do you use layers ?
It's twice and painful work!
What do you think of this concept ?
Putting the components or objets up and bottom
you can rotate the view without see them !
And all are visible inside the Menu Window/Outliner
For example you start from your complete model
then move each element +100 or -100 on Z
in each scene
you have just to choose it on the Outliner and make the inverse move -100 or +100 on Z!
when you need one of them in a scene
Because animate with layers is easy with less elements but a nightmare with more than 5

And also a nightmare with the Proper Animation
I will see your problem of rotation of the red element


-
Pilou,
I followed your example about exploding the components to first be positioned far enough out of view of the final drawing area. Great idea!
 I managed to complete my animation exactly the way I wanted to using your suggestions.
The .avi file appears differently than the .skp file after I export the animation. How can I fix this?
Since this is a new topic, I will post it as a new one.
Thank you.

David
Hello! It looks like you're interested in this conversation, but you don't have an account yet.
Getting fed up of having to scroll through the same posts each visit? When you register for an account, you'll always come back to exactly where you were before, and choose to be notified of new replies (either via email, or push notification). You'll also be able to save bookmarks and upvote posts to show your appreciation to other community members.
With your input, this post could be even better 💗
Register LoginAdvertisement


