Bedside table
-
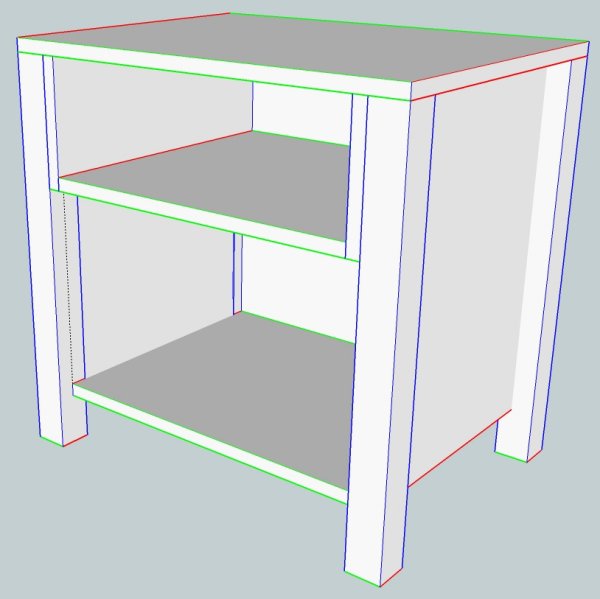
I'm slowly getting there with (1) learning Sketchup and (2) designing the bedside table. After 15 years of poking away learning woodworking and setting up my shop, it's time I tackled a proper bit of furniture with mortice and tenon joinery in the case, dovetails in the drawers, solid wood and some decent design elements. I am on no time frame with this project.
Here is a jpg so far. I might post here from time to time as I go along. I've figured out the beginnings of a workflow, components and more or less got precise dimenionsing down, but still lots to learn. No where near tackling the joinery and details yet. Still learning the basic tools. I have no specific questions so far, but they're coming.
-
You look as though you are tackling the basics well Dadoing. Ask all the questions you want when you are ready and we will all do our best to help you. Soon enough you'll be helping us as well. Keep her lit!
-
@dadoing said:
I'm slowly getting there with (1) learning Sketchup and (2) designing the bedside table. After 15 years of poking away learning woodworking and setting up my shop, it's time I tackled a proper bit of furniture with mortice and tenon joinery in the case, dovetails in the drawers, solid wood and some decent design elements. I am on no time frame with this project.
Here is a jpg so far. I might post here from time to time as I go along. I've figured out the beginnings of a workflow, components and more or less got precise dimenionsing down, but still lots to learn. No where near tackling the joinery and details yet. Still dealing learning the basic tools. I have no specific questions so far, but they're coming.
The chiefwoodworker posted a TUT in 2008 on bed side table. Maybe this will help you in the learning process. It is an 8 part series http://www.srww.com/blog/?m=200803
-
@mac1 said:
The chiefwoodworker posted a TUT in 2008 on bed side table. Maybe this will help you in the learning process. It is an 8 part series http://www.srww.com/blog/?m=200803
Well, how wonderful is that?! I downloaded all 8 parts into a personal PDF and will study it carefully. Just great.

-
As the model gets more complicated, it is harder for me to draw new edges in place and then gather them to define them as new component. I could move existing components out of the way, but then I would have to move them back precisely. Maybe moving them back into place not as hard as it seems, but is there better way to deal with this issue?
-
Rather than using the tedious method of moving a component and then attempting to get it back into the same place later, I just hide it. Single click on the component to hide then right click and choose Hide. When you want to retrieve it go to Edit and Unhide.
-
jllmarks has good advice regarding hiding components so you can work on their neighbors. I also use several other methods depending on what I am doing. In some cases I Copy/Move the component that I need to work on out away from the model and edit that component. When I've finished with it, I simply delete that instance of the component. There's no need to move it back. Of course that doesn't work if you are using groups instead of components.
Another way to work is to switch to X-ray mode so you can see though components.
Often I just work by 'feel'. This comes with practice and familiarity with the program. I can put a tenon on the end of a rail, for example, without seeing the end of the rail at all.
You'll work out things that work for you as you gain experience and proficiency.
-
Very helpful, folks. Still a long way down the learning curve, but getting there.
-
Keep up the good work and don't get to frustrated when you get into a funk on something. Just two months ago I was proud to make a cube. And then when a client requested a folding step ladder to be made of oak with some other requirements (collapse to less than 3 1/2" in depth, 3 steps with the top one ~30 inches high, etc.) I went into panic mode knowing full well that; (1) I probably couldn't find anything quite like this anywhere (2)a mock-up would be futile until I had some "good" plans to work with and (3)my proficiency with SU was lacking. Well, after about 3 weeks of struggling with procedures it finally started to all come together. Between these forums and FWW's Design, Click, and Build I found some incredible resources to help me along. By no means am I an expert or even proficient yet, but I am finding it easier to actually figure some things out on my own. And in doing so, I can actually make some renderings that look like furniture.
Good luck and thanks to all on these forums for their input.
-
@jllmarks said:
Rather than using the tedious method of moving a component and then attempting to get it back into the same place later, I just hide it. Single click on the component to hide then right click and choose Hide. When you want to retrieve it go to Edit and Unhide.
This is the tip that allowed me to fix faces and edges deep in the table that had not been gathered properly into components.
To get at those buried elements I did this:
- Double-click to highlight an obstructing component.
- Left-click on the component and select Hide.
- Repeat with other obstructing components, to reveal the problem edges and faces. Fix them.
To Unhide the hidden components: - In View, turn on Hidden Geometry.
- Double-click on a hidden component to highlight it.
- Left-click on the hidden component to Unhide it.
- Repeat on the other hidden components.
- Warning: I'm a newbie, so don't trust my guidance.
I was unable to figure out how to Unhide all the hidden components at once. The "All" option did not work when I selected all the hidden components at once.
-
@dave r said:
In some cases I Copy/Move the component that I need to work on out away from the model and edit that component. When I've finished with it, I simply delete that instance of the component. There's no need to move it back. Of course that doesn't work if you are using groups instead of components.
This is really powerful for working on a deep component, once all the faces and edges of the table have been gathered into separate components.
The process I worked out from this valuable pointer:
- Select the whole table, then Move-Ctrl to copy and drag a copy over to the right.
On the copy: - Double-click on a copy's component to highlight it.
- Move it out of the way.
- Repeat with other obstructing components.
- Work on the deep component that needs attention: changes made to the component in the copy will be reflected on the sister component in the original.
When finished: - Open the Outliner.
- Double-click on a component in the copy. That highlights the copied component's name in the Outliner.
- Left-click on the highlighted component in Outliner and select Erase. That deletes the copied component, leaving the original.
- Repeat with the other copied components.
- DON'T TAKE MY WORD ON THIS -- still a newbie.
- Select the whole table, then Move-Ctrl to copy and drag a copy over to the right.
-
The videos at these two links were suggested to me by a forum member in the thread http://forums.sketchucation.com/viewtopic.php?f=183&t=27578. They were a big help at this point in my Sketchup learning curve:
http://www.finewoodworking.com/item/22911/a-fern-stand-demonstrating-my-drawing-process
http://www.finewoodworking.com/item/24328/jeffersons-bookstand-another-workflow-example -
I think you're working too hard. Try this process.
- Select the component you need to edit, then Ctrl+Move to copy it and move it over to the right (or up or back or forward; whatever is easiest).
- Double click with the Select tool to open the component for editing.
- Make the needed changes to the component.
- When finished editing the component close the component. Click in space with the Select tool.
- Select the component instance that you just edited. Solid blue line bounding box. Hit Delete.
I'm glad you found my videos helpful. It's just my way of working but I find it fairly efficient.
-
@dave r said:
- Select the component instance that you just edited. Solid blue line bounding box. Hit Delete.
When I tried that on my own yesterday, Selecting and deleting the copied component deleted both the copied component and the original one that had just been changed by working on the copied component. That's when I stumbled into the more complex process for erasing the copied component. Must have been doing something wrong. Perhaps make the copied component unique first?
-
The reason you ended up deleting both copies of the component is that you didn't close the copy after editing it. In reality you didn't delete the component but rather the geometry inside the component definition. Or you opened the component for editing prior to copying and ended up copying the geometry and not the component.
If you make the copied component unique, you've lost the benefit of copying the component in the first place.
-
@dave r said:
The reason you ended up deleting both copies of the component is that you didn't close the copy after editing it.
Aha - my problem is that I was clicking 3 times to select the copied component for deletion, not once. Got it now.
-
(Hope nobody minds me this turning into a bit of a newbie's experience blog as I crawl up the learning curve.)
All the tips and tutorials are very helpful. Like playing the piano, there is no substitute for practice. As my repetoire of tools and workflows slowly expands, I'm beginning to spend more time designing.
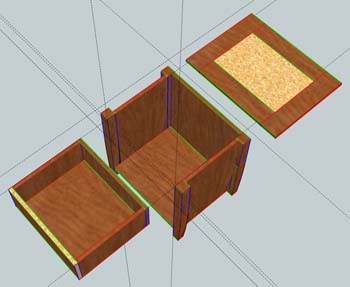
The key for me is to "make component" after drawing a piece of wood, and then "group" components that make up an element like a drawer. If there is a complementary component in mirror image on the other side of the table, then I can copy-drag along a construction line (guideline) or precise measurement to create the sister piece, then flip it so that when I get to the joinery, changes in one sister reflect symmetrically in both.
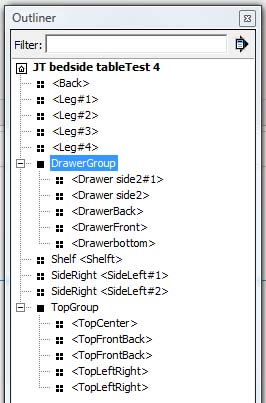
That Outliner panel in Window\Outliner is essential: shift-click to create a group, or highlight a group to explode (ungroup) it temporarily, or highlight a component to delete it.
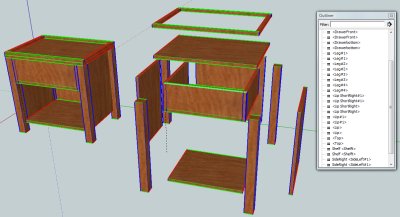
I'm getting handier with dropping in construction lines ("guidelines"; in navigation, I'm used to moving lines of position along "construction lines"), so it only takes seconds now for me to make a couple of intersecting construction lines before dragging obstructing components out of the way to work on something inside. In the photo below, I've moved the top group out of the way to work on the case components around the drawer, and moved the drawer group out to work on its componenets separately too. When I'm done, I can simply grab a point on the group corresponding to the intersection point of the relevant pair of guidelines to drag the group back into position.
Or, I can make a copy of the whole table, and work on the components there, because changes in a component in the copy will reflect in the original component in the original. Both techniques have their utility.
Slick stuff. I have lots to learn about basic cabinet design and joinery elements. Sketchup is now letting me build virtual furniture and discover my mistakes before I wreck real wood. I had not anticipated this bonus. I can try a designing feature and look at it 3-D to discover why I need to learn more, then go look up options on the Internet or the classic woodworking books.
-
I found another option; if one needs to edit a lot of component that are "buried" deep within a model is to click on -Window==>Model Info==>Components and beside the second slide bar labeled "fade rest of model" click the box that says hide.Now when you open a component it hides the rest of the model. Simply unclick the box when you are done. (i work on two screens so i simply keep this window open on the other screen and adjust visibility as needed.)
-
@prismcnd said:
I found another option; if one needs to edit a lot of component that are "buried" deep within a model is to click on -Window==>Model Info==>Components and beside the second slide bar labeled "fade rest of model" click the box that says hide...)
If you use this function a lot, best is to assign a shortcut key for it (Preferences > Shortcuts). You can easily toggle this hide/unhide function from that on (often you need some reference point outside so even just for a second it's worth toggling) and the option is buried quite deeply in the Model info panel.
-
Probably not a lot of help on this project, but on future projects try using layers. Put related parts onto separate layers, i.e. face frame parts on one layer, framing on another, panels on another etc. That way you can shut off a layer and clear stuff out of your way to work on other stuff.
Hello! It looks like you're interested in this conversation, but you don't have an account yet.
Getting fed up of having to scroll through the same posts each visit? When you register for an account, you'll always come back to exactly where you were before, and choose to be notified of new replies (either via email, or push notification). You'll also be able to save bookmarks and upvote posts to show your appreciation to other community members.
With your input, this post could be even better 💗
Register Login


Advertisement