Help Me Draw A Dome [TUTORIAL]
-
I am ready with these steps so far...
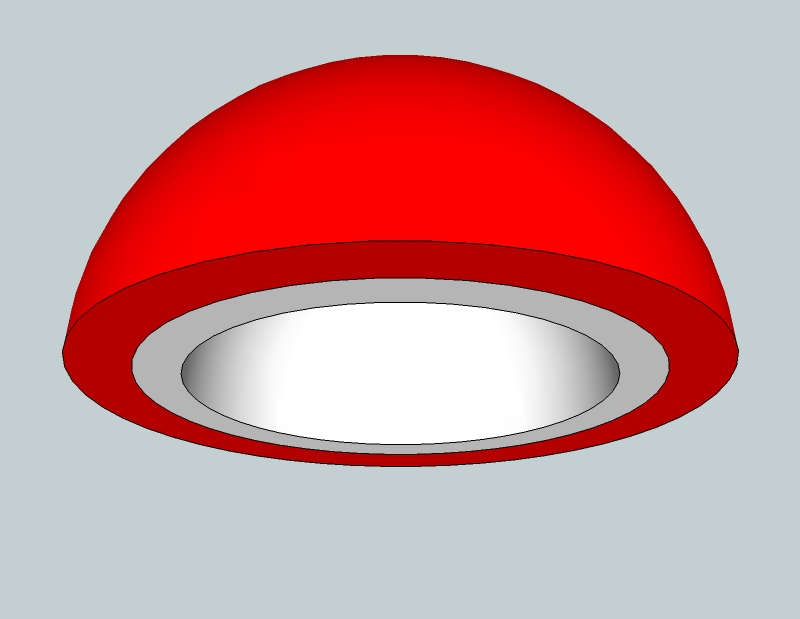
-
Yes, Yes, Yes.
I got it. Feels so good to achieve this
Never thought this would be so excitingAs you can see I've already shaded the top dome in red. The rim of the inner dome is Green and the inside of the inner dome is yellow.
So, where to from here?
-
Okay, now we are going to make some preparations to slice up your melon.
Previously we have seen that curved surfaces are made up of practically flat (just visually smoothed) facets. This is what we are going to utilize now. You need to divide the domes by 6 which is a lucky number as our circles we built it on top have 48 segments that is dividable by 6 (the default 24 is also - so whenever you need an odd number to divide your circles with, plan ahead...)
First, turn on hidden geometry under View > Hidden geometry. This will reveal the facets and the dividing (though segmented) arcs. Then (if you haven't done so yet), activate the Standard views toolbar from View > Toolbars (though they are also accessible from the Camera menu > standard views). Go to "Top" mode and also into Parallel projection so that you can see everything nicely aligned to the axes and orthogonal. I myself only use parallel projection in these cases but others often prefer to model this way.
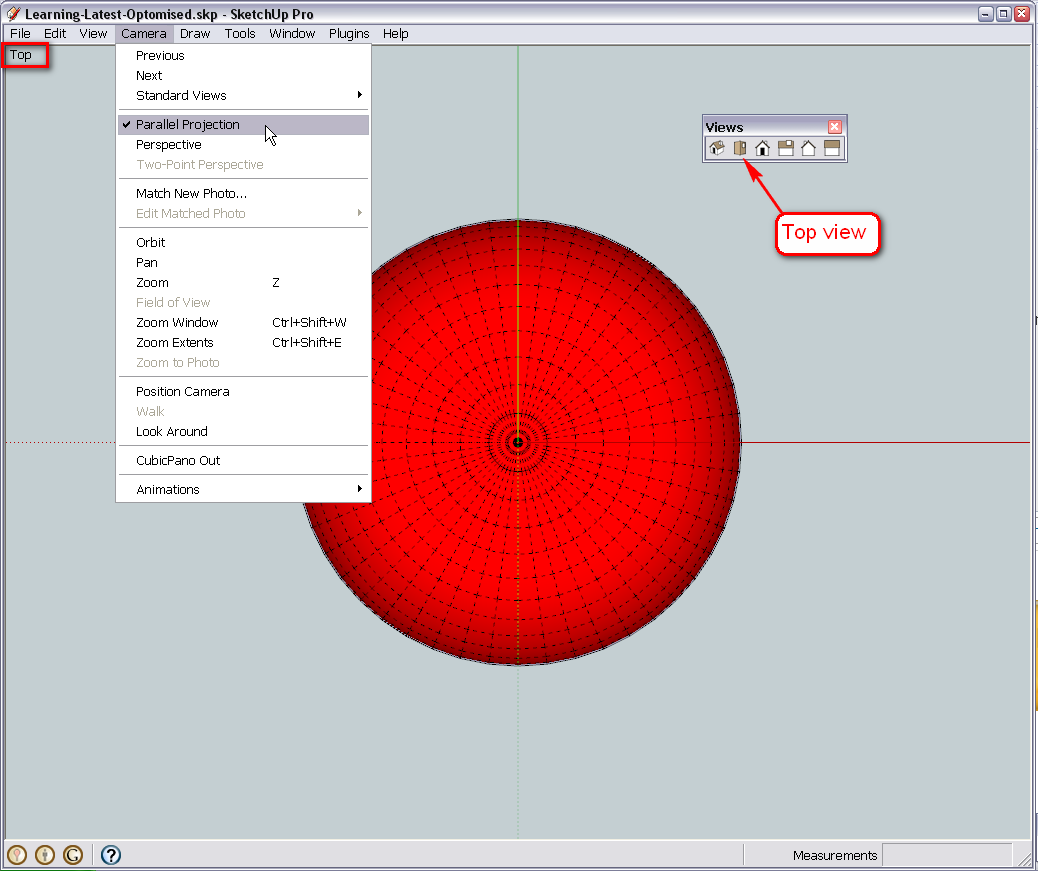
Though now we have a nice view, I already know that while working on the little pieces of the geometry here, one or the other shell of the dome will be very much in our way to access parts of the other. Fortunately we have a very nifty tool to overcome this. On the right, you can see the model info dialog (Window menu) > Components tab. Although groups are not components, they behave the same way in many respects and this function works with groups, too; Check the "Hide rest of model" (when editing a group/component - in this case, ONE of our shells).Since this item is hidden quite much (even under View > component edit > ... menu), and we may need it quite often in the biggest urge, best is to assign a shortcut key to it. It can be found under Window > Preferences. I use Ctrl+H but it can be anything.
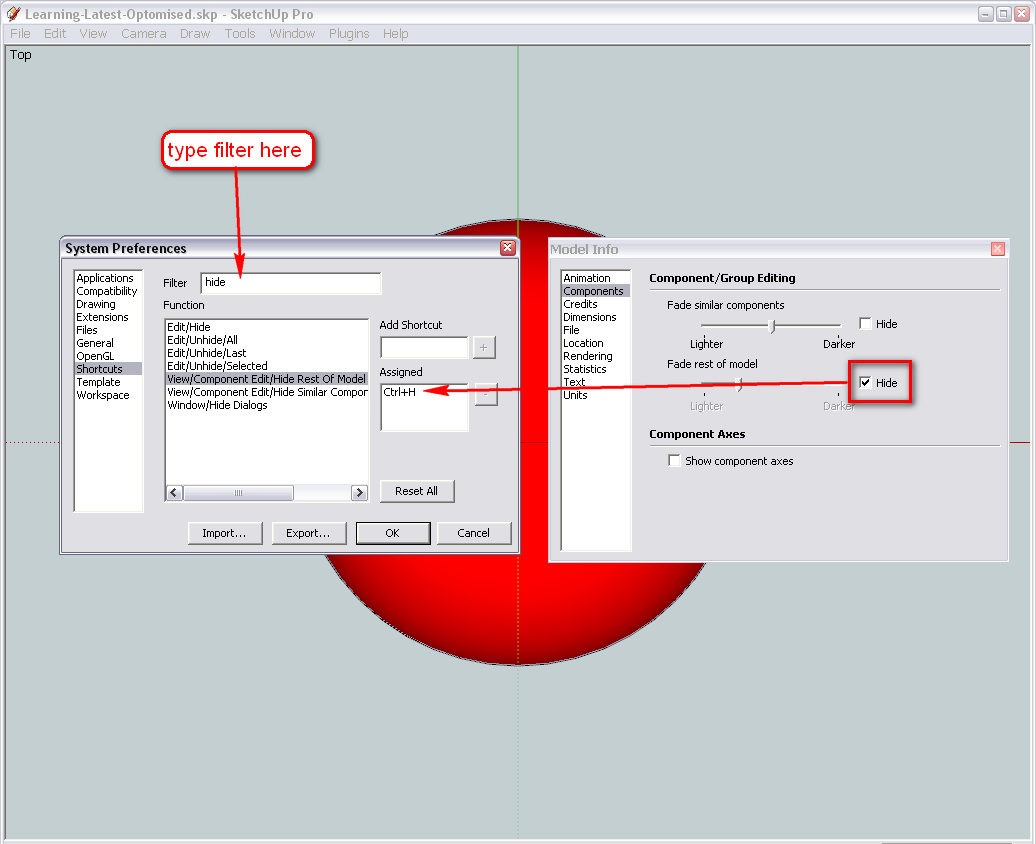
One more thing - either activate the Face styles toolbar (now you already know where these are) of under View > Face styles, turn it to monochrome. This is better to model little parts like this as well as you will always see where there are back faces.Now start editing one of your groups and find out how you could easily delete parts from the hidden geometry. If you find it boring, don't go on because this is NOT the way we are going to do it - by the way, it is high time to make a backup file because when we finish (with another method - intersecting with a plane), you will notice that it is not the way you wanted it and we will need to start over.
If you want to avoid this, find out NOW what we need to do. Some hints in this topic:
http://forums.sketchucation.com/viewtopic.php?f=79&t=24578Another hint - we are going to use the rotate tool extensively.
Now I have an urgent meeting with a friend in my regular, local, corner bar, so I quit but if I can, I will get back. If it is too late for you (I think you are a bit ahead of time than me), I can still prepare the home-work for tomorrow.
In the meanwhile, also think about what other changes you would like to make in later phases.Cheers;

-
Oh yes, and forgot to say that your dome is completely upside down. Select everything (both groups) in your mode > right click on the selection and "Flip along..." the blue axis.
-
Hi Gaieus
I have allocated my shortcut key and backed up my file at this stage.
I didn't realize my dome was upside down but thats sorted now.With regards to additional changes in the dome, I think we have everything covered at the moment.
Here's a recap- Split dome into 6 equal parts.
- Allow removal of each part individually and combining them together again.
- Underneath the dome is a covering so to say. I would like to be able to remove this covering and also re-attach it if need be.
I also need the dome to sit on a platform. The platform has it's own dimensions.
Do you need these now or can we incorporate that later after the dome is complete?I think that's about it for now, untill something else pops up in my head but I highly doubt it. I have thought this over real hard and can't really think of anything else.
Regards
D0me -
It's a dome's class in depth

-
Rivetting ... really
-
Thanks guys - I am enjoying it myself.
Starting from nowhere, D0me will probably be able to do it perfectly.
Now D0me, we are going to draw a rectangular face that we use as a knife to slice up our domes. First of all, here is the model that I have already moved up to the origin (after flipping, it was a bit sunken). Also I deleted those two. little line segments you can see in the last image once you get there.
Learning-Latest-Optomised.skpHere are the steps:Start drawing the rectangle with lines now . from one endpoint in the group to the opposite, diagonal endpoint. Make sure you pick the endpoints that lie on the red axis (or green if you prefer - but on either). This is when it comes handy that we drew our circles with their endpoints perfectly aligned on the axes.
Ah yes - and this rectangle will be outsideof either group (so don't edit either)!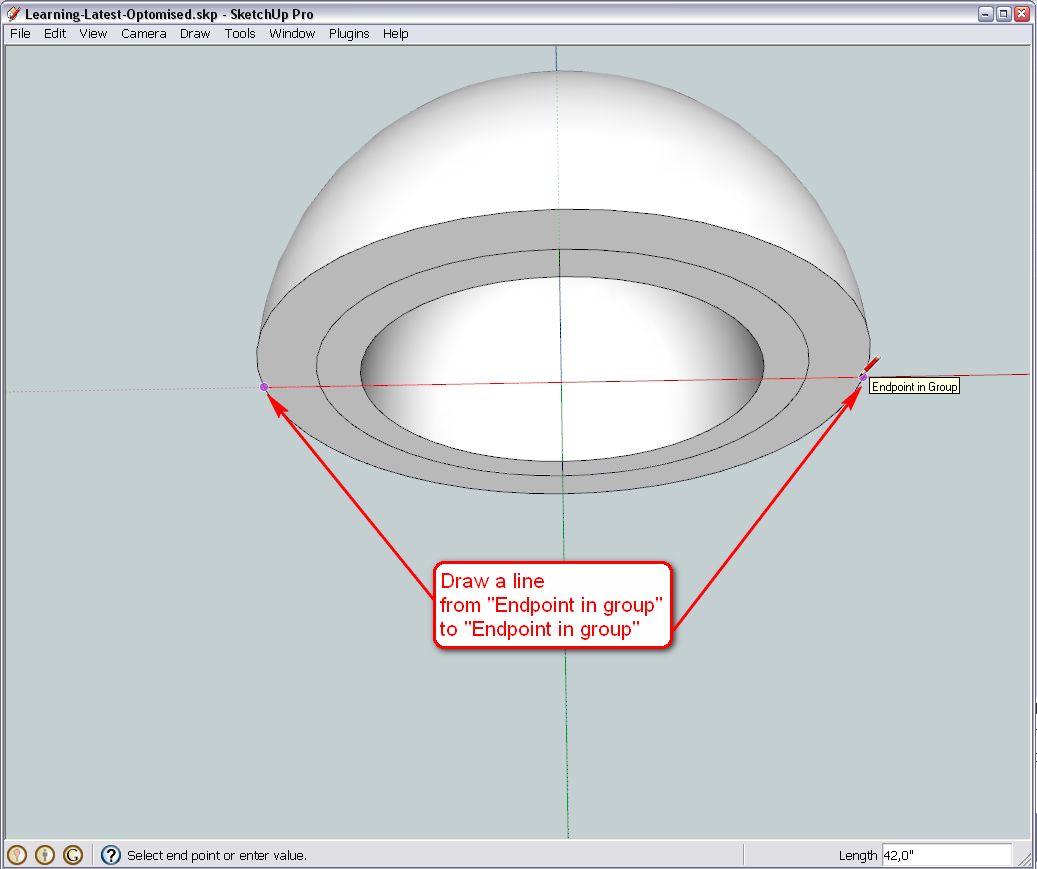
Now a bit of an exercise to practise inferencing in SU: go on with the rectangle from the point you finished your first line along the blueaxis. Make sure that the line (before you click to finish it) shows in blue (and also notice the tooltip I have). It's indifferent how long (high) you draw it just make sure it is higher than the dome.
If - for some reason - SU doesn't "want" to draw it along the blue axis, go to front view (you already have the View toolbar) and it will be easier. Also, once you get the blue line inference, press (and hold) the Shift key to lock it there.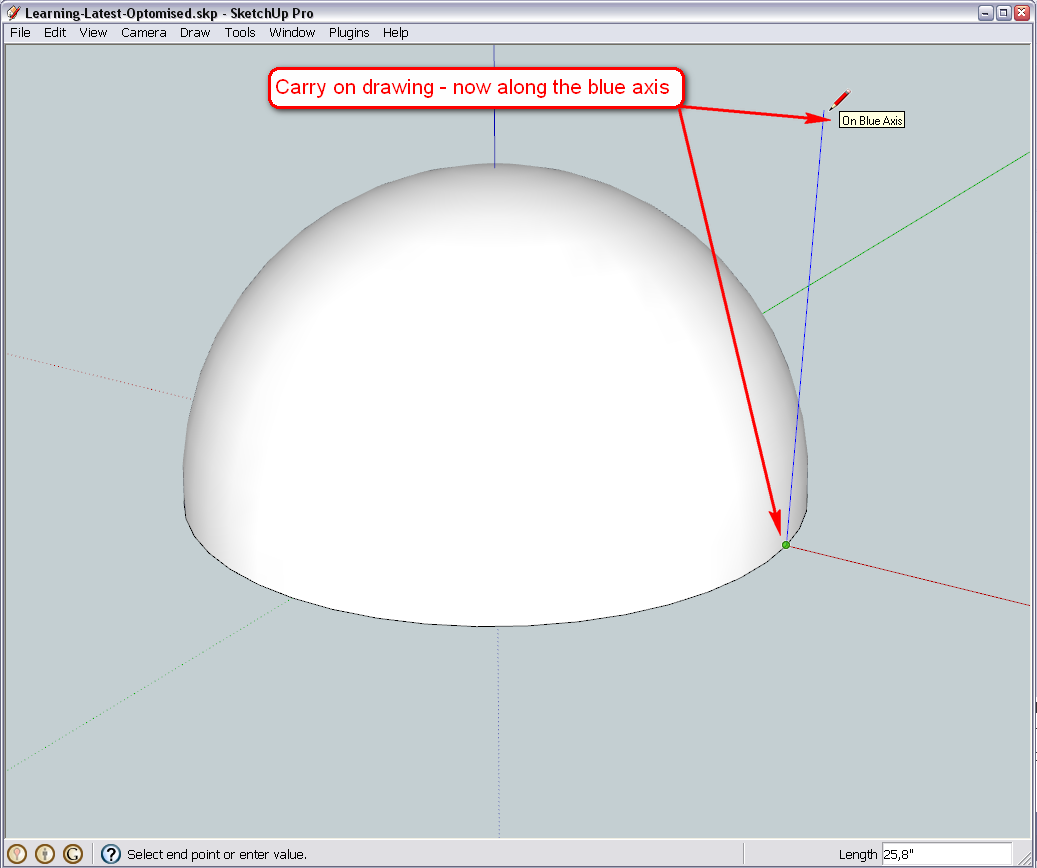
Okay, now we are going back on the red axis. This may even be more tricky - but only at first. You can get a decent inference (best is still in front view) if you first hover over the very initial endpoint until it shows the tooltip "Endpoint", now start moving your cursor up until you get the red inference again and you can see what's on the screen beléow - your previous endpoint coloured black, from there, a blue, dotted inference line to your cursor - indicating that a (future) line on the blue axis would connect the two points. Now you can click.
Another method would be to start your line on the red axis, press (and hold) the shift key to lock it - and simply click on the endpoint at the edge of the dome (where we started the rectangle). SU is very powerful at these inferences and you can easily turn them on your advantage.
Practise both methods.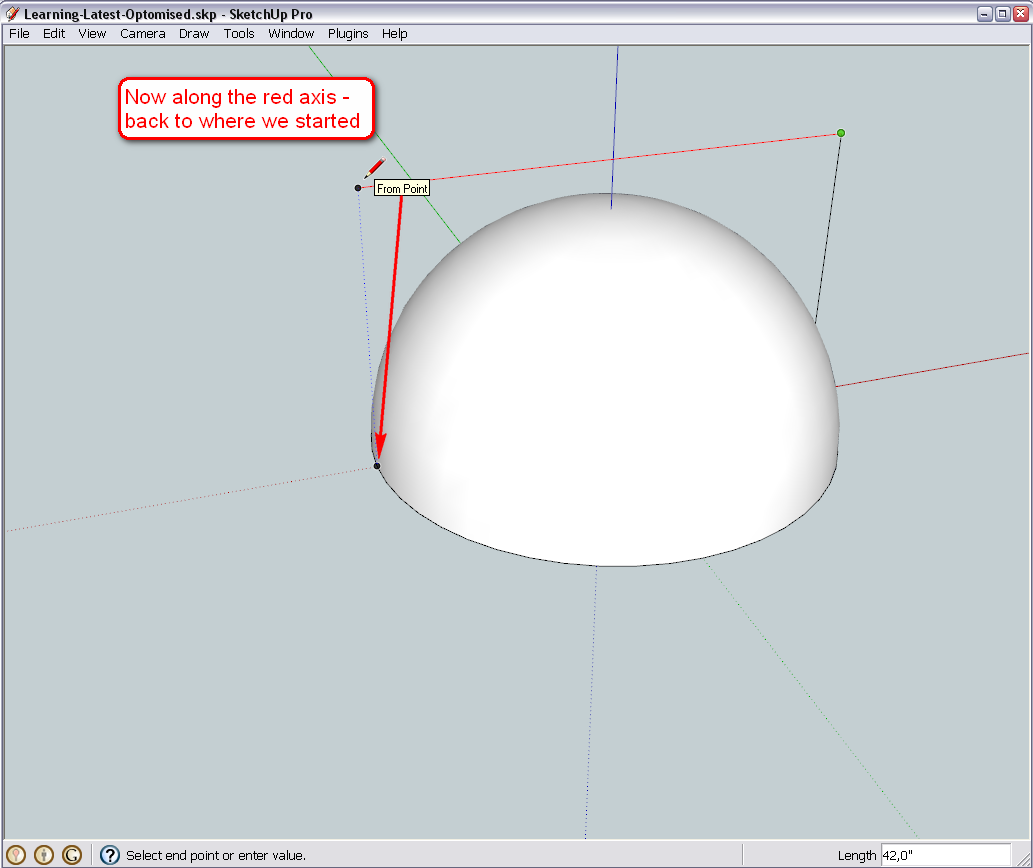
Finish the rectangle. This is easy.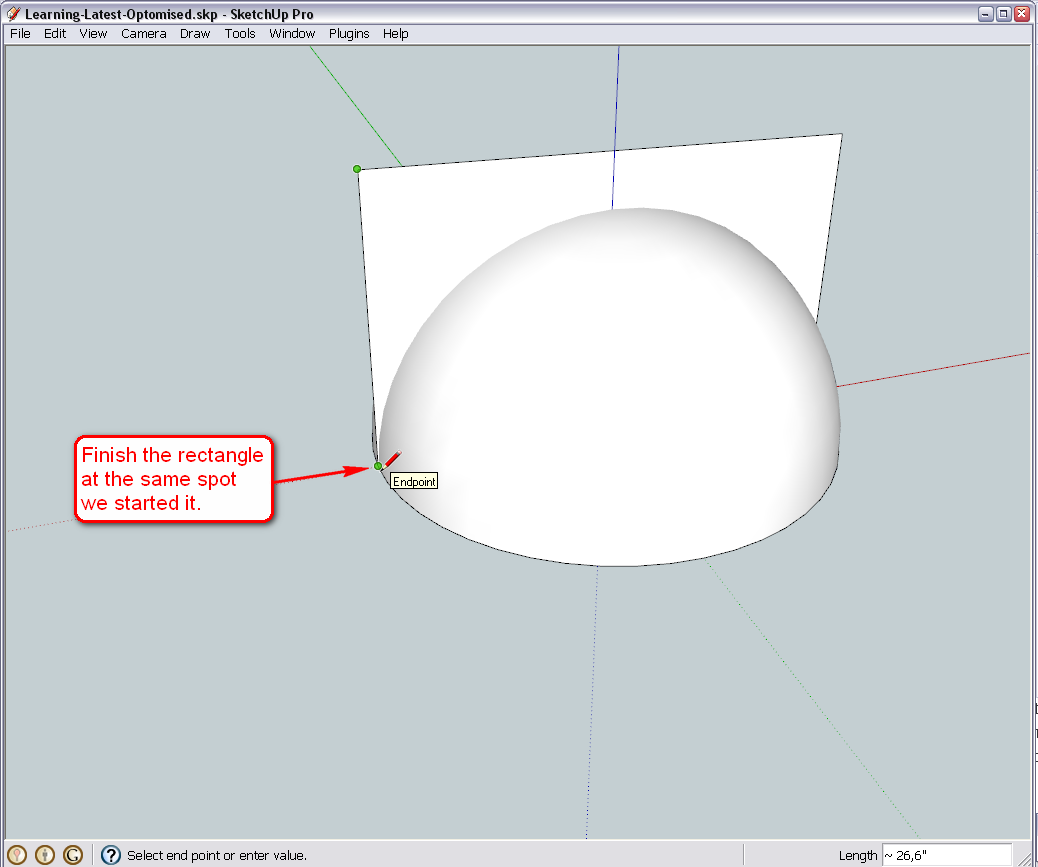
Now let's check if everything went well. Open your Styles dialog from the Window menu, go to "In model" (the little house icon) > Edit tab > Edge settings (the first, little wireframe icon). Here, change your edge colour to "by axis". I have also turned the axes off in the view menu so that we get a better view from below, too. If you see your edges in red and blue colours, everything seems to be fine (this is always a good "quicky" to check your model if something goes wrong - e.g a face doesn't want to form because some edges are out of plane)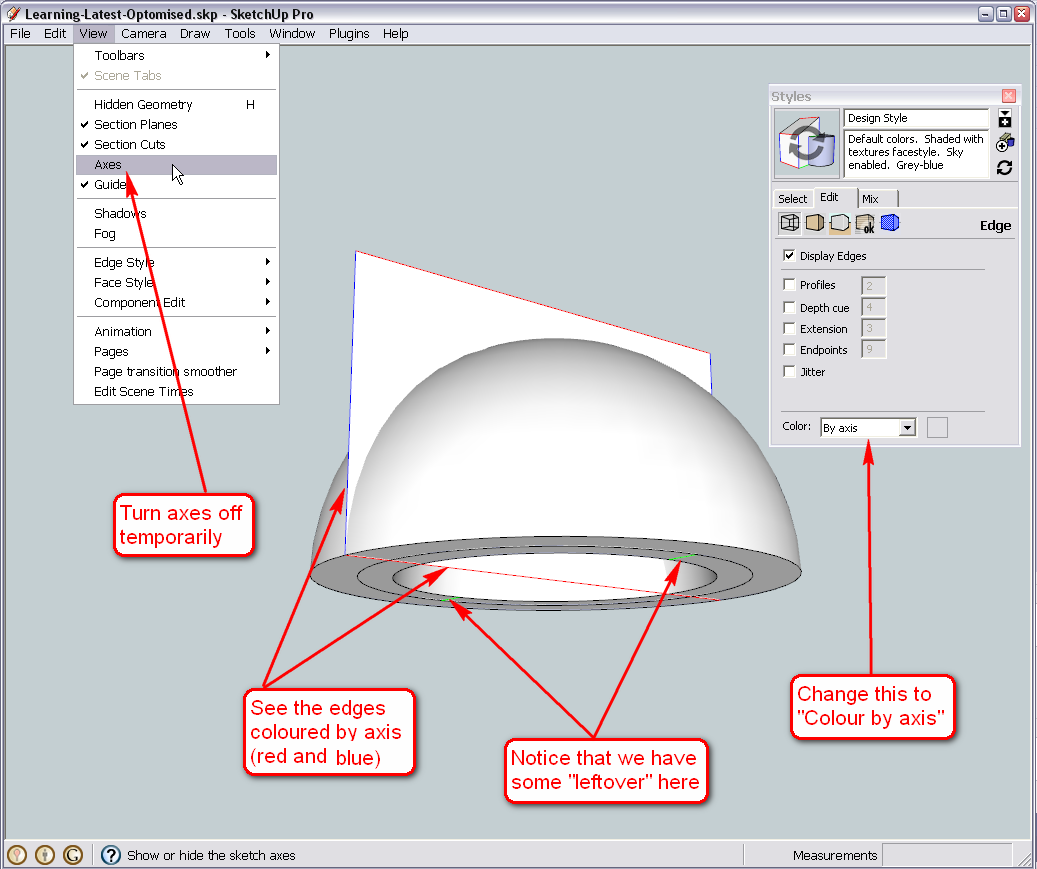
Ready for the Rotate tool? -
Hi guys
Pilou and Chrisglasier, this is truly a phenominal lesson and I'd advise everyone to take a stab at it especially for beginners like myself who want a general feel of how to us SU.Gai, done. A quick question,
In the following post http://forums.sketchucation.com/viewtopic.php?f=79&t=24930&start=30#p214278 , you mentioned that you optomised the image for further work. I did download that version and have been using it from then till now. In you previous post, you gave me another version to download which I did and currently, that is the version I am working on. Just wondering what optomisation you did and do I need to know learn those optomisations, or can I leave it out.The reason I ask is because I will do my own exam at the end of this excersise by changing all of the dimensions of the dome and then try to create the dome from scratch. I think that's the only two places where I used you version of the file.
Ready for the rotate tool, Sir!
-
The problem with that original version was that since there was already a "ready" bottom face for the domes, when lathing them around, this face vanished and had to be filled again. You can try an earlier version and see how it does not get a bottom rim.
Not a big deal, easy to fix - I just did not want to confuse you with things that are not relevant to this whole thing and generally do not happen.
Now to get back to the Rotate tool... (in the meanwhile, I also grouped our "slicing plane" for easier management).
The first and most important thing is to define the axis of rotation as it is of course not indifferent. First of all, select what you want to rotate (in this case, the slicing plane - and now it comes handy that we have grouped it). Also make sure you are looking somewhat "down" like in my image because the Rotate tool will auto align itself to the plane which covers most of the screen.When it is selected, select the Rotate tool and hover over the "ground" until you see it blue.
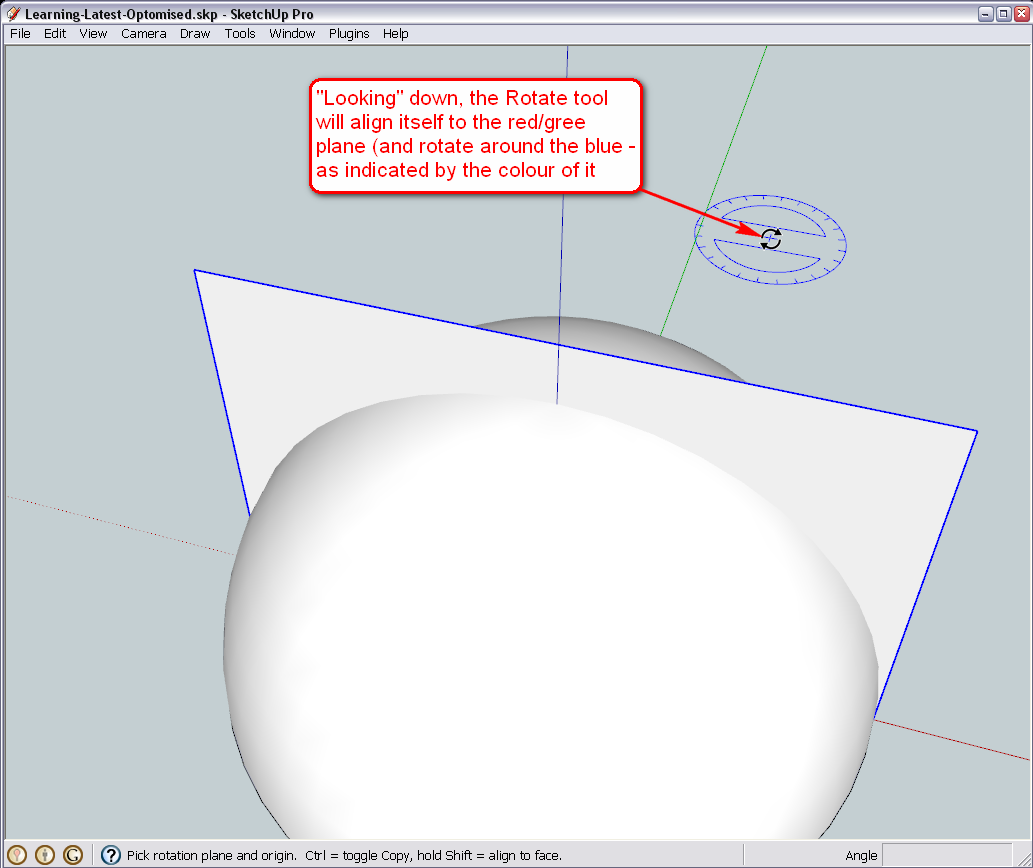
Now (as we have already learnt it), you can lock this inference by pressing the Shift key and place the Rotate tool to onto any geometry that would otherwise not be on this plane (and we have nothing on this plane in this model at the moment).
If you click now, you have already set the axis of rotation (the very middle of our slicing plane, exactly on and along the blue axis)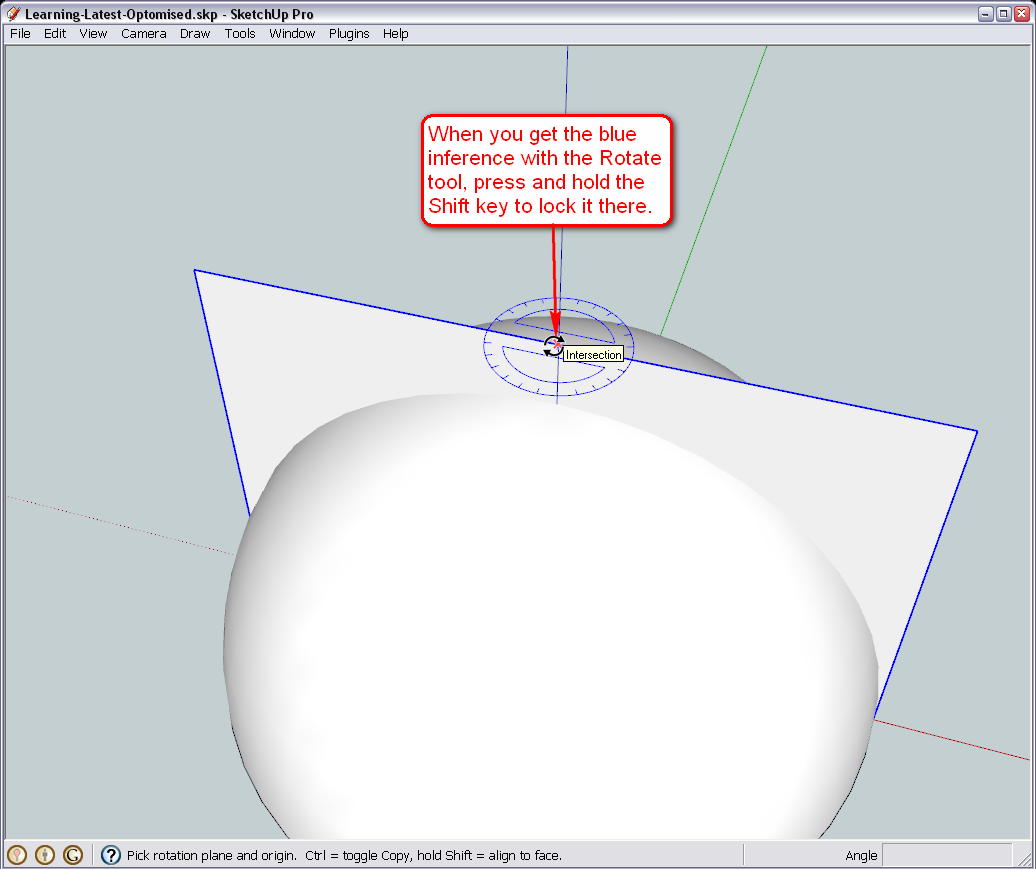
Sometimes however, you cannot really get a good inference like above and you need to "force" SU in a certain direction. If you hover over any geometry, the Rotate tool will always auto-align itself on the face it is placed on. But of course, we do not want to rotate anything along the green axis.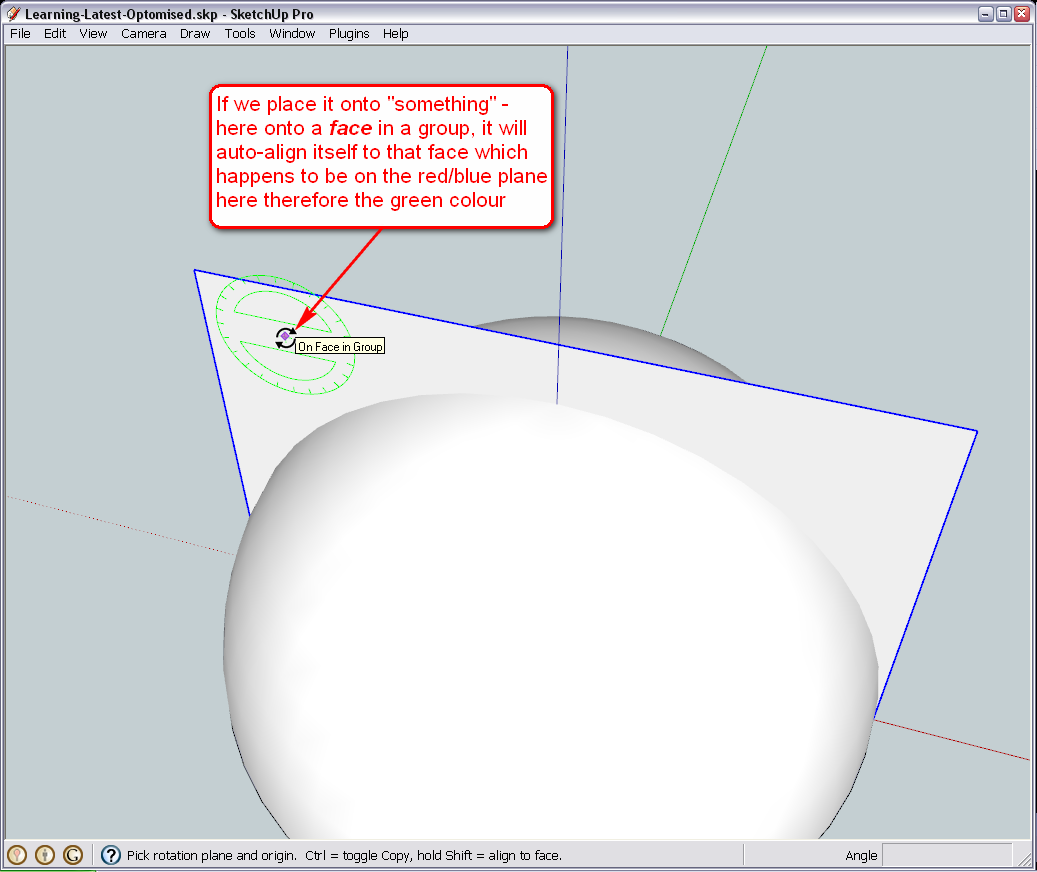
Now pick the point we picked in the example above (the "intersection" is between the group and the blue axis - if the axis weren't there, we could have a Midpoint inference instead).
Click with your left mouse button and keep it pressed there.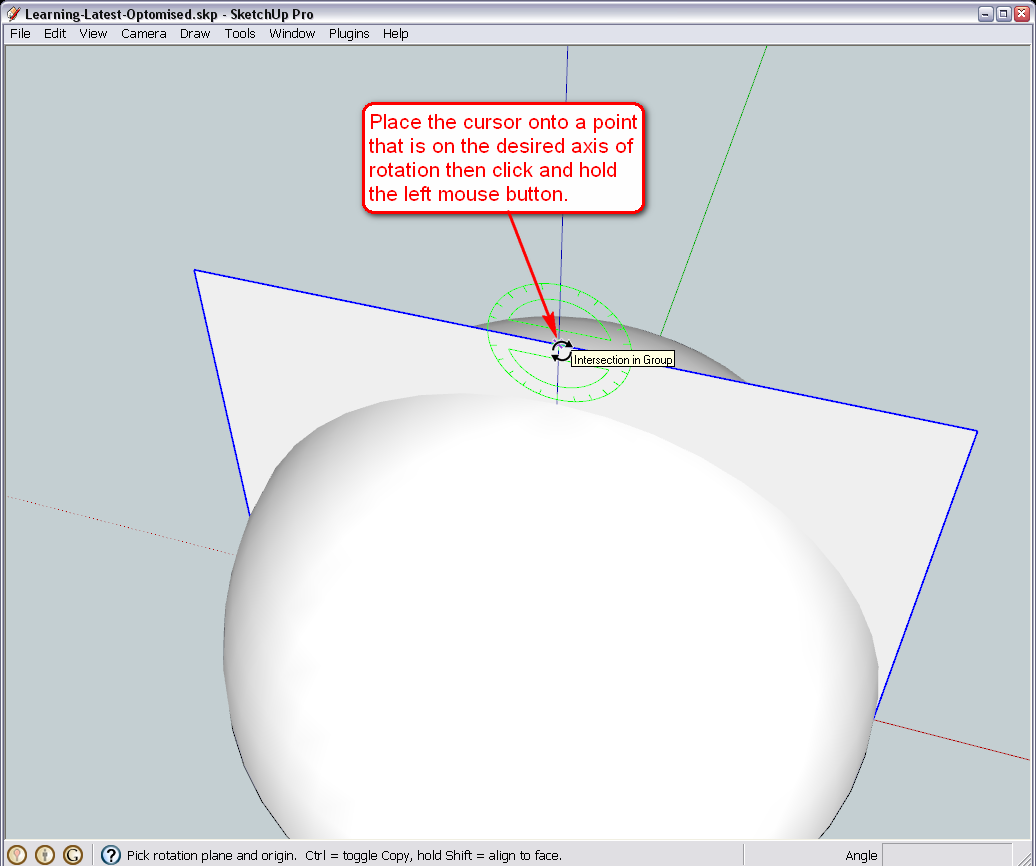
Now while still pressed, drag it along the blue axis until you get the inference (the tool turns into blue and even says "on blue axis"). You can even play around dragging it along the edge of that plane until it turns red. This is a very powerful feature as sometimes we are not perfectly aligned along any axis and you may want to rotate something along some odd line - but this feature works with anything.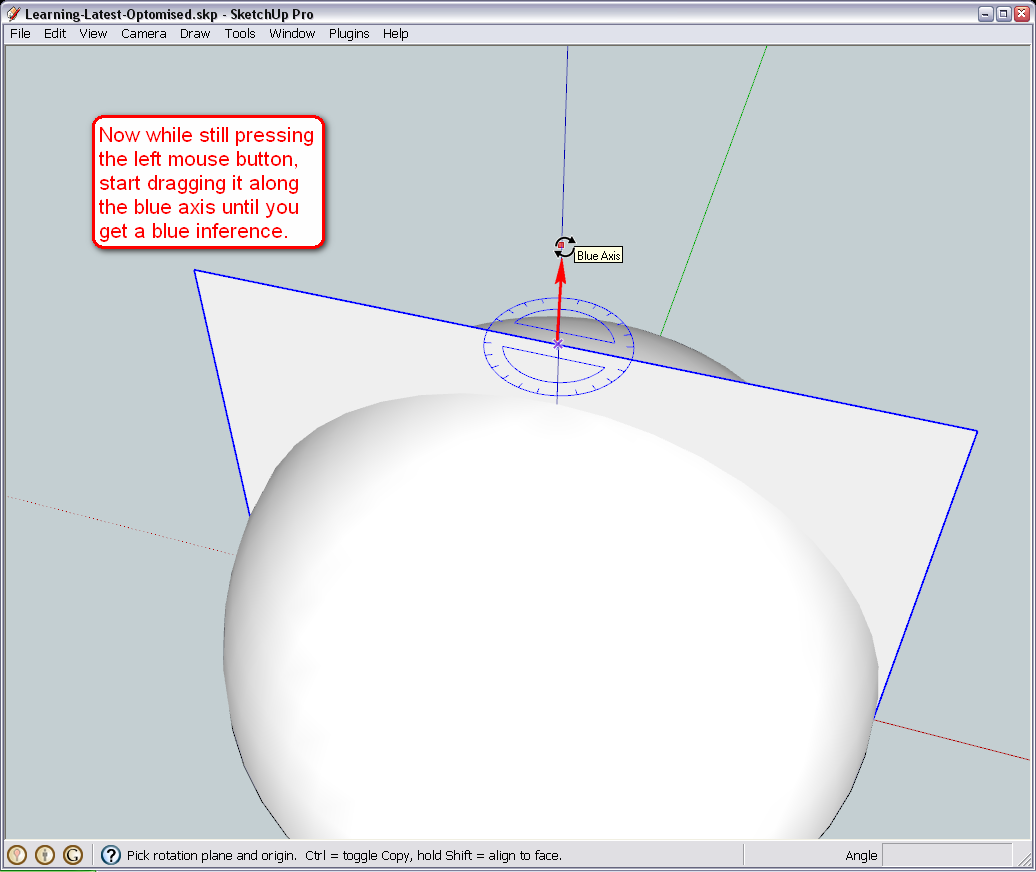
So using either way, we have set the axis of rotation and if you release the left mouse button now, the Rotate tool will still be stuck in this position. Now you can pick a point anywhere in your model (left mouse click), start rotating whatever is selected (I hope you pre-selected the slicing plane!) and with another click (to anywhere in the model), finish the rotation.Let me know if you feel comfortable and certain with the tool.
-
This thread needs to be a sticky. It is absolutely fabulous! I'm trying to think of some future topics!

Rick
-
Go ahead, Rick, think of something!

In the meanwhile, D0me, please, start thinking about the future of your model. We will end up with six slices of the two domes each. Are they always going to be identical pieces?
By the way, I am ready with the next steps, to...

(And my buddies are waiting for me again )
)No, seriously, my home town is the European Capital of Culture this year and the opening ceremony is just happening some 100 metres from where I live.
Theyx are broadcasting it online, too - what a crappy online channel! Works only on IE (the middle block)

-
Well, did a bit of website building and css coding (damn, that IE screws up everything!)
So back now and let's rotate that slicing plane.
First, turn on hidden geometry (View menu again) because we will need it. Then align the rotate tool as we did above. You can now release the mouse button - the Rotate tool is stuck in its position. You can even use the middle mouse button (press the scroll wheel) to Orbit to a better position.
Grab the plane at its corner by simply clicking on it (this is also an endpoint in the dome) and start rotating, Snap it to the nearest (or actually whichever) midpoint.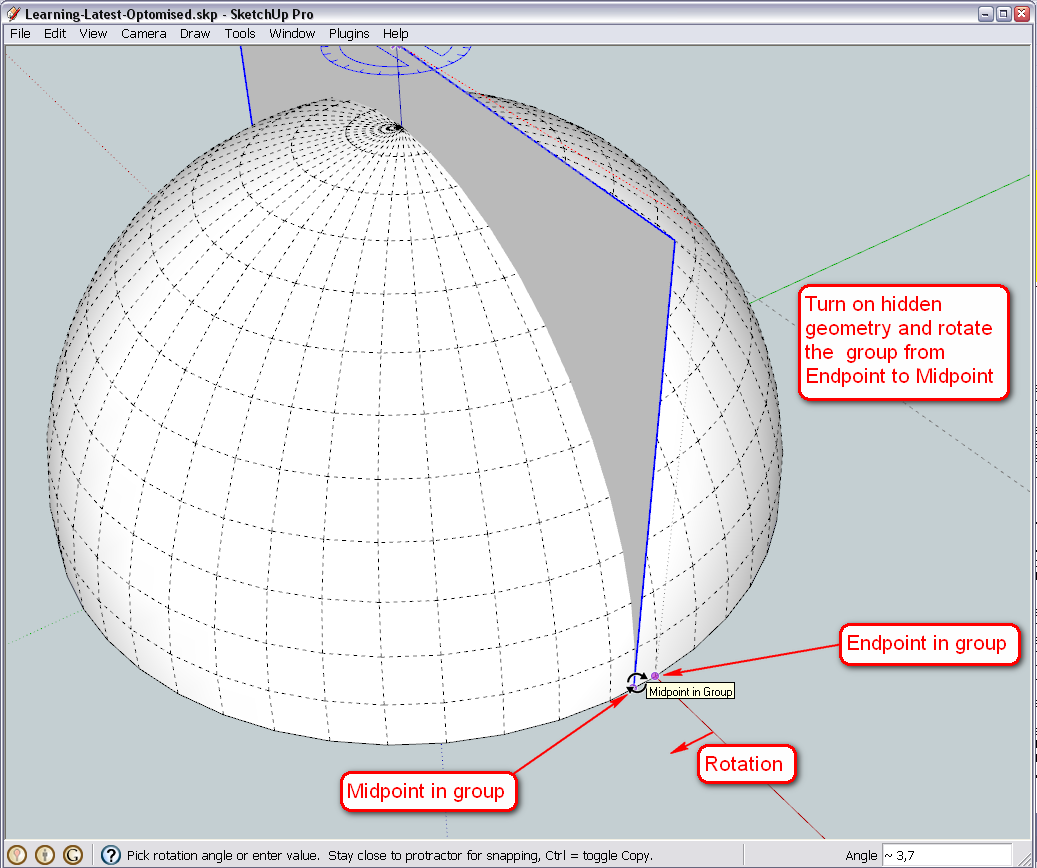
We need to do this to avoid visible seams between the parts/slices of the dome when we chop it up (like it is nicely visualized by TIG here, in another topic and there is a good tutorial about it by Eric here).Well, we now need a copy of this plane rotated around the same axis and by 60 degrees as you need 6 segments for the dome and 360/60=60. This is done by a method called "Copy Rotate". Align the Rotate tool again where before, grab the corner of the plane again but now hit the Ctrl key, too. With the Ctrl key, we will not only rotate but "Copy-Rotate" the plane - i.e. the original instance will remain there.
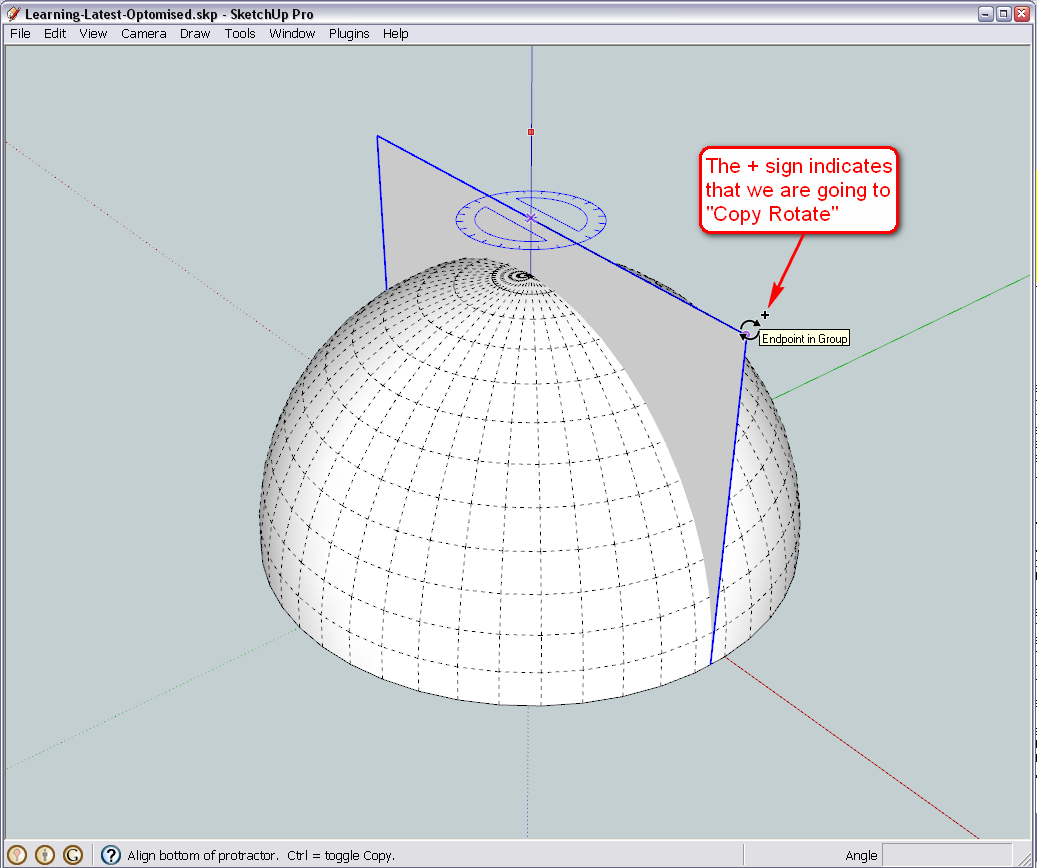
Start rotating and go ahead by 8 segments (we have 48 segments in the circle and 48/6=8) OR until you can see "60" in the Measure box at the bottom right. Alternatively (and this is the fastest) just type 60 and hit Enter (note you can always do this when the Measurement box is active - i.e. ready to accept input - just you need to know what kind of input it is looking forward to).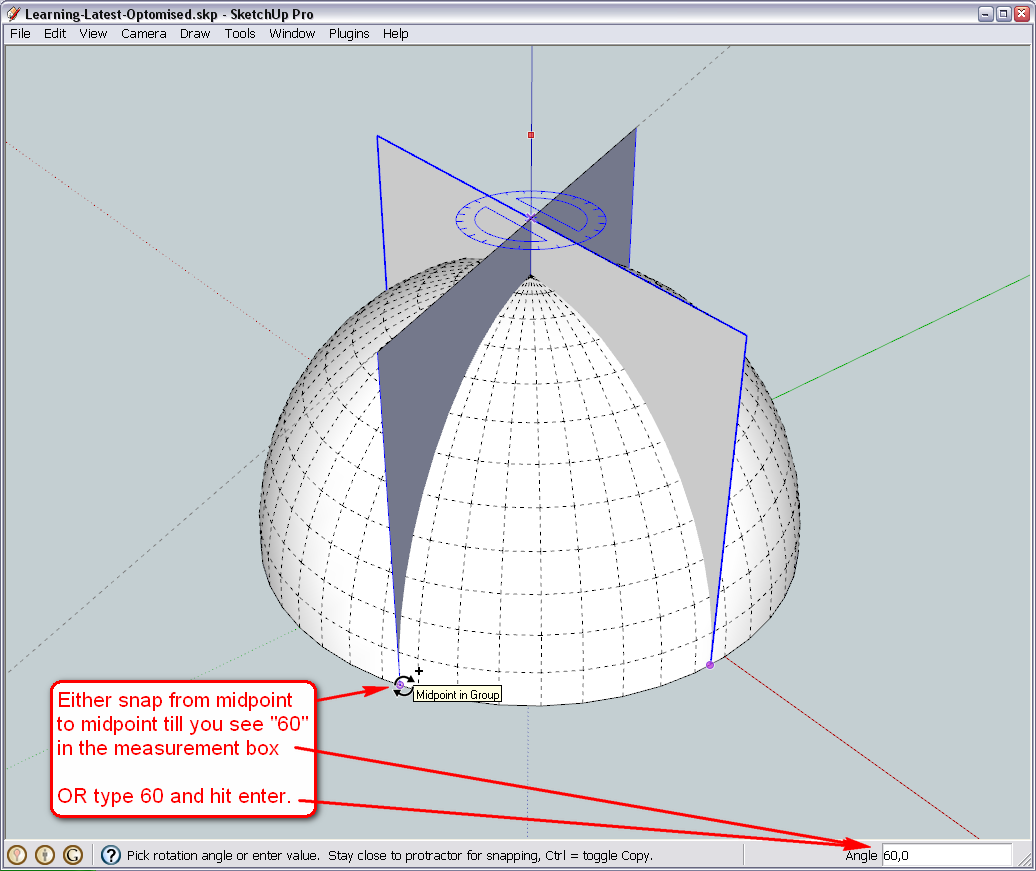
And voilà - we are done. Next tool is the "Intersect" tool. -
So what's up, D0me?
I have already finished the job:
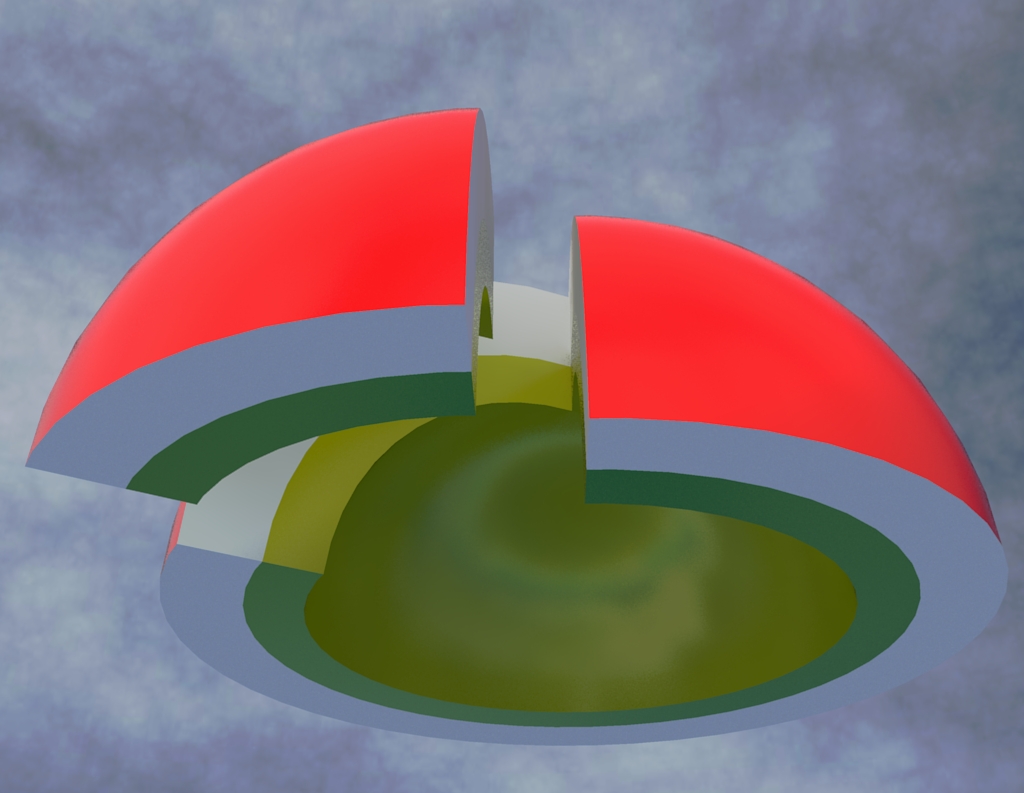
-
Hi Gai
Firstly my sincere apologies. My progress has been slow in the past day or so.Due to unforseen circumstances, I didn't have time to do much till now, but I've started with the instructions in reply http://forums.sketchucation.com/viewtopic.php?f=79&t=24930&st=0&sk=t&sd=a&start=30#p214687
@unknownuser said:
Now to get back to the Rotate tool... (in the meanwhile, I also grouped our "slicing plane" for easier management).
How do I group my slicing plane for easier management?
I notice that you have also completed the sketch. Looks great. I'm almost there.
I hate to do this at such a late stage but I have another addition to the sketch. I'd say this request is quite late since you have already completed, but if we can accomplish this then that'll be cool and if not then its no train smash. I think you've already got me to a stage that I didn't even think was possible.
I completely forgot that there is an opening in the dome. I have attached an image which details the description of what I mean.Thanks
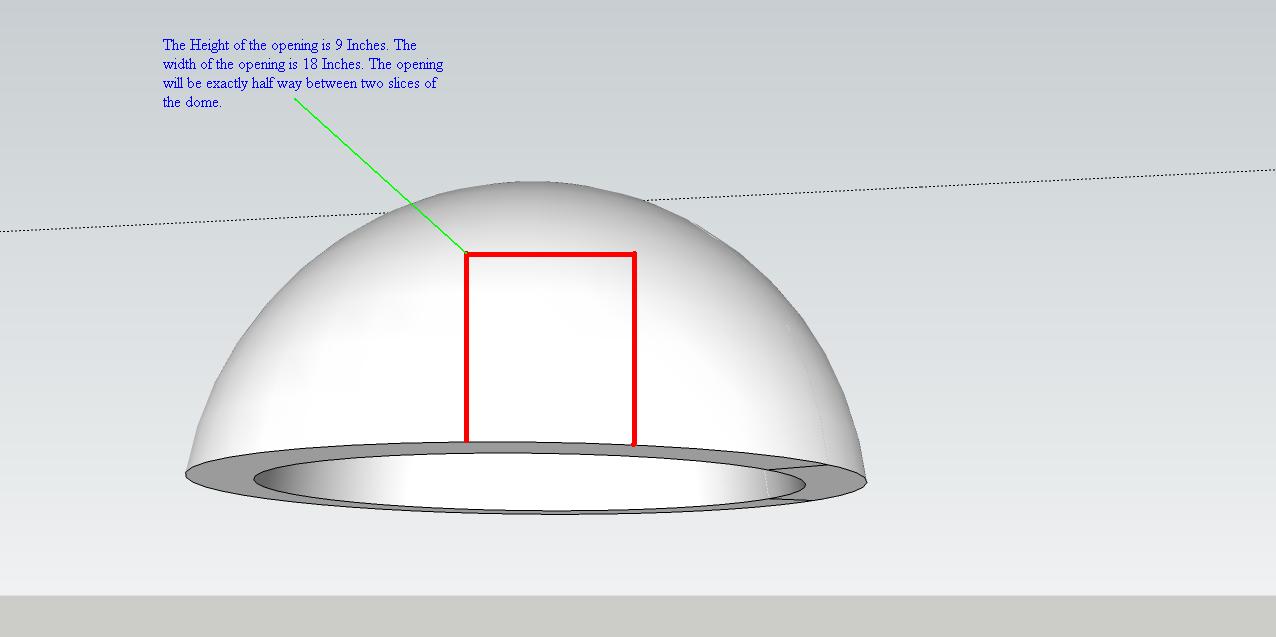
-
As for grouping - we do this the same way we did previously. Double click on the face - it will select the face and its bounding edges (in case other, more complex geometry is involved and you want to select everything, a triple click would select all connected geometry).
Now right click on the selection and choose "Make group" from the context menu.
As for the opening - I was kind of expecting it and we can do it later.

Now let's concentrate on the steps outlined above (and of course, no problem with being late for the class, I had my things to occupy myself with).
-
Hi Gai
This Rotation tool took its toll on me. I just couldn't quite get the hang of it at first but after repeatedly reading your instructions and not forgetting the informative pictures you attached, I finally managed to find my way around (excuse the pun). Finding the midpoint was the hardest as SU dosent easily snap onto midpoints as easily as it snaps on to endpoints but hey, whats the fun of it if it dosent make you sweat.
I've attached the sketch. Please check it and see if what I've done is correct.
Ready to continue, Sir!
-
Well, looks like this is it. Well done!

(Although you seem to have rotated it in the other direction - or the same direction but by 120 degrees instead - it does not matter).
Now we are going to use these rotated planes to slice up our model. This is going to be done with a tool called "Intersection". Just a few words bout this tool first. When you use this command, where two different objects go through each other, SU will create lines. Very important thing to remember that it will always create these lines in the editing context you are in.
As we have groups in our model, and we are now "outside" of them, if we did this intersection outside of their editing context, these lines would also appear outside - i.e. would not become part of the geometry of anything inside the groups (in our case, the domes). So this means we have to get inside the groups' editing contexts - and since we can only do that one at a time, we will need to do this twice.I will only show you one example however - you will do it with the other dome the exact same way.
First of all, we have to hide one of the domes otherwise SU will intersect the one we are working with with that one too. The fist image shows what we do NOT want and what we would get if we didn't hide the other dome (this rarely happens but you have this weird setup with two, touching domes)
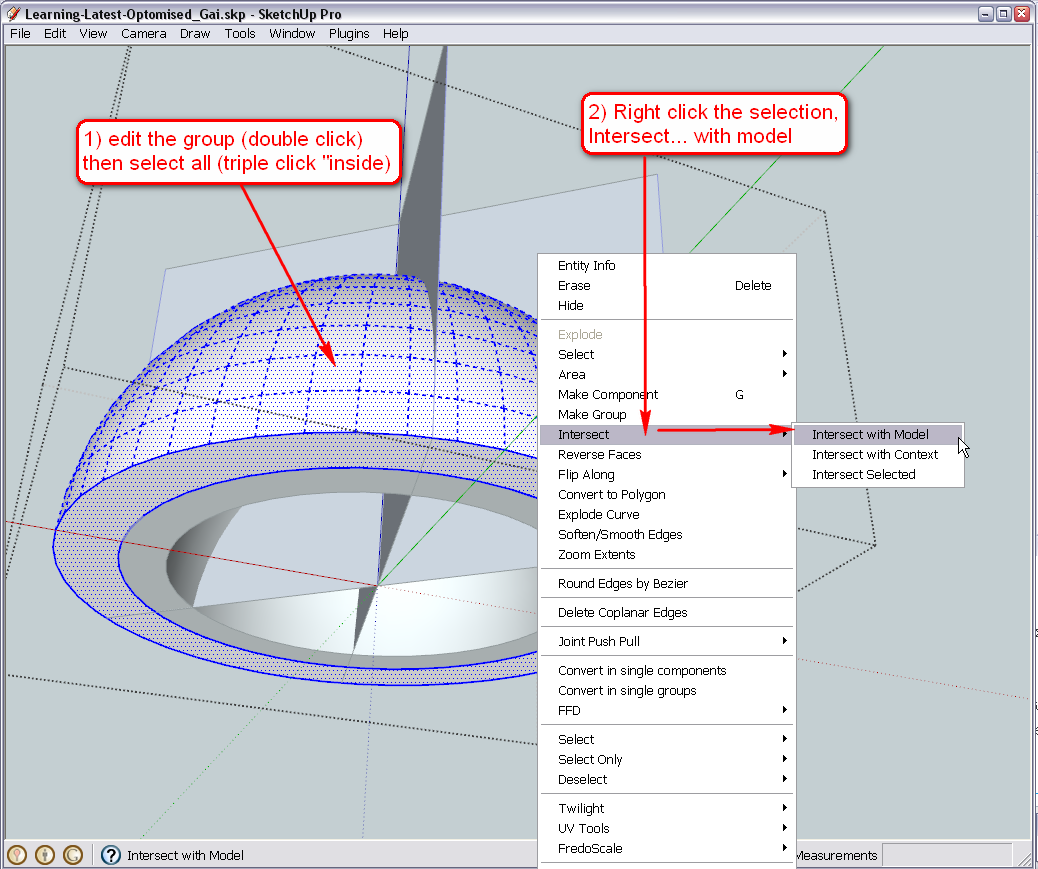
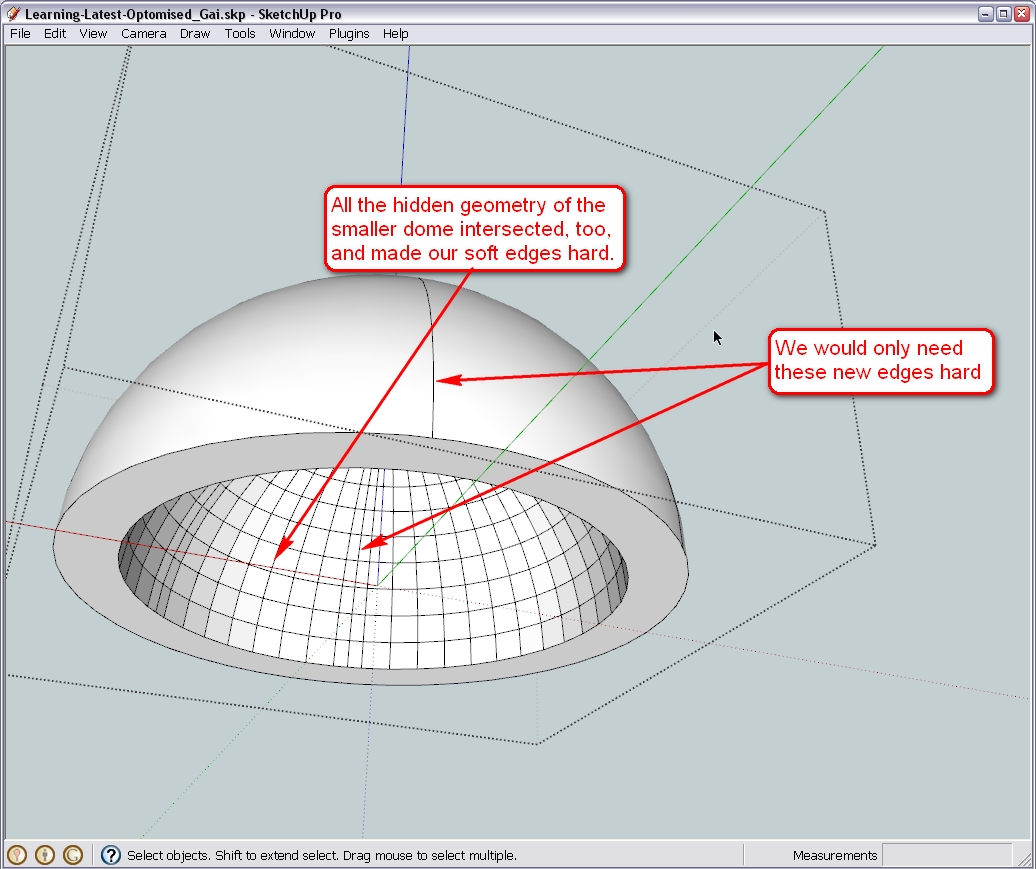
So right click on either dome (I chose the inner one) and hide it.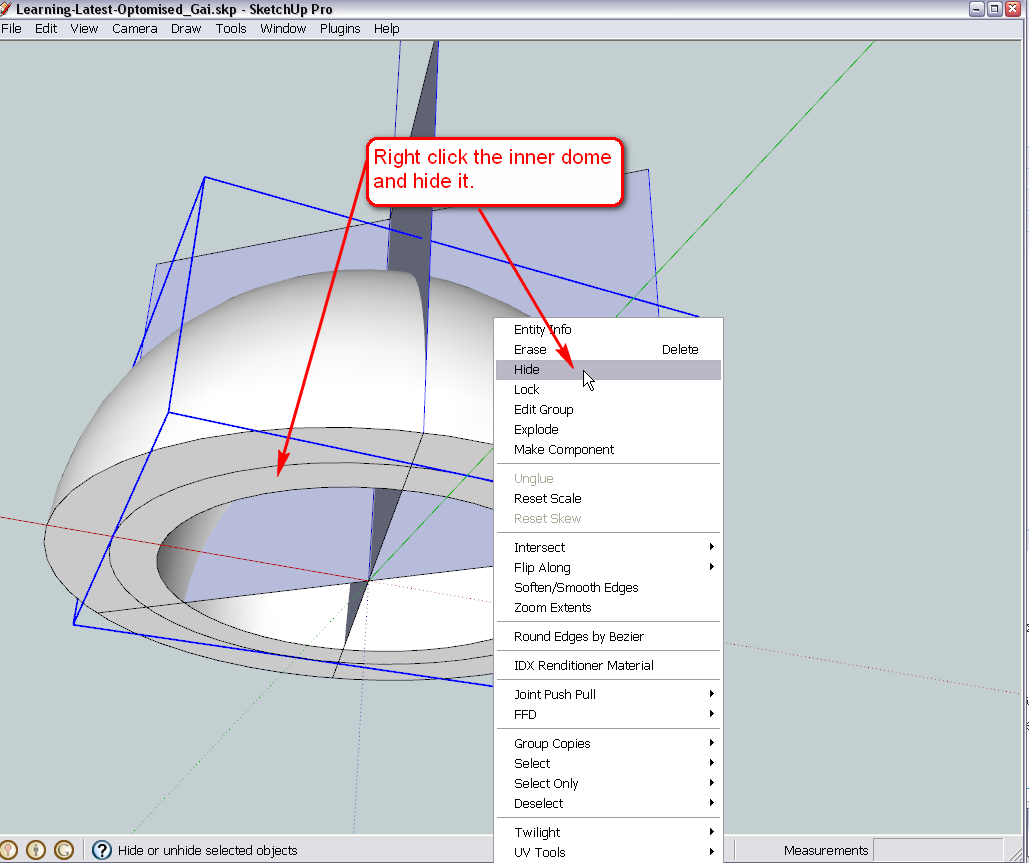
Now do what you could see in the first image - edit the group - select all (if you triple click the dome group at the beginning, you will not only get into its editing context like when double clicking but all the geometry will also be selected - so you can spare two clicks), right click, intersect with model etc. This is what you should get.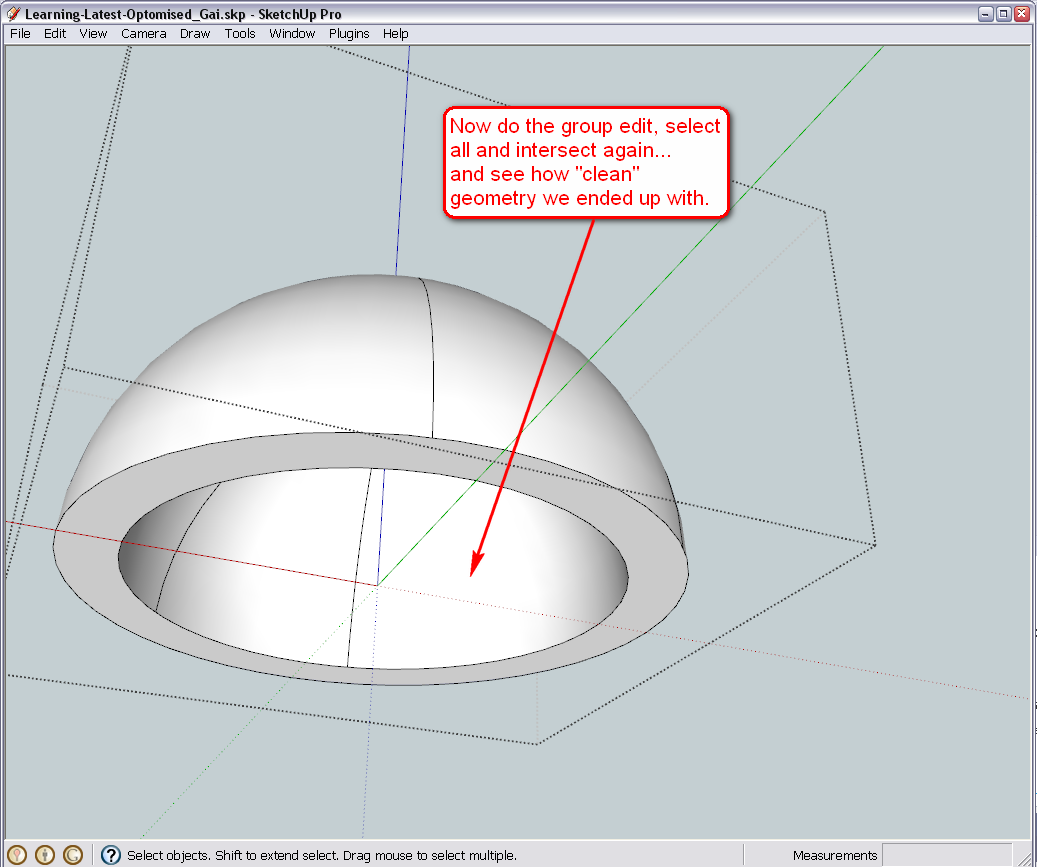
Now comes the boring part - clean up unnecessary and unwanted geometry (in several steps - without further, written comment):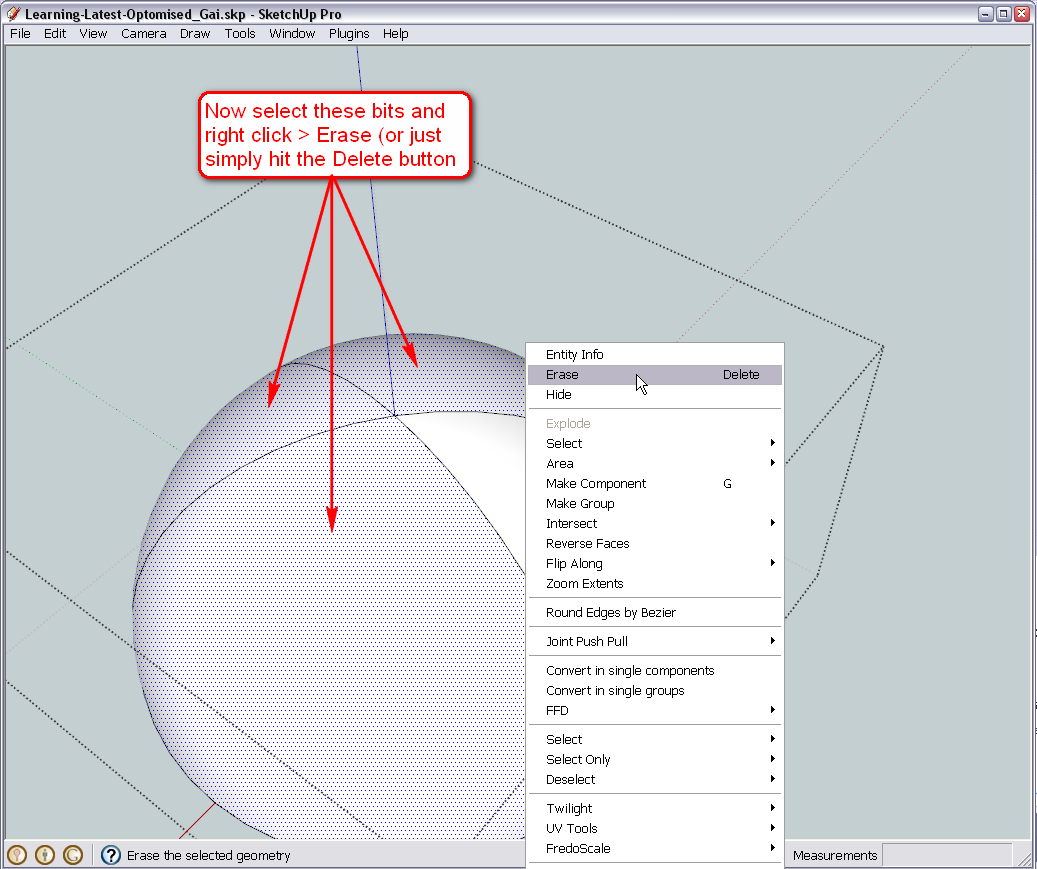
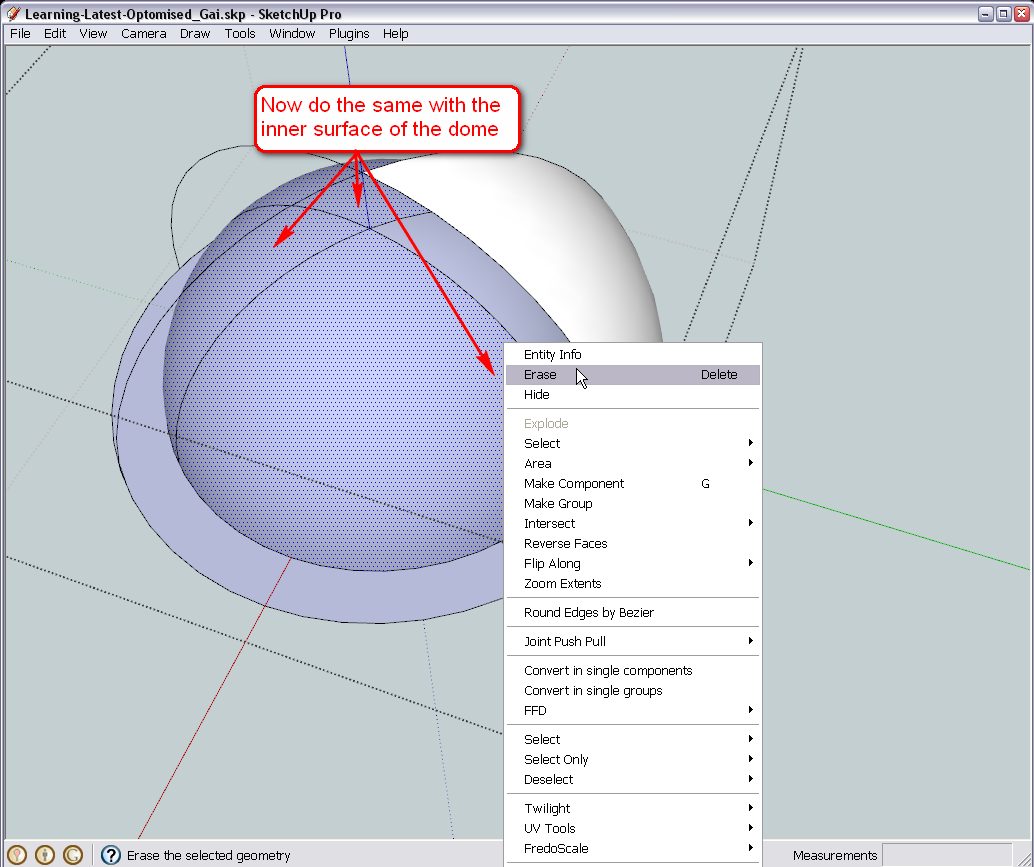
We also close the sides of our slice by using the line tool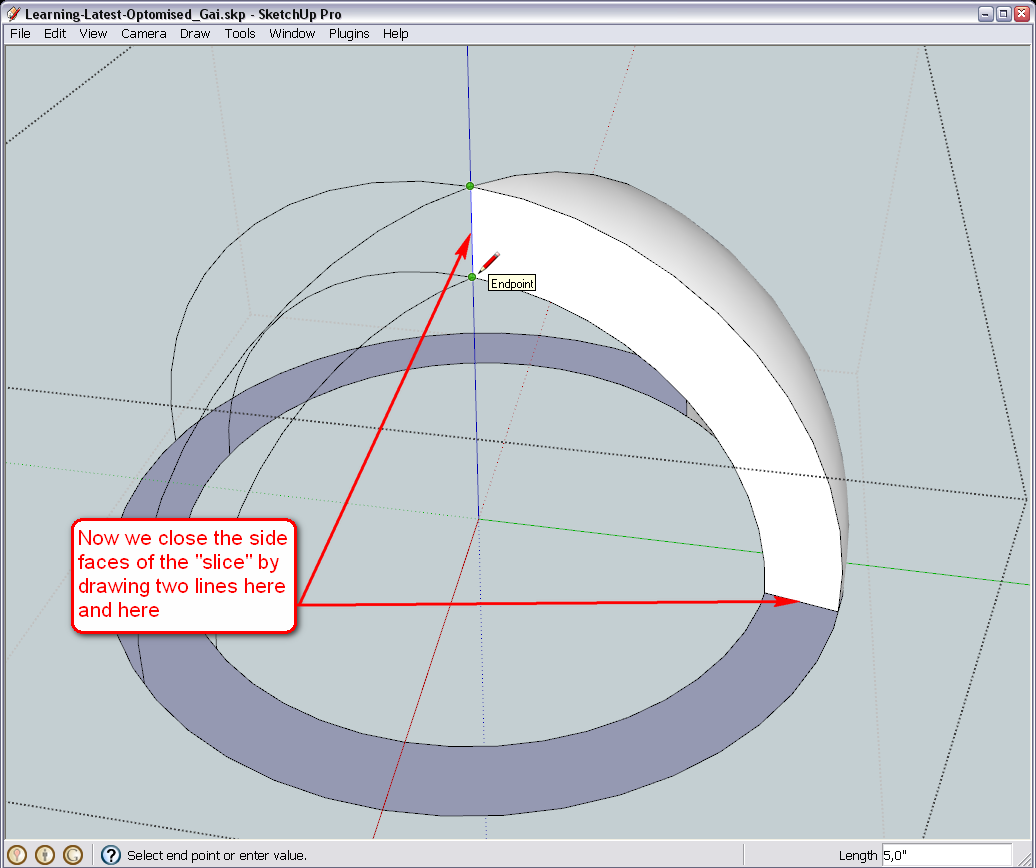
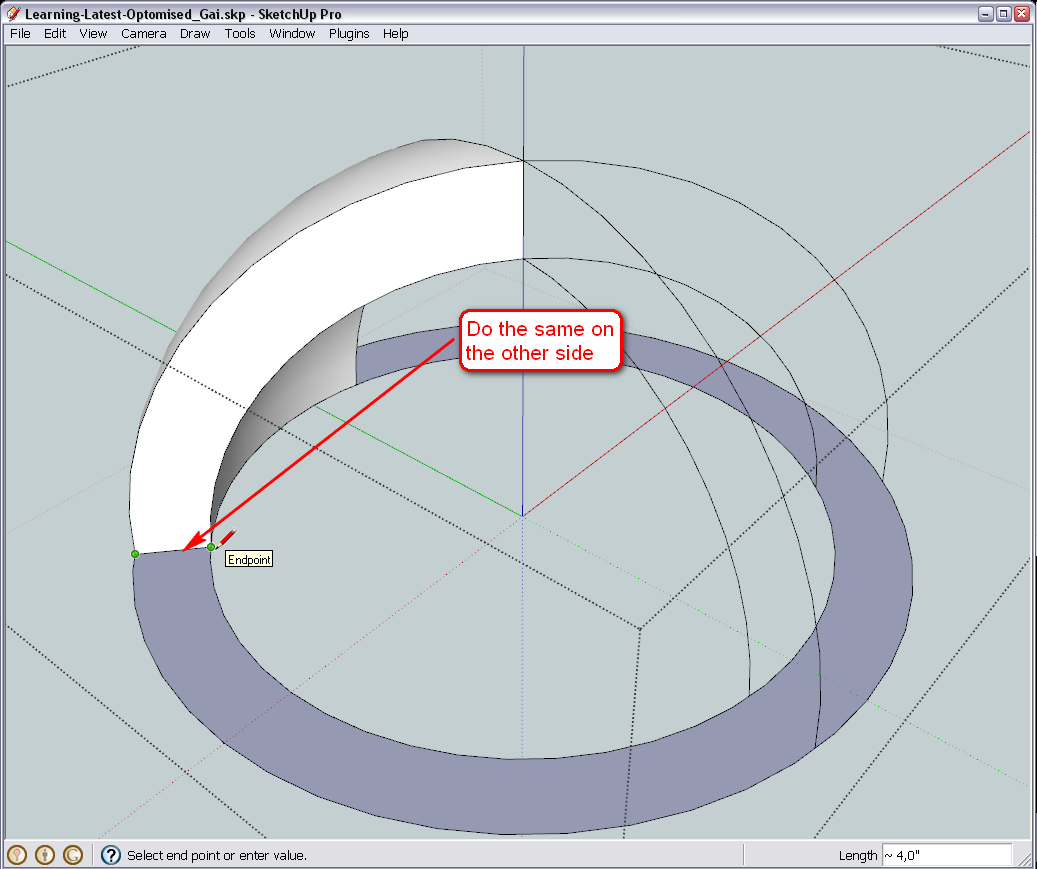
Some further cleanup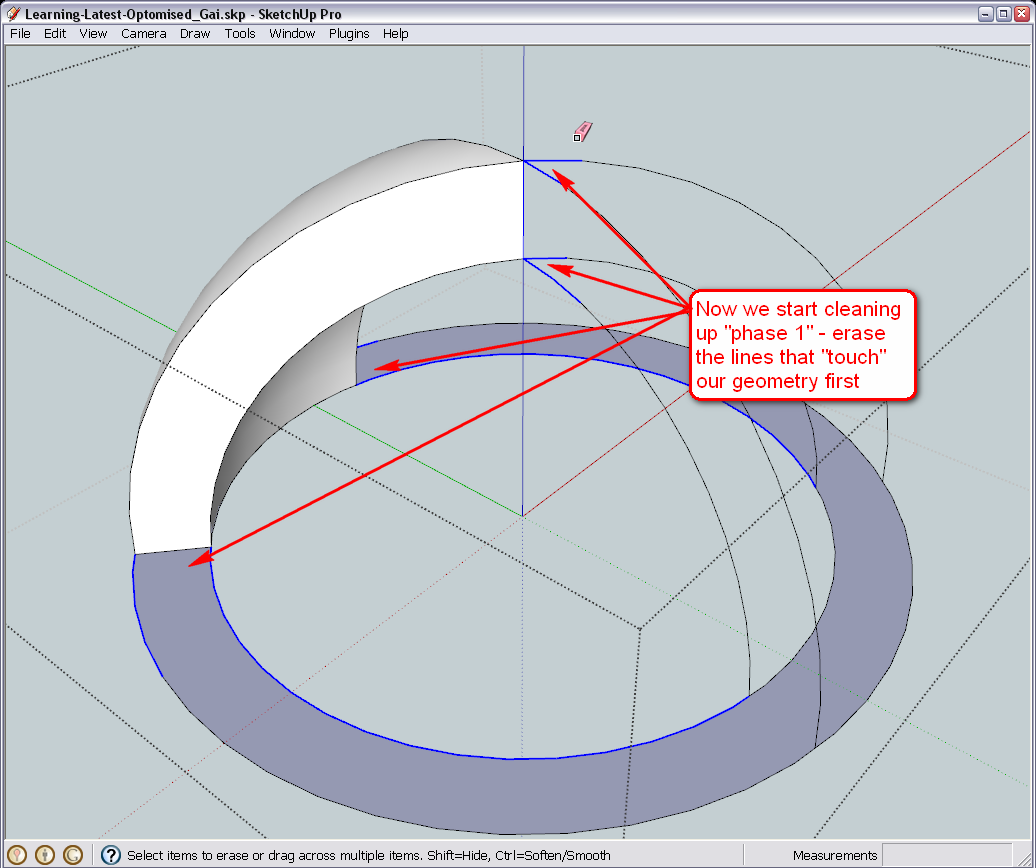
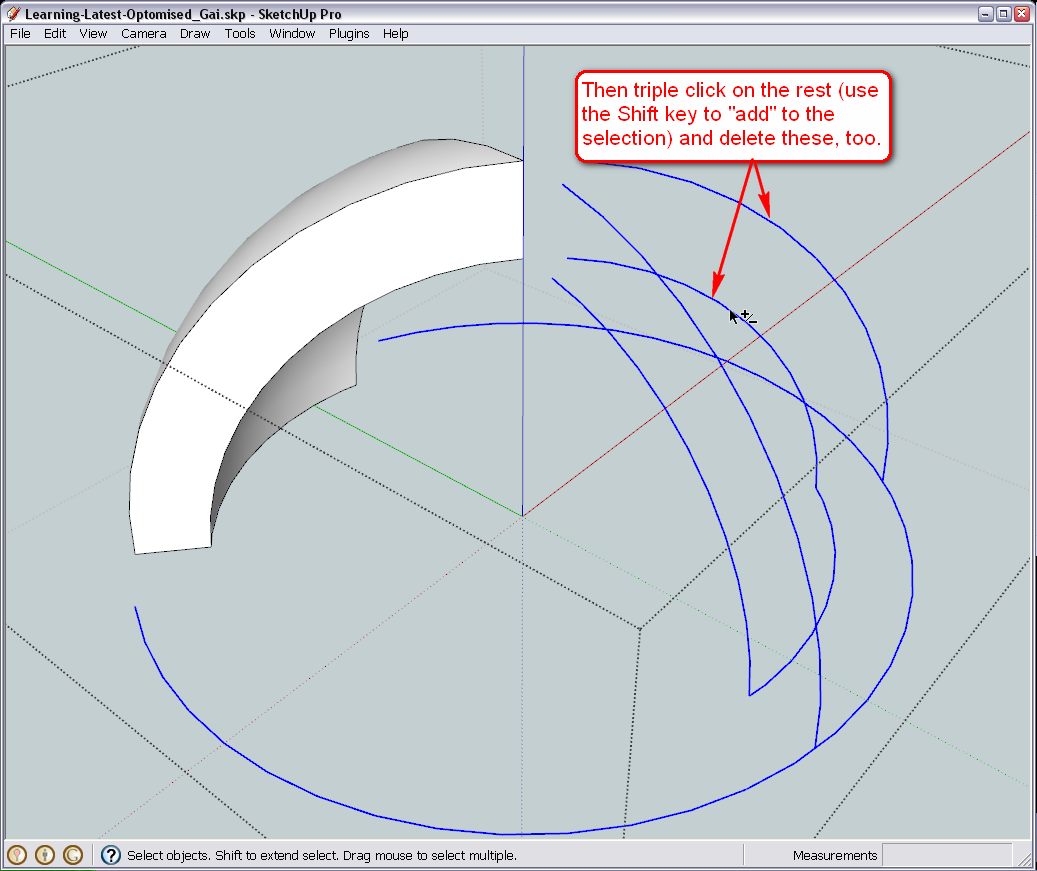
And voilà - this is our first slice we ende up with. Dont worry that we have lost the rest of the dome, as you need six identical slices, we are going to copy this piece around five more times.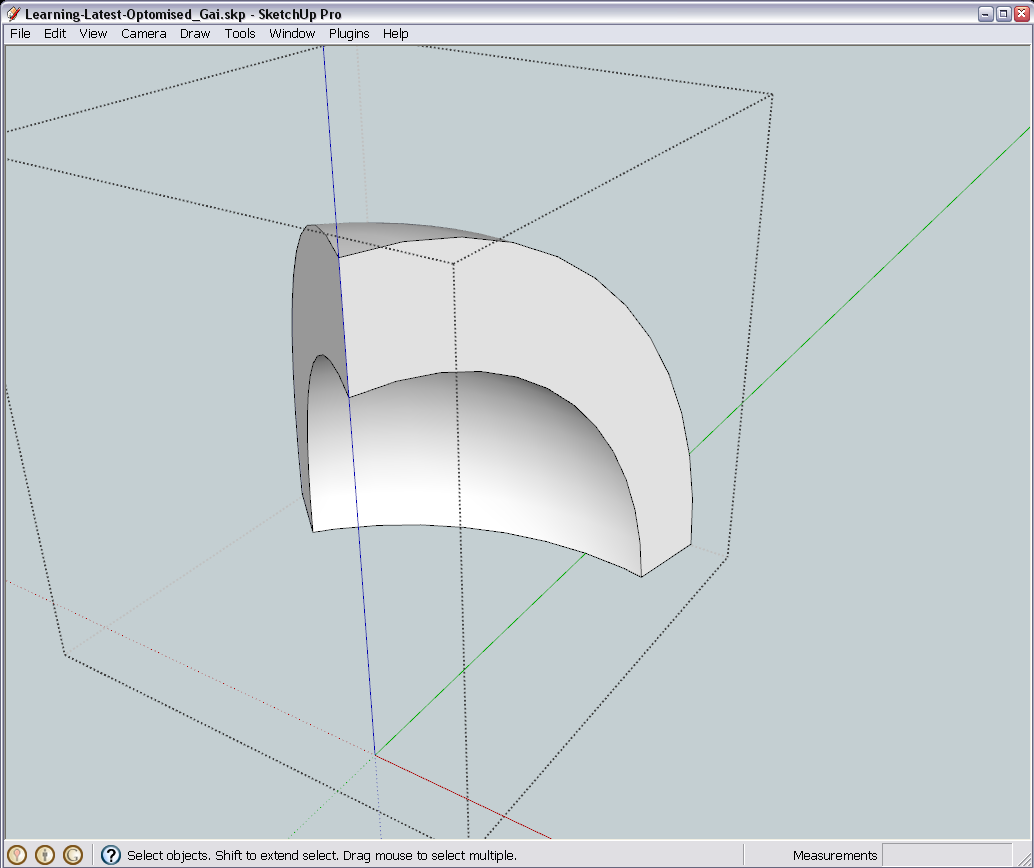
Now unhide the previously hidden, inner dome from the Edit menu > Unhide > either "Last" or "All", hide the slice we have just claned up and do all the steps we did above with the innder dome. Best would be to keep the piece right under the one we have just finished.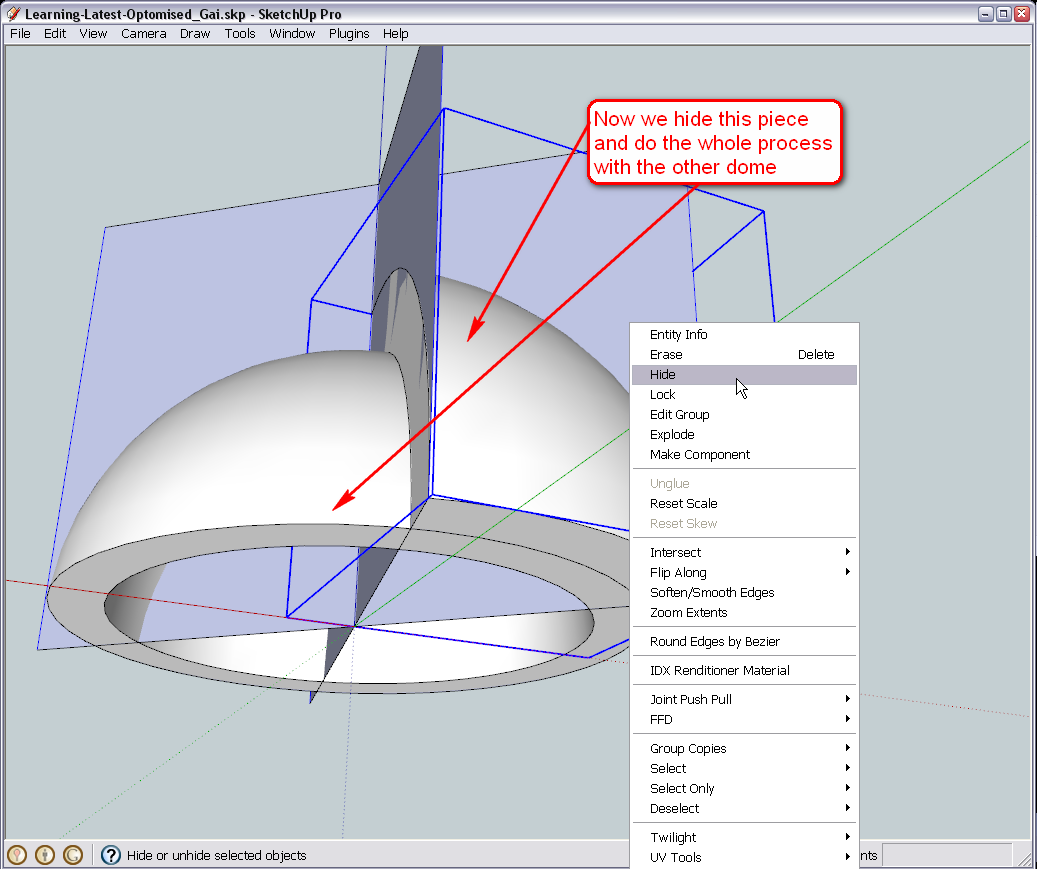
-
Hi Gai
Please help!
I cant seem to get pass this pointI have followed you instructions by right clicking the inner dome and selecting hide. That worked fine.
I then tripple clicked on the dome that's visible and then right clicked it and selected intersect with model. I've succeeded there as well.
I then erased the 3 bits you asked me to erase and that worked as well. After this point, I am unable to erase the inner surface of the dome. When I try to select the inner surface of the dome, I can only select bits and pieces of it (The small square like pieces created by the segments) but I cant seem to select the entire pie piece of it.I also wanted to know whether my sketch is correct compared to yours since I notice that at the point where you started erasing bits of the dome, your images dont have the slicing plane like mine do. Did you remove the slicing plane?
Thanks
Regards
D0me
-
Okay, no problem, there is an easy fix.
This is actually what I wanted to avoid by hiding the inner dome (as its hidden edges now intersected with the outer dome as well). No problem however - apart from the intersection lines we wanted to create, now new geometry was created - just old, softened edges hardened.There could have been a whole bunch of ways to avoid this - I though I found an easy one and I don't know why it didn't work for you as I cannot "Undo" your steps once you closed the model.
Anyway,
- go into the group again,
- select all by triple clicking,
- right click and choose "Soften/Smooth edges.
- When the popup opens, make sure that "Soften coplanar" (edges) is NOT checked and move the slider a bit (just enough to "touch" it).
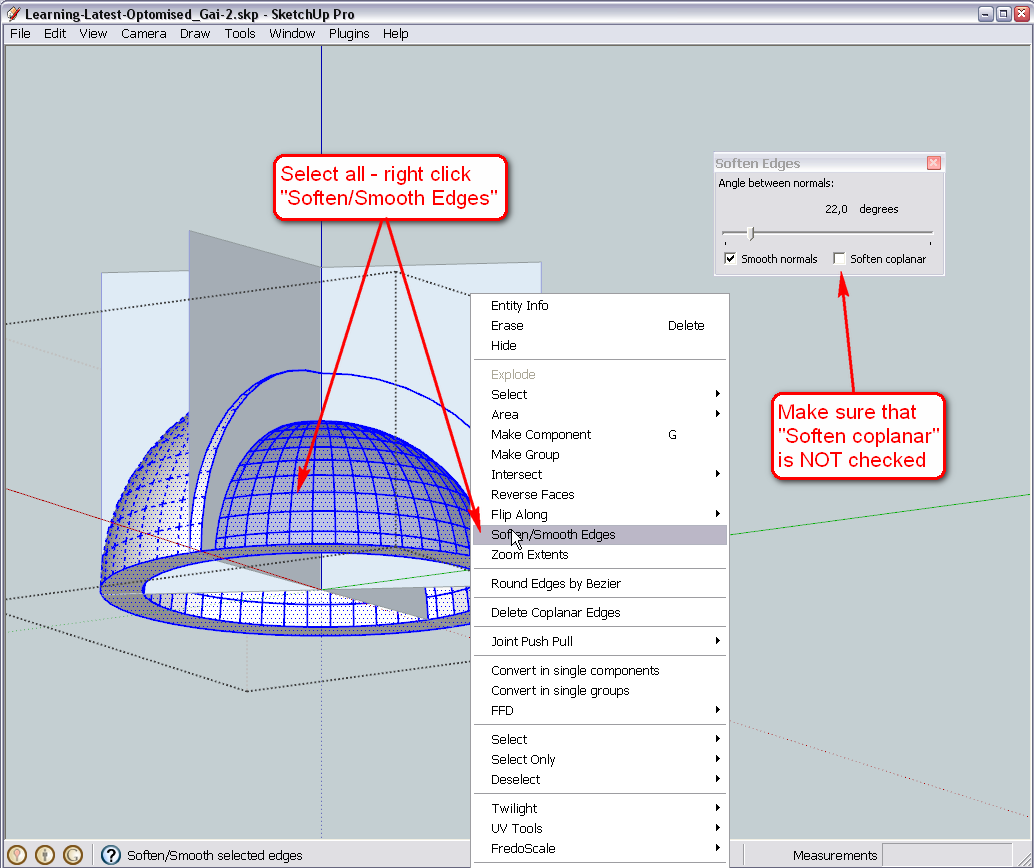
Since we have rotated our slicing planes to the midpoints, we cut the facets in the middle thus creating two but perfectly coplanar ones of each. This is why we can use this trick now and soften everything else BUT what we actually need.
When you have done this, you will be able to go on cleaning the stuff.
If the other dome behaves the same, naughty way, deal with it similarly.
Hello! It looks like you're interested in this conversation, but you don't have an account yet.
Getting fed up of having to scroll through the same posts each visit? When you register for an account, you'll always come back to exactly where you were before, and choose to be notified of new replies (either via email, or push notification). You'll also be able to save bookmarks and upvote posts to show your appreciation to other community members.
With your input, this post could be even better 💗
Register LoginAdvertisement


