Create solid-appearing 3d models of a subsurface
-
That's a great idea, Dale. That's one more thing I have no knowledge of yet! I am looking for the video tutorial on scenes--I'm sure I watched on once before. I might as well explore that area and animations in general. Can you point me to a source?
-
So is an animation just a collection of still scenes? Like a power point presentation? Or can it be a true, continuous fly-through movie?
-
You should rather consider scenes as "control points" of your animation. When you right click a scene tab and choose "Play" (or export it into a movie), SU will connect the "control points" with a series of smooth transitions.
Note however that if you have problems with orbiting in your model, it will be jagged using scenes as well. There should be a "preload" function in SU to prevent this but there isn't.
-
I'm discovering the jumpiness in my large model. It's not too bad, but definitely jumps to the new scene in steps, rather than continuously smooth camera flow. I think I'm getting the hang, but i don't see the place to save various animations (various collections of scenes).
-
Scenes are actually fairly easy to use. I use them when someone else in our office is going to do a presentation without being present myself because they are fairly foolproof, so they don't get caught floundering around trying to make things work.
I think it should still work quite well even with your file size.Drop down the "Window" menu from your menu bar, and select "Scenes"

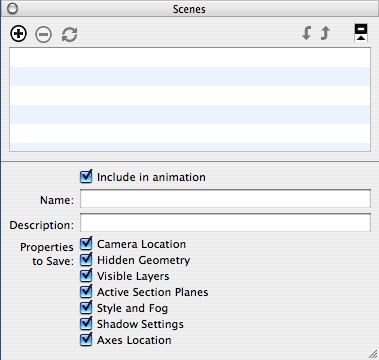
The "scenes" menu will be added to your desktop and should look something like the above.(I'm on a mac currently so it may be slightly different)
If you rotate your model to where you would like to start and press the "+" button (at the top of the scenes menu) it will add the scene. At the top of the SketchUp desktop you will see "Scene 1" will appear as well it will be in the Scenes menu as well.
Rotate your model again and find the second position you like and once again hit the"+" button in the scenes menu and it will add Scene.
You can add as many scenes as you wish to show the model.
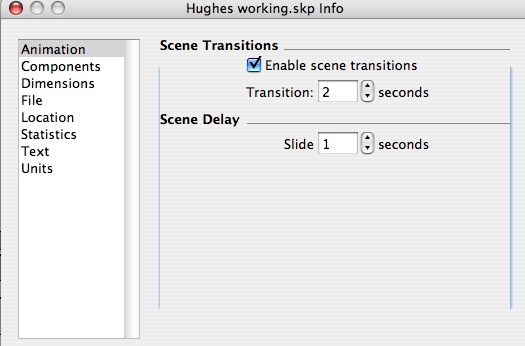
Now go to the "View" menu in your main drop down menu, select "Animation" and from the drop down menu choose "Settings"
This dialog box will allow you to set the number of seconds the scene remains static (Scene Delay), and how fast you move from scene to scene (Scene Transition)
You can play with these setting until you get the combination you like.To get the animation to work without manually clicking each scene, check the "Include in animation" check box which is in the "scenes menu"
This is really just the basics, and I hope I haven't confused more than helped -
Sorry I'm a little late as there have been several posting since my last one.
This isn't the best form of animation, but you can make some pretty simple and dynamic presentations with it.
-
It's a very good overview, Dale. Thank you. I'm having fun with this. Now that question again: can I save multiple animations?
-
Actually I'm not sure you can without creating separate files, but I'll do a little digging.
-
I posted your question as a new topic in the discussion forums in case there is someone who hasn't been following this thread that can answer your animation question. I'm really not sure you can.
-
I have -and IMO it is not possible unless there is a plugin maybe.
-
Okay, if and until something turns up it's save separate files to save different animations (messy but it works!). I'll probably just make one animation long and boring....

-
Simple style, attached!
-
I will also tell you another thing I have done and why. This model is so large (I think 81,500+ elements), that at some point orbiting and panning would cause several of the groups (individual surfaces) to disappear which only their box-frames visible during the actual orbit or pan. The solution I tried seems to work--I can use the orbit, pan and zoon tools to guide someone through the model without this happening. What I did was save out a secondary, "presentation" file within which I then exploded every group in the model and regrouped everything together in one group. I know it's a dead end file with regard to significant additional model changes, but except for making some areas invisible (which is no longer possible in it), it seems to be fairly stable for demonstrating the geometry. I have no idea what unforeseen consequences I might encounter with it this afternoon! Can you think of any?
-
Pilot error again, sorry. I imported all these terrain surfaces at an earlier stage of SketchUnderstanding, and I see I have a few things associated to layers differently than planned. Now that I'm older and wiser, I'll watch more closely for those errors.
I need to wrap this test project up soon. The plan now is to finish the geometry, apply smoothing to each of the terrain surfaces (which I've tested), apply color and/or some canned rock-like texture to them, and then render. Render--I'm not even sure I understand exactly what that encompasses and what possibilities exist. I assume it's basically light settings (multiple lights are possible, I hope) and allowing shadows and such. I envisage this "cliffscape/canyonscape" bathed in a warm morning light, but there are lots of nooks and crannies that should be properly illuminated should a viewer want to navigate into one of them to investigate. I'm not ready to buy a special rendering package right now--would like to exhaust what SU has to offer first. Any suggestions?
-
These are helpful, thank you. I was successful with tests of these workflows just now and got the results i wanted--when I was very mindful that the group from which elements to be moved (selected, grouped and re-assigned to the other layer) still resides on that original layer. I think I'm trying to add to your suggestions that you need to explode (or ungroup--that does mean the same thing as explode, right?)the group in the layer of origin (Layer 0) before reassigning it to the destination layer. Otherwise the reassigned elements are still in a group that's attached to layer 0 and will not be visible on the destination layer if the destination layer is the only one turned on. Am I making any sense? My project is pretty cluttered with close-fitting groups on different layers and I may have been afraid in the past to ungroup all these TIN elements for fear I'd never get the remainder back together in a group again! Truly in my mind a toggle switch to switch ALL layers on and off at once would be helpful on projects like mine.
-
Oops forgot the files.
Gone. gone...
-
Thanks James and Chris. Yes I found your instructional, Chris, and found it helpful. What i really need is more general information about the dem file format. I have yet to get one to load in SU. Tried to download and use the one from your tutorial but it bogged my machine down (and it's a pretty powerful workstation--but that may be an issue with my local Windows and Linux network). Found another dem sample and downloaded it and an asci txt file of the same. I can see on the text file it is ncols 358 and nrows 468. That's 167544 "points" right (SU is asking for "points")? I could not get it to load either--zero division errors or something.
What I'll be doing, if successful, is transforming flat asci files with three columns containing an x, y, and z (elevation) for every sample point into a "dem" file that SU will accept. Actual reference to real space--x and y earth coords--are not important to me, but if it works out that they are easy to keep then I'll keep them.
Yes it will be like importing several of these stacked, terrain-like dem surfaces into SU, as well as a few that are also non-coplanar but near-vertical. Display them all and probably do an Intersect Model to establish the intersecting edges between them. Then I will probably cut away perimeter pieces to expose the inside. The attached shot of work by a commercial supplier of these sorts of illustrations will give you an idea of what I am talking about. The texturing of the rock in their illustrations is not immediately important to me.
-
I'm calling this model complete for the present. I have a somewhat decent animation ready to go for my meeting next week and the folks I've shown it to are very excited about the use of SU. We will see if the suits are too. I want like to thank every one of you who helped me stumble along in the dark! Man there is still so much to learn.
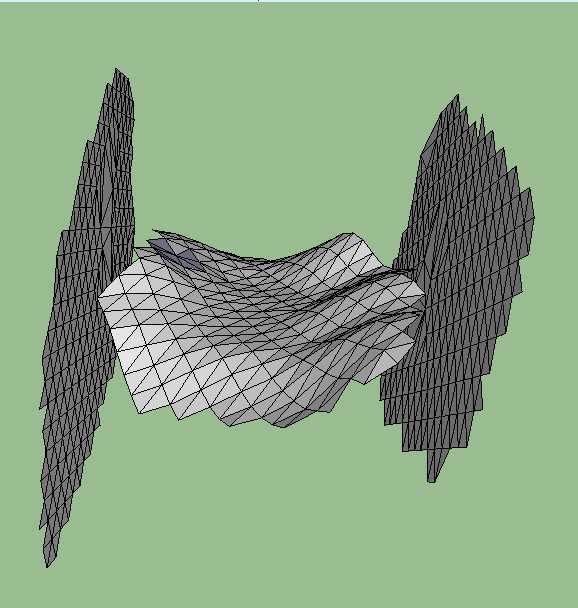
I still have questions, though, and for this one I'm not holding out much hope that the ruby will exist--but here it is: Consider the attached illustration of 3 TIN surfaces I would typically Cloud-import into SU. The middle, horizontal(ish) one is supposed to connect to the near-vertical ones on either side. My software that creates and exports the horizontal one won't export it connected--it will always fall a little short of touching the side ones--much less extending them beyond so I intersect-with-model and trim away to create my "cliff edges" (you guys have seen what I'm doing*). For the construction of the model I've just finished I manually extended each and every one of these boogers by creating geometry largely with the protractor guideline tool and pencil--it worked but is time-consuming. The question is, has anybody written something to automate this? It would be something like "extend edges of a group" and would look at the geometric attitude of each triangle along perimeter and project that out away a distance specified by the user.
I'm not holding my breath but I thought I'd ask.
*A thousand+ of you?

-
Well congrats on your work and good luck with the suits.
Still amazes me that you can start fairly raw with a model of this complexity and accomplish the visuals you have.
With all the complaints about SketchUp, I don't think there is a tool out there that could perform with this ease of use.
This has been a fun thread to follow, and I have gleaned a great deal to apply to my work, so thanks for the post, and to all the people of the forum who have contributed. -
FYI, the suits were impressed--enough to purchase the Pro if we needed it. Funny though, I have now tested this by comparison and I was using the cut-down free version all the time (well, except for the first 8 trial days). I never noticed anything go away after the first 8 days so I assumed I was just living with Pro on borrowed time--that's a newbie for you! Anyway I'm concluding at this stage of our use that we can get along fine with the freebie version and wait to pick up Pro at a later date. Thank you all again for the help you gave me getting through this. We are taking the exported animation to a trade show next week, where I suspect it may draw some attention.
Advertisement


