Cutting a notch in a cylinder
-
Hi guys. I just started with SU and am enjoying being able to "see" my ideas.
I have been designing a log cabin and am curious if it is possible to make individual "logs" by by making a horizontal cylinder and then cutting out a portion. The log style I am trying to emulate is called Scandanavian full scribe, which essentially means that I want to remove a perpindicular half cylinder from the "log" as the "notch" and cut a rounded channel along the bottom where the log will sit on the one below it.
Here is a simple diagram of what I'm after.

Here is a picture of someone cutting out the notch on a log. (This is the bottom of the log. It's just easier to cut rolled over).

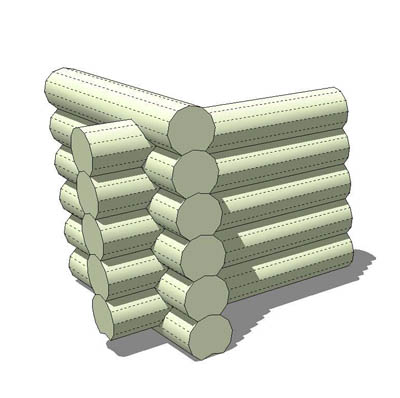
Here is a picture showing how several logs stacked, showing how the channels come together.

Finally, here is an illustration of how the notchs and channel lock a wall together.

I know this would be a lot of work to build each log individually, but it sure would make for a cool animation. Any ideas?
Thanks,
-- Pritch
-
That shuld be possible. For the notch running the length of the beam, just draw an arc on the top of the cylinder and push it along the length of the cylinder. For the 2 other notches, id get 2 cylinders of the same diameter as the first, position where the notches will be, select everything, right click it->intersect->with selected, then delete all the uneeded stuff.
You could then group this and copy it lots of times using the move+ctrl key to make your wall.
Sorry for the rushed reply, im sure someone will be able to answer this in a bit more detail later.
-
Yes, definitely, an easy job with intersection - however you wouldn't really need to do it. When you put the logs i"into" each other, it won't be seen anyway!
-
If you are going to build the entire cabin log by log I'd strongly recommend that you limit the number of segments in each log to something like 12...as in my example. Otherwise you're going to end up with so many faces your model is likely to grind to a halt. The ends may look a little clunky, but as you can see, if you turn Hidden Geometry off, the logs themselves still look perfectly round.
I think the construction sequence in the file is clear enough. One thing to watch out for is the fact that the semicircular "bite" at the end isn't actually semicircular. You need to line up the mid line of one log with the base of the perpendicular log, then intersect with model. You can see that the resulting "arch" actually goes a little higher than half way up the other log, because of the groove you've already taken out of the base.
AS Gaieus states, you don't really need to cut out the grooves, because this is a virtual model and the logs will just fit together anyway. However, if the groove is cut out, then you will get a better-looking animation and also get a clean intersect line at the corner where the logs fit against each other, as opposed to them magically appearing out of a continuous surface.
BTW you can either physically form the slot at either end of the log, or just do one end...like I have done...then duplicate the whole thing, rotate 180 degrees and join the two ends together.
-
WOW! Thanks everybody for your prompt and very helpful responses. This is EXACTLY what I was looking for. When I have something, I'll make sure to post it.
-- PRITCH
-
I guess I had better get more proficient at moving in 3 dimensions with a mouse before I try piecing cylinders together and stacking them.
 It sure can be frustrating when you grab an object and just can't get it to go where you want it to!
Alan, you accomplished exactly what I was hoping for, so now I know it is possible.
 I have saved this information for when I am more conversant with SketchUp. Right now I still need to get a handle on the basics, as well as manipulating components.
Thanks again.
-- Pritch
-
I dont know if oyu know about this, but you can lock the direction of movement (when your moving stuff) simply by pressing an arrow key (right=red axis, left=green axis and up and down=blu axis.) I personally find this extremely useful for moving unruly geometry about.
-
Sacrilege! Silicone sealant in a log wall

Traditionally the bottom groove of a log is shaped with a tighter radius to allow sealant material (moss or tarred hemp fiber from a used rope)to be placed within. The groove sides are shaped carefully to fit exactly on top of the lower log.Anssi
-
Pritch, take a look at the tutorial I did on basic positioning. It's actually fairly easy to place the logs precisely once you get the hang of two things.
-
The notion that where you pick up an object is as important as where you want to move it to. For example, pick up one log at the very top node on its circumference, then move it so that it snaps to the node at the top of the groove on the base of the next one.
-
Moving by inference. When positioning logs that are perpendicular, grab one by the node a suitable point, then get it moving along the axis you want before holding down Shift to lock the direction...then move your cursor to the point on the other log it will line up against. It will snap into position.
In the case of these logs that will mean picking one log up by the same node at the top of the circumference and moving it to the node at the top of the end notch on the other log. This will get it nearly correct, but not protruding enough. Then you do the reverse...and pick the same log up by the node at the top of the notch get it going in the correct direction, lock it with Shift, then move the cursor to the top dead centre on the opposing log.
-
-
thanks for the tips guys. I'll give'em a try.
@anssi said:
Sacrilege! Silicone sealant in a log wall
Traditionally the bottom groove of a log is shaped with a tighter radius to allow sealant material (moss or tarred hemp fiber from a used rope)to be placed within. The groove sides are shaped carefully to fit exactly on top of the lower log.Anssi
LOL! Anssi, now that you've outed yourself as a log building geek, you'll have to post some of your SU log creations!
-- Pritch
-
@pritch said:
LOL! Anssi, now that you've outed yourself as a log building geek, you'll have to post some of your SU log creations!
-- Pritch
It's just that Anssi is Finnish and until (almost) recently almost all buildings in Finland were built this way
-
In fact I have to confess that I have never designed a log building except our first assignment at architecture school that was to design a small log sauna in full detail (still sweating after about 35 years). But as most of my work involves old (in the Finnish context)buildings I have to keep up some understanding of traditional building methods. As Gaieus correctly points out, most domestic building here was in logs until the 1940s, and in the earlier days also most public construction too. I am not sure if the Kerimäki church from the mid-1800s is still the largest log building in the world.
The kind of log construction using round logs is traditionally not very common here, except in outhouses and temporary buildings. Permanent buildings were made of hewn logs and boarded over. In modern times the "chalet" style has become more popular, first in summer cottages, later it has been the preferred style of the log house prefabricators.
Anssi
Hello! It looks like you're interested in this conversation, but you don't have an account yet.
Getting fed up of having to scroll through the same posts each visit? When you register for an account, you'll always come back to exactly where you were before, and choose to be notified of new replies (either via email, or push notification). You'll also be able to save bookmarks and upvote posts to show your appreciation to other community members.
With your input, this post could be even better 💗
Register Login


Advertisement