Modeling curved surfaces
-
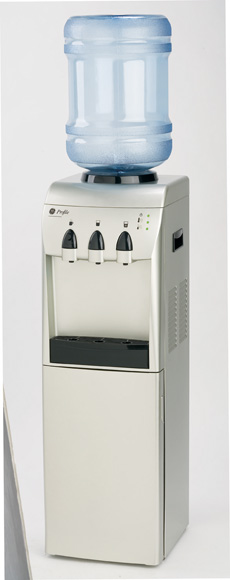
I don’t have a lot of experience modeling objects with curved surfaces and could use some advice on how to approach doing this. I am attaching a water dispenser I am trying to model. Using photomatch, I easily got the proportions for the base of the dispenser modeled but I don’t know how to model the curved surfaces. I am going to do some digging on my own but if someone can steer me in the right direction, I would really appreciate it.
Thanks,
Tim

-
This is for a jet engine, but the principles will be pretty much the same.
-
This will probably be better.
-
-
Attached is where I am currently at with the model. The bottle was a breeze with the follow-me tool. The part of the model that is giving me fits is the base. The front of the base at the top is curving in towards the bottle. The corners are all curved. I feel I have the proportions correct but here is where I could use some advice. I know this is possible, I just haven’t done it before.
Thanks,
Tim
-
I keep getting Bug Splats whenever I open the file. I've never had that problem before and files open from 3DW okay so there might be a problem with your file.
-
That’s odd. I downloaded the model myself and it worked fine. I saved a copy and posted in the warehouse. Here is the link http://sketchup.google.com/3dwarehouse/details?mid=84b456b666b21042b9f5ce190cd5193
Thanks,
Tim@johnsenior1973 said:
I keep getting Bug Splats whenever I open the file. I've never had that problem before and files open from 3DW okay so there might be a problem with your file.
-
I got bug splats even when downloading from the 3DW. I eventually opened it okay by opening up SU and loading it directly into SU from the program.
I hope you can work out what to do from my crappy example. I'm not a very good tutorial writer.
-
Thanks for the tutorial. There are some good tips in it. This is a tricky little model. The top section is sloping back but the slope is actually a curve. And with the edges around the top plane curved, I am stumped.
Thanks,
Tim@johnsenior1973 said:
I got bug splats even when downloading from the 3DW. I eventually opened it okay by opening up SU and loading it directly into SU from the program.
I hope you can work out what to do from my crappy example. I'm not a very good tutorial writer.
-
Hi Tim,
If you use the follow me tool to lathe the 2D shape into 3D, you can make the top edge of the 2D drawing any shape (e.g. sloping or curving or anything).
-
I understand how to use the follow me tool to lathe the bottle but I don’t understand how to use it when the end result is not symmetrical. I have a curved front, vertical sides and the edges are curved. Sorry to be so dense.

@gaieus said:
Hi Tim,
If you use the follow me tool to lathe the 2D shape into 3D, you can make the top edge of the 2D drawing any shape (e.g. sloping or curving or anything).
-
can you upload the file (it seem that it's rather me who is blunt here...)
-
Sure, you can turn off the base and the bottle to see the photo I am working off of. Thanks for your patience.
@gaieus said:
can you upload the file (it seem that it's rather me who is blunt here...)
-
Sorry Tim,
I could not open the file, I got a bugsplat.
-
I’m not getting any errors on my end but John was looking at this file yesterday and here is how he was able to open it. Could it be a Mac/PC issue?
I got bug splats even when downloading from the 3DW. I eventually opened it okay by opening up SU and loading it directly into SU from the program.
@gaieus said:
Sorry Tim,
I could not open the file, I got a bugsplat.
-
Hm. I tried that way too - and got a bugsplat.
-
Let’s try this. I copied the model into a new file and I am attaching the photo separate. Hopefully it will open now.
@gaieus said:
Hm. I tried that way too - and got a bugsplat.
-
Do you have the soap, skin and bubble ruby installed? That could probably be used. The FFD ruby as well.
TBH you're wanting to put in way more accuracy then I've ever wanted to put into a model. I can kinda understand why you'd want to do it if it's just a challenge you've set yourself, but I think you'd need better photos to model from.
Another way you could do it is when you are creating the top curve instead of doing it all in one so it is one straight line, you do it in around 10 steps. And instead of just scaling in back from the top of the model, you also scale the front face as well.
-
Just tried it a little.
Just used the Push-Pull with CTRL four times with a rectangle with a curve on front. I didn't round out the edges of the curve, you'll probably have to to get it more accurate.
-
thanks
@johnsenior1973 said:
Just tried it a little.
Just used the Push-Pull with CTRL four times with a rectangle with a curve on front. I didn't round out the edges of the curve, you'll probably have to to get it more accurate.
Hello! It looks like you're interested in this conversation, but you don't have an account yet.
Getting fed up of having to scroll through the same posts each visit? When you register for an account, you'll always come back to exactly where you were before, and choose to be notified of new replies (either via email, or push notification). You'll also be able to save bookmarks and upvote posts to show your appreciation to other community members.
With your input, this post could be even better 💗
Register Login


Advertisement