A locking tenon joint?
-
David , Your correct about draw boring for the peg. Offset hole in tenon, peg a little longer than needed , taper one end real good and there you have it. I'm sure most of the pegged joints the Japanese craftsmen cut for timber framing were draw bore. Still don't think my saw and chisel skills are good enough for this kind of work....
-
I'm certain my geometry is off as to rake angle's/etc.......that said; I had a go at it just for fun as to what the "lock tenon" might look like.
-
An elegant alternative, Charlie. If there's a way to shape the tenon like a butterfly key, then you'd have a real locking joint.
Thanks for taking the time to work through this.
Best,
dh -
@davidheim1 said:
An elegant alternative, Charlie. If there's a way to shape the tenon like a butterfly key, then you'd have a real locking joint.
Thanks for taking the time to work through this.
Best,
dhThanks dh
I started to wonder if the "lock" in lock tenon was maybe taken a bit too literal?
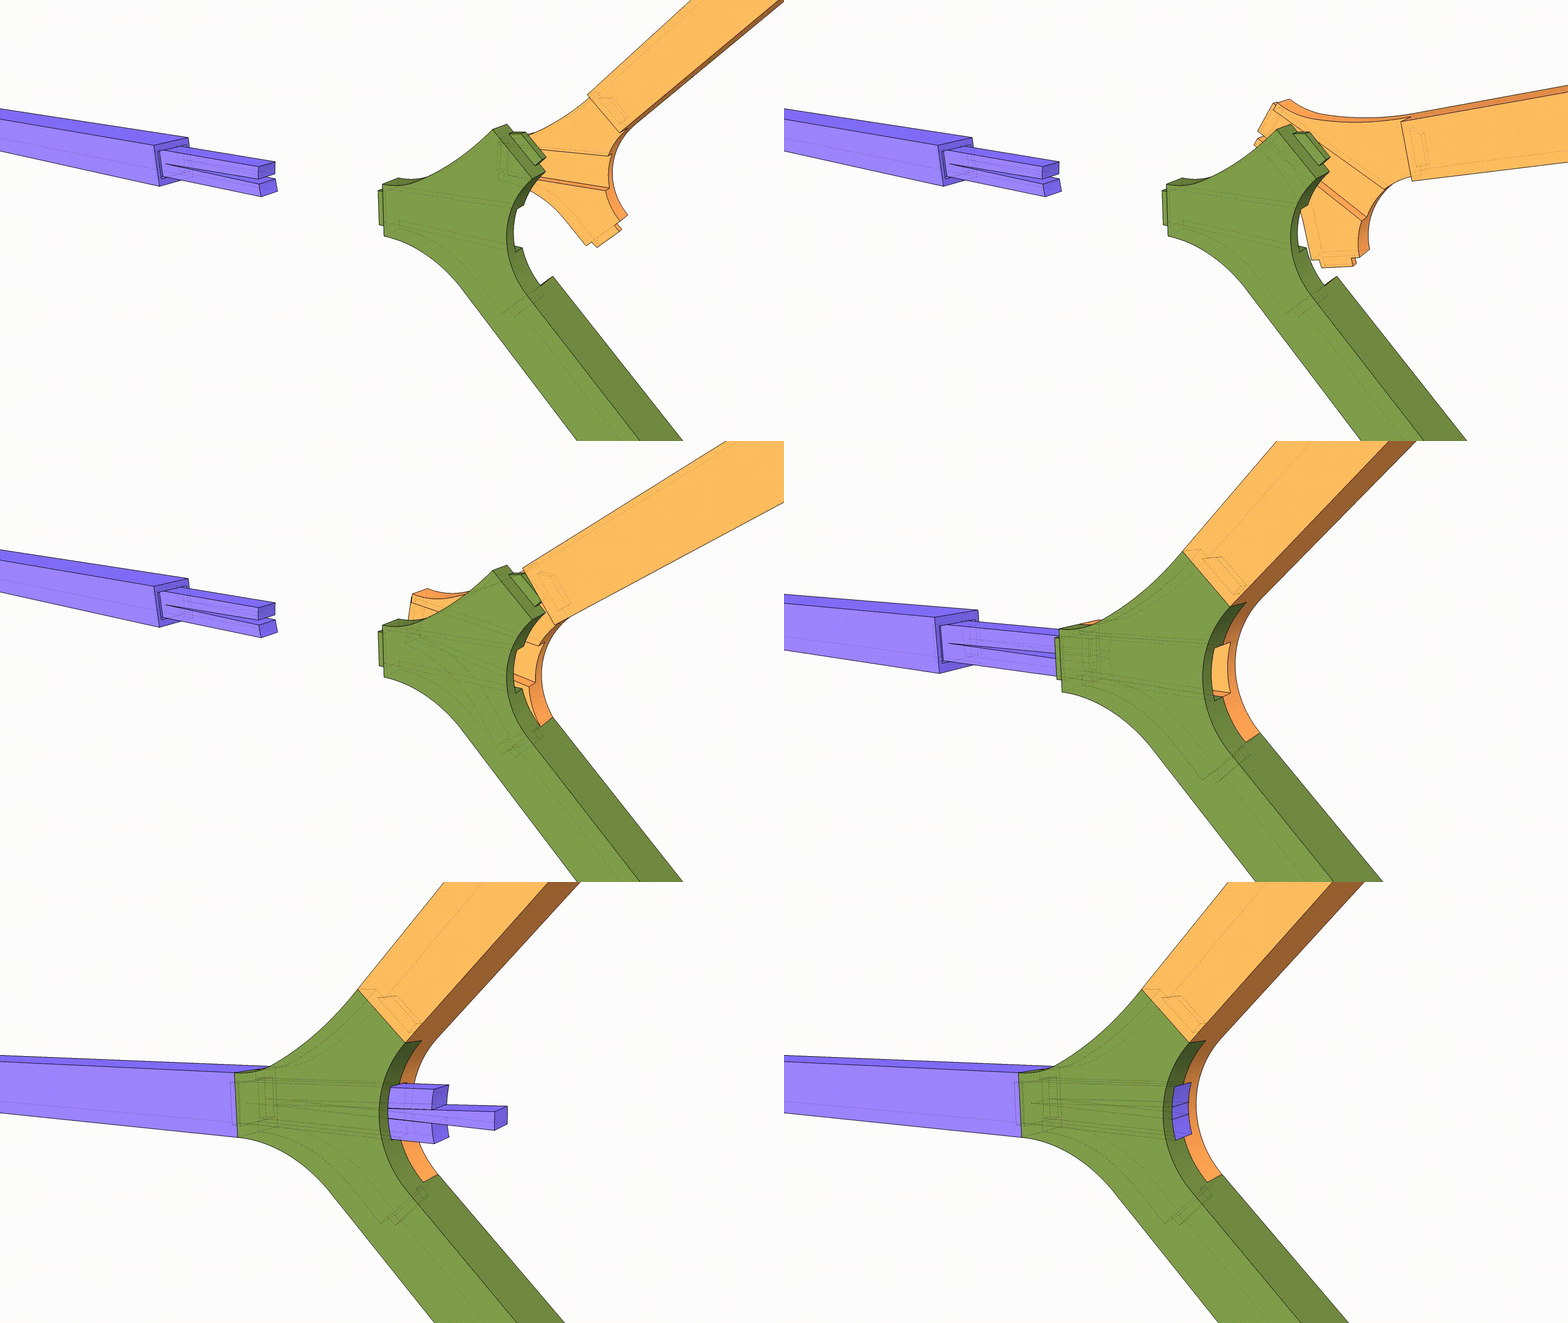
So I made a second attempt with that in mind...... IDK....maybe the upper & lower part of leg get "rotated" to fit together and then slipped over tenon? (just a carpenter here, and not a master woodworker)C
-
Very colorful and ingenious. Thanks for taking the time to model this. But it doesn't look as if the tenons on the brown part can be fitted into the mortises in the purple and green parts. The tenon fitting into the purple part works, but I don't see a way to get the tenon into the mortise in the green part. The long tenon on the purple part will prevent the other pieces from rotating into position. But if you make the purple tenon butterfly-shaped, then I think you'll be on to something.
-
@davidheim1 said:
Very colorful and ingenious. Thanks for taking the time to model this. But it doesn't look as if the tenons on the brown part can be fitted into the mortises in the purple and green parts. The tenon fitting into the purple part works, but I don't see a way to get the tenon into the mortise in the green part. The long tenon on the purple part will prevent the other pieces from rotating into position. But if you make the purple tenon butterfly-shaped, then I think you'll be on to something.
Dh
I was thinking the brown and green get assembled as a unit first. (Rotating both so tenons could “fit” together)
Then, brown and green assembly slips over the purple parts (long)tenon and lastly brown/green smaller tenons engage purple part.I’ll see if my Fredo Animator plug in still works and try to post a video of assembly.
If not, ill just put a few scenes together to demonstrate what may be lacking in my verbal assembly description.And yes, butterfly shape on purple long tenon would definitely make is a true locking tenon.....just don’t Know how that is possible in this configuration.
C
EDIT: UPLOADED .gif
-
Charlie,
Now I get it. Your locking joint works just fine. Thanks for the gif.
Best,
dh -
To force the final [purple?] tenon to lock firmly into the mortise...
Make it with a central small tapering horizontal cut along its length, make it widest at the visible end.
Make the tenon-mortise's cross-section so that its external end is slightly bigger that its start size.
After the joint whole is assembled, you can then drive a glued wedge into the tenon's exposed cut.
Over size the wedge's length so that after its firmly in and all is set, you can trim off the excess exposed end of that wedge and finish everything neatly.Now all of these connections are locked in all directions ?
-
@tig said:
To force the final [purple?] tenon to lock firmly into the mortise...
Make it with a central small tapering horizontal cut along its length, make it widest at the visible end.
Make the tenon-mortise's cross-section so that its external end is slightly bigger that its start size.
After the joint whole is assembled, you can then drive a glued wedge into the tenon's exposed cut.
Over size the wedge's length so that after its firmly in and all is set, you can trim off the excess exposed end of that wedge and finish everything neatly.Now all of these connections are locked in all directions ?
TIG,
Thanks....& Aha....much like an Axe handle wedge, to keep the axe head from flying off.And also goes to dh's thinking on butterfly joint as final "lock".
I only tapered the tenon's mortise 1° which actually seems like a bit too much? (maybe not)
Please see GIF
____________________________________________________________________________________________________
EDIT: I should have properly thanked Fredo for his Animator plug-in used to create the GIF’s in this thread ......so Thank you Fredo, for all the magic you have done with the Animator plug-in!
____________________________________________________________________________________________________
-
I think that does it. Thanks to TIG for suggesting the wedged tenon and to Charlie for producing yet another version of the joint.
Best,
dh
Advertisement