Medeek Wall Plugin
-
I've basically distilled it down to three interior window casing styles as seen in the images above.
The left most example includes the full casing that wraps the window as well as the stool and apron. The middle example eliminates the casing but keeps the stool and apron and the simplest version is just gypsum wrapping the interior of the window well.
Where things usually get more elaborate than this is with the addition of additional elements to the top casing or head casing:


I'm not a huge fan of rosettes but I've seen plenty of this as well:


I need to keep the geometry fairly simple otherwise it will really bog things down when you start adding a lot of windows or doors into a wall panel. Take for example the complexities of the stool and apron combo below:
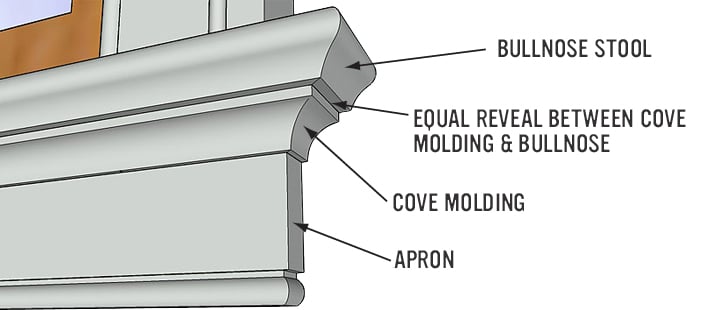
-
Today and yesterday I'm taking a much needed break from plugin programming to address my new reseller program. I am still fleshing out the way I want this to work but I think it will be a good thing, allowing me to focus on the code while more talented individuals are able to drive the sales end of things.
-
Just an FYI there is a known issue with stacking walls right now (multi-level structures), funny that this did not show up previously. I am currently working on it and should have a new revision in a few hours that hopefully addresses it fully.
The issue is with the auto-corner configuration, apparently the algorithm is detecting walls on different levels when it should only be detecting the walls within a specified vertical range (on the same level).
I think I've got my head back in the game now after a short hiatus from the code.
Currently the three hot development items are:
1.) New HTML menu/draw tool
2.) Gable Walls
3.) Garage Door ModuleI'm also excited to report that the new reseller system is live and ready to go. I am currently recruiting resellers so please contact me directly if you are interested. I haven't determined the number of resellers or if there will be a specific limit however I am looking for people with diverse backgrounds and people who are passionate about promoting SketchUp as a primary architectural design tool for residential and commercial design.
You may also want to reset your bookmarks to the new Medeek Wall extension page:
I've had to switch to a dynamic html page with the implementation of the reseller program however the static page will automatically redirect to this page.
-
Version 0.9.0c - 08.08.2018
- Critical fix to the auto-corner configuration module which addresses a bug with multi-story construction.
If you are doing multi-story construction with the plugin you will want to download and install this fix immediately.
-
Version 0.9.0d - 08.09.2018
- Added logic so that callouts for stacked windows are properly cascaded.
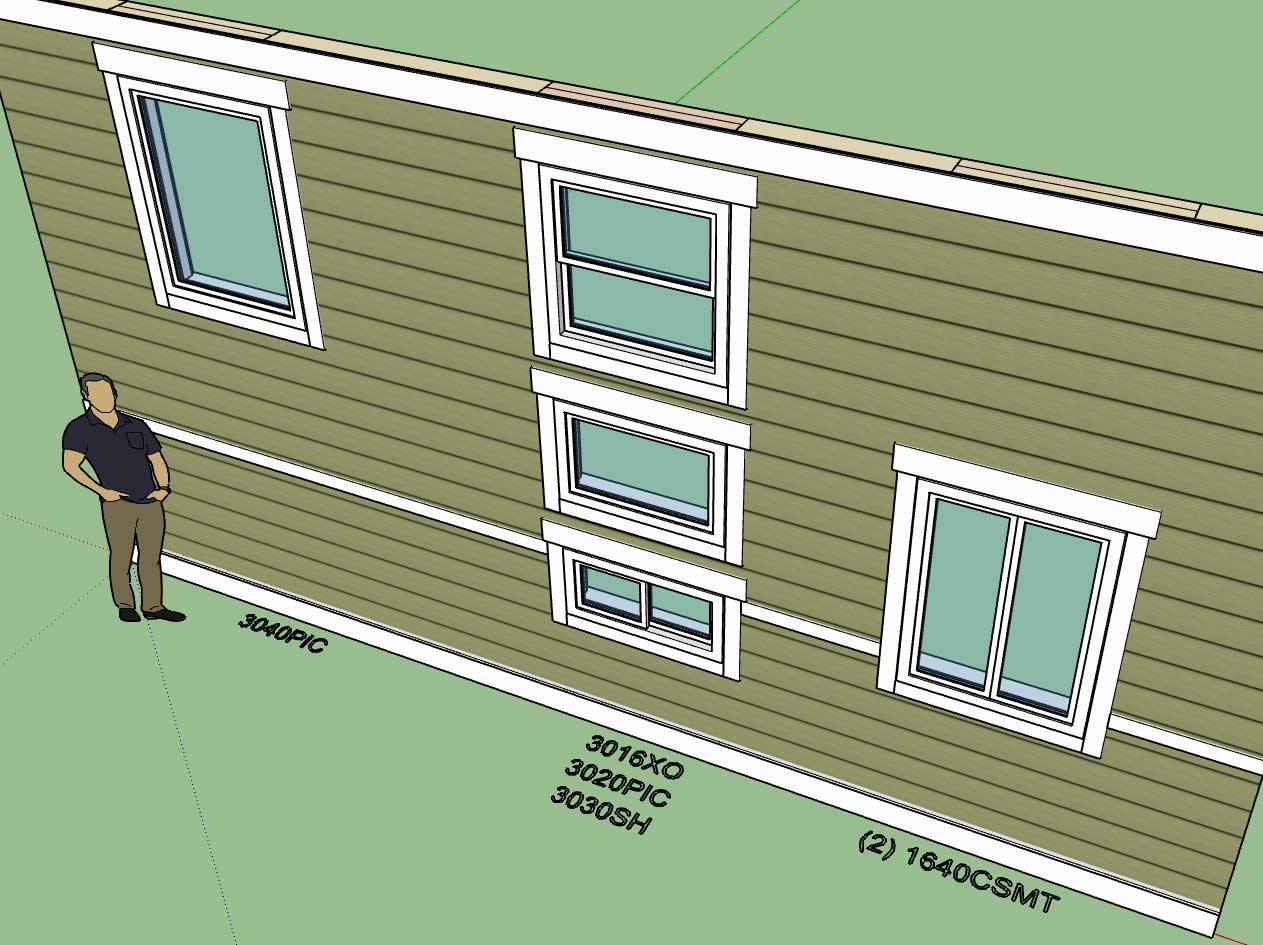
Note that there is still an issue with stacking windows in the full framing mode. The plugin will not throw any errors (within the ruby console) but I will need to add some additional logic to properly frame up the cripple studs between windows, if any are required. Also the algorithm for the trimmer studs will require some modifications.
Initially I did not foresee stacked windows but they do seem to be quite common so they have become a high priority.
View model here:
3D Warehouse
3D Warehouse is a website of searchable, pre-made 3D models that works seamlessly with SketchUp.
(3dwarehouse.sketchup.com)
-
Transoms are common in our designs.Generally they are mulled with the window.
-
@pbacot said:
Transoms are common in our designs.Generally they are mulled with the window.
This is slightly different than transoms, this is a situation where windows are stacked and each window has its own header.
-
I have updated the listing/title in the plugin store and on my own web page to show that the extension is still in BETA. Even though a lot of progress has been made, I am of the opinion that I am still a little ways off before I can confidently say the plugin is ready for production work.
I am hoping to wrap up some major items in the next couple of weeks and hopefully this will get us to Version 1.0.0 and the official release.
-
Looking at this screenshot one would think I am attempting to edit a wall panel however if you look a little closer you will notice that I am actually drawing a wall panel:
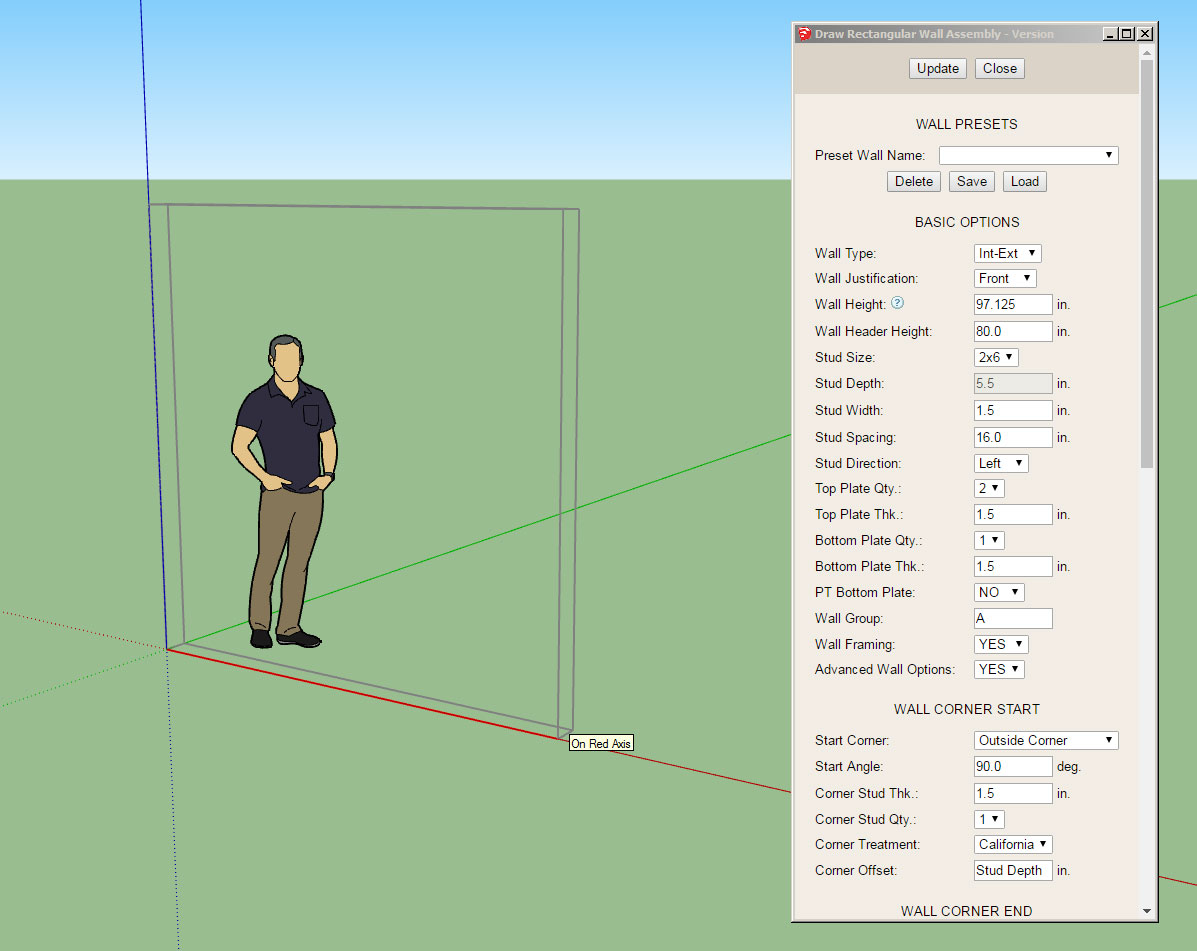
The HTML draw menu (Graphical UI Option) is almost ready to release. I have a bit more testing to do and some additional javascript logic to add to the HTML itself and then I think it will ready for prime time.
I think everyone will find this is a much quicker and easier way to create wall panels than the legacy (non-GUI) method. However, for those who prefer the old menu system that will still be available by setting the graphical UI option in the global settings (General tab) to "NO".
The other upside will be the ability to select from your presets rather than having to edit the wall panel after the fact.
Pressing the spacebar will exit out of the draw wall menu and tool, as is usual for SketchUp tools.
Pressing the ESC key on Windows will exit the current wall panel polyline and allow the user to start a new series of wall panel(s).
Clicking the Update button will update the draw tool with the parameters shown in the menu and allow the user to change things up mid-stream during the creation of wall panel(s).
I am hoping that this will be a big usability improvement for the plugin and make it quite a bit more efficient.
-
Version 0.9.1 - 08.15.2018
- Added an HTML "Draw Wall" menu option. This is toggled in the global settings with the Graphical UI parameter.
I would actually consider this a critical update since the improvements with this new menu system almost make this a completely new plugin. Please upgrade to this latest release at your earliest convenience. If further testing proves that this is the best way to go I will probably devise a similar system for drawing windows and doors.
Using an HTML menu allows for much more complexity and control (ie. javascript) as well as tooltips and other cool features such as SVG graphics.
-
I've got a lot of things on my plate right now (plugin development and other unrelated items) but as I've been communicating with various parties today regarding the current functionality of the plugin it would appear that a common theme is the ability to better manage and apply materials.
With that being said I've decided to develop my own material manager (within the global settings of the plugin). The user will be able to easily add, edit and delete materials. A material can be either a color or image based material. For an image based material the user will be able to specify the image (upload to library) and then specify the scaling (horz and vert). For a color based material the color can be set with a palette picker or RGB code. Additional customization (ie. transparency) can be accomplished via the standard SU material dialogs/tools.
This will allow the user to setup commonly used materials and have those populate the various drop downs in the draw and edit menus of the plugin.
Initially I wanted to go the SKM route but this has some serious backward compatibility problems so I've since abandoned that idea.
Currently the wall cladding drop down allows for the selection of any material currently defined within the model however this methodology is flawed in that it becomes too cluttered with materials that the user probably does not care to utilize for the wall geometry.
I may also incorporate some sort of flag system so that the user can specify which custom material will appear in which drop down field (ie. sheathing or cladding or both). I will need to give this some additional thought.
There will still exist some standard materials that are hard coded into the plugin and cannot be removed (ie. OSB, Plywood etc...) The idea being that some users may not want to spend the time defining a custom library and just want some standard materials right out of the box.
I think I've nailed down most of the details on how this will all go together but any suggestions or thoughts are always helpful.
-
On a slightly different note I am very curious as to how the plugin(s) are actually being utilized. I rarely see posts with good examples of the plugin(s) in action. My most recent call for projects on the boards did not have a very large response so I often wonder if people are actually using these plugins as I intended, or do they just get purchased and then put off to the side.
In order to spur some interest I am considering offering a cash prize (and additional time added to any plugin licenses) or some other similar prize/reward and possibly make it into some form of a contest. My idea being a contest where you can submit a project (one per person/firm) and then have a community vote to determine the winner. Each submittal would consist of five images or some similar sort of criteria.
I would post a permanent page on my website highlighting the winners/contestants so it might also server as an advertising vehicle for some as well.
It would also serve as a form of advertisement for the plugins as well since it would showcase their capabilities and utilization in actual projects.
I'm not a rich man (yet) so I was thinking of starting out with a $100 cash prize, with future such contests hopefully garnering even more interest and then being able to up the stakes considerably.
At this point it's just an idea, thoughts? Is there any interest?
-
How would you call out a entrance door with sidelights?
Along that same vein here is a schematic of how the single and double side lites for doors will be calculated:
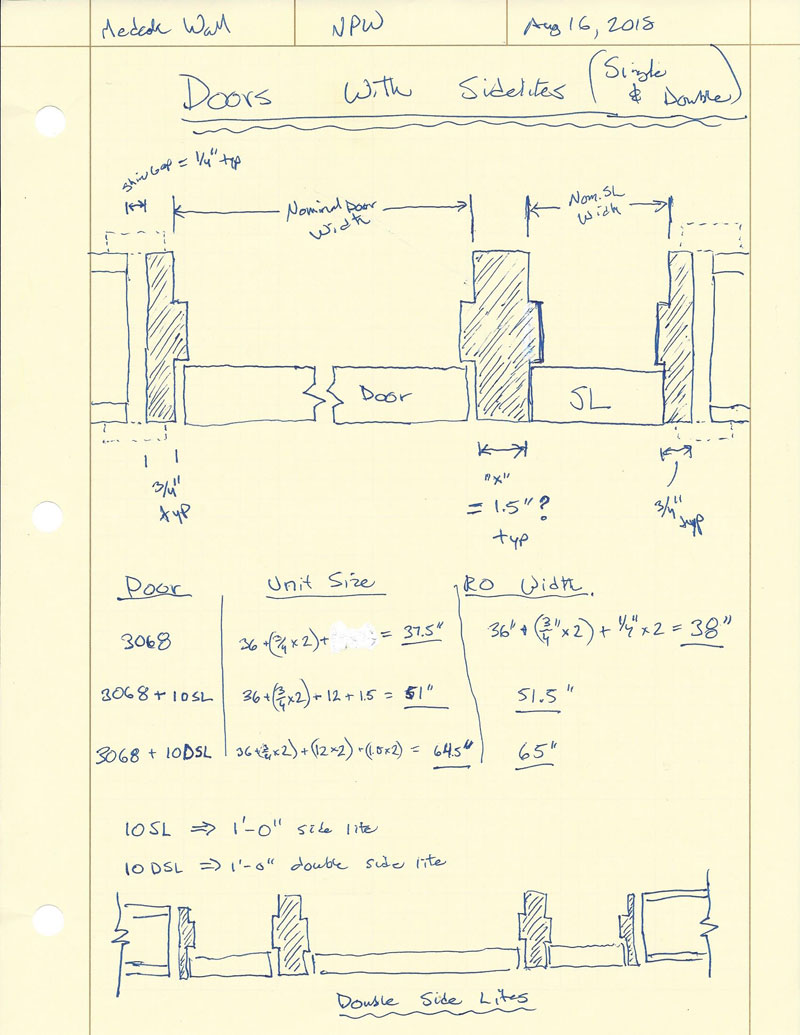
Rather than provide doors with side lites as a new type of door I will probably just make side lites an additional option for existing doors.
Switching a door from RH to LH will move a single side lite to the same side as the door knob, this seems to be the most common configuraton. Of course a door with a double side lite will be symmetrical and it doesn't matter on the door handedness.
-
Version 0.9.1b - 08.16.2018
- Configured the HTML "Draw Wall" menu to remember the previous settings.
-
Version 0.9.1c - 08.17.2018
- Added an option in the Walls tab of the Global Settings to auto-load a wall preset within the HTML Draw Wall menu.
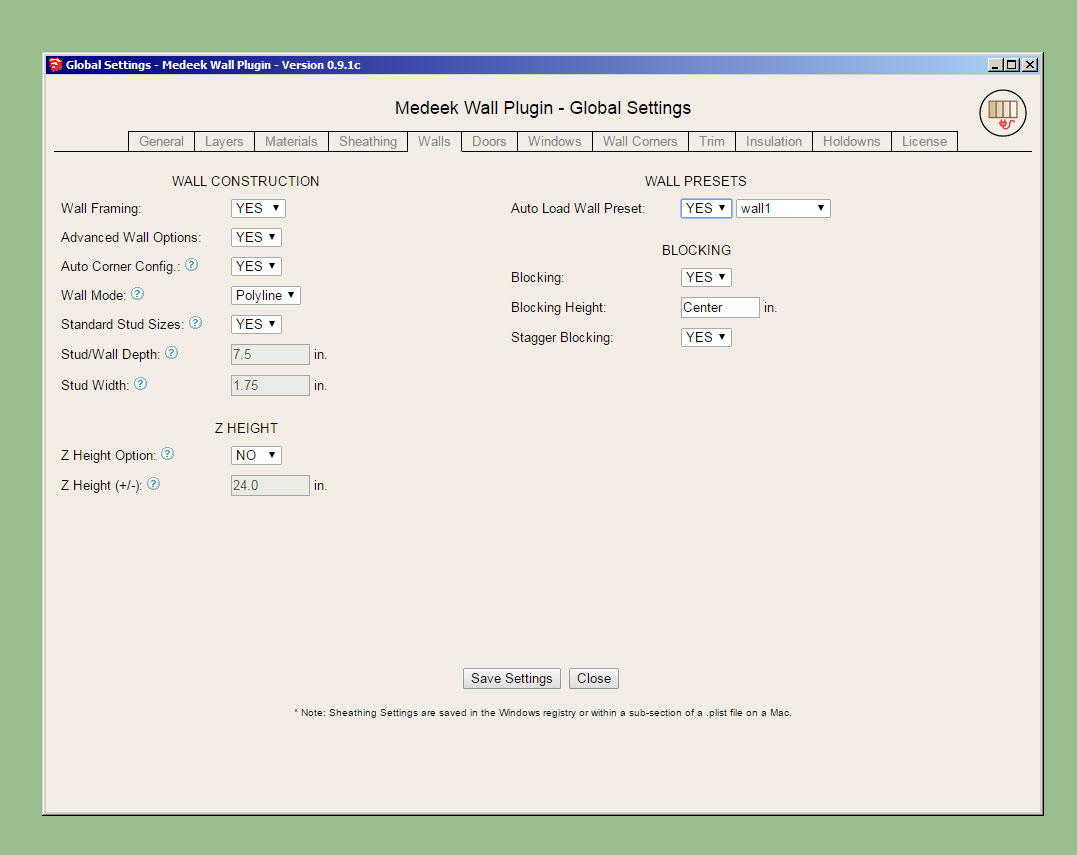
If the auto-load preset option is enabled then each time the draw tool is activated it will pull the parameters from the preset, otherwise the parameters will be per the previous wall drawn.
Note that the Auto-Load Wall Preset parameter only applies to the HTML draw menu. If the graphical UI is not enabled then the legacy system is in place and there is no way to auto-load a preset.
Some may still find the HTML draw menu a bit overwhelming with all of its parameters. I may add a +/- button at the top which will allow the user to shrink the menu so that only the presets are shown and possibly a few other options. The menu configuration will then be memorized and will pop up the same as the previous configuration (large or small). Along those same lines I should probably also provide a global settings which will allow the user to set the default behaviour of the menu configuration.
-
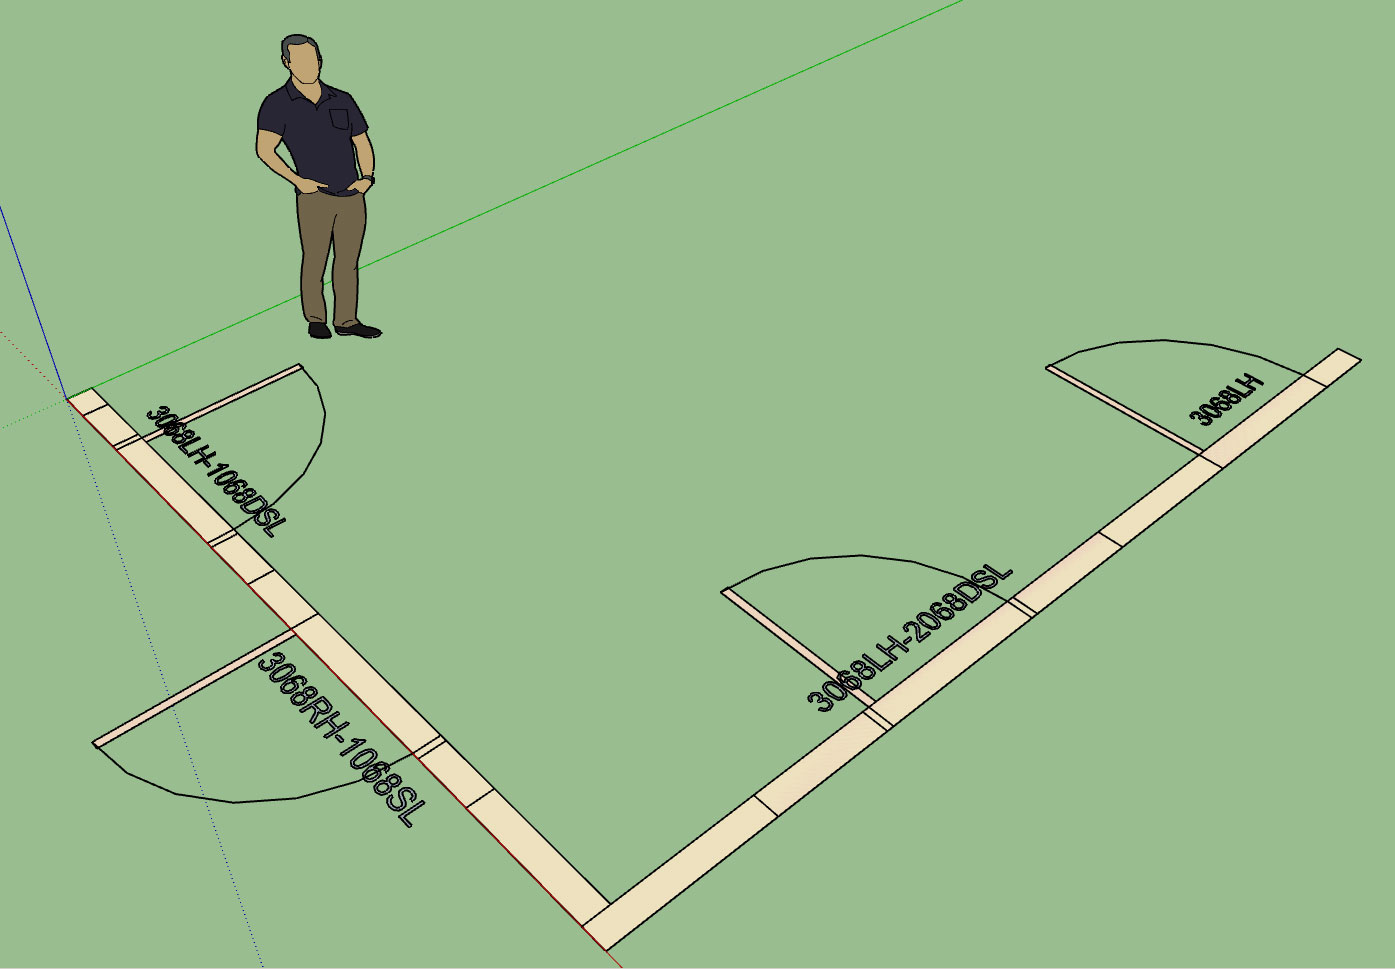
Sidelites in 2D:
-
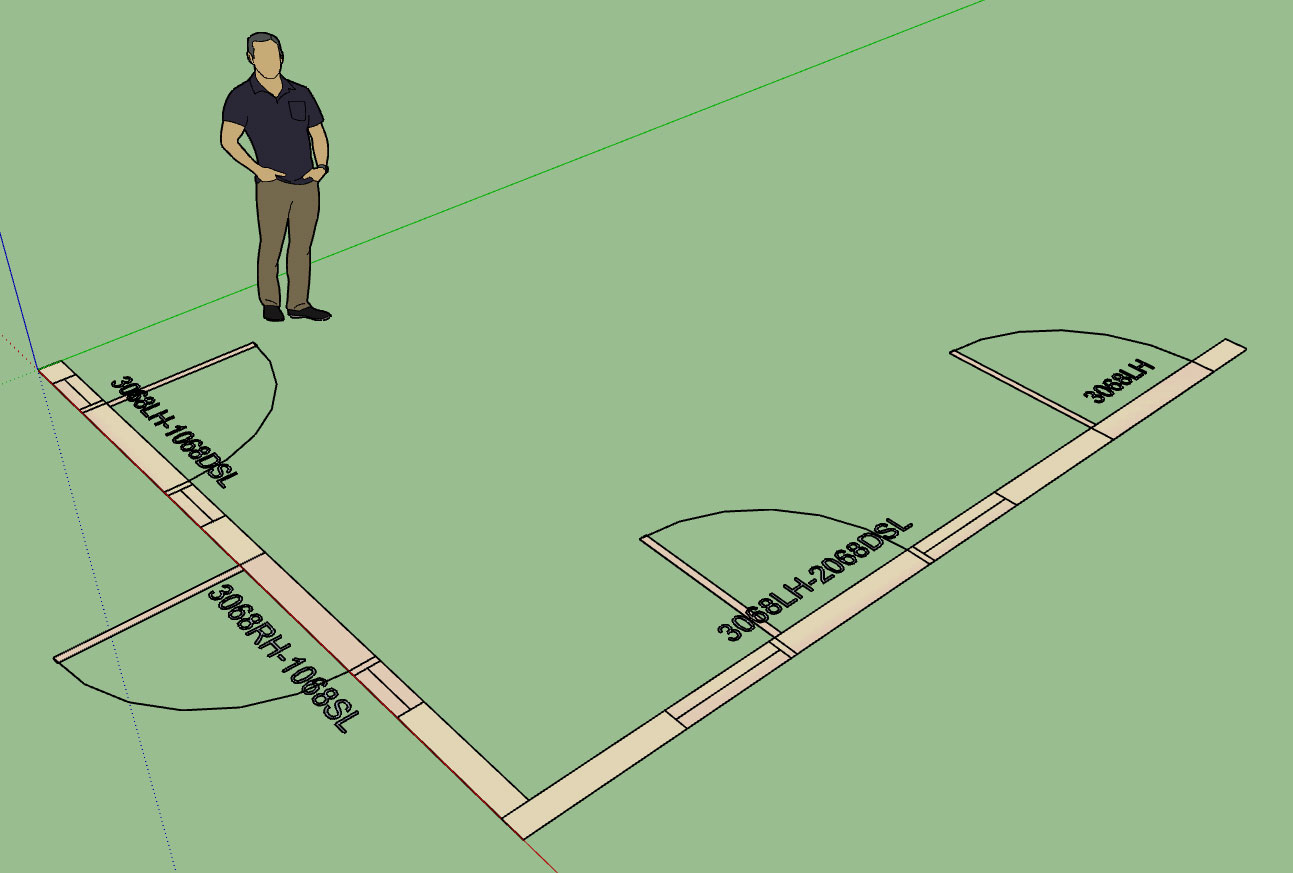
You might add a line in the sidelight symbol to indicate glazing or two lines like a fixed door.
-
I forgot to add in the glazing line into the sidelites, I think this is a little better:
-
Version 0.9.2 - 08.21.2018
- Added sidelites (double and single) for all door types.
- Enabled 5-lite (full glass) and 3-lite (half glass) grilles for door sidelites.
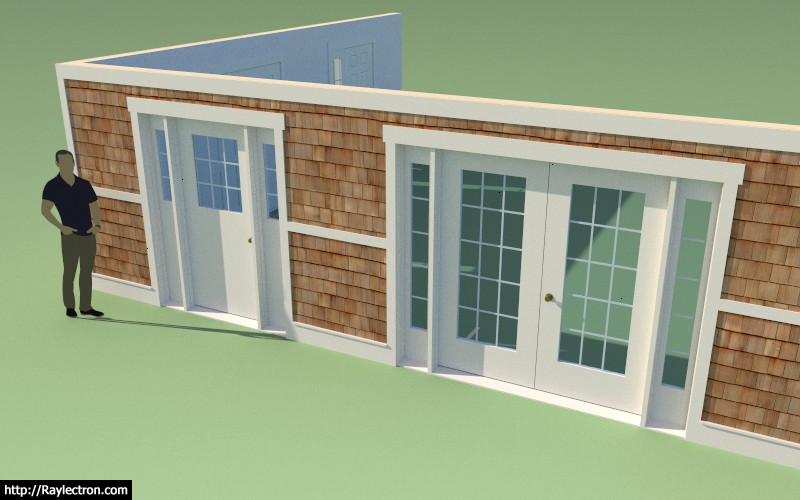
View model here:
3D Warehouse
3D Warehouse is a website of searchable, pre-made 3D models that works seamlessly with SketchUp.
(3dwarehouse.sketchup.com)
I will probably need to add a few more options for grilles for the sidelites and probably even a couple more parameters so that full glass sidelites can be mixed and matched with half glass doors, but I think I've got a decent start on this one for now.
Note, that sidelites can be moved to the right or left of the door (single sidelite) by changing the handedness of the door.
Both the door draw and door edit menus have been updated with this new feature. The sidelite width can be set to any value and defaults to 12" (400mm) which seems to be the most common size.
-
Featured on SketchUp Essentials (Justin Geis):
Note that this video was made prior to the new HTML draw menu, so unfortunately it is already a bit dated.
Advertisement


