Foundation Plugin
-
I'm interested in putting the new polyline stemwall tool through its paces. If you have a fairly complex foundation plan that you think I should try and model please email me a PDF of it.
-
Version 1.4.2 - 09.06.2019
- Fixed a bug with the rebar in closed loop stemwall assemblies.
Critical bug fix, I strongly suggest upgrading to this version of the plugin.
-
I've moved to the complex roof development but there are still a number of glaring holes in the foundation plugin. To get a better feel for how well it would work I modeled up a foundation for a residence that I did some local engineering for a couple of years ago:
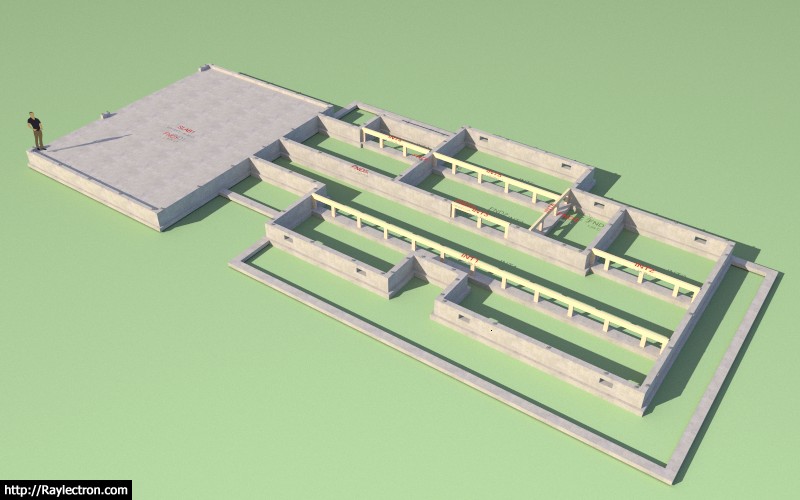
View model here:
3D Warehouse
3D Warehouse is a website of searchable, pre-made 3D models that works seamlessly with SketchUp.
(3dwarehouse.sketchup.com)
Really the only manual edits that were required was the blockouts for the garage doors and the footings for the porch roofs. The following list summarizes some areas that need further development:
1.) Need some sort of option for garage door block outs.
2.) Need the ability to create holes in stemwalls (crawl access, windows, doors)
3.) Add interior footings to regular slabs, similar to the interior footing tool for slab-on-grade foundations.
4.) Stemwall opening tool should also remove any conflicting rebar (boolean subtraction).
5.) Still need to add the tool for a simple polyline footing (ie. porch footing shown). The workaround is to create a stemwall and then manually delete the stemwall leaving the footing portion.I'm also thinking about creating a material list table that summarizes quantities, similar to the legend I generate in the electrical plugin.
So much to do, I really need a whole team of developers to get everything done I need to do.
What would be interesting to know is how much time it would take to manually model up the equivalent geometry, also bear in mind that there would be no parametrics available so if you need to adjust something it would require considerably more time and effort to make that change. With the plugin if I need to adjust something like anchor bolt spacing I simply edit the assembly with a right click and the changes are instantaneous.
Modeling time was about 30 minutes. Most of that time was transcribing dimensions from a large, crumpled set of paper plans. The rest of the time was largely spent on fiddling with the garage door block outs and then trimming the rebar back. As it stands now I do think the plugin offers some significant time savings but there is much that remains to be done.
-
Impressive perseverance, talent, and dedication!
-
Combining a slab-on-grade with a stemwall footing (with steps):
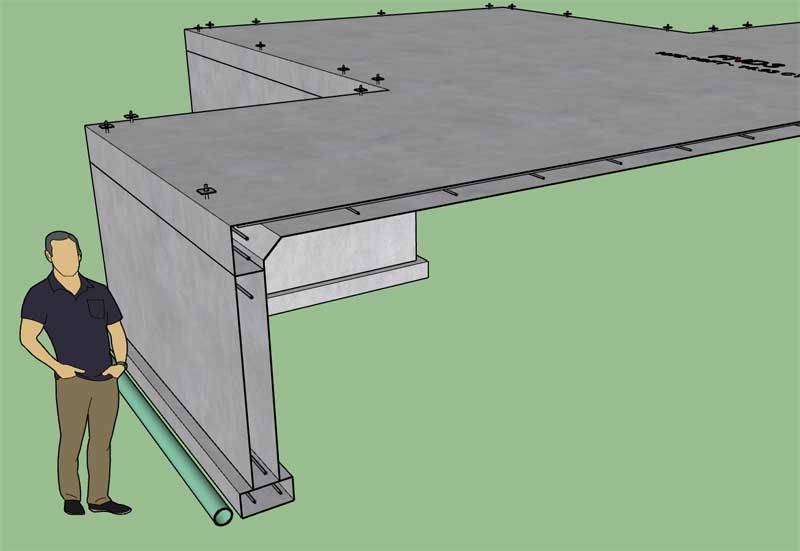
View model here:
3D Warehouse
3D Warehouse is a website of searchable, pre-made 3D models that works seamlessly with SketchUp.
(3dwarehouse.sketchup.com)
-
Version 1.4.3 - 09.07.2019
- Enabled the "Draw Strip Footing" tool with the following advanced options: rebar, drain pipe.
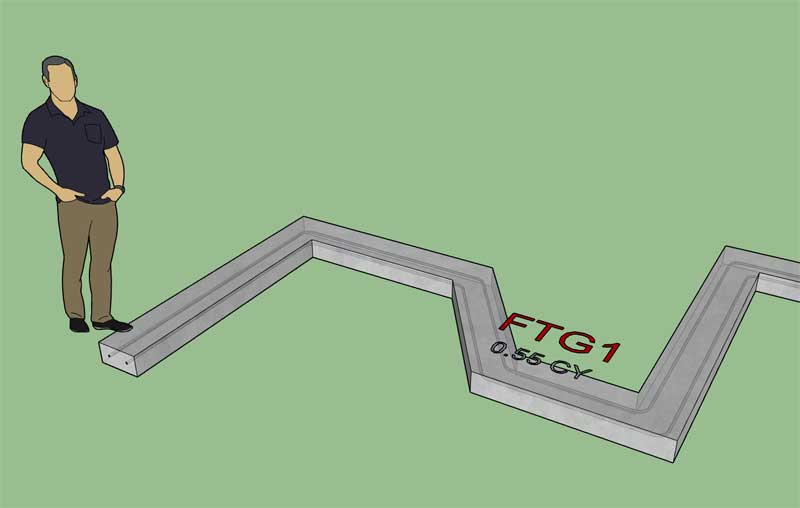
Similar to the polyline stemwall tool you can create closed loop polylines (polygons) as well as simple linear sections of footing.
Similar to the polyline stemwall tool the point selection of the tool is terminated with the "DOWN" arrow key.
The horizontal bar option is shown in the menu but is currently not enabled. I need to give this option some additional consideration before I make it live.
-
After working through the complex foundation on Friday, and having to manually create stemwall blockouts for garage doors I've come to the conclusion that a stemwall blockout tool is critical to the success of this plugin.
I guess I'm just a lazy 3D modeler, but even having to push/pull a blockout is too much work for me and then it ultimately breaks the parametrics of that particular stemwall assembly, so manual edits should be avoided whenever possible.
Yet another toolbar:

Like the Wall plugin the Foundation plugin is starting to collect quite a few toolbars, this will be the sixth toolbar for this plugin. I'm starting to run out of screen real estate, I may have to do something about that, I'm not sure what yet.
The problem is that the plugins need to be able to do a lot of things, so there are a lot of tools and each operation/function needs its own icon or button to instigate it. I've managed to wrap some functions into context menus but some operations are better presented as a direct icon in my opinion.
-
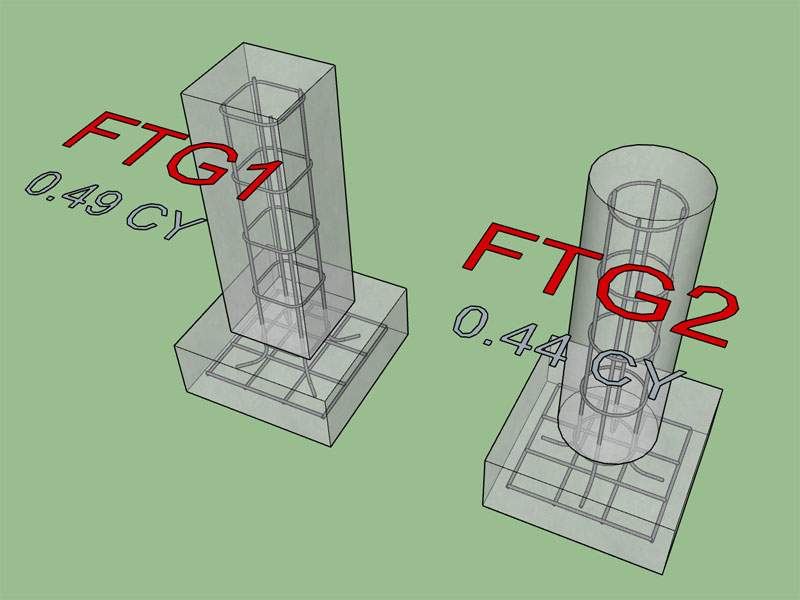
First look at some column footings (spread footings) with and without pedestals:
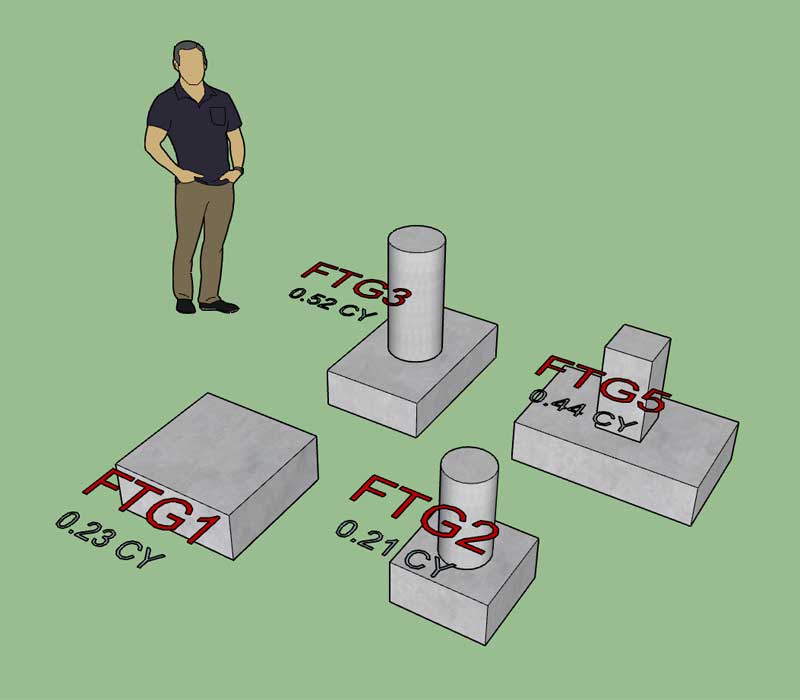
I've decided not to add the column portion into the Foundation plugin, that will be part of the Wall plugin.
I just need to add a bit of rebar into these assemblies and then I will roll a new version.
-
Version 1.4.4 - 09.09.2019
- Enabled the "Draw Column Footing" tool with the following footing types: spread footing, spread footing w/ pier.
- Added transverse and longitudinal rebar for column footings.
- Added the Stemwall Blockout toolbar and icons.
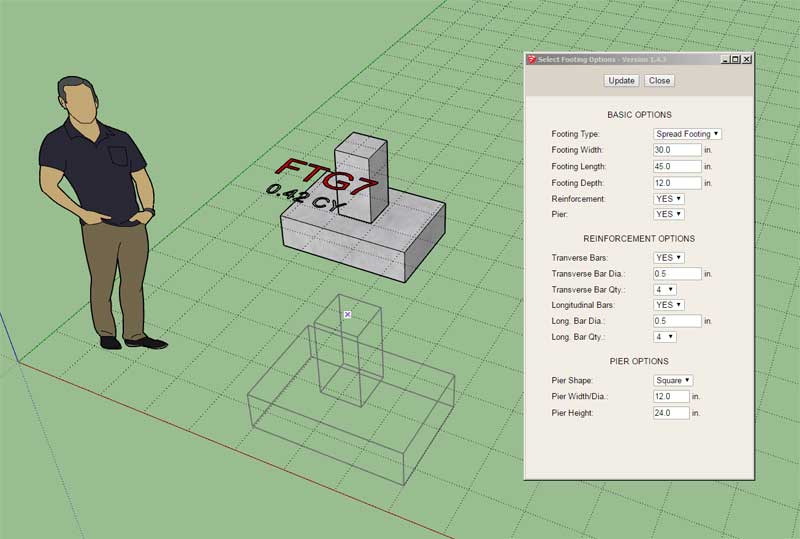
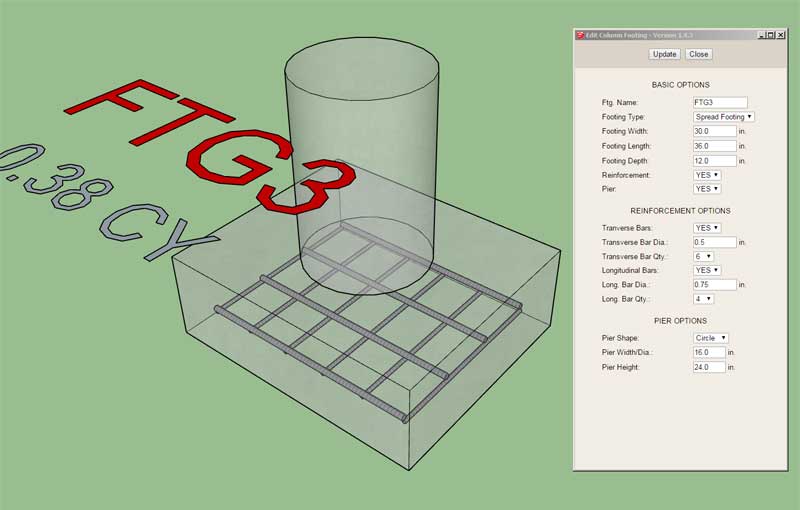
The Draw Column Footing tool is the 4th icon on the main toolbar.
This is a really easy tool to use, I highly recommend upgrading to the latest version to take advantage of it.
The blockout toolbar has been added however these tools will not be functional until the next release.
With the pier option enabled I would be interested in adding in options for vertical rebar (with hooks) and possibly hoops, but I first would like some more feedback in this regard.
-
How is this integrated with the rest of the Foundation--or does it just create an isolated component from which you position copies into the model?
-
@pbacot said:
How is this integrated with the rest of the Foundation--or does it just create an isolated component from which you position copies into the model?
This tool creates separate footing assemblies within the model. It is separate from the rest of any other foundation assemblies.
These footing assemblies can be edited and moved anywhere within the model.
View model here:
3D Warehouse
3D Warehouse is a website of searchable, pre-made 3D models that works seamlessly with SketchUp.
(3dwarehouse.sketchup.com)
-
For concrete piers resting on a spread footing I was kind of thinking something along these lines for the rebar:
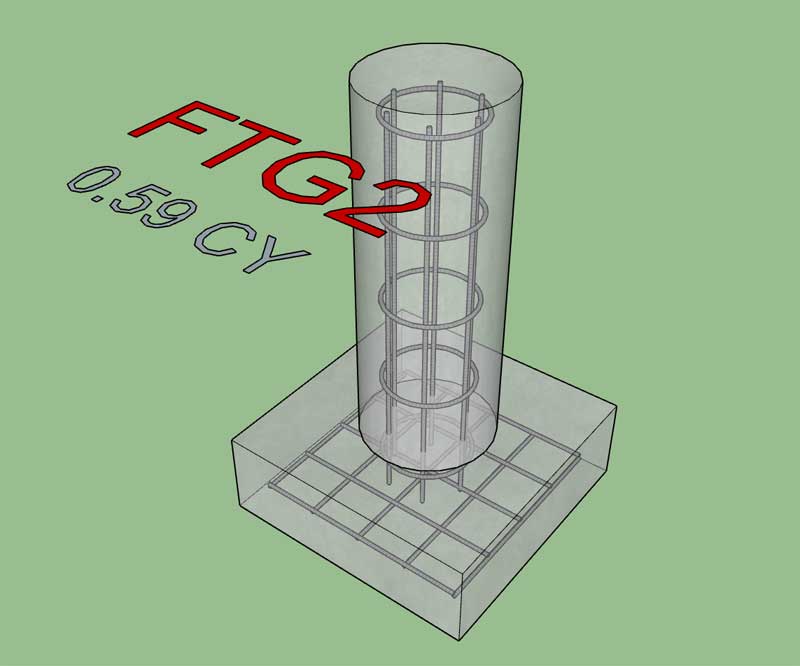
However, one would probably want the vertical bars to hook into the spread footing rather than terminate as shown.
Parameters might be something like:
Vertical Bars: Yes/No
Vert. Bar Dia.:
Vert. Bar Qty.: 2,4,6,8Hoop Bars: Yes/No
Hoop Bar Dia.:
Hoop Spacing:Let's try to avoid taking it to this extreme though:

-
Probably something more along these lines:
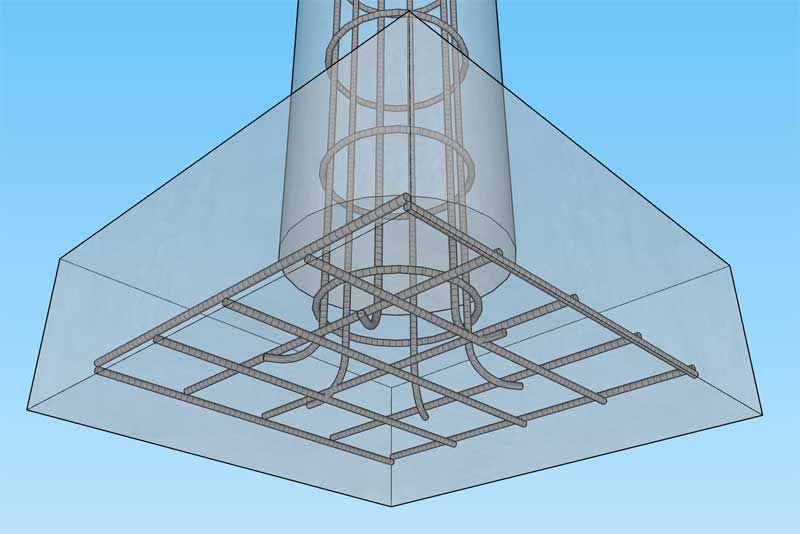
View model here:
3D Warehouse
3D Warehouse is a website of searchable, pre-made 3D models that works seamlessly with SketchUp.
(3dwarehouse.sketchup.com)
If you look closely at the model you will notice that the texture/material on the vertical bars is a bit of a mess where they flare out to meet the spreading footing. Special attention will be required to make sure the initial follow me operation is done on the X-Y plane and then the bars are rotated up into the vertical position.
Does this type of rebar detailing look useful? Sometimes I need to use a bit of restraint so I don't take things to far, but if this is something that would find some utility I can add the additional rebar options in.
-
Version 1.4.4b - 09.10.2019
- Added vertical and hoop rebar for column footings with round or square piers.
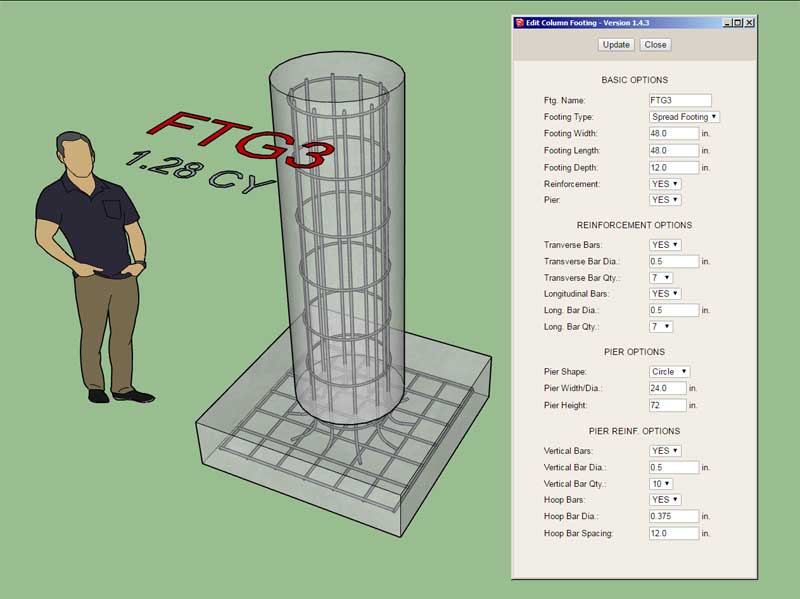
Sorry, useful or not, that pier rebar was just too tempting to pass on. When you enable piers and rebar you are now presented with an additional section with options for vertical and hoop rebar within the pier. Square piers are currently limited to two, four or eight vertical bars, round piers are limited to the following number of bars: 2, 4, 6, 8, 10, 12.
If you need more than twelve vertical bars then you are probably not designing a residential structure.
I'm not a concrete guy (haven't done a lot of reinforced concrete engineering, mostly lumber and timber), so this is kind of my best guess at what is appropriate for residential work. If you need specific details changed up, please let me know.
Square pier with eight vertical bars:
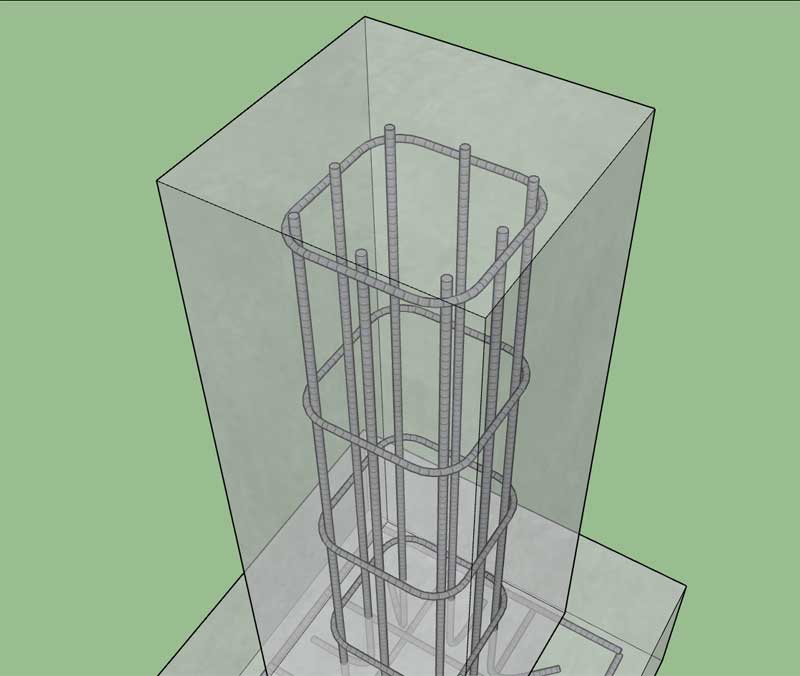
I'm also thinking about adding in sonotube footings/piers (no spread footing) with an option for a bell shaped footing:

-
Version 1.4.5 - 09.11.2019
- Added Sonotube footings to the "Draw Column Footing" tool.
- Added a flared "Bell" footing option for sonotube footings.
- Added vertical and hoop rebar for sonotube footings.
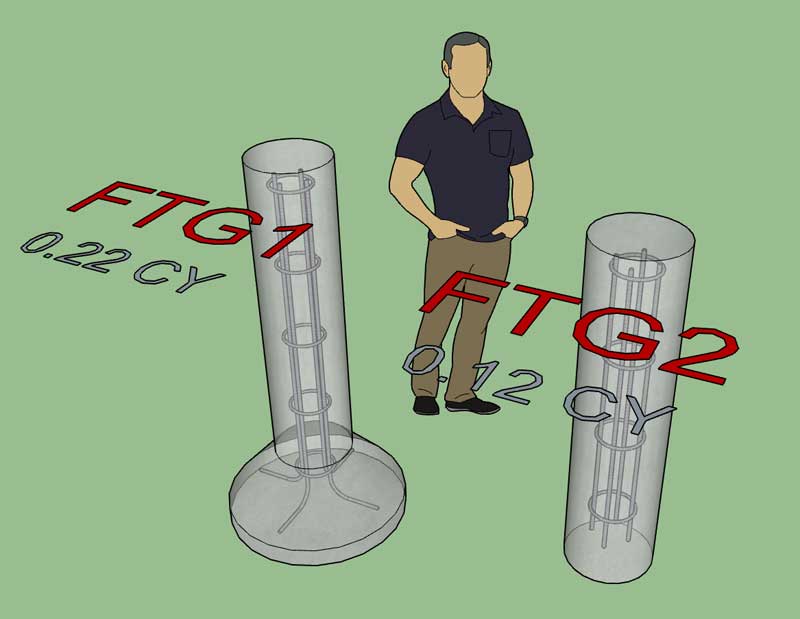
When you toggle the "bell" option on I have the vertical rebar bend 90 degrees as shown and extend to the perimeter of the bell (ground clearance maintained).
Sonotube footings without a bell option have vertical bar as shown.
View model here:
3D Warehouse
3D Warehouse is a website of searchable, pre-made 3D models that works seamlessly with SketchUp.
(3dwarehouse.sketchup.com)
-
Version 1.4.5b - 09.11.2019
- Added the option to place a double mat of rebar within a spread footing (top & bottom).
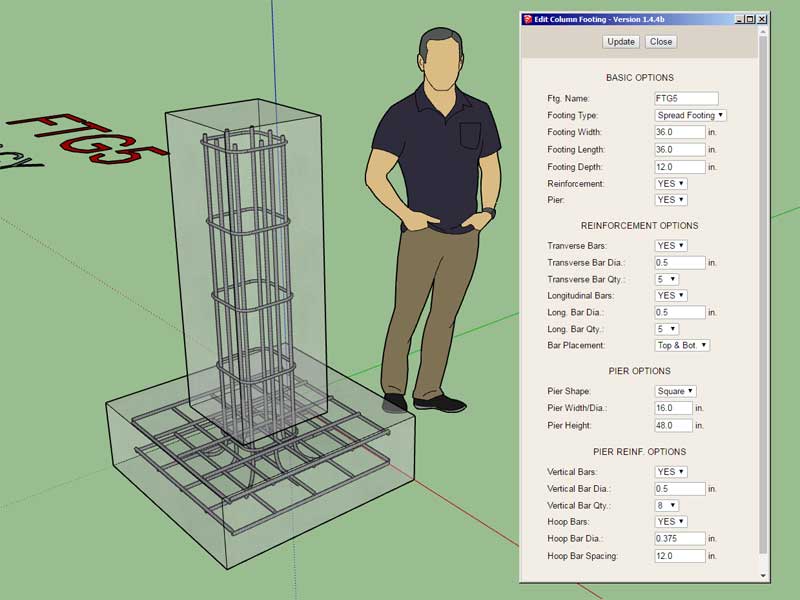
Note that the top mat is identical in size and spacing as the bottom mat.
View model here:
3D Warehouse
3D Warehouse is a website of searchable, pre-made 3D models that works seamlessly with SketchUp.
(3dwarehouse.sketchup.com)
-
@juju said:
thanks for the efforts!
the toolbars for your extensions are becoming rather elaborate and taking up a bit of toolbar / screen space, any chance you could implement a single initiation button/icon instead and have a secondary open when the primary has been triggered, much like Fredo does some of his extensions?
@medeek said:
Hmmm, you might be on to something with this.
I agree that the amount of toolbars has multiplied quite rapidly as I keep adding more features to each plugin, it does take up quite a bit of screen real estate now.
Thank you for the continued efforts Nathan! I see the toolbars are steadily increasing, any chance you can look into the request / suggestion above?
-
@juju said:
@juju said:
thanks for the efforts!
Thank you for the continued efforts Nathan! I see the toolbars are steadily increasing, any chance you can look into the request / suggestion above?I am looking into this further. Again, not entirely sure on the best possible solution but I will see if I can either consolidate or provide some other system.
-
First look at the blockout tool and its results:
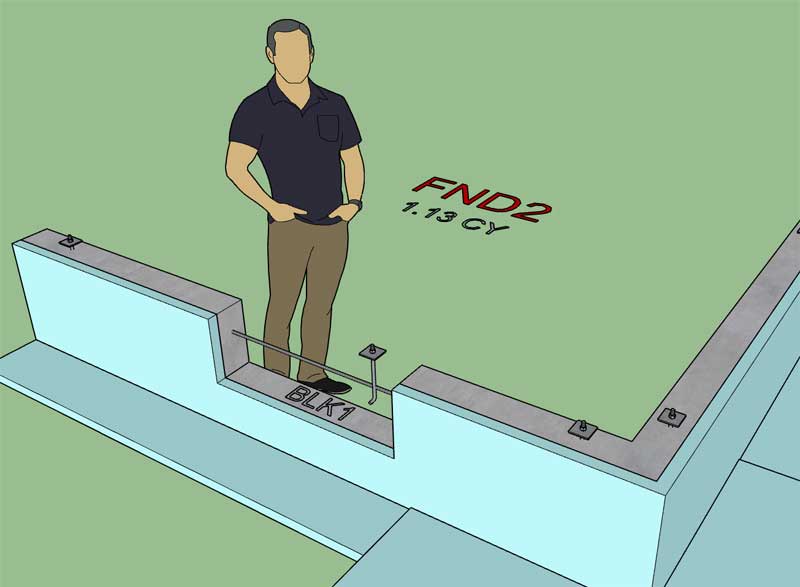
Now I just need to have it trim out the rebar and remove anchor bolts that are in the way.
I'm also including an option to have it remove anchor bolts or not remove them in the case that for some reason you don't want to remove anchor bolts that clash with the opening.
I'm going to assume that designer would always want to trim the rebar out and the insulation, but I could also be mistaken on this and might need to provide a couple more options that allow for toggling this behaviour on and off for each blockout.
The edit and delete functions seem to be stable, I just need to get on the move tool and make it work similar to the move tool for openings in the Wall plugin.
The blockout label is on the hidden layer and toggles on and off automatically with the blockout tools.
-
First look at rebar trimming and anchor bolt removal:
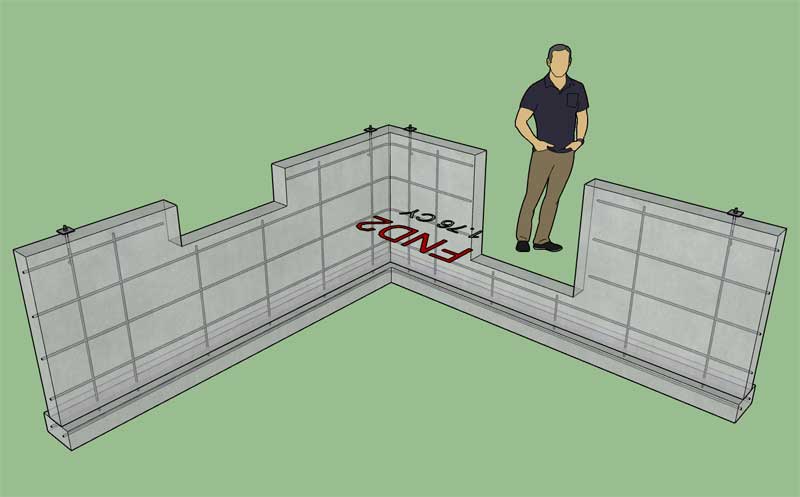
Now I just need to get the move function working correctly and I think this new set of tools is ready for prime time.
And yes, when you insert blockouts the plugin is correctly calculating the decreased volume of concrete or CMU blocks for the stemwall.
Advertisement


