Jewelry Box
-
Here is a jewelry box that I'm working on for my wife and daughters. I'm not very disciplined when it comes to planning my work so I include a procedures text in my sketchup drawings. (
 I say that like I've done many. This is only my second or third).
I'll make one of cherry, one of red oak, one of white oak and one of a maple/walnut mix. Please feel free to respond with criticism - it's a $%$&& good way to learn and teach!Thanks for lookin'
Jb
-
Hi John, hi folks.
I did not see them in your model but I presume that you will add separations inside the drawers and the upper storage that is probably accessed via a tilting lid.
Just ideas.
-
Hi John,
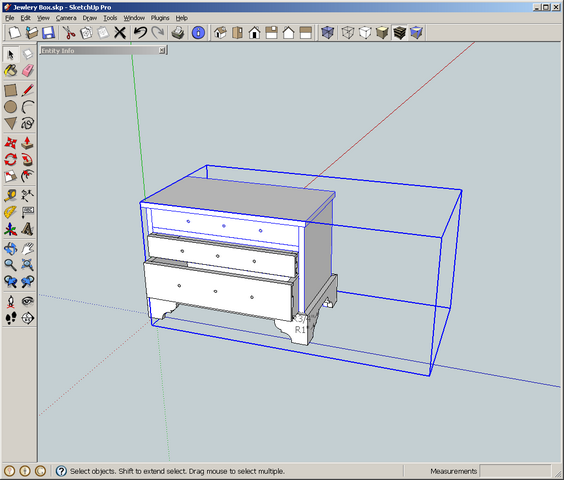
There are a number of things I noticed about the model. The first thing was the model was not centered after Zoom Extents - that typically means there is some tiny bit of invisible geometry somewhere out there.
Use Zoom Extents, open the Entity Info window, then select the the big empty space on the left. Although you can not see it, the Entity Info windows ways there is a single Edge selected, so just press Delete to get get rid of that, and Zoom Extents again to check for more.
Note that is is possible that the rogue geometry is in a Group/Component, and selecting it now could have found nothing. You also need to open Groups and Components to check them.

-
I would further reduce the cost by removing the 2 shelves the drawers are sliding on.
- Router a 5/8" x 1/4" deep rebate into the outside face of each draw side.
- Fasten 1/2" x 1/4 rails to inside face of jewellry box gables, for the drawers to slide on
-
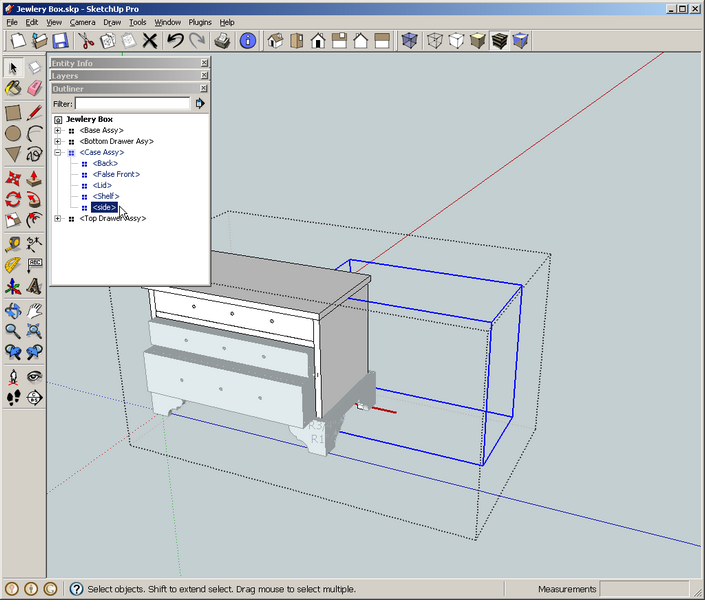
Next, when selecting the Case Assy Component, the BoundingBox does not fit tightly as it should.
This could mean a couple of things.
One is that there is geometry on a Layer which has been turned off; but you haven't added any to this model.
Next, it means there is more invisible geometry in the Component, or in any of its sub-components. These could be Faces, Edges, Groups or Components.
You can open each Component for editing, and use Edit > Unhide > All in order to find any loose geometry that may have been hidden. Of course, it may also be very small as in the previous post, so use the Select Tool to help find it. The Outliner Window will be useful here.
You can see when you get to the "side" Component, its BoundingBox is not a tight fit.
If you open the "side" Component for editing, and select Edit > Unhide > All, You can see a pair of old sides are still in the model. Or perhaps these were supposed to be the sides.
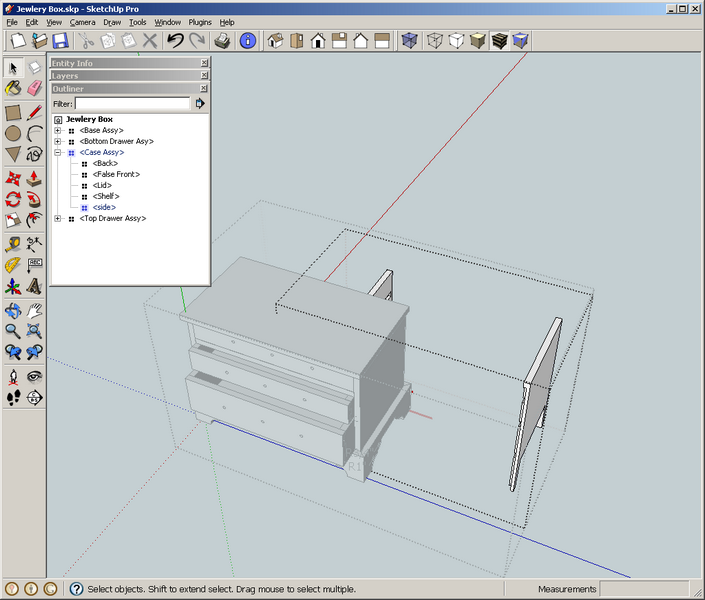
Hope this helps. There are other Components with hidden geometry in them also, but you I'll let you find them! I just wanted to give some idea how to go about cleaning it up.
-
Good comments all. Thanks. I hope I'll be able to help others here soon.
again, thanks
Peppers
-
Jim makes some excellent comments.
I addition, I would suggest that you make each piece that you would make in the shop, a component. For example the case sides should each be instances of the same component. Currently, the sides themselves are not components at all. The same goes for the front and rear base trim. While the side base trim pieces are components, they could be instances of the same component which would be more efficient. The same goes for the drawer sides
If you want to get accurate dimensions out of your model, you might want to take a look at aligning mating components. The drawers seem to need a bit of attention in that area. The lower drawer as drawn is too tall for its opening. If you follow the dimensions as drawn, you'll wind up with some troubles when you try to fit the drawer.
I'm curious about why you have the global axes repositioned--notice in Jim's screen shots that the green axis is up. It's the blue one that should be up and the red running from left to right across the front of the model. Many of the component axes seem to be in strange locations, too. This leads me to think you're working too hard.
Tomot makes the point that you don't really need the dust panel between the drawers. He's right. You don't. Although I doubt there'd be much of a cost saving in leaving it out. It doesn't need to be as thick as you made it of course. If you do opt to remove it, my suggestion would be to add traditional runners which would act as kickers at the bottom. I think that would look nicer than setting runners in the sides of the case and having exposed grooves plowed in the sides.
If you're going to dovetail the drawer sides into the front, why not dovetail the back into the sides as well? You might want to cut the drawer back so the bottom panel can slide in after the box is assembled. Put a groove on the inside of the drawer front to receive the bottom and fasten the bottom to the back with a single screw. Run the grain on the bottom panel across the width of the drawer and put a slot in for the screw so the bottom can expand and contract with seasonally without trying to push the box apart.
I would leave the legs off the sides of the case and set it into a rabbet around the top of the base. Some small corner blocks can be used to strengthen the corners.
Keep plugging away.
Hello! It looks like you're interested in this conversation, but you don't have an account yet.
Getting fed up of having to scroll through the same posts each visit? When you register for an account, you'll always come back to exactly where you were before, and choose to be notified of new replies (either via email, or push notification). You'll also be able to save bookmarks and upvote posts to show your appreciation to other community members.
With your input, this post could be even better 💗
Register Login


Advertisement