Help Me Draw A Dome [TUTORIAL]
-
Hi Guys
I am totally new to Google Sketchup.
I followed the tutorial found here http://sketchup.google.com/support/bin/answer.py?hl=en&answer=39070 but I am so lost, I just cant seem to get this right. I will list what type of dome I require and im sure someone can assist me.Below is the type of dome I require.
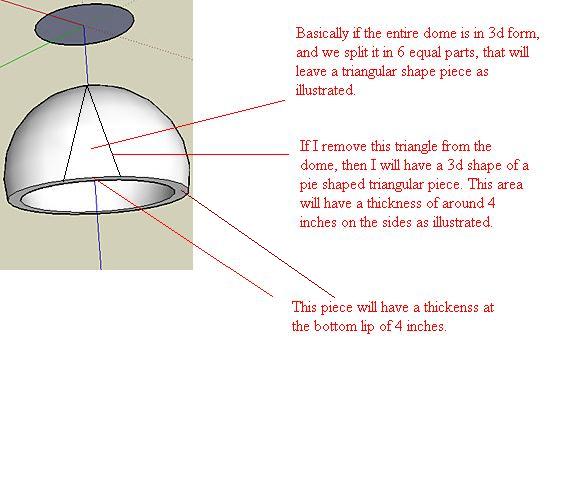
- Circumference of the domes base is 30 Inches.
- The height of the center of the dome is 14 Inches.
- I want to split the dome into 6 equal parts.
- I then need to remove one part of the dome. This would look like a pie shaped piece.
- The pie that comes out should have an equal thickness of 4 Inches on either side. The top and bottom thickness depends on the size after it is split into 6 equal parts
Please can someone assist me step by step into doing this.
Thanks a million guys
Regards[color=#FF0000:3mpr2pvw]][/color
-
Ho D0me,
Lucky you, i am the regular dome-man on these forums. See this tutorial for instance.
Now you didn't say if you want a sort of wall thickness to your dome (such as the one we can see in that Google tutorial).
-
The problem here is that this dome would look rather funny. Beside that it's hard to define a circle by its circumference (as you should divide it with 2PI which is an irrational number) so mine is also just 29.92" or so, the 14" height will result in a very "bulgy" dome.
-
Hi SCF
Thanks for helping me outI dont know how to put what I require into words, so I've attached the original tutorial I found on google.
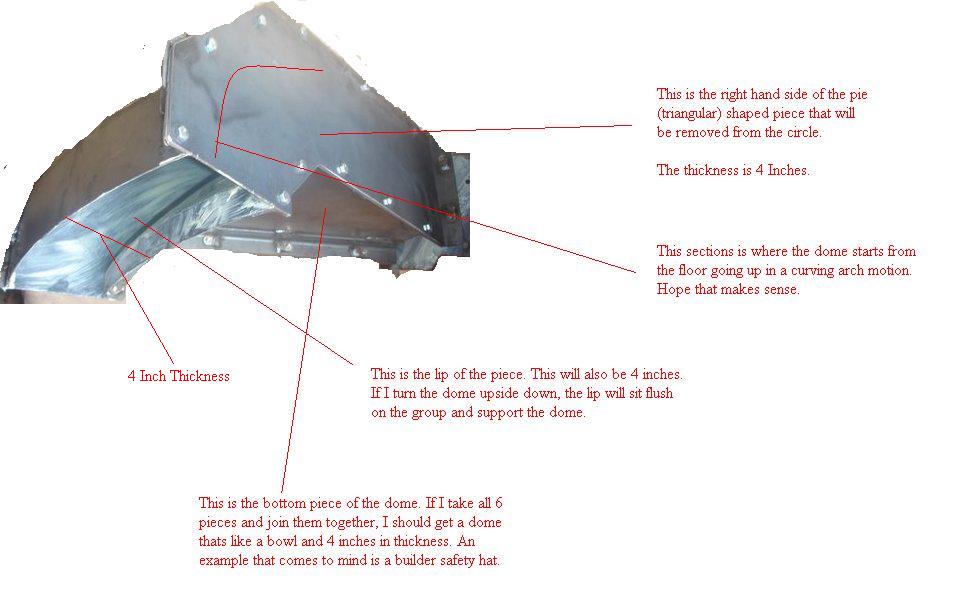
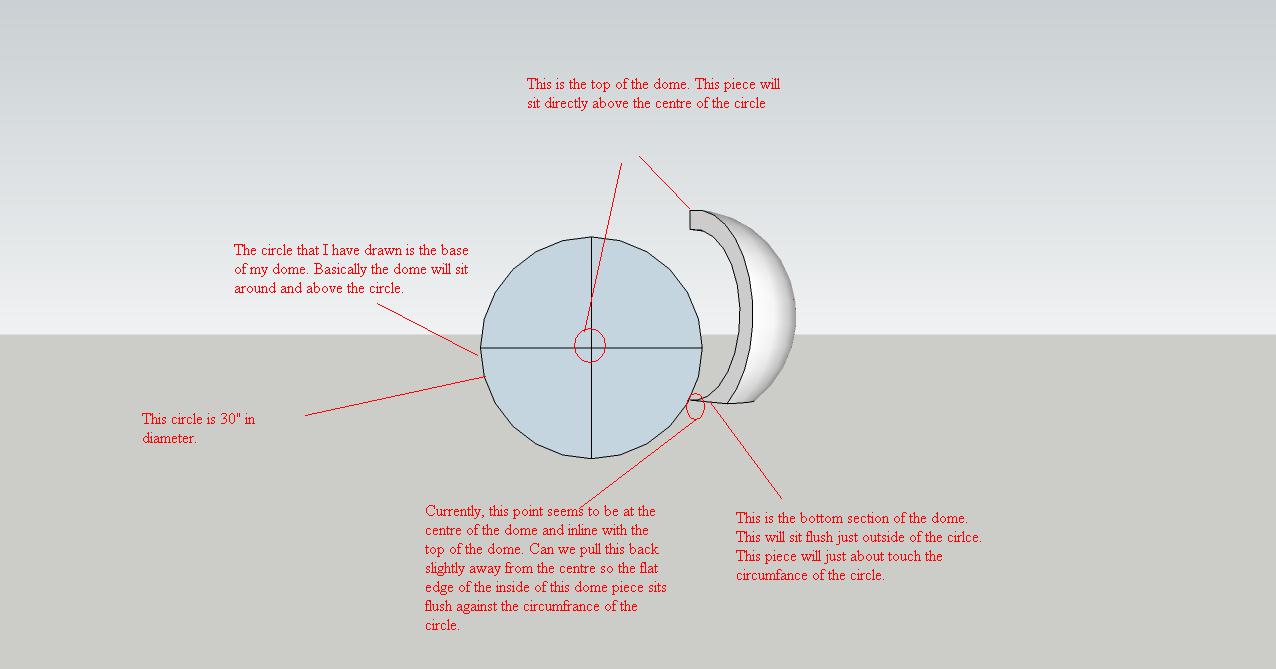
I've attached a picture of what I require and I'll try to illustrate on the picture what I want to do. Hope it makes sense.Sorry for the poor explanation. I hope you understand. I just cant find the right words to express myself.
The second picture does not have the perfect curvature and arch of a dome, but its all I could find.Let me know if there's anything else you require.
Thanks for all your assistance.
-
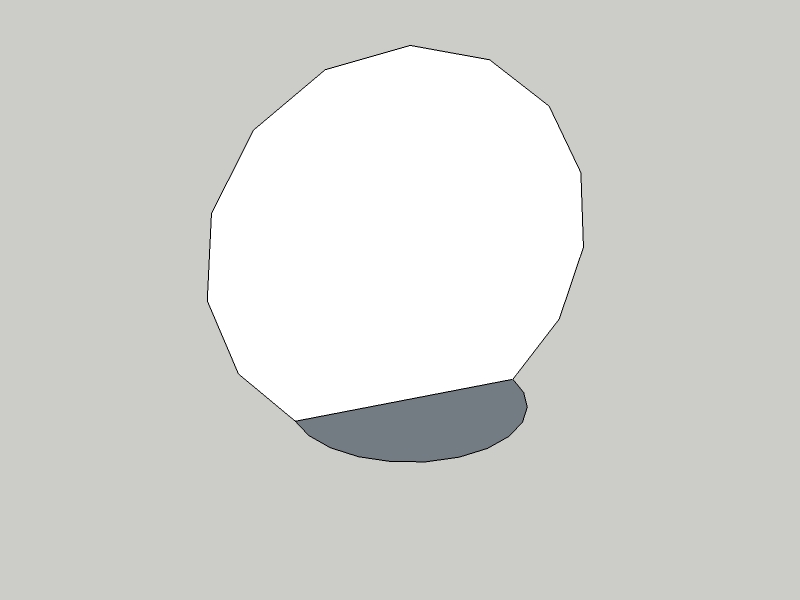
OK, I see. With a really bad pun, I could say it is a piece of cake

BUT! If the perimeter/circumference of the base circle is 30" altogether, you will end up with something like this:
-
Wow. Wow again. That's impressive. It took me an entire day to try and follow a step by step example of just getting the dome piece with failing on each attempt. You make it look and sound so easy. Thanks a million.
I do require a few modifications but its 80% there. I have this whole picture of what I need mapped out in my head.
I will use the picture you gave me and make notes onto it.
PS: Dunno what made me call you SCF in my previous post. Sorry for that. I was actually typing out that reply 2AM in the morning so I guess sleep took over.
Thanks again Gaieus
-
Hi
After looking at the drawing and then linking the drawing you created for me with the one I have mapped out somewhere in my head (excuse the pun), it seems I have made a few minor errors.
I have attached the original picture you gave me with some corrections.
It you look at the picture and the top piece of the drawing you gave me, the edge (end point) of the top piece should sit directly above the center of the circle, this I beleive is also the centre of the dome.
I incorrectly gave you the diameter of the dome as 30". The diameter I gave you is in fact that of the circle base that sits below the dome. I am unsure what the dome diamter is. Maybe you can tell me once we set the bottom section of the dome piece flushed against the circle sitting on the floor and the top of the dome sitting directly above the center of the circle.
Is it possible to take the dome piece you gave me and then duplicate it 5 times. Using the 5 duplicate pieces + the original piece, and joining them together around the circumfrance of the circle on the floor, to give the dome in its entirety with a 3D view of the circle.
Appologies for repeating everything I put in the attachment here. I'm trying to put this in the most descriptive form as possible.
Do you know of a software or super machine that can attach to my head and take the image of what I require and draw it out on paper? lol
Thanks again for all your assistance. It's greatly appreciated.
Regards
D0me
-
Well, that's why I asked twice whether you are talking about circumference or diameter. They are not the same!
So what is 30"? The inner circle or the outer circle? (both will be "bases").
Before we go on, are these dimensions correct? (They follow your description actually).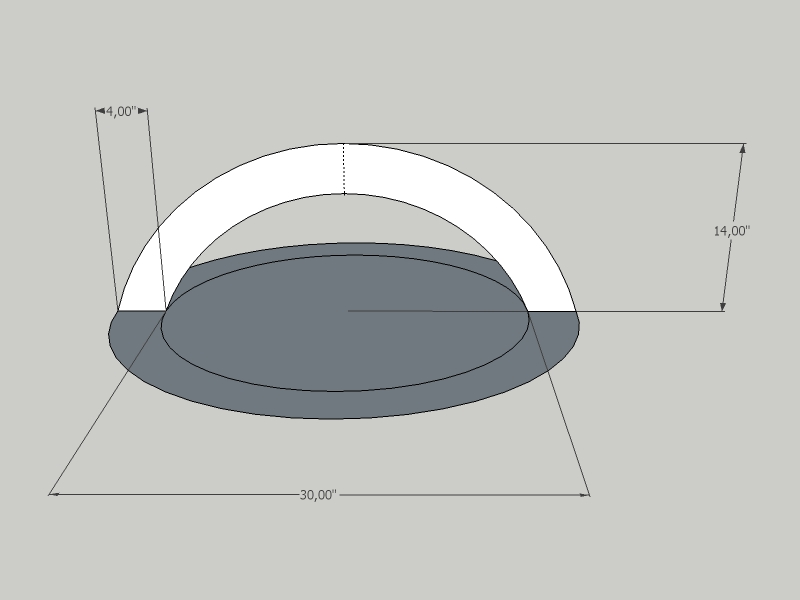
You need to get the right dimensions from the beginning to get the correct result. There is no such thing that we "pull something back a little".@d0me said:
Is it possible to take the dome piece you gave me and then duplicate it 5 times. Using the 5 duplicate pieces + the original piece, and joining them together around the circumfrance of the circle on the floor, to give the dome in its entirety with a 3D view of the circle.
Yes but let's set the dimensions first.
@d0me said:
Do you know of a software or super machine that can attach to my head and take the image of what I require and draw it out on paper? lol
Sure - you are using it right now, it is called SketchUp.

-
"Speechless" I really don't know what to say.
@unknownuser said:
D0me wrote:
Do you know of a software or super machine that can attach to my head and take the image of what I require and draw it out on paper? lolSure - you are using it right now, it is called SketchUp.
You are the attachment to my head. I actually re-read my last post many times over to see if I can understand what I was asking, and trust me, if I were in your position, I wouldn't know what I was requesting but you simply put my words into a drawing. WOW again.

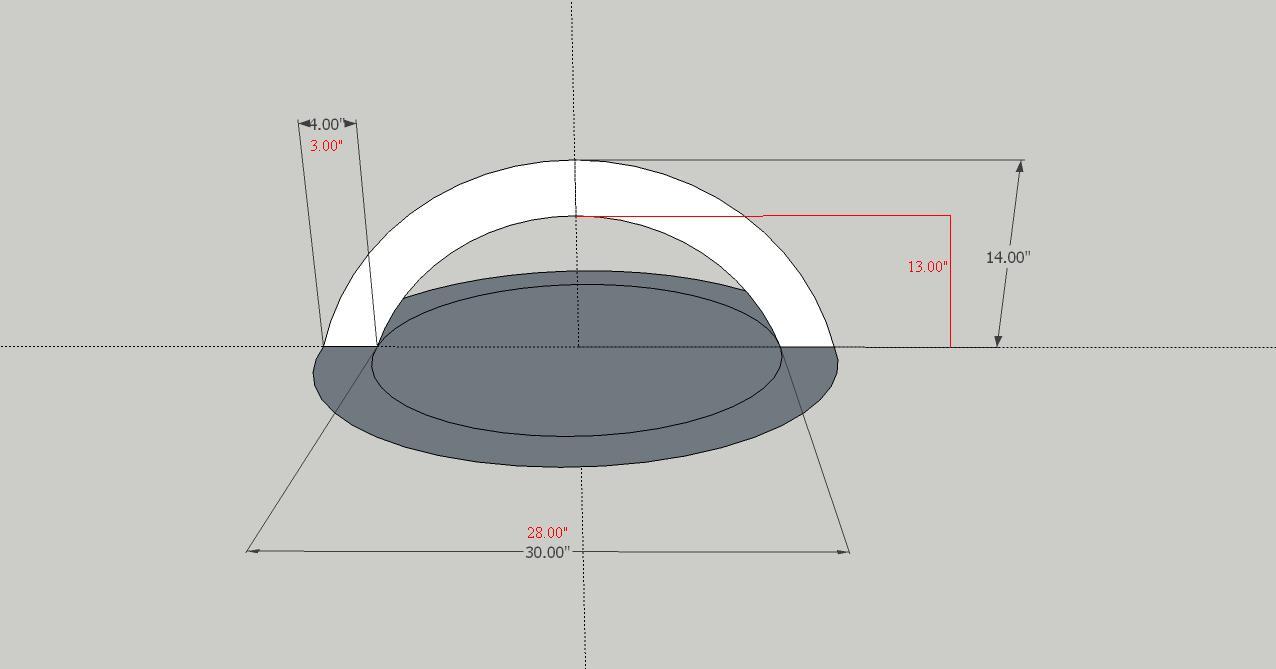
I do appologies for not settling on 1 set of dimensions. The first drawing you gave me totaly change my mind, after looking at what my brain could only imagine. Now with the second image, I have changed again but I do hope that this is the finaly set of dimensions attached.
-
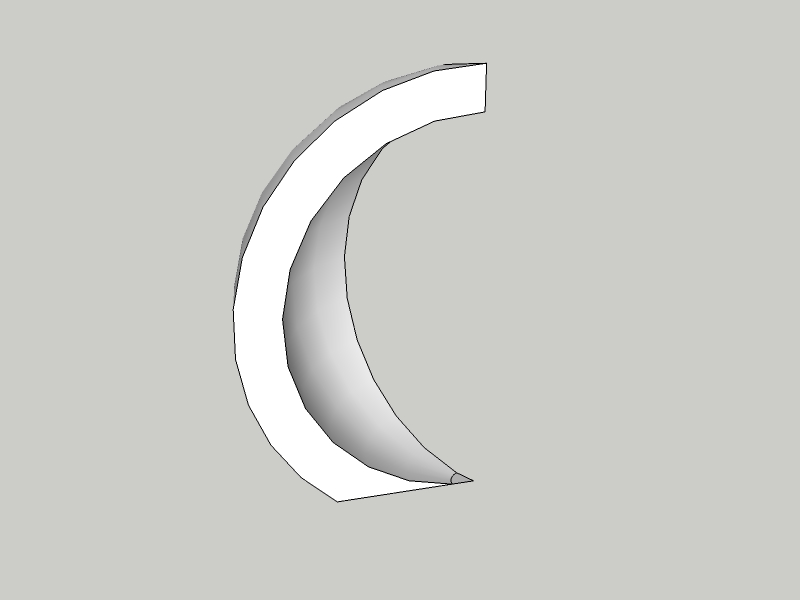
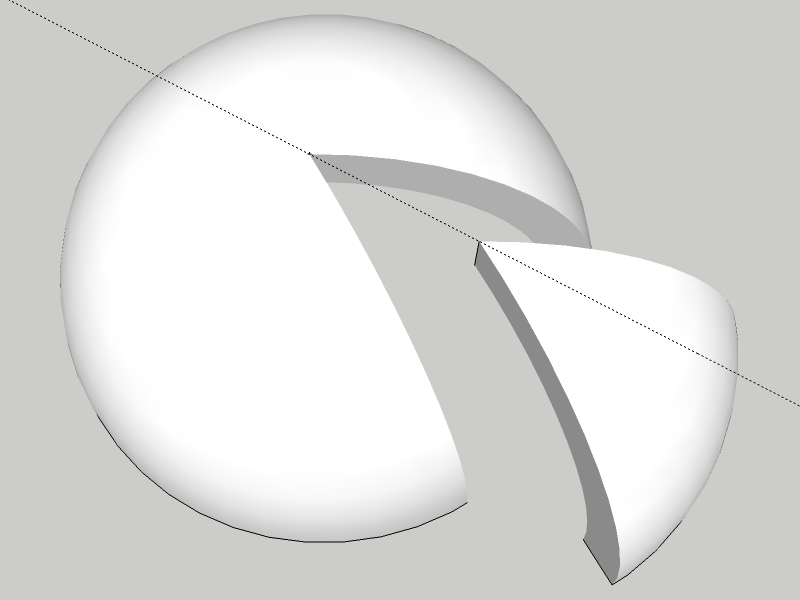
See if this is what you mean (Click on Scene2 when opening the model).
The guide line is there to help moving it along...
-
Phoenominal. Absolutely Phenominal.
Its perfect. The single pie that was removed is pretty impressive might I say. I can actually attach and detach it from the entire dome. You truly have a gift Gaieus.I actually feel embarrased to ask you for the next additional request since you've done so much already but I cant resist. It's just too amazing what I've seen so far that I want to exploit the image more.
- Is it possible to break apart the dome into 6 pieces and allow me to attach and detach pieces as I feel the need?
- Can you make a 3rd scene like the one in reply http://forums.sketchucation.com/viewtopic.php?f=79&t=24930#p213916 . It would allow me to show the new measurements easily
- With regards to point number 2, can you create the entire dome in 2 halves as a fourth scene with the floor in 2 halves. This will allow me to better view how this dome sits.
- Lastly and this is a huge request, and I'd understand if you cant fulfill it. As I said you've done so much already. Can you guide me how to do this myself even if its not anytime soon? Whenever the time suites you is ok with me.
Thanks so much. You've been most helpfull
Regard
D0me -
D0me, I usually do not like to do the job for others - rather help them with learning how to do that as in fact this is a help forum, not a job forum, sin't it? So when you ask
@d0me said:
Can you guide me how to do this myself even if its not anytime soon? Whenever the time suites you is ok with me.
that was actually going to be my intention and we have come this far with the model itself only because I didn't really understand what you wanted.

The "rest" of the model can come later (unless it is ultimately urgent for you - but I would really like you to model it).
So there are two things to start with. Circels and arcs have default segment numbers. In this model, I doubled them because I had a feeling that you want close views of the objects and when it is too low poly, it does not look nice.
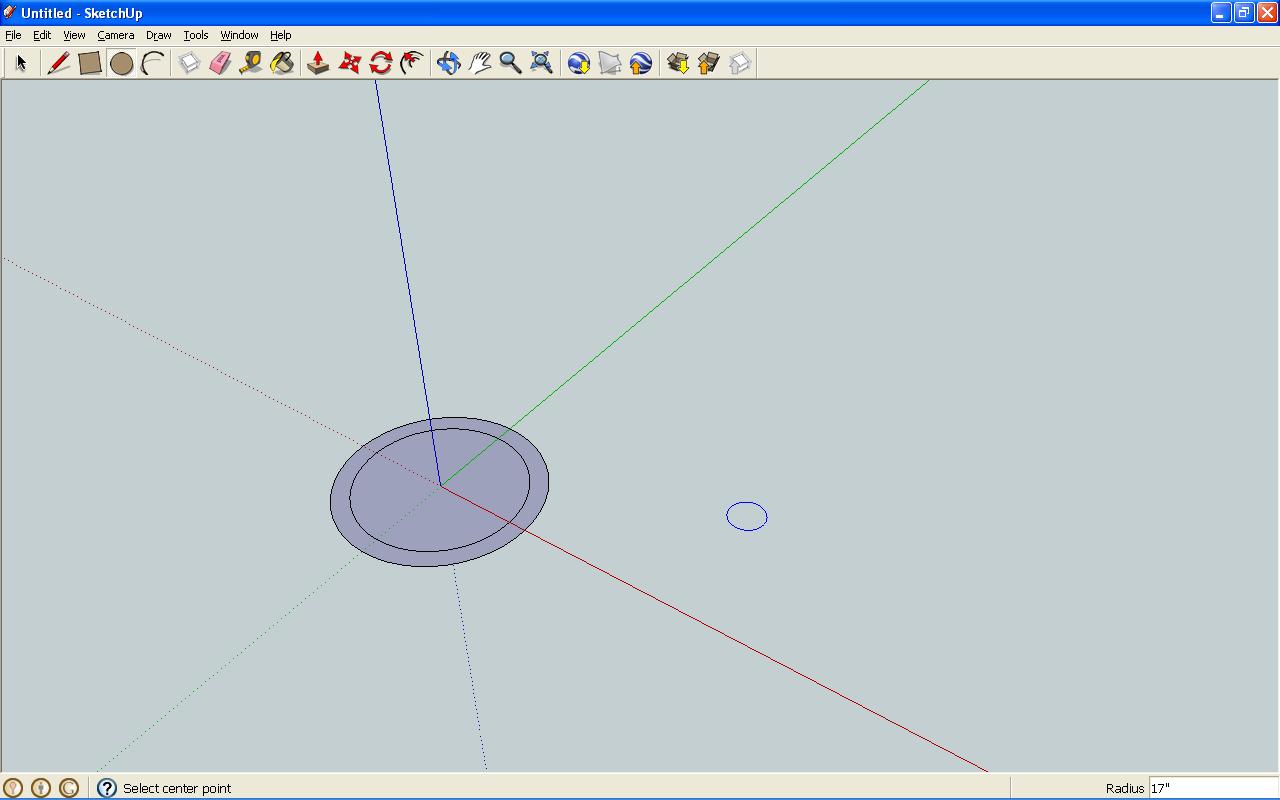
So start drawing a circle from the origin, make sure you pull it out along one of the axes (red or green), type 48s (for 2x the default 24 segment) and hit Enterthen type 14 (for the radius) and hit Enteragain (if your model unit is inch, you won't need to type the " symbol).
Now go back to the origin with the circle tool, start drawing your circle - again, along an axis -, type 17 (this will be the outer circle - 3" wider than the other) and hit Enter (no need to set the segment count in this case because it will remain 48 for the rest of this session).
Let me know when you are done.
(Pilou, if you dare to chime in with a plugin, I buy you a diet coke)
-
Ok Done
I've attached a screenshot.
One part I was a little confused is the Segment. Is there a special box I should enter this value into or should I enter it into the radius box and then fill in the radius of 14.Thanks
-
You can do it in two ways:
- either just type 48s "into the thin air" and hit Enter (in the meanwhile, you can see what you are typing at the bottom right, in the Measurement box but do NOT click in there to type)
- or after you drew the circle, right click on its perimeter and select "Entity info" until you affect your circle with other geometry, you can manually type in the segment count changing the default.
Now we will do the same with the arc which has 12 segments by default but we want double so select the arc tool and type 24s followed by Enter.
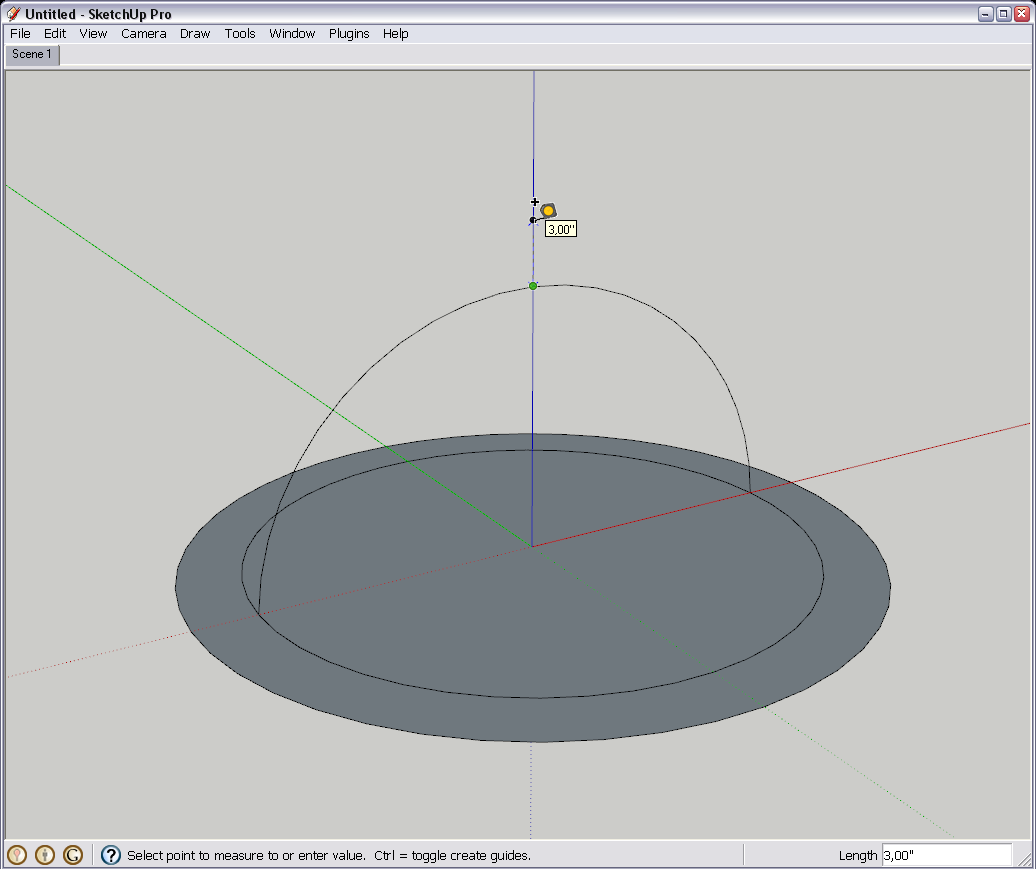
Navigate/orbit your model so that you are not looking down but almost horizontally. This will let you align the arc tool easier on the blue axis once you placed both ends of it (on the proper ends of the diameter of the inner circle - possibly along either the green or red axis). Start bulging the arc and when you see the blue, dotted line and the tooltip "on blue axis", type 13 and hit Enter.
Let me know when you succeed with this. -
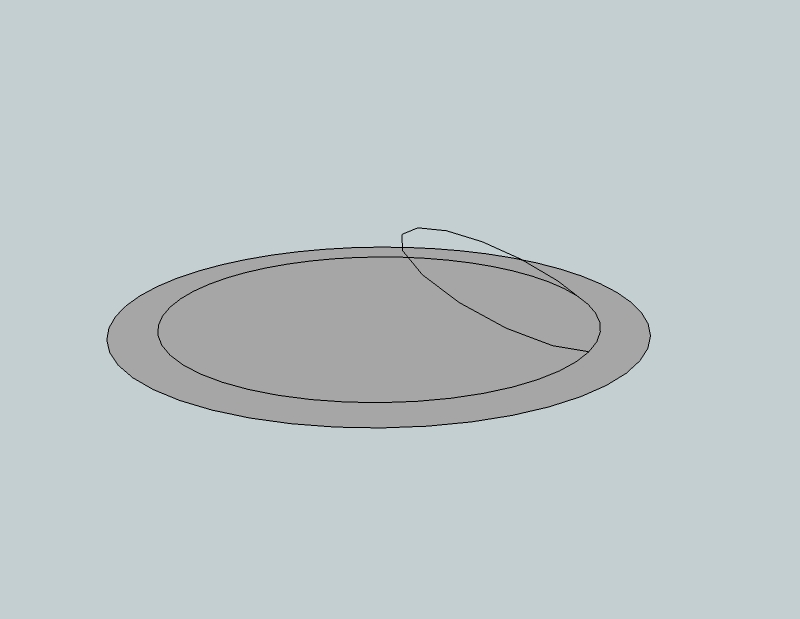
I think I've succeeded. I placed the starting point of the arc on the inncer circle right on the red line (axis) and then set the next point on the same circle a little bit away and then started bulding towards and past the center until I saw blue axis. I then entered 13 as you instructed and this is what I came up with.
-
Nono,
You have this (are the endpoints oof your arc on the endpoints of the same diameter???):
while you should have this: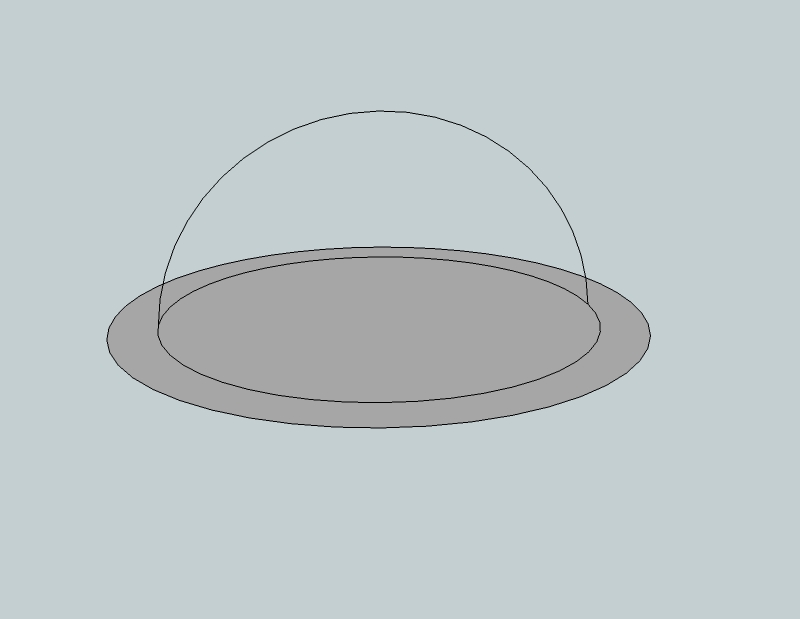
Moreover, you haven't changed the segments of the arc.
You don't necessarily need to - but that's part of today's lesson (we want to end up with a nice piece of cake)!
-
-
SketchUp forms everything from straight lines and flat faces. Smooth, curved edges and surfaces are just a visual effect. Have a look at the picture below. There is a half cylinder "from inside". I exploded the two curves (arcs) so that you can see the endpoints dividing the straight segments of the curve if you turn on endpoints in the Style dialog (Window menu).
You can also see the softened edges (dotted) which bound the facets of such a smooth surface as a cylinder if you turn on hidden geometry (View menu).
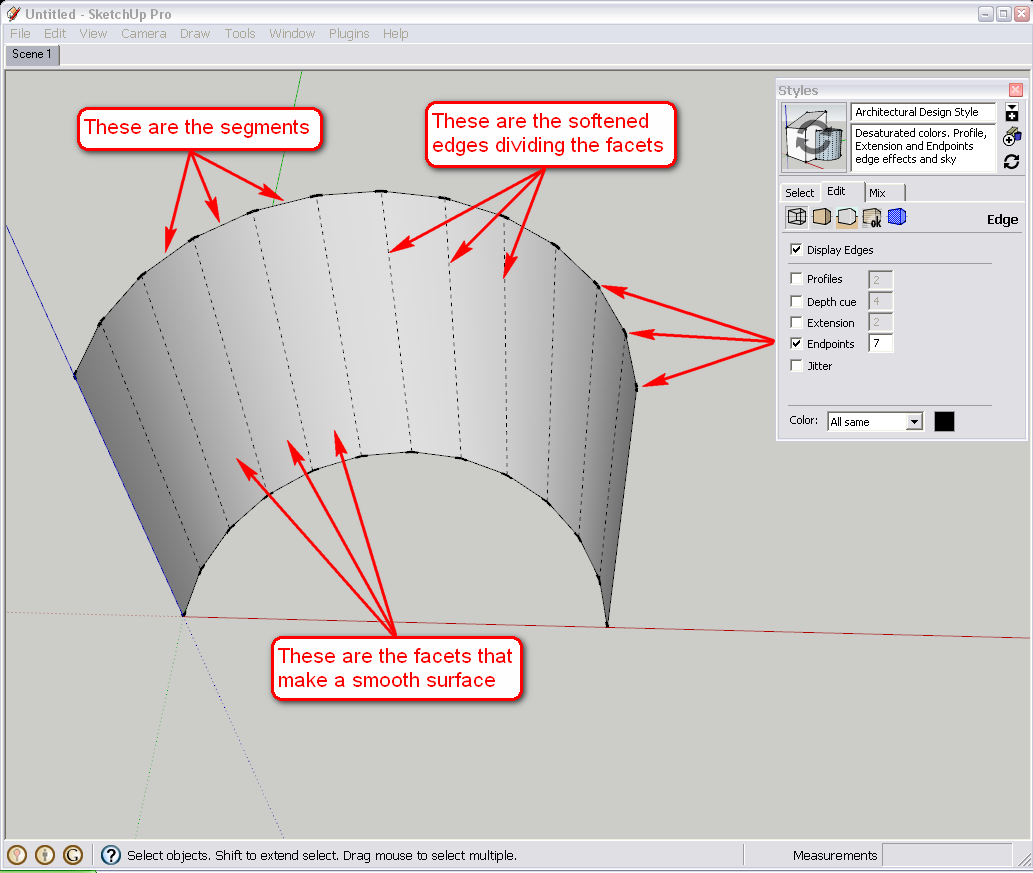
Now it always depends on the purpose how many segments we want to work with. If there is a tree in the background (especially if covered with a coarse bark material), about 6 segments for the trunk will do to keep polygon count low. When there is a fine object like a detailed, technical something you want to display from close, some more segments are always welcome - especially if your model won't eventually be extensive.
Now let's go on with the lesson.
Next step is to define the outer arc that will give us the final thickness of the watermelon (or what we are building). Select the Tape measure tool and from the topmost endpoint of our previous arc, start "measuring" up along the blue axis then type 3 and hit enter. It will leave a guide point there where we can snap our arc next.
If our previous arc were a half circle, we would not need this step as the outer arc would also be a half circle and we get fine inference tooltip for half circles.OR - add the height of our smaller arc (13") plus the thickness of the outer ring (3") and draw your outer arc 16" high according to this in the next step and skip this one (with our easy counting, it is also viable - in other cases construction geometry like guide points can be more handy because complex modelling elements all around).
Now draw your outer arc snapping to this guide point: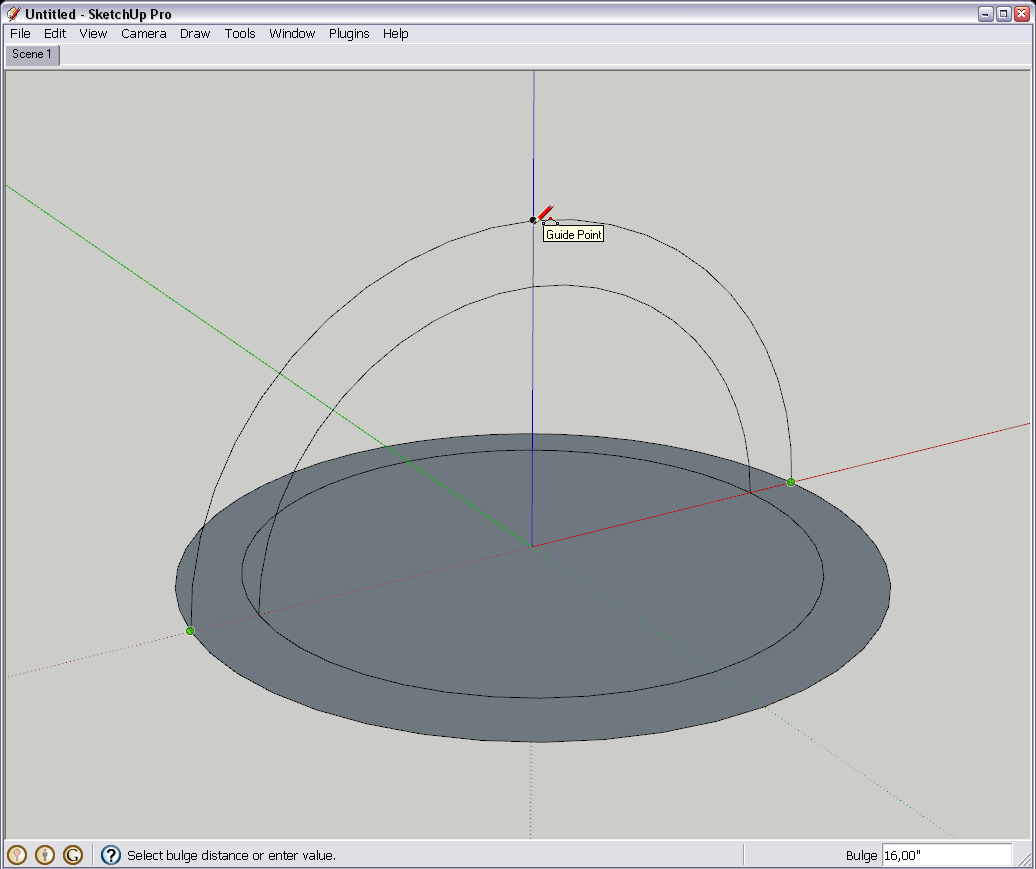
Finally with the line tool, close the face between the two arcs. This face is what we are going to use for the follow me tool in the next step.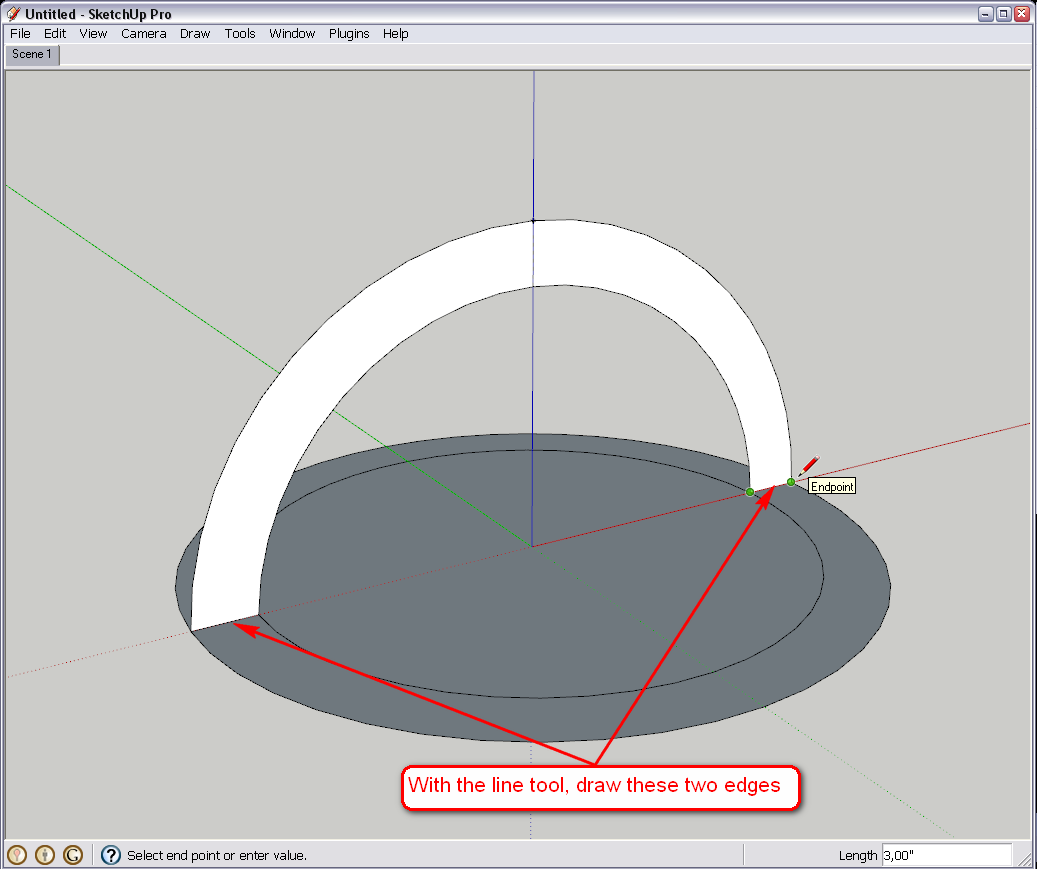
Okay, now I also attach the skippy so that you can check if you did everything fine.
-
Incredible. It's so easy when you see it done and obviously guided from a pro like yourself.
ThanksBefore we continue, there are some modifications. The dome has some additions. The initial thickness of 3 Inches will stay but there is a further 4 Inches that needs to be added but shown as a different colour. Another 1 Inch will be added ontop of the now 7 Inches. I'm still contemplating on adding further to that but I'm sure once I have the know how of how to pile additional inches, I can do the further additions.
Secondly, this dome will be sitting on a platform with its own dimensions. Do you need those dimensions now, or can we leave that for further in the lesson. The platform also comprises of thicknesses which I'd like to show.
Let's continue, Sir.
-
Hm. I don't really understand the modifications again. Where would the further 4 inches go? Adding it to the 3 (so altogether 7) or would there be a dome with double shell? Or adding totally up like below?

")
See the state of the two models below.
If this is what you want, the way to modify is almost exactly the same as we have been advancing so far (with the exception that the top arc is now an exact half circle so it is even easier).
Hello! It looks like you're interested in this conversation, but you don't have an account yet.
Getting fed up of having to scroll through the same posts each visit? When you register for an account, you'll always come back to exactly where you were before, and choose to be notified of new replies (either via email, or push notification). You'll also be able to save bookmarks and upvote posts to show your appreciation to other community members.
With your input, this post could be even better 💗
Register Login


Advertisement