Toy Truck
-
I decided to learn SU in order to model things for wooden toys. I'm not a craftsman when it comes to woodworking, but it's mostly a passion to enjoy the process and the beauty of the wood. That I can make something that I enjoy or others enjoy is simply gravy!

A while ago I posted questions in the newbie forum about my tire design and a component issue with the cab of the truck. I thought I would show you all the fruits of my SU labour. My plan is to use SU to design and build all kinds of wooden toys. I also have a WWI airplane in the works, a German Albatros DI to be specific.
Thanks for all of your help.

 -
Those will leave sawdust on the pavement!
-
Craig, those are good, now take 10 seconds to run fredo6's Round Corner on them to make them great, just like the photo
-
@d12dozr said:
Craig, those are good, now take 10 seconds to run fredo6's Round Corner on them to make them great, just like the photo
I have Fredo's plugins, but haven't quite figured them out yet. I will give it a shot! Thanks for the idea.
-
Nice. How are you cutting the grooves? I assume you are doing it prior to gluing the halves? Do you have a method for indexing the wheel as you move to the next cut? How do you register the halves when you glue them together.
-
@dave r said:
Nice. How are you cutting the grooves? I assume you are doing it prior to gluing the halves? Do you have a method for indexing the wheel as you move to the next cut? How do you register the halves when you glue them together.
Dave,
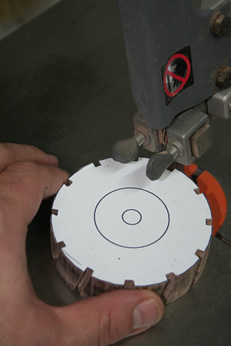
The way I cut the grooves is with my band saw, but you could use a table saw. I tilt the band saw table to 15° for the cuts. Doing the cuts on a table saw would require a simple jig.The way I index the location of the cuts is by printing out a 2D view directly from SU. I use a temporary spray adhesive and glue the "pattern" onto the wood. In this instance, I printed out eight copies of the tire for eight pieces of wood. Because I have this consistency, and am not worrying about errors introduced by tracing a design, so the grooves line up really well. I clean up the treads with a small flat hand file and sandpaper. The bevel on the outer edge of the tread is done with my sanding station where I tilt the bed on the vertical disk and simply sand them down. I drill out the holes as needed and then glue the parts together.
-
Thanks for the explanation. They do turn out quite nicely. I like the idea of using the bandsaw instead of tablesaw. I think it's safer that way. It does seem like one of those things Matthias Wandel would find a way to automate, don't you think.
-
Here's a couple of photos I took to document the process.
Band sawing the tread grooves:
(Don't worry, the saw was turned off!)
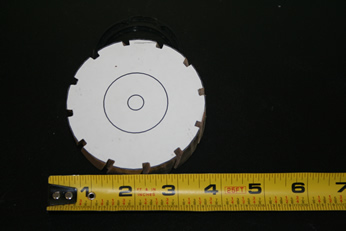
[attachment=1:1uyou4mh]<!-- ia1 -->Band%20sawing%20the%20wheel.jpg<!-- ia1 -->[/attachment:1uyou4mh]Finished cutting the grooves. View showing the 2D pattern created in SU:
[attachment=0:1uyou4mh]<!-- ia0 -->Finished%20band%20sawing%20-%20shows%20glued-on%20pattern.jpg<!-- ia0 -->[/attachment:1uyou4mh]
-
Excellent!
-
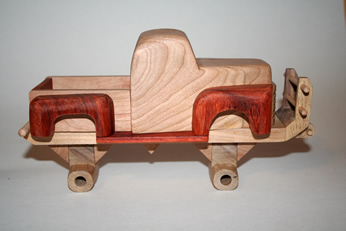
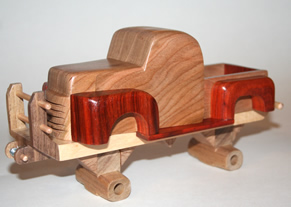
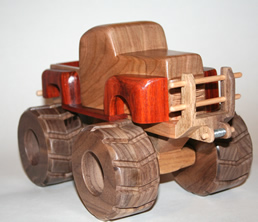
Thought I would post a few more pictures of my monster truck project. I used a book by Les Neufeld as inspiration and I adapted the plan from there. I created all of the parts in Sketchup in full 3D, and printed 2D views of parts to use as cutting and drilling patterns.
The woods used are:
Cherry for the cab and box of the truck.
Bloodwood for the fenders and tailgate.
Black walnut for the wheels and bush bumper, as well as the axle housings.
Maple dowels for the bars on the bush bumper and the winch, as well as the rear bumper and driveshaft axles, as well as for the wheel axles.
Aspen for the frame on which the truck body sits.
Hello! It looks like you're interested in this conversation, but you don't have an account yet.
Getting fed up of having to scroll through the same posts each visit? When you register for an account, you'll always come back to exactly where you were before, and choose to be notified of new replies (either via email, or push notification). You'll also be able to save bookmarks and upvote posts to show your appreciation to other community members.
With your input, this post could be even better 💗
Register Login


Advertisement