Maxwell Rendering
-
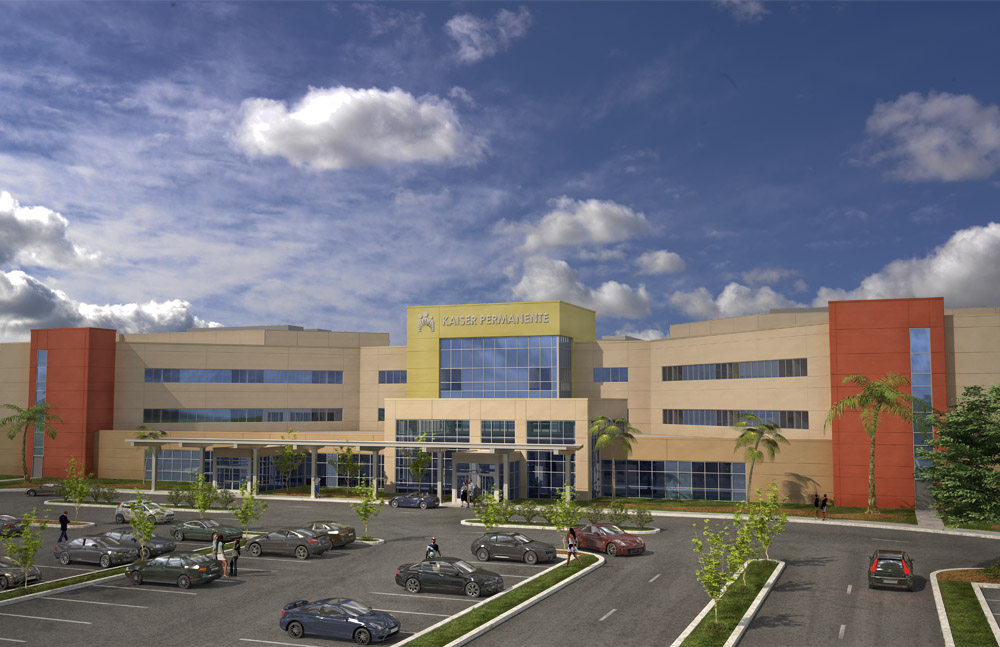
Here's the latest. Feel free to comment...
-Brodie
-
I cant see the pic, i think it might be at a restricted domain.
-
Uploaded it directly. Should be gravy now.
-Brodie
-
wow brodie, what a great work, very nice material and ilu, but i think the sky should be a little more desaturated and brighter, any way i like this render very much, congrats!!
btw do you have a bigger resulution of the image, that would be nice..
-
agree with teofas...sky is maybe too dark... seems much darker than the building...so its getting lost...that, and the cars seem too glossy and kind of look washed out and dont match the feel of the rest of the scene....looking great though.
-
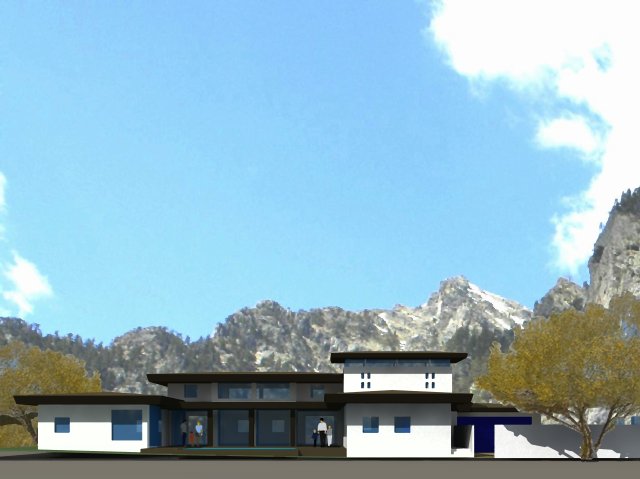
Hi Brodie, Nice model. I like the feeling of parking lot pavement's texture. I too would keep the sky (and other background elements) just above the building fairly light, then shade to darker if there is enough room on the image for the sky above. Also consider reducing the contrast of the sky's elements (and slightly blur the image) in order to give the background the sense of atmospheric distance.
The attached image is my example of (preprocessed) sky background. The trade off is that sky is a little flat, but it doesn't distract from the building. The building is rendered with lots of strong shadows to create contrast, making the flat perspective look 3d. As you can see, I never got around to completing the foreground, bumping the walls, or post processing the image.
-
I really like it, good work Brodie!
-
Thanks for the comments guys. You all picked up on the things I was disappointed with as well. It's good to hear some conformation, as sometimes I'm not sure if I'm being picky or not.
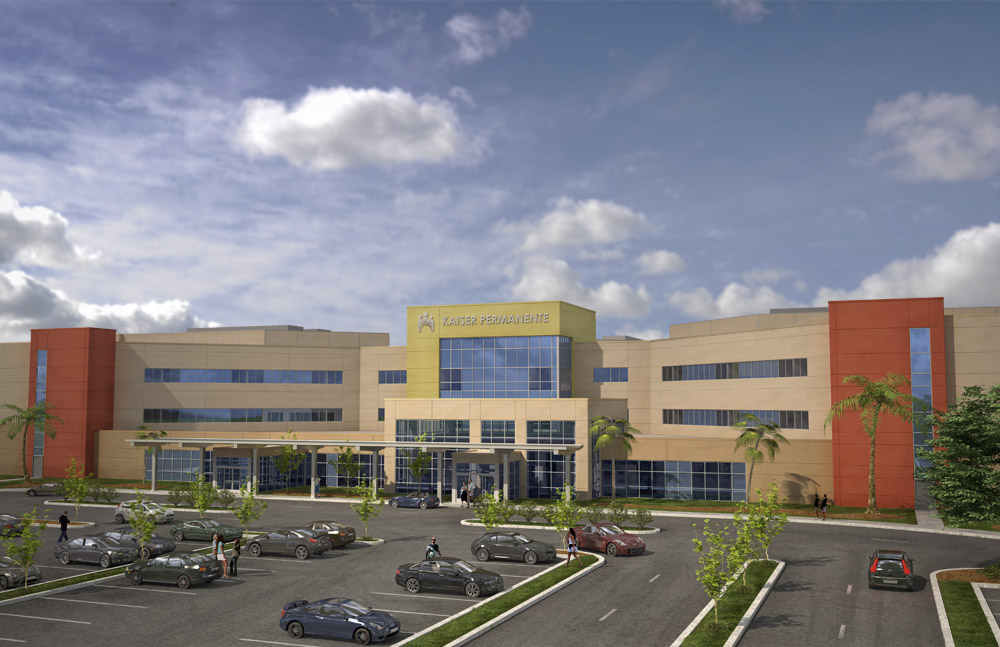
Lightening the sky up was actually one of the last things I did. After printing it out and looking at it in a different medium it was easier to see just how dark the sky was. But sometimes I have the tendency to be too subtle with my adjustments and it sounds like I didn't go far enough. Tell me what you think of the image below, if I got it better.
You're right about the cars too, they aren't quite right. It's a dilemma I'm working on. I started with Maxwell's standard car paint materials but they're so bright that it's distracting. Then I found that Richard had made some car paint materials especially for Arch-Viz so they don't stand out so much. That helped me a lot with the colors but then they were too flat. I went and adjusted the materials to make them more reflective but it's still not quite right. It doesn't help that those are low poly cars too so the reflections aren't very smooth. That's sort of a work in progress. If anyone has some suggestions on that I'm all ears.
Here's a link to the full res version https://dl.getdropbox.com/u/384281/2009-04-29%20Harbor%20City%20full%20%281%29.jpg
-Brodie
-
since the cars arent the focus, i always just use a simple glossy plastic.... even just the preset plastic you get in the maxwell menu within sketchup... gets the job done...
-
Thanks for the tip marked, do you have an example you could post so I can see how that turns out?
Thanks,
-Brodie
-
Little adjustments produce big improvement. Don't you wish all this stuff could be done real time?
-
Nice work Brodie!!!
Mate was the sky a HDRI in the render or did you add it later? I posted a fairly lengthy post on the PPB yesterday regarding cutting in a new sky and getting it right.
For me the sky is a little deep for the camera angle if that makes sense? meaning it feels it needs to be transformed by squeezing its height!
Glad to hear the cars paints I did gave some help, though wasn't aware they were too flat, though I haven't done a lot of testing with them, just wanted something that cleaned faster than the MR distributed ones.
-
Richard,
Thanks for the comments. The background is...sort of an HDRI. I got a set from Dosch that has like 8 HDRI's each with about 30 backplate images to use as backgrounds. I still haven't quite figured out how to properly map an HDRI in maxwell. If I scale it 1x1 it seems WAY to big. I end up having to scale it like 4x4 or even 8x8 for it to look right in my preview. Of course then I have to worry about the 8 suns I have around my image and reflections and such. How do you scale your HDRI's?
I know you've been working hard to get a decent workflow with HDRI's and maxwell. I'll take a look at that post, got a link? Let's just hope that version 2 makes all that effort worthless somehow
 I'm crossing my fingers for a cool real-time preview option like the new 3ds Max has.
I was thrilled to find your car paints as I've been struggling with those for awhile. It may have been my scene but they just didn't come out right. I really like the color scheme you came up with though. I'm going to try the shiny plastic materials using a variety of your colors on the project i'm working on now.
-Brodie
-
Here is a bit of the post!
If you want best results with sky replacement later in post processing using alpha allows you to get a better result as you don't get pixel blending at the inference of your sky and roof silhouette. However I rarely do render with alpha as I find it a little hit and miss with lighting otherwise and the maxwell sky give you a good guide or reference when adding a new sky to match the colour and lighting intensity. I will normally blend my new sky with the maxwell one to get the sky close to best. However if your scene contains trees then rendering with alpha is almost a must if the sky is to be replaced.
A few tricks I found to cut in you new sky is to always render with material ID enabled. This is also great for any material editing later as you don't need to spend as much time initially getting material colours correct. When in post pro in PS the material ID image allows you to use the magic wand to select the sky.
- Open the render in PS, duplicate background layer,
- Open the material ID in PS, shift drag to the render file (shift locates it to the correct location),
- Select the sky on the material ID layer using the magic wand,
- Expand the selection by one pixel,
- Switch to the duplicate render layer and hit delete to delete the sky,
- Expand the selection again 1 or 2 pixels and apply a subtle gaisson blur to soften the hard edge of the silhouette,
- Drag in new sky and place/scale behind the duplicate render layer and blend this layer as required with the maxwell sky from the original maxwell sky (background layer).
-
Dont worry mate I've been having the same issues with HDRI location and actually posted to the MR wish list a solution I'd like to see incorporated. Modo also does real time lighting from HDRI so the results from the illumination channel can be quickly tested.
I've been playing with a work around for correctly positioning the HDRI for the illumination channel, though haven't get it finished yet! Check it out it may give you some ideas, or you may see ways to contribute! Oh hang on you posted to it - duh!
Mate as the last post I always add my skys in later, there are a ton of sky images out there, infact any photo with plenty of sky will work.
Using plastic for car paints can look a bit unrealistic unless you are going for more primary colours that aren't so suited for arch work - the grey, silver, brown inert tones one wants for arch vis are generally metallic and therefore need a coating in the BSDF. Metallics do tend to look a bit flat as the sheen spreads and disperses the light more!
I one day should get back to this project - I can still see a great need for them for Maxwell and any other app they might work with - any that can take weight maps!


Hello! It looks like you're interested in this conversation, but you don't have an account yet.
Getting fed up of having to scroll through the same posts each visit? When you register for an account, you'll always come back to exactly where you were before, and choose to be notified of new replies (either via email, or push notification). You'll also be able to save bookmarks and upvote posts to show your appreciation to other community members.
With your input, this post could be even better 💗
Register Login


Advertisement