Assembly Animation -- a New Functionality of SU Animate 2.0
-
Assembly Animation -- a New Functionality of SU Animate 2.0
---by Paul Pai
SU Animate is a software product made by Cadalog, in a format of Ruby .RBS files, as a plug-in for SketchUp 6 Pro. SU Animate version 1.0 came out just less than two years ago, while the current public version is 1.1.1. The 1.0 version only supports SketchUp Pro, but up from version 1.1.1, SU Animate works with the free version of SketchUp.
Using SU Animate 2.0, we can easily create assembly animations, which is a neat tool for industrial product presentations. Installation procedure can be demonstrated with ease, to avoid complicated literal explanations.
Such animations can also be utilized in architecture design or interior design, to grant the user a better grip on his works.
This new functionality of SU Animate 2.0 is based on a new feature in this version -- the "delay" option. So what exactly is this "delay"?
Let us think of the basics of animation: we set up paths and assign them to objects, then these objects will move along the paths.
In the default setting, all the objects will start moving at the same moment. However, in an assembly animation, we often want the components to start moving one by one in a specific order, so we need to assign different starting times at which the objects begin their movements. This time offset is what the delay option does.
SketchUp论坛(http://www.SketchUpBBS.com)下载- FAN-PodiumE.jpg (165.33 KB)
2008-6-18 15:21
(Rendered by Podium)
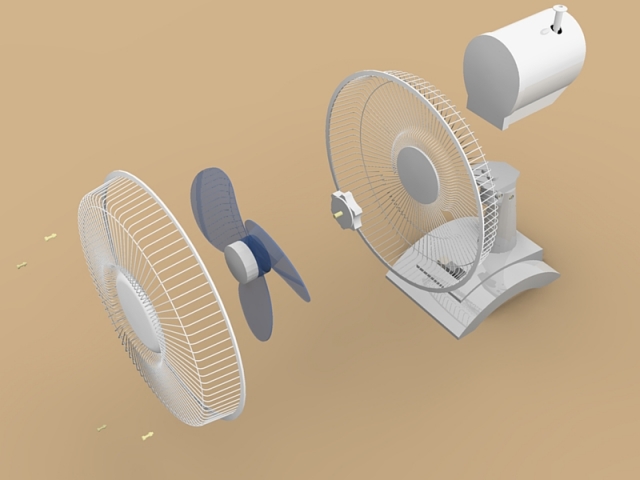
Now let us give a try to this new feature, to create an assembly animation from a given table fan model. I borrowed this fan model with some U credits on the trading board of SketchUpBBS forum.
I especially appreciate the author of this fan model, for he already grouped up the major components for my convenience. I really saved a lot of time from this work.
⑴ Note that in SU Animate we can only move objects in named groups, so I named the 7 groups as the following: ①Rear, ②Screw, ③Fan, ④Front, ⑤Pin, ⑥Motor, ⑦Base.
I also put the groups on 7 different layers, which is not necessary, but helpful when I tested the result.
⑵ Next, I created 6 new layers for paths, named as Path0 - Path5, so each of them could contain a movement path for of one object group (except the ⑦Base group, which doesn't move in the animation). Having 6 layers is not necessary either, just for an easier testing.
We can always put all the paths on a single layer. But make sure to put objects and paths on separated layers, because we want to set all the layers containing paths invisible before creating the scene, so the paths are hidden in the animation.
⑶ In this step, I tried to figure out how to assemble the fan, by disassembling it.
To be precise, first I moved away the ⑤Pin group from the others, along the green axis toward the front, for 1000mm. I started with this group because it is the last piece in the assembling process.
Then following the same logic, I moved away the 4 groups ④Front, ③Fan, ②Screw, ①Rear respectively, in the order of ④③②①. I left a 200mm distance between those groups, so the initial state of the fan assembling can be clearly shown in the animation. Last, I moved away the ⑥Motor group upward for 200mm.
Thus I had completely disassembled the fan.
SketchUp论坛(http://www.SketchUpBBS.com)下载- SUMA-Menu0E.jpg (528.72 KB)
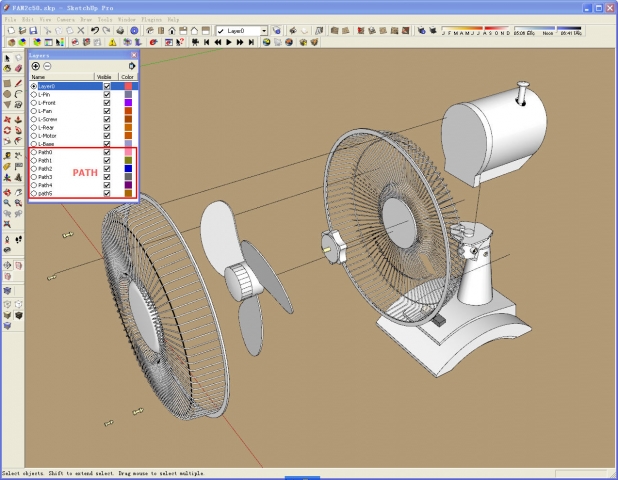
2008-6-18 15:21
⑷ Now the real works began: setting up paths which lead the object groups back to their position.
I started with the ⑤Pin group: on the Path5 layer, I drew a 1000mm straight line, starting from a corner of one of the pins, parallel to the green axis, ending at the original position of the pin.
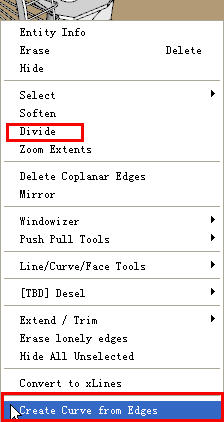
I used the divide command to cut this line into 50 segments, selected them all, and from the right-click menu, chose the command "create curve from edges". This is the first command from SU Animate we have seen so far. Now the segments were combined into a curve.
Note that we don't necessarily create the "curve" from a straight line -- it can be a literally crooked curve.
SketchUp论坛(http://www.SketchUpBBS.com)下载- SUMA-Menu1E.jpg (23.33 KB)
2008-6-18 15:21
If we right-click on this curve, we will see three commands on the menu: "reverse curve direction", "assign attributes", and "delete attributes".Yes, the curve had a direction, which was determined by the its drawn direction, and it determined the direction of object movement in the animation.
Precisely speaking, since I drew the path from 1000mm in front of the fan to the body of the fan, in the animation the objects would move into the fan.
If we happen to draw the curve in the other way wrong, we can always use the "reverse curve direction" command to toggle its direction.
SketchUp论坛(http://www.SketchUpBBS.com)下载- SUAM-Menu2E.jpg (89.12 KB)
2008-6-18 15:21
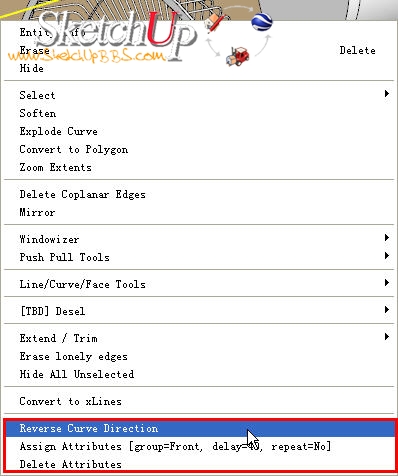
Next, I wanted to associate this path with the object group ⑤Pin.
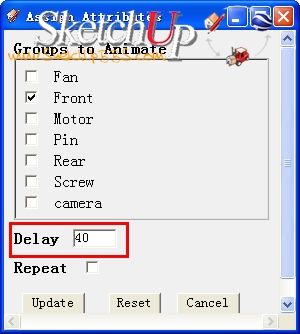
I clicked on the "assign attributes" command, and an attribute setting window showed up, listing out the 7 named groups, so I chose the ⑤Pin group.
I left the repeat value blank as default, as I wanted it just run once. The unit of delay value is frame. I set it 50, so in the animation the pins of the ⑤Pin group would move 50 frames later.
I clicked on the "Update" button to save the changes I had made, then I repeated this process to create the paths for other groups and to set their attributes.
Here is a summary of group-path association and attribute values:
Group: Pin, Path layer: Path5, Path length: 1000mm, Delay:50
Group: Front, Path layer: Path4, Path length: 800mm, Delay: 40
Group: Fan, Path layer: Path3, Path length: 600mm, Delay: 30
Group: Screw, Path layer: Path2, Path length: 400mm, Delay: 20
Group: Rear, Path layer: Path1, Path length:200mm, Delay: 10
Group: Motor, Path Layer: Path0, Path length: 200mm, Delay: 0
Since the ⑦Base group is stationary in the animation, we don't need to make a path and set attributes for it.
SketchUp论坛(http://www.SketchUpBBS.com)下载- SUAM-Menu3E.jpg (56.35 KB)
2008-6-18 15:21
⑸ Now I had assigned the object groups for the 6 paths, and had set their attributes, and the next step was to make them move.
Before building the animation, I remembered to set the layers containing paths invisible, so we wouldn't see the paths, which would spoil the magic, in the animation.
To build the animation using SU Animate, there are two command in the menu of Plugins > SU Animate! we can use: "Make Scenes" and "Make Batch Files".
Let's talk about the first one. "Makes Scene" is the old trick inherited from 1.0, which simply computes total number of frames required based on paths and delay values, creates the same number of layers, and builds a scene on each layer (corresponding to each frame).
When it plays, with all but one scene hidden (layer set as invisible), the scenes are shown one by one in the order, so effectively we see a continuous animation, as long as the time interval between frames is small enough, say, 1/15 second -- the persistence of human vision.
Of course, to determine appropriate number and density of scenes really depends on experience and trials. If we make the distance of some objects from consecutive scenes too large, we get a jumpy movement. However, if we make the distance too short, we will end up with hundreds of scenes, which is a big overhead for SketchUp that you don't want to see.
Let's do some quantitative thinking. If we determine the number of frames based on a 25fps standard, it means 100 frames can merely hold 4 seconds. This animation will be halfway gone if your audience has a sneeze; if he even crouches his head to light a cigarette, the next frame he sees is the last frame!
Anyhow, this time I will build this animation from SU Animate.
However, I didn't use the "Make Scene" command, but the "Make Batch Files" command instead, to output a sequence of .skp files. This takes more time, but gives a better flexibility.
I clicked on the "Make Batch Files" command on the menu, and a dialog box popped out, which said SU Animate wanted to build 76 frames based on its calculation. I decided to keep this number, because I knew it would just duplicate the last frame if I had raised the number, and I wasn't sure what would happened if I had lowered it. So I clicked on "OK" to continue, then there was a file browsing window. I created and entered a new folder and gave a file name "FAN.skp".
Note that we don't want to omit the ".skp" extension; otherwise SU Animate will save them with extension-less file names.
Now I clicked on "OK" again, and SU Animate started to output the .skp file, frame by frame. I opened the folder, then I saw exactly 76 .skp model files, from "FAN.001.skp" to "FAN.076.skp".
⑹ The continuing work is kinda complicated. I opened these .skp files in SketchUp one by one, and outputted a 800x600 jpeg image for each one.
Direct output of .skp files has some benefits. For example, I could even render each model (like using Podium), and compose the animation from the rendered images. But I guessed I wasn't crazy enough to do this. Damn, that's 76 models in a row! So I outputted the images from SketchUp directly, and got these 76 jpeg images.
One more thing to mention: in general, we would like to duplicate the first frame at the beginning and last frame at the end, for about 1/2 second each, which is around 10 frames each. This is to avoid a sudden movement at the start and a sudden end that confuses our audience.
Therefore when I outputted the images, I named them from FAN0011.jpg to FAN0086.jpg, and added the duplicates, FAN0001-FAN0010 and FAN0087-FAN0096. Mind that there was an offset between the model numbers and image numbers, so I had to pay more attention to stay clear.
⑺ Now I had a pretty sequence of jpeg image files, then on a second thought, I decided to make it disassembled after assembling, for a better visualization and amusement. Thus I duplicated the images in the reversed order, and appended them to the sequence.
To be honest, this easy yet tedious, so I actually did the work while watching a TV series -- it took me just less than one episode to complete.
With these 220 jpeg files at hand, I could make an animation of 8 seconds, at a 25fps rate, which is good enough.
I opened Premiere Pro, created a new Proproj file, with the setting of 25fps rate and Cinepak compression method.
I chose FAN0001.jpg from the folder, with "Numbered Stills" checked, and clicked on "Open(O)". Now the 220 images were loaded and composed into a movie clip. I dragged it onto the Timeline to play the preview, which seemed to be fine.
So I outputted the AVI video clip; it was 12Mb for 8 seconds under 800x600 resolution. Fair enough.
The very last step was to convert it into Flash format through Camtasia Studio, so I could put it online. Although it's still pretty big as a flash, it's easier to view anyway.
I have appended this video in the end of this post, to give everyone a glance what SU Animate 2.0 can bring us.
Ok, one last thing: I started to write this post as a testing report, but it seems like a tutorial now.
Anyway, no matter what, I am very glad to have the chance to demonstrate the new feature of SU Animate 2.0, and give an idea of how we can utilize it in our work.
Thanks to all the developers of this software!
SU Animate 2.0的组装动画功能
SU Animate是Cadalog公司的产品,从1.0版上市迄今尚不到两年,目前的版本是1.1.1版。
SU Animate是应用Ruby程式语言写成的,编译成.RBS格式,以插件方式内挂在SketchUP 6 Pro里面执行。1.0版只支持SketchUp Pro版,从1.1.1版以后则可以支持SU的免费版。
藉由SU Animate 2.0可以产生所谓“组装动画”,对于工业设计的产品发布特别有利。在组装动画的演示下,设计产品的零组件安装顺序和安装位置都能清晰的表达,避免冗长的文字说明或词不达意的问题。当然组装动画也可以应用在建筑设计和室内设计以及其他的设计领域里,必然或不必然都在使用者的方寸之间。
其实做组装动画只是SU Animate 2.0的新功能之一,运用的是这一版新加入的一个“Delay”(迟延起动)设置项。何谓迟延起动?动画的本质是,我们为动画设置路径,把路径指派给特定物件,让物件沿着路径移动。当场景里只有一条路径的时候,没有物件迟延起动的需要。可是应用在组装零组件的动画上,各个零组件在组装过程中有先后的顺序性,也有组装过程中的时间差。因此我们需要各个组件开始移动的时间不一样,这个“Delay”就是用于对各个零组件按照需要的顺序设置不同的起动时间。
现在我开始测试SU Animate 2.0的Delay(迟延起动)的新功能,我的目标是一台桌上型电扇的安装过程。在SketchUpBBS论坛上模型交换区花了点U币借用一个电扇模型。在这里特别要向这个电扇模型的原作者致谢,他很好心的已经把电扇的组装元件,包括①后罩、②轴箍、③扇叶、④前罩、⑤螺丝、⑥马达以及⑦底座都设置好Group(群组),为我节省了不少构建群组的时间。
⑴由于SU Animate移动的物件必须是已经命名的Group,所以我把上述组装元件这些群组物件分别给它们命名为:①Rear, ②Screw, ③Fan, ④Front, ⑤Pin, ⑥Motor, ⑦Base。我把这7个群组物件分别放在不同的图层上,这并不是必要的步骤,只是在测试软体时能开关图层显示比较方便而已。
⑵接下来我着手新建了6个给Path(移动路径)用的Layer(图层)分别给它们命名为Path0~Path5,准备每个图层上放置一个群组物件的移动路径。这也不是必要的作法,其实只要一个专门放置路径的图层就行了,在写成Scene之前把这个路径图层关闭,免得以后在动画里看到路径那几条线。
⑶第三个步骤开始做整理电扇模型的工作,既然要演示电扇的组装过程,当然要先把电扇拆解开来,把各部份零组件排列好,别人才看得清楚安装的顺序,对吧?我动手把上述电扇的各块组件按照⑤④③②①的顺序沿着座标绿轴向前方移出来,“⑤Pin”外移1000mm最远,“①Rear”外移200mm最近。各个组件之间间隔200mm,如此可以清楚的看到每块组件还没有组合成电扇的样子。又把“⑥Motor”也向上方移动200mm,这就完成了把这部电扇大卸八块的手续。
⑷正式开始工作是建立移动路径,好让这些被移出来的电扇组件能沿着路径回到原位。我从最远的螺丝开始,切换到Path5图层,从螺丝的一个角落沿着绿轴画一条长度1000mm的线,运用Divide命令把这条线分割为50个Segments(段落),全选线段以后在右键功能表上选取一个 “Create Curve from Edges”命令,这是第一个出现的SU Animate操作命令。这条线就被结合成所谓Curve( “曲线”)的Path,为什麽叫做Curve?因为路径不一定是条直线,也可以是条七扭八拐的曲线。把滑鼠游标放在这条路径上按右键,这时右键功能表上的命令变成了三个,“Revese Curve Direction”,“Assign Attribuates”,“Delete Attributes”。
第一个“Revese Curve Direction”的意思是“倒转曲线的方向”,什麽时候会要倒转曲线方向?刚才我画这条路径的时候是从外面的螺丝位置画向电扇的位置,不错,曲线的起始方向是从画线的起始点决定的,同时也决定的物件沿着路径移动的方向。如果画反了,可以运用这个命令把沿路径的方向反过来。
我要使用的是第二个命令“Assign Attribuates”(赋予属性),把路径指派给某个已经命名的Group物件,要它沿着这条路径移动。在此同时我可以给它设置Delay(迟延起动)和Repeat(重复动作)属性。选择“Assign Attribuates”,马上出现了SU Animate的属性设置视窗,在面板上列示着6个已经命名的Group,我把这条路径指派给Pin,这次我做的是组装动画,Repeat就保持它的内定值。我要设定的是Delay,Delay的单位是Frame(影格数),我让这个螺丝迟延50个Frame才开始动作,所以给它“50”的数目。设置好Pin的动作,点击“Update”关闭这个属性设置视窗。
重复上面的步骤,分别画出各个电扇组件的移动路径,以及设置它们的移动属性参数,设定的结果如下:
Group: Pin, Path layer: Path5, Path length: 1000mm, Delay:50,
Group: Front, Path layer: Path4, Path length: 800mm, Delay: 40,
Group: Fan, Path layer: Path3, Path length: 600mm, Delay: 30,
Group: Screw, Path layer: Path2, Path length: 400mm, Delay: 20,
Group: Rear, Path layer: Path1, Path length:200mm, Delay: 10,
Group: Motor, Path Layer: Path0, Path length: 200mm, Delay: 0,
电扇底座是不动的,所以没有给它设置路径和属性。
⑸现在我已经给这6条移动路径都指派了物件,也设置了移动的属性参数,接下来的工作就是要让它们动起来。在叫它们移动之前,我没忘记先把那些放置路径的layer(图层)关起来(Invisible),免得动画场景里面出现那几条路径的线条杀风景。
要从SU Animate建立动画,在下拉功能表Plugins > SU Animate!的里面有两个命令我可以选择,一个是“Make Scenes”(制成场景页面),另一个是“Make Batch Files”(输出循序文件)。先说说第一个,“Make Scenes”是从1.0版延续下来的老东西,它先在各组路径和Delay组合中挑出最长的,算出Frame(影格)数目,建立相同数目的Layer,把要移动的物件沿着路径循序复制在路径节点位置上,若设定了Delay格数,它就越过设定的格数再开始复制。跟着建立跟影格数相同的Scenes(场景页面),每个Scene对应一个Frame,并且只有一个相关的Layer是开启的,其他一大票Layer都关着。因此只要这些Frame的间隔时间在1/15秒视觉占留以内,在这些Layer开开关关之间,就能得到动画的视觉效果。
当然,在路径上物件每次移动的距离多长以及节点数多少比较适当,这是得靠经验和试验磨出来的,每次移动的距离设得太大,动画中物件好像兔爷一样蹦着走。每次移动距离设得太小,写出的Scene又太多,几百个页面对SU也不是好玩的。要是依循着插件开发者的思路,直接写出Frame(影格)的话,我们以25fps(每秒25影格)的速度数出动画,100个Frame只能撑4秒钟,播放动画时,如果看的人不小心打个喷嚏,动画已经播了一半。要是哪个人低头点支香烟,再抬头时动画已经播完了。怎麽去玩转SU Animate,请看我在论坛上的相关帖子。无论如何,这次我还是跟着软体开发者的思路做这段组装动画。
这一次我不使用上述“Make Scenes”方式制作。我要使用的是第二个方法“Make Batch Files”,直接输出循序的SKP文件,虽然过程比较麻烦,可是可以得到最大的使用弹性。点选功能表上的“Make Batch Files”以后,首先弹出一个交谈框,SU Animate告诉我已经算出要建立76个Frame,我没改这个数字,因为即使增加数目,也只会在把最后那个Frame复制增加,改少了我不知道会发生什麽事。就按“OK”同意它的内定值吧。接着出现的是一个文件储存选择视窗,在上面建立一个新的文件夹,给个文件名字“FAN.skp”,要注意的是一定得加上.skp的延伸文件名,否则SU Animate会存成没有尾巴的文件名字。当我按下“OK”以后,SU Animate开始根据每个Frame输出skp文件。弄好了我后我检查一下,那个文件夹里从FAN.001.skp到FAN.076.skp总共有76个连号的skp模型文件,一个也不少。
⑹继续的工作是比较繁复的,把这些skp文件逐个载入SU,逐个输出解析度800X600的JPG影像文件,按照编号给它文件名称。使用直接输出skp模型文件有个好处,据说我有个机会可以把它们逐个进行渲染(例如Podium),使用渲染后的影像合成动画。不过今天我的精神还算正常,要连续渲染76个影像,哇靠。我还是老实点直接从SU输出影像就好,所以不一会儿我就拥有了76个连号的JPG影像文件。
我还得注意一件事,通常我们制作动画,习惯上会复制动画头尾的影格,长度差不多1/2秒左右,换算成Frame大约是10 Frame。作用是让看动画的人在一开始播放时能看清楚起始的场景,以及动画结束时的场景,不会让人看了感觉没头没尾的。因此我从SU写出一张张影像时就得从FAN0011.jpg开始编号,由于此时模型文件的流水号跟输出影像流水号不一致,这得仔细的做以免弄错了那就会特“郁闷”。
⑺手头上终于有了一串连号的JPG影像文件,不觉胆气一壮。心想如果把这个组装动画弄成先组合再分解,给人看了视觉效果可能更好些。于是开始把这些影像文件复制一份,按照相反的顺序更名,接续着原来的流水号码,把它们接在原来那些文件后面。别说这种事情好像很烦,可是由于不花什麽脑筋,一边看电视连续剧一边做,演不到一集居然也弄好了。现在我手头上有了220个JPG影像文件,以25fps计算,可以撑到8秒钟,够用了。
⑻启动Premiere Pro,开一个新的Proproj文件,设定好25fps速率、Cinepak压缩码。从那个文件夹里点选FAN0001.jpg,勾选了“Numbered Stills”(连号静态影像),按下“打开(O)”。一下子220个影像都被载入并且自动合成了Clip,把它拖拉到Timeline(工作列)上,从预览视窗Play一次没问题,就不再恋战直接输出AVI影片。看看解析度800X600的影片8秒钟有12Mb,还好。最后一步则是把它载入Camtasia Studio转换成能在网路上播放的Flash文件,虽然640X480的Flash文件还是那麽大,不过总算是解决了播放的问题,所以我现在可以把刚刚做出来的组装动画贴在后面,给大家看看SU Animate 2.0的新功能。
再灌一点水,写完了回头看一遍,发现一个问题。明明我要写的是关于SU Animate 2.0组装动画功能的测试报告,现在看看好像写成了教程。没关系,报告也好教程也罢,重要的是能够帮助各位朋友清楚明瞭SU Animate 2.0的功能,知道它能在我们的工作中扮演的积极角色。最后,我要感谢这个软件的开发者们辛苦的劳动成果。
-
Thank you for the tutorial, It is great to know there is a SU solution to this type of animation.
Is there any place I can get to see the completed animation? -
The SU exchange cannot leave China.
[flash]http://www.sketchupbbs.com/temp/FAN.swf[/flash] -
[flash=438,387:yebsoee4]http://union.bokecc.com/flash/player.swf?videoID=68398_3577307&autoStart=false[/flash:yebsoee4]
-
SU Animate 2.0 is an animation plug-in for SketchUp Pro 6 Windows and Mac. This simple application works inside SketchUp and automatically creates scenes that you can play as an animation in SketchUp or export to an AVI or MOV video file. SU Animate will create "key frame" like animations where SketchUp objects move along a path or walk thru type animations where the camera moves along a path.
We have prepared several Flash based tutorial videos so that you can evaluate the program's functions. Furthermore, there are several SketchUp models that are ready to run. All you need is SU Animate to run them. In addition, there is a 10 day evaluation version that you can try out. Please read and view the video tutorials prior to evaluating it.
Download SU Animate 2.0 Windows Version
http://www.ohyeahcad.com/suanimate/index.php -
-
Thats awesome, thanks for the tips.
I was waiting to see if the fan would spin, is that even possible?
-
Yes, you can rotate the fan. See this crude model which was generated via Animate 2.
-
[flash=380,320:1dn1nfj5]http://www.sketchupbbs.com/temp/FAN-SPIN-2.swf[/flash:1dn1nfj5]
-
Just wondering....How easy to use is the plugin?
[EDIT]: Never mind, I read the explanation again. I think the foreign language signs confused me

-
Thanks for explaining..
-
Spin the Fan Using SU Animate
SU Animate enhances the power of building animations in SketchUp. We can create Path Animations in SU Animate, as well as the built-in functions for Scene Animation in SketchUp. To play the animation in SketchUp, we simply use the command Animation>Play.
But of course, we can also output the scenes as a collection of .skp files, render them, and string them up, to create a high quality movie clip.A Spinning Fan
To make a fan spin, we don't even need the new features from SU Animate 2.0 -- the current version is capable of doing that. It's not a difficult task, so here I will take the fan model from my previous assembly animation tutorial as an example.
First, I group up the fan blades and give it a name, say "FAN".
Then I draw a circle in front of the fan body, to be the movement path of the blades. Note that the center of this circle has to be align with the center of the blades, and also mind its direction, as a fan always spins clockwise.
Next, I divide the circle into 6 segments, use the command from SU Animate to create a path from them, and assign it to the group FAN.
Last, I use the command from SU Animate to build up 7 scenes, and it is done.
To play this animation, we first go into View > Animation > Setting, to set both Scene Delay and Scene Transition as 0, and then click on Animation > Play.
I am attaching the complete .skp file at the bottom, so you can download it give it a try by yourself.How Fan Blades Really Spin
However, that was a bit naive. Anyone ever used a fan knows that when we turn on a fan, rather than moving in a sudden, it will smoothly accelerate from stop. In fact, this phenomenon applies to most mechanical devices, for examples, vehicles.
Since SU Animate does not provide a way to set varying frame rates within an animation, I have to tune the blade spinning speed by building the frames manually.
Since this fan has 3 blades, this time I create a path with 24 segments, and use the "Make Batch Files" command from SU Animate to output the .skp files.
Due to symmetry, the last 16 files are actually redundant, so I use Podium 1.5 to render the first 8 .skp files into 800x600 JPEGs, to be the frames of my animation.
Since the blades are the only moving parts of the fan, these frame are enough to create the entire animation. The logic of spinning speed is simple: the greater angular difference of blade positions in adjacent frames, the faster they spin in the animation; and vice versa.
Hence I create this 9 second long animation using the 8 rendered JPEG images. Thanks to the rendering work, which removed the borderlines of objects (edges) in SketchUp, the image looks actually pretty refined.
This piece of animation has demonstrated a fan spinning at a varying speed, which accelerates from stop, decelerates, and then finally stop.This animation was shown upper, by bianhai
He is so kindness. -
I was wondering if it's possible to combine SU animate and Flight Path (part of presentationbundle2). So one can export an avi file of the camera moving around, while objects move ?
Thank
Jorgensenps. I'm quite new to this animation part

-
-
@jorgensen said:
I was wondering if it's possible to combine SU animate and Flight Path (part of presentationbundle2). So one can export an avi file of the camera moving around, while objects move ?
Thank
Jorgensenps. I'm quite new to this animation part

Someone should make a round up of all the animation plugins around and what they do exactly .
Frankly, I am starting to feel a bit lost... -
3 minutes setup and 8 minutes render using Vue.
[flash=425,344:27pdiy55]http://www.youtube.com/v/4M4aPaDRVXQ[/flash:27pdiy55]
-
Wow - that was a nice one

-
SOLO very good!

-
-
Solo,
Did you make the animation completely in Vue or was it first made with 'animate2' ?
Hello! It looks like you're interested in this conversation, but you don't have an account yet.
Getting fed up of having to scroll through the same posts each visit? When you register for an account, you'll always come back to exactly where you were before, and choose to be notified of new replies (either via email, or push notification). You'll also be able to save bookmarks and upvote posts to show your appreciation to other community members.
With your input, this post could be even better 💗
Register LoginAdvertisement


