My CarterCraft Boat -- (W-I-P)
-
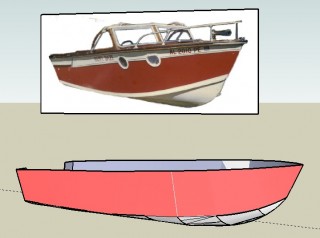
Okay- I'm ashamed to say how much time I've put into this project so far, but here's a start. Just trying to get a mirror image of the half hull drove me nuts!
I can see that my curves are not precise, and when I used smooth- I almost lost the hard chine that is a strong feature on this boat.
I'm prepared to take any C&C or just "get outta here!". Either way, this idea has a very long way to go.
-
-
Thanks Kris...
Sure is a pretty setup you sent!
I realize I was not using a rib-method in my first attempt. One problem is that the plywood construction doesn't use actual ribs. I think I'll need to do some calculations now, and make "working" ribs, to get the lines right.
I tried connecting a series of lines along the "chine-points" on your sample, and ran into problems. Seems the inferences code doesn't know what I'm trying to do.
Could this have something to do with my "lite" version of SU? I wonder if the Pro version has tricks I don't know about.
OH, if only I had better measurenemts! The boat is in a shed many miles from me now.
So I think I'll try a series of panels, one for each mold station, with points for connecting my curves, and see where I can go with that. -
oh... no ribs... is it plank wood construction? or fiberglass?
-
@unknownuser said:
oh... no ribs... is it plank wood construction? or fiberglass?
Neither- It's a common approach around here for plywood hulls- there are a few transverse elements to stiffen the hull, such as seats, bait wells (on fishing skiffs), bunks parts, etc. Under the floorboards are rib-like braces which stiffen the bottom and anchor the flooring. At the stern on the CarterCraft is a stout splashwell box which gives a lot of strength to that part of the hull. More stiffness is provided with longitudal stringers inside the bottom. My boat has at least 4 of these either side of the keel. When I draw these in, I'll be wa-a-y-y down the road in my modeling!
Thanks for the coaching -- I learn from every reply
Reg -
Reg,
A general tip for selective smoothing is to use the eraser tool ("E") and hold down the control key (on a PC, not sure if it's same on a mac) to soften the lines.
Sounded like you lost more definition than you wanted when you attempted to "smooth" some of the lines.
Then, if you have lines that you want to "un-soften", you can turn on hidden geometry (in the view menu) to see all of your contour lines. The softened or hidden lines will show up as different dashed line styles. To unsoften, use the erase tool again, but hold down Ctrl+Shift.
hope this helps.
cool project. looks like you're making progress and learning plenty along the way.

-
Nick, these are great tips... new territory for me.
Thanks a bunch.
Just lately I've made this model a bigger mess than it was! But I learned from it.
Looks like the basic truth about building almost anything definitely applies to this project: Start with a solid foundation, when using guides, they must be accurate. It's much harder to correct errors than to start with accuracy.
Problem is I don't have the precious measurements that would apply here. I have to do like my old grandpa when he built shrimp boats- "trust the trained eye".
Hopefully I'll put a better example on line, thanks to you guys in the forum.@nick w said:
Reg,
A general tip for selective smoothing is to use the eraser tool ("E") and hold down the control key (on a PC, not sure if it's same on a mac) to soften the lines.
Sounded like you lost more definition than you wanted when you attempted to "smooth" some of the lines.
Then, if you have lines that you want to "un-soften", you can turn on hidden geometry (in the view menu) to see all of your contour lines. The softened or hidden lines will show up as different dashed line styles. To unsoften, use the erase tool again, but hold down Ctrl+Shift.
hope this helps.
cool project. looks like you're making progress and learning plenty along the way.
-
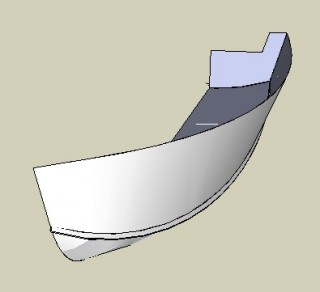
Confession- I had so much trouble trying to develop this model without proper measurement, I began to just hang out on the forums instead of pushing myself. But- Weather got so bad down here, I stayed indoors and made new efforts.
My main accomplishment at this phase is getting the chine molding to almost resemble the real thing. Follow me tool is easy enough, but getting that bezier curve to accurately swing through all 3 axes brought me to my knees!
Also- following Nick's suggestions, the erase tool has some pretty cool tricks built into it.
The slanted transom is another beast that I have barely gained any control of, and looking ahead- I have to learn to put openings thru the hull for the port holes.
So, thanks again to Kris and Nick for the encouragement.
-
Reg,
Do you have 2 sections of the boat laying around? Because these will seriously help you, even 2d orto views will help you out seriously when moddeling something such as this.
One question though are you modelling in SU? Because it looks like you are modelling in Acad or so, your mesh is such a mess.
-
As I can see it looks like he is useing sketchup,mesh looks little bit terrible because some faces inside are still there that should not be so it is not smooth.Removeing them it will look again nice
-
Thanks for concerns ivica and robmoors...
HAHA! I'm so ignorant, I don't even know what Acad is (although I am classified as Acadian)!
I do have a small exposure to Strata3D (can't afford it), Blender (my PC can't handle it), Wings (don't like it).
Oh yeah- almost forgot.. I spent a lot of hours back on 2004-2005 "building" in Second Life. That is a whole 'nuther system!Yeah, just using Sketchup for this model, and I know what a mess I made of the bottom of the boat. Part of my trouble is thinking too much of how the builders bent that plywood, and the other part is that I'm in way over my head. It's all about starting with those critical, unforgiving curves.
@unknownuser said:
Do you have 2 sections of the boat laying around?
Not sure what you mean by sections. Cross-section?
I'm putting a later version here.

HDhalfhull-0-4.skp
I made some progress with the eraser tool, but using transverse panels, maybe I can close up the "leaks".Today I spent a whole lot of time messing with the portholes and the V-berth, just to avoid working with the bottom. I'm planning to put in some ribs to guide me, then rework the bottom using longitudal panels. Maybe I can get the stitching to work better that way.
I like to think that a boat could be modeled in CG faster than in the physical world, but I'm rethinking that.
Help and comments always appreciated.
Some photos and screen grabs here:
http://www.msnusers.com/HDfiles/shoebox.msnw?Page=1
A flakey 3D site I started a long time ago...
http://reg3d.tripod.com/3dpage.htm -
Reg,
Some of the "mess" was due to the top part, the connecting, longitudinal "rib" (or what that is) and the bottom part not being evenly segmented. I mean that from where there are endpoints of the vertical (hidden) lines of the top part, you should go on modelling the bottom part, too - keeping the hull following the segmentation all the way. If you have a closer look, the curves just don't meet.
Now if you are just thinking of adding "guide ribs" for modelling the bottom part, keep this in mind and start those "ribs" from those endpoints of the top part.
Well, I may sound a little "messy" with what I have written down - I hope you see what I was trying to say in my lame way...
(Nice advance though... )
-
looking good Reg...
you may notice some clipping when you try to zoom in... try turning off the perspective view, this will make your view of the model a bit strange, but it will also allow you to zoom in very close, with out clipping.
cross sections are the slices of the boat we talked about earlier, remember the port to starboard slices?
i think it's looking very good... remember they are always messy until they are done...
-
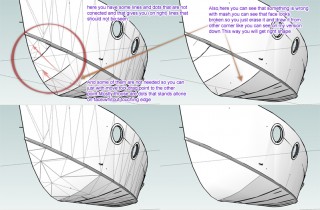
This is just little orientation that could maybe make your boat easier to make.I just wanted to show you how you can make your boat more beautifull.Removeing some dots and lines can make it better and correcting some of the lines as I show you on image

 .NIce boat btw
-
WOW- I want to thank all of you for taking time to help!
Sure gives me a lot to think about (uhuh- a good way to keep me off the forum for a while )Confession: This runabout model is supposed to get me ready for the boat I spent my early years working on as a deckhand for my dad..
Maybe I better hold off on that
-
really it's never the size but the detail... the hull should be very much the same regardless of size...
-
Indeed I am currently writing a small tutorial that will help you with the beat you are currently creating
-
I hope this helps you out a little to clean up your mesh, if you got any questions please do ask them!
-
@krisidious said:
really it's never the size but the detail... the hull should be very much the same regardless of size...
Oh yes! If/when I get that hull done there should be enough detail work to keep me busy for a long time.
BTW- that is/was a 2-inch thick mahogany hull 65 ft long (I don't know if Katrina spared it- it was in Biloxi)

-
robmoors says:
@unknownuser said:
I hope this helps you out a little to clean up your mesh, if you got any questions please do ask them!
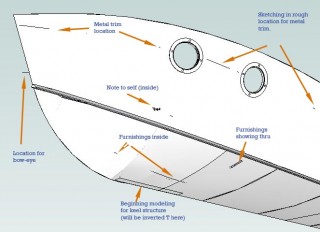
Gracias! That tut will be a great help. However, I feel defensive about some of the "junk" you see in that model.. please see attached.
The eraser is really a serious tool that I had ignored.
It will be interesting to apply your method at the "pointy" end of the boat.
Hello! It looks like you're interested in this conversation, but you don't have an account yet.
Getting fed up of having to scroll through the same posts each visit? When you register for an account, you'll always come back to exactly where you were before, and choose to be notified of new replies (either via email, or push notification). You'll also be able to save bookmarks and upvote posts to show your appreciation to other community members.
With your input, this post could be even better 💗
Register Login


Advertisement