On the road
-
Nice work David.
And nice work of Gary's.
Where to next?
-
Great job. That's a fresh looking design. Nicely balanced.
(if you are unsure of your curve... it looks like the original's outside curve's tangent becomes vertical towards the bottom then actually turns out. Is yours doing that?)
I think a young friend of mine from Hawaii went to sessions at this school a few years ago. A sensitive and skilled woodworker. He's got his own shop now.
-
Thanks, all, for the good words.
pbacot: I'm not sure what my curve is doing. All I had to work with was the photo, so I got as close as I could. Gary Rogowski is a most accomplished woodworker and quite a good teacher; I'm sure your Hawaiian friend got his money's worth by studying with Gary.
Best,
dh -
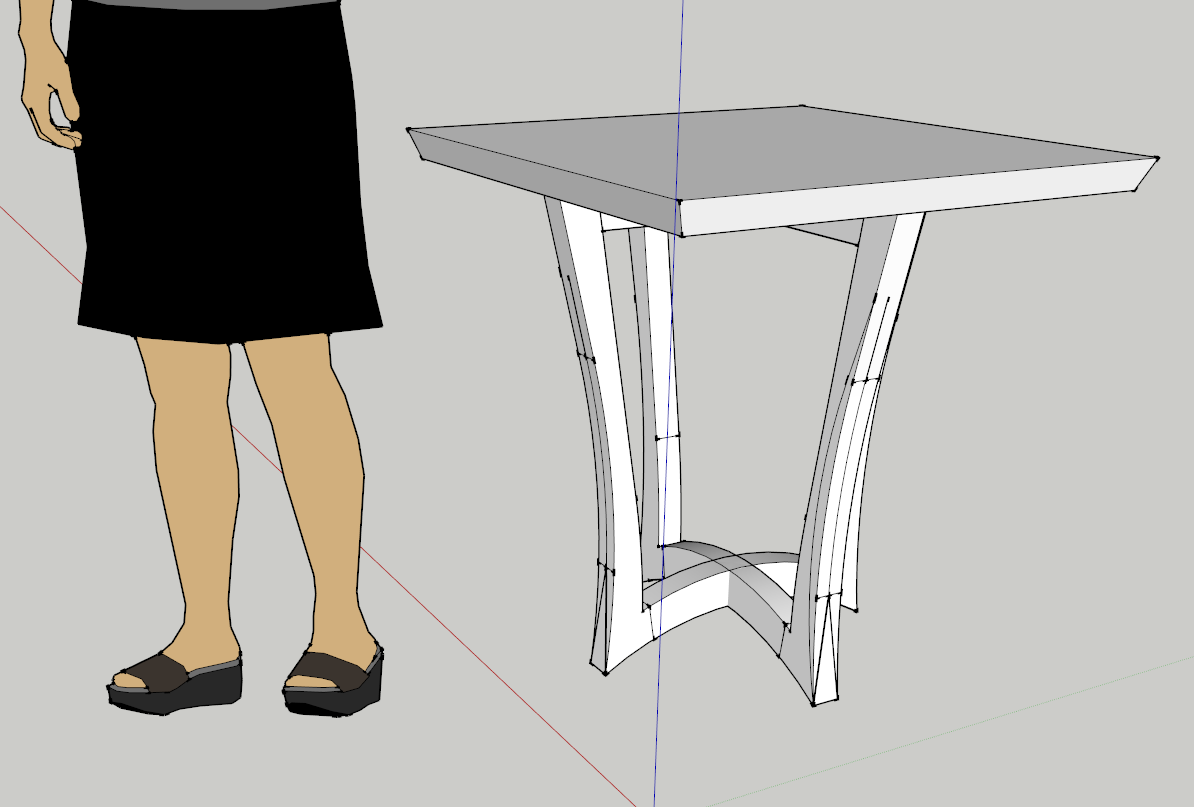
David, I am so intrigued by this design I am trying to model it myself. Here is my poor attempt.
I have it sized at 28 x 28 x 29 inches high, with all parts, top, legs, stretchers, all 1-5/8" thick, but you gotta tell me, what did you do to model the leg bevels? A plug-in?
How close do I have the overall size?
-
I expect the chamfers on the legs would be a pretty straightforward Follow Me operation with a profile following a curved path that starts and finishes off the leg. At least that's how I'd draw them if I was only going to use native tools. I'd only draw half the leg, too.
-
I'd be mildly concerned that if I slid my Tiffany lamp too near the corner to make room for a woodworking magazine and a snifter of brandy, a mess could be made.
S.
-
@s shepherd said:
I'd be mildly concerned that if I slid my Tiffany lamp too near the corner to make room for a woodworking magazine and a snifter of brandy, a mess could be made.
S.
Good point. When it starts to tip, you'll have to decide whether to catch the Tiffany lamp or the brandy.

-
My apologies. I thought I had responded to Gene and Dave earlier today.
Both of you are close. I made the table 30x30x30 inches--arbitrary dimensions. I didn't use Follow Me for the chamfers, though, although I did draw just half the leg. Instead, I used one of the loft plug-ins (don't remember which one, but I think it was one of Fredo's). Here's what I did:
I drew half a leg, leaving it rectangular in section. Then I made a shape that looked like an arc with the base closed off, and I pushed it into the half-leg. Intersecting the two shapes gave me the curve that falls on the curved face of the half-leg. I added a curve to the side of the leg. Then, after welding those two curves, I moved them away from the rest of the model, connected them at the top, and used that loft plug-in to generate the face of the chamfer. After that, it was relatively simple to bring the curved face back into the model and erase faces I no longer needed. Last, I copied and flipped the half-leg to make the whole one.
I'm sure that Dave is correct that you could use Follow Me to generate that chamfer. But for me, it was easier to use the loft plug-in than to figure out how and where to place the path for Follow Me.
Best,
dh -
Thanks, David. I knew those chamfers were warped and would need lofting. The spokeshave is carefully twisted as it is pulled, and a close examination of the photo of Gary's tells the story.
I had to familiarize myself with Fredo's "Curviloft" plug-in again in order to get some surfaces, but sort of succeeded, as the attached picture shows.
The chamfer on mine starts with a point at the bottom leg corner, then fades to flat up near the top, but when I rework the leg, I will extend the top end of the cut to the top end of the leg.
The proportions look good to me now, for L x W x H, and the 1.625 finished thickness of all parts looks good as well. Won't take much 8/4 oak. My lumber source had some good-looking spalted maple when I went there yesterday to buy some cherry. Spalted maple might be nice.
In the screenshot, the colored surfaces were lofted. Will try to place 8mm or 10mm dominos in at the intersects to see how they look.

-
Excellent work, Gene.
-
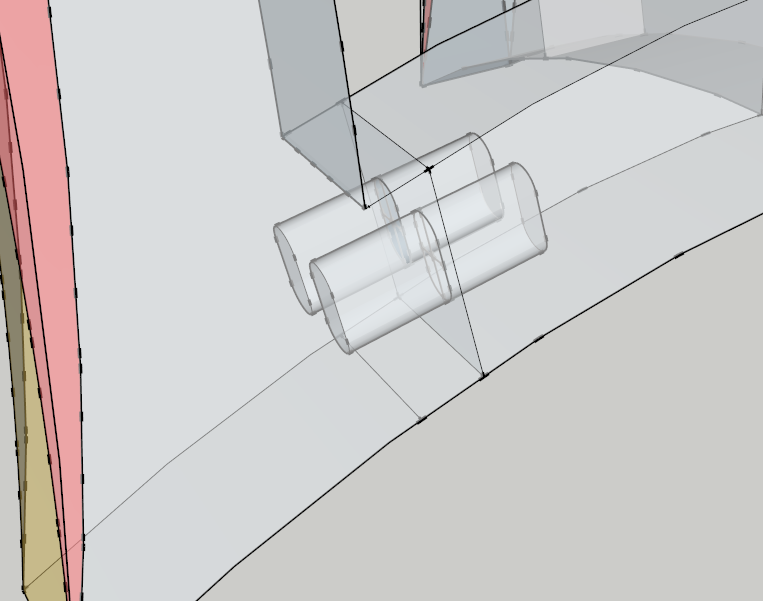
Joinery workout using Festool domino. I really enjoy the way Sketchup aids in selecting the right size of domino and placement of multiples. On the 3D warehouse is a model of the entire kit of dominos in the 4mm to 10mm range. Dominos and mortises. What you see here is a pair of the 10mm x 50mm tenons.
-
Gene, where the component origins on the Dominoes you got from the Warehouse?
-
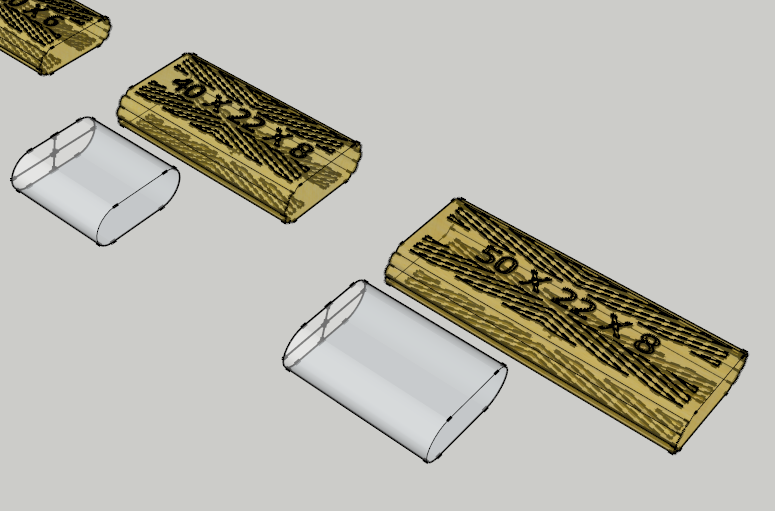
Here is a partial view of the kit of dominos and their mortises one gets when downloading the model from the 3D warehouse. Each domino and each mortise is a group. The crosshair lines on the mortises enable quick registration to any face in the model. Once in place, I mirror the mortise to get the opposing one.
-
Ah ha! I found them in the 3D Warehouse. Seems like they require a lot of unneeded work to use. At least more work than I would want. I have an easier process for that sort of thing. Still, if they work for you, that's cool.
Hello! It looks like you're interested in this conversation, but you don't have an account yet.
Getting fed up of having to scroll through the same posts each visit? When you register for an account, you'll always come back to exactly where you were before, and choose to be notified of new replies (either via email, or push notification). You'll also be able to save bookmarks and upvote posts to show your appreciation to other community members.
With your input, this post could be even better 💗
Register Login


Advertisement