Invitation to the SketchUcation collection
-
Nice bed Keith.
Funny thing, though. The table looks like the bed.

-
Here are 2 new models that may meet the requirements for the collection. One is extra long twin bed made as a captians bed with drawers below the bed. The other is a twin pedestal dining room table.
Keith
http://sketchup.google.com/3dwarehouse/details?mid=f21822974c8c492085c5f690e9252fc5
http://sketchup.google.com/3dwarehouse/details?mid=615b800fb332525385c5f690e9252fc5Edited link to Table
-
I just posted this model in another thread, but I think its appropriate here.... Its a dynamic, reconfigurable door. I use it all the time for my woodworking plans...
-
Thanks Eric
-
This is the Heirloom Hope Chest orginally publised by Wood Magazine in Issue 142 (june/July 2002). I built this chest as a Christmas present to my wife in 2008.
From the original plans from Wood:

From my model:

-
Excellent!
-
Nice model! I really like it.
Did you use LayOut, or the CutList plugin to figure out how to build it?
-
@gaieus said:
To elaborate Dave's advice; you can only position a texture/material on a single face. "Not single faces" are (and the "Texture item thus doesn't even appear in the context menu):
[list:3i32cga8][:3i32cga8]groups/components - like in your case. Dave explained how to solve this.[/ 3i32cga8]
[*:3i32cga8]curved/smoothed surfaces - let them be "really" curved or even just coplanar with a softened, dividing edge (in fact, these edges should be deleted instead of being dealt with like below). With curved/smoothed surfaces however you can do the following- Go to View > Hidden geometry; this will reveal the "facets" building up a curved surface
- these facets can be manipulated like single faces - i.e. in this case you can position a texture on one
- Now select the Paint bucket tool and pres the Alt key > the tool will turn into an eyedropper/sampler tool
- sample the positioned material on the above "one" face
- Turn off hidden geometry (again; uncheck it in the View menu)
- Paint the whole, curved/smoothed surface with the positioned > sampled material.[/list
 3i32cga8]Sounds to be a lot more complicated and longer than doing it with a little routine...
Thanks for this Gaieus!
I cannot tell you the frustration I've had when trying to tweak some textures on certain surfaces that 'appeared' flat. The "Texture" part of the right-click menu just did not show up (as in the post above). All of these problem-surfaces (it turns out) had some kind of rounded edge-treatment applied (using follow-me). Using your advice, I was able to go back into several of my models and turn-on hidden geometry. Voila! -- I was able to isolate my flat-surfaces ad scale my textures the way I wanted. -
My first complex model in SketchUp. This is my interpretation of Christian Becksvoort's Shaker Collector Cabinet.
-
I'm new to SketchUp and there is still a lot I have to learn. I had already finished the knobs before I saw Tim Killen's video about Shaker Knobs on another blog.
I had seen this cabinet in a couple of different publications and I wanted to get the proportions and approximate measurements in case my woodworking skills take a quantum leap...
-
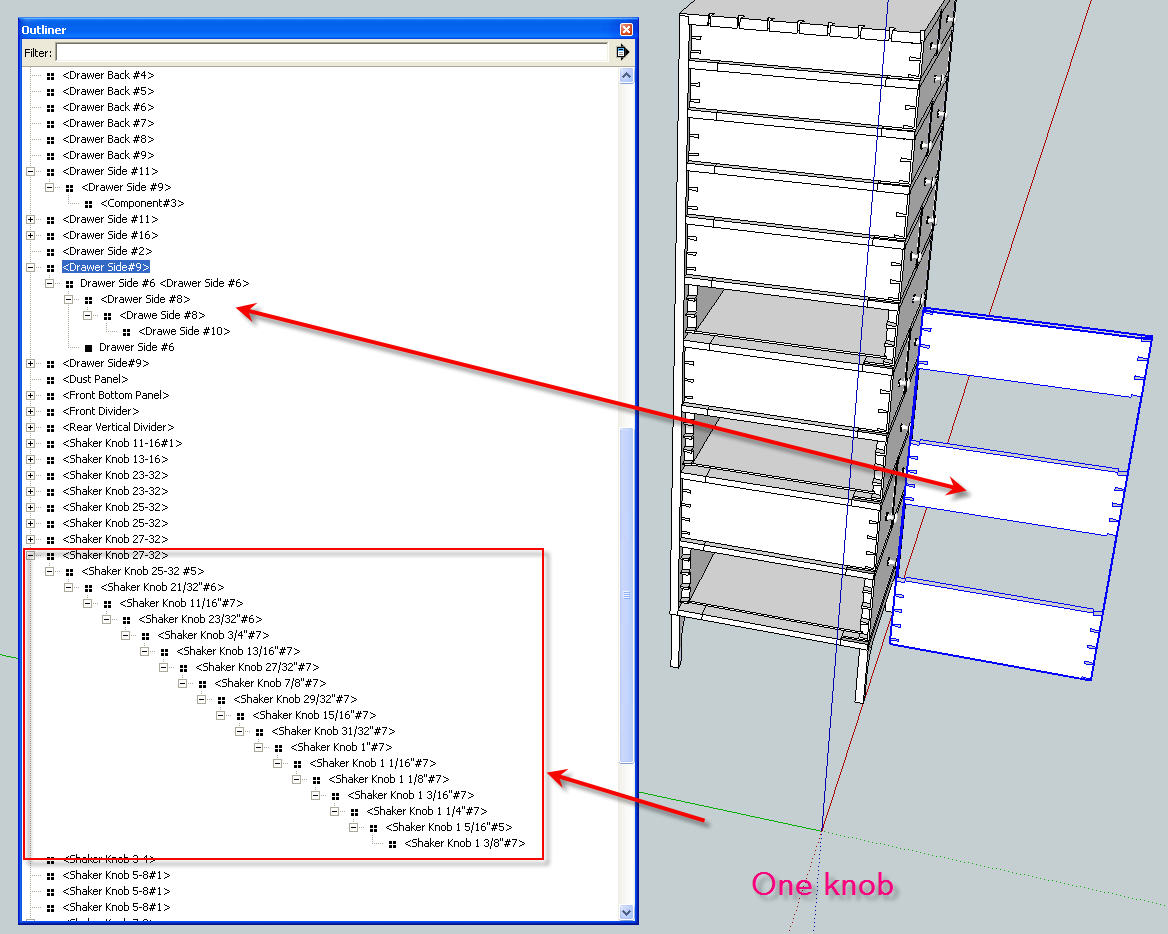
Interesting cabinet. It's a pretty big file for such a small cabinet. I purged unused stuff and got rid of 26 unused components and 4 unused materials. If you'd apply the materials to the faces instead of the components, you could eliminate one each of the Cherry and Maple materials. And why are the knobs buried in 17 component levels? The knobs are rather high poly for no larger than they are.
Why are there two copies of the right side panel in the same space? And why do you have a single group inside a component? There's a lot of unneeded nesting going on throughout. This makes it difficult to work with the model. I found three drawer sides in one component. So if you want to open one of those drawers, all three of those sides move out at the same time.
I'm not trying to be critical but I think your modeling could be a lot easier. It all looks like you're working pretty hard and you should need to do that.
By the way, where did you find this piece? I'm working on larger a Becksvoort Shaker piece right now. I've already done his little Classic Shaker table with two leg options and a chest of drawers
-
The SketchUp stuff and the woodworking will come.
Are you going to build this piece? Hand cut all those dovetails? That'll make your woodworking skills take that leap. After this piece you'll be able to cut those dovetails with your eyes closed.

-
Here's a small Arts & Crafts table I designed recently. It features legs with a subtle curve on their outside edges and through-tenons to hold the stretchers to the legs. The stretchers join with a half-lap joint.
If this model passes muster, I'll share others.
David Heim -
Nice little table, David. Are you building it after the Bombé chest?
-
No, Dave, the little table comes first. It's something I'm actually capable of building. The bombe chest is another story. That one's going to exist strictly in SketchUp for a very long time.
I'll try to add the file for the current model. I just refined the feet to model the ball-and-claw detail more completely.
-
Those ball-and-claw feet look better. They are a bit of a challenge to do. It's something I want to do a blog post on when I have time to work out a good method that I can do and describe.
-
Here's a link to my latest model: The Governor Winthrop Secretary, featured in the 1957 book "Heirloom Furniture," by Franklin Gottschall. At one level, modeling a complex piece like this is akin to building a scale model of the Titanic out of toothpicks. A secretary has so many components, small bits, hidden elements. Modeling all that stuff is an exercise in self-satisfaction. However, this particular piece has some challenging elements: the round medallions on the gooseneck molding (done with a Curviloft plug-in), the flame finial, the carvings on the gallery doors and drawers (Curviloft again), and the ball-and-claw feet. Modeling those sharpens one's SketchUp skills considerably.
I'd appreciate feedback of all kinds. Let me know what you think of the model.
Many thanks,
dh -
Seems like a very nice job with most of the joinery sufficiently detailed to build it from the model. There is the odd small face missing here and there but that doesn't amount to anything serious at all.
I think the ball and claw feet could do with more work - the claws especially seem to lack definition (although not knowing this piece, they might be like that) but I am used to seeing knuckles on the talons which need to hug the balls more closely..
-
@chrisjk said:
Seems like a very nice job with most of the joinery sufficiently detailed to build it from the model. There is the odd small face missing here and there but that doesn't amount to anything serious at all.
I think the ball and claw feet could do with more work - the claws especially seem to lack definition (although not knowing this piece, they might be like that) but I am used to seeing knuckles on the talons which need to hug the balls more closely..
You're right that the feet could use some added definition. To make them, I take a profile of the foot, give it some thickness, copy and rotate the profile, then intersect the copies and remove the waste. After that, I extrude a ball and scale it until it fits the space in the foot (more or less). I was feeling pretty smug that I'd figured out how to take the modeling even that far. I've tried without success to figure out how to give the talons more definition. So I'm open to any suggestions. How would you do the feet?
Thanks,
dh -
David,
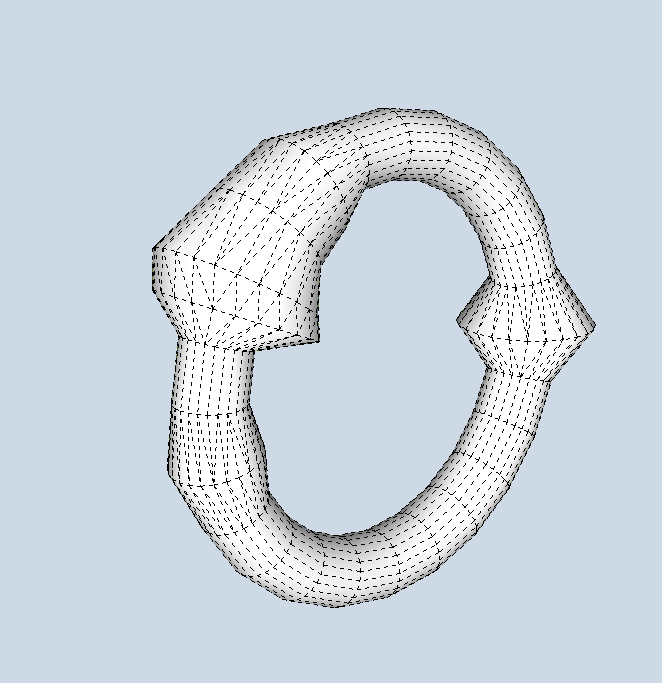
I think my approach would be to wrap a torus round a sphere, intersecting stuff as required to give me the necessary arc lengths, then to cheat a little (or a lot) and use the free training edition of this plugin ( http://www.tgi3d.com/index.php?Page=Download ) to thicken/thin the tube as required to make knuckles. I have not tried to give them any particular shape here - just illustrating the resizing possibilities of the plugin.
Other approaches might use Fredo's Tools on Surface to draw the lines for the talons directly on the ball, without cutting up a torus and then use pipe along path or tube along path to create the claws.
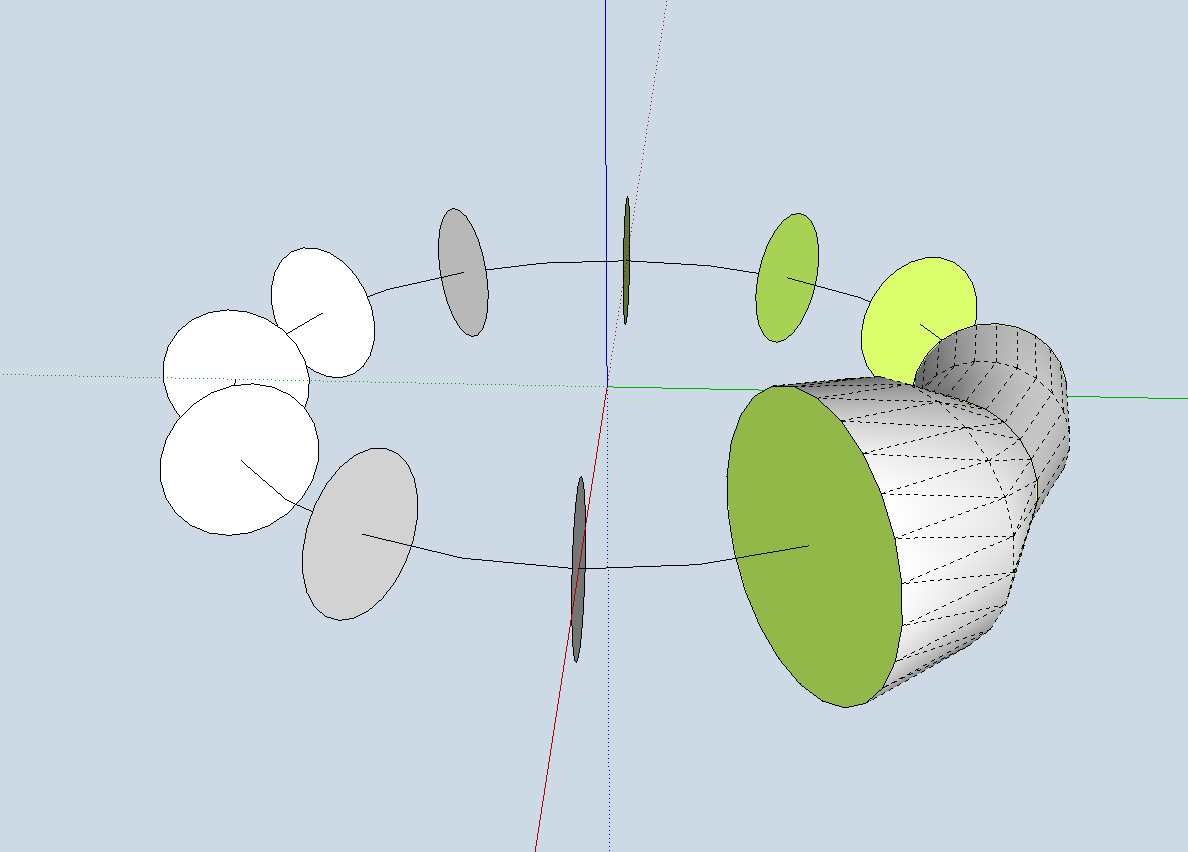
Again, one could employ a method like the one below where I made a radial array of circles (no need for a full circular array of course, then used the MOVE tool on the cardinal points to resize a couple of the circles then used Fredo's Curviloft to skin them.
Hello! It looks like you're interested in this conversation, but you don't have an account yet.
Getting fed up of having to scroll through the same posts each visit? When you register for an account, you'll always come back to exactly where you were before, and choose to be notified of new replies (either via email, or push notification). You'll also be able to save bookmarks and upvote posts to show your appreciation to other community members.
With your input, this post could be even better 💗
Register Login


Advertisement