This is cool! SU render - yep SU!
-
Very cool Richard! What's the secret, lens correction, slight blur, noise layer?
-
Its great Richard. I have one complaint though, its too noisy for me. In my mind the noise from maxwell and others has always driven me away from them. So purposely duplicating it seems silly. now I reckon a little bit of noise helps make it appear more photo like and less CG, but that second one for sure feels more noisy than not. But thats just my opinion of course. I'm sure its something that could be controled to the users likings in the process. All in all though, very nice!
Chris
-
I actually like the noise Chris. For a massing study it's very appropriate. Gives the drawing a bit of graphic depth. And the black sky here is good too.

-
Yes, What are your tricks there Richard?

This is a good study on why things look photoreal.
Is it the noise introducing a bit of randomness?Makes you wonder what all the hype about Maxwell was about.
I sometimes have the feeling it is exactly that noise of an unfinished render that makes it look real.
If you let it render until it is really really clean, is the quality that much better than a Vray render? -
Thanks guys!
I possibly do agree with Chris F. that the noise is a little over done (film filter) though I went that way though as the model has no textures!
At the moment the process is still a bit hit and miss, though I hope to get that worked out and will post a workflow!
It is interesting as to what makes an image look convincing! Here for starters (particularly the second) is a quick and dirty trick it get fairly close to rendered output with less mucking around then any render app just a few image exports! I do't think this will work as well, well it wont, for fully textured works as there are no reflections or spec and the lighing really only suits these type of massing studies. Though using lower res textures on the model could certainly give a better idea of the finishes as if the surfaces where printed on paper and stuck to board prior to model construction.
At the moment I'm finding it a case of getting the shadows fog and line style right then the rest is a bit of trial and error (at this stage) in PS with layer weights, blending and filter application.
-
great images! they look to be the ideal solution for those dirty quick works where you don't have enough time to cook a render
-
My best guess now that he has given us some clues:
Perhaps he generated a depth map from SU using black fog with almost white edges in hidden line mode, then loaded that depth map in Photoshop, and used it as a mask for a couple of adjustment layers and for lens blur, and added a little grain texture to finish it.
Check the last tut in this page:
http://sketchup.google.com/training/videos/expert_to_gsu.html
In the video the narrator uses the trick to achieve lens blur, but you can use that same mask for other effects. If you apply it as a "Multiply" layer and modulate it a bit, you can give the impression of using a headlight.Another related trick: Place two cameras really close, export a JPG animation from them, average the result in VideoMach and voilá! Motion blur from SketchUp.
-
However you did it Richard, I look forward to your tutorial.
-
Hi Richard,
Thanks for that little tut.
Together with the Dennis technique and Worncall (or is it Cornwall?) this produces nice images.I am going to do more NPR images again as I find that photoreal rendering in pre-design gives you nothing but trouble towards clients.
-
@kwistenbiebel said:
Hi Richard,
Thanks for that little tut.
Together with the Dennis technique and Worncall (or is it Cornwall?) this produces nice images.I am going to do more NPR images again as I find that photoreal rendering in pre-design gives you nothing but trouble towards clients.
And like you said on the PPB mate they are MUCH more fun!!!
-
@linea said:
However you did it Richard, I look forward to your tutorial.
Still trying to get back to playing with this!
Richard's Render Technique:
These images where taken with fog on monotone SU (road normals flipped), default colours changed to suit. The Fog needs to be onto the subject to get good depth.
The ground model was unsoftened edges and some small random pushpull to subtly disjoint the surface.
Images where exported for two sun angles, both lines (sketchy edges) on and off.
Images layered in PS:
Play with layer blending (no set blend, sun angles make a difference) - when correct the effect will jump out.
lense distortion (CS3 - lens blur older not as good) to some.
film grain filter to some.
AND the big one - Render lighting!!! Render two or more? spotlights (best to separate layers) from the directions of your sun! Remember also lights in PS can be used as light suckers which are useful!
A bit of shadows and highlights filter on some of the layers will if the radius is tuned will provide an almost added render effect of sticking shadow to edges.The blurr tool can help to blurr the outer for DOF effect. And sharpen edges filter on the top layer as final.
As suggested earlier yeah the film grain what you want but I upped it a bit to give texture to the board!
I said "to some" a bit as the weight of your layers will bear on the effect apllied, layer weight will be effected by your sun angles. I find you want two differing intensity shadows with the PS lights adding to the sources and dominance of the lighting direction.
And its all just light bits most effect you may want to Edit > fade: "last effect".
Cheers, Richard
-
dear Richard you r so creative person . Isaw your work whit layout too. interestiny . and also your new trik is fantastic. keep growing.
-
Thanks Majid
I hope now I get to see some people trying it out for great results (hint, hint)!
-
Just wondering if anyone has had a go at this yet with any results?
-
@richard said:
Just wondering if anyone has had a go at this yet with any results?
Yes, I am starting to use the method at work. Not quite at the same level as you yet, but it is refreshing to use the D method.
Can't put the office images here though. -
@kwistenbiebel said:
@richard said:
Just wondering if anyone has had a go at this yet with any results?
Yes, I am starting to use the method at work. Not quite at the same level as you yet, but it is refreshing to use the D method.
Can't put the office images here though.Darn! Would love to see someones attempts!

-
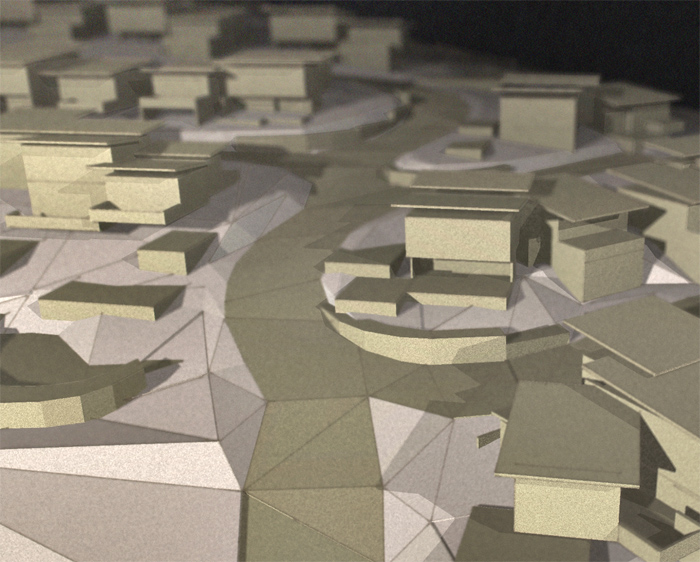
Just testing again with the same model to work out a defined workflow - this time using a depth image (black fog, front/back faces white) to mask the lens blur.
This seems to give better and more predictable results.
I followed a slightly different work flow with this one;
SU export: monotone mode light faces are reversed normals (could be done with just face colours though)
- Fog, shadows left, line on (light front face, dark back face)
- Fog, shadows left, line off (light front face, dark back face)
- Fog, shadows right, line on (light front face, dark back face)
- Fog, shadows right, line off (light front face, dark back face)
- Fog, shadows off, line off (white front face, white back face) depth map
PS edit:
A. Normal blend 1 and 2 to get preferred line weight, merge layers
B. Normal blend 3 and 4 to get preferred line weight, merge layers
C. Black fill background layer
D. Apply layer mask to A / B layers using depth map
E. Apply lens blur (with noise) to A / B using mask as source
F. Apply filter > Artistic > film grain to A / B layers
G. Normal blend Layer A / B to get preferred shadow cast
H. Copy merged > paste new layer
I. Apply Filter > render > lighting effects, create lights from direction of light sources and adjust to suit
J. Apply Filter > distort > lens correction - use negative correction to add distortion, lighten vignetting to light extremes from light source,
K. Use shadows and highlights edit to fix shadow depth etc.
L. Adjust levels.This image uses three lights in PhotoShop all added in same action
- Bottom left toward center
- Bottom right toward center
- Top left toward back center
Still amazed this can be done with SU.

Close Up

-
for some reason the image does not show up here in China.
could you repost it? -
I've attached it Dennis (just the close up anyway)!
I think you'll find this pretty cool when you consider it is pretty much just two SU images with little bit of PS.
-
lens blur is particularly effective.
I felt like I'm back to school and staring at a photo of a card board model.
Hello! It looks like you're interested in this conversation, but you don't have an account yet.
Getting fed up of having to scroll through the same posts each visit? When you register for an account, you'll always come back to exactly where you were before, and choose to be notified of new replies (either via email, or push notification). You'll also be able to save bookmarks and upvote posts to show your appreciation to other community members.
With your input, this post could be even better 💗
Register Login


Advertisement